
Empfohlen
Empfohlen
Weitere ähnliche Inhalte
Kürzlich hochgeladen
Kürzlich hochgeladen (20)
Empfohlen
Empfohlen (20)
Proficy machine edition logic pc view duplication
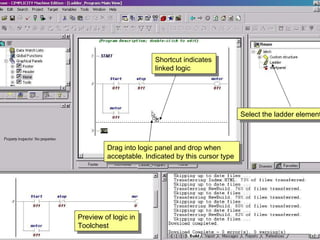
- 1. Select the ladder element Drag into logic panel and drop when acceptable. Indicated by this cursor type Shortcut indicates linked logic Preview of logic in Toolchest
- 2. Linked logic is shown as faded blue and has a a shortcut icon. This logic cannot be edited
- 3. Each time you place a linked object on the screen you will be prompted for a name
- 6. Original graphic is ON Logic is ON Copy “Latch” is off Logic “Latch” is off
- 7. Original graphics and Latch and Latch1 are on and their respective logic is on
- 8. Double click the original graphic element
- 9. Click here to change colours
Hinweis der Redaktion
- When we created our original logic we saved it for re-use. Here we can see how quickly we can make similar application elements rapidly. At present we have one motor circuit and an associated panel. If we dragthe ladder element from the toolchest we can rapidly create a linked piece of logic
- Linked logic displays as faded blue and has shortcut icon to indicate that it is linked to the toolchest to change this logic we break the link or normally change the original logic and drop it on the ladder element and then refresh the project or download
- Each added element has a name applied and you will see that this name is appended to each rung element Here I have added Latch and Latch1
- Now we have the logic side sorted we can repeat with the graphic element startstoppanel
- Again we are prompted for a name and here we are given oons of logic with which we can assiciate the graphic or enter a new name
- After download we can see this screenshot which show the independence of both pices aof logic and graphifs
- The three sets of logic and graphics are running independently
- To demonstrate the the quick and easy which we can apply changes to our graphics we will now change the colour attributes of our start Stop panel. Double click the original panel on it’s start button you will need to unlock it if you locked it previously
- By selecting the colour areas above OFF and ON you can change to preconfigured colours or create custom colours
- You can select colours as awful as you like or adhere to customers standard colour schemes perhaps
- Here I am changing the line width around the circle object
- Select the whole of the graphic and drag it into the toolchest and drop it directly onto the graphic element of our toolchest
- After downloading you will see these changes on all three elements