
Empfohlen
Weitere ähnliche Inhalte
Was ist angesagt?
Was ist angesagt? (20)
Andere mochten auch
Andere mochten auch (13)
Ähnlich wie Colour !
Ähnlich wie Colour ! (20)
Mehr von Hastingshighart
Colour !
- 1. COLOUR !
- 2. What do you already know? • What are the primary colours? • What are the three secondary colour? • What is the third categories of colours called?
- 3. Did you get them correct? • Yellow, Red, Blue • Orange, Purple, Green. • Tertiary.
- 4. Colour tones • When you add black or white to a colour, these are called tones. • Look at what happens to red when we add black and white to it.
- 5. • You will need: • Your Art sketchbook • A variety of coloured pencils • A ruler • An HB pencil • Possibly a rubber and pencil sharpner!
- 6. • Task 1: Creating a 9 square grid. • Open your sketchbook to a clean page and write the title ‘Colour Tones’. • Using a ruler carefully create a square 9cm x 9cm. • Using the sides, top and bottom of the page will help you to create an accurate square (L5). Alternatively you can use the 9cm template. (L4). Divide this into 3cm squares.
- 7. Creating a tonal grid • Use this method to fill in your grid. • Choose a colour and lightly colour in the top right hand corner square. In the square below use the same colour but press slightly harder, repeat for the bottom square pressing harder. • You should have a range of tones in one colour. • Now fill in the other squares using two other colours.
- 8. Tonal shades • You now have created a grid of light and dark tonal shades. • You can use watercolour paints to get the same effect but you would need to use white paint to get paler shades and black paint to create darker tones.
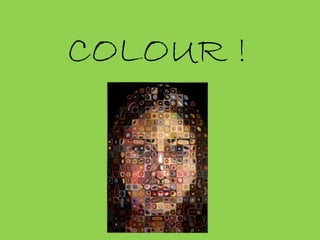
- 9. Chuck Close • This is a self-portrait by a contemporary American artist. He mainly creates portraits and has created many self-portrait.
- 10. • If we zoom in a bit further you can see that the portrait is made up of squares. • Each square is filled with cell like patterns. • Each pattern is either a light or dark toned pattern.
- 11. • Task 2: Creating Chuck Close inspired patterns • Draw another grid containing 9 squares using the same measurements as before on a new page in your sketchbook. • Using the A3 sheets provided create your own set of Chuck Close inspired patterns in light, medium and dark tones. • Try to create some flesh coloured squares in light and dark tones. • On the next slide there are some examples.
- 13. • Task 3: • Now choose a different medium to create another set of patterned squares. • Watercolour: you can produce different shades by mixing in black or white paint into the original colour. Watercolour can produce subtle shades. Please use a mixing pallet. • Oil pastel: you can blend different shades with these and the colours can be vibrant and produce striking effects.
- 14. • Review • In your table groups, decide which medium (pencil, pastel or paint) produces the best effects. Write your thoughts about this in your sketchbook. • Things to consider: • Vibrancy of colour, ability to create a variety of light and dark tones, ease of use, time to complete each square.
- 15. • Task 4: • You will now be given a square of paper with a grid on it, there will be some light and dark areas on each one. There will be a number on the back. • Using tracing paper carefully trace the grid and the areas of light and dark, you can go over the lines more heavily once you have drawn them. • Now turn the tracing paper over and place it on a piece of drawing paper face down. Draw the over the lines, using a ruler where necessary, draw the shape of the dark and light areas. You may get a piece with just dark on or just light. Most will be mixed. Transfer your number onto the back of the paper.
- 16. • Your next job is to colour in the squares using the tonal patterns that you have created. Using the dark patterns for the dark areas and paler patterns for the light areas. You could choose paint, pencil or pastel. • Take your time and complete your piece to the best of your ability. Your piece is going to be part of a larger picture. • When you have finished. Give your completed piece to your teacher and stick the tracing paper into your sketchbook.