SlideShare ist ein Scribd-Unternehmen logo
1 von 7
Downloaden Sie, um offline zu lesen
Excel 2007
Printing Workbooks
Introduction
Preparing to Print and Printing
Watch the video! (10:14min) - Tips for watching our videos.
Download the example to work along with the video.
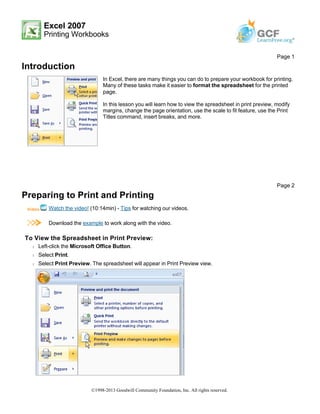
To View the Spreadsheet in Print Preview:
Š Left-click the Microsoft Office Button.
Š Select Print.
Š Select Print Preview. The spreadsheet will appear in Print Preview view.
Page 1
In Excel, there are many things you can do to prepare your workbook for printing.
Many of these tasks make it easier to format the spreadsheet for the printed
page.
In this lesson you will learn how to view the spreadsheet in print preview, modify
margins, change the page orientation, use the scale to fit feature, use the Print
Titles command, insert breaks, and more.
Page 2
©1998-2013 Goodwill Community Foundation, Inc. All rights reserved.
Click the Close Print Preview button to return to the Normal View.
To make previewing your spreadsheet easier, add the Print Preview command to the Quick Access toolbar.
Exploring Print Preview:
Once you are in Print Preview, you can access many of the same features that you can from the Ribbon;
however, in Print Preview you can see how the spreadsheet will appear in printed format.
To Modify Margins, Column Width, or Row Height While in Print Preview:
Š Click the Print Preview command on the Quick Access toolbar, or select Print Preview from the Microsoft
Office Button menu. The spreadsheet opens in print preview mode.
Š Hover your cursor over one of the black margin markers until a double arrow appears.
©1998-2013 Goodwill Community Foundation, Inc. All rights reserved.
Š Left-click and drag the marker to the desired location. The change will be reflected in the spreadsheet.
To Modify Margins:
Š Select the Page Layout tab.
Š Left-click the Margins command.
Š Choose one of the predefined settings or enter custom margins.
To Change Page Orientation:
Š Select the Page Layout tab.
Š Left-click the Orientation command.
Š Select either Portrait or Landscape.
Page 3
©1998-2013 Goodwill Community Foundation, Inc. All rights reserved.
Portrait orients the page vertically, while Landscape orients the page horizontally.
To Use Scale to Fit:
Š Select the Page Layout tab.
Š Locate the Scale to Fit group.
Š Enter a specific height and width, or use the percentage field to decrease the spreadsheet by a specific
percent.
Scale to Fit is a useful feature that can help you format spreadsheets to fit on a page. Be careful with how
small you scale the information -- it can become difficult to read!
To Change the Paper Size:
Š Select the Page Layout tab.
Š Click the Size command.
Š Select a size option from the list.
To Define a Print Area:
Š Left-click and drag your mouse to select the cells you wish to print.
Š Click the Print Area command.
Š Choose Set Print Area.
Š Now, only the selected cells will print. You can confirm this by viewing the spreadsheet in Print Preview.
To return to the default setting, which is the entire worksheet, click the Print Area command and select Clear Print
Area.
©1998-2013 Goodwill Community Foundation, Inc. All rights reserved.
To Insert a Break:
Š Select a cell below where you want the break to appear.
Š Select the Breaks command.
Š Select Insert Break.
Click Print Preview to confirm the break appears in the correct place in your spreadsheet.
To Use the Print Titles command:
This is an important command to be familiar with if you intend to print your worksheets. It allows you to select
specific rows and/or columns that will be repeated on each printed sheet. Imagine how difficult it would be to
read page 48 of a printed spreadsheet if the column and row headings only appeared on the first page.
Š Select the Page Layout tab.
Š Click the Print Titles command. The Page Setup dialog box appears.
Š Click the icon at the end of the field.
Š Select the first row in the spreadsheet that you want to appear on each printed page.
Š Repeat for the column, if necessary.
Š Click OK.
Page 4
©1998-2013 Goodwill Community Foundation, Inc. All rights reserved.
To Print from the Microsoft Office Button:
Š Left-click the Microsoft Office Button.
Š Select Print Print. The Print dialog box appears.
Š Select a printer if you wish to use a printer other than the default setting.
Š Click Properties to change any necessary settings.
Š Choose whether you want to print specific pages, all of the worksheet, a selected area, the active sheet, or
the entire workbook.
Š Select the number of copies you'd like to print.
Š Click OK.
You can select Quick Print to bypass the Print dialog box.
Challenge!
Use the Budget or any Excel workbook you choose to complete this challenge.
Page 5
Š View the spreadsheet in Print Preview.
Š Change a column width in Print Preview.
Š Insert a break.
Š Use the Print Titles command to print a specific row or column on each printed
page. Use Print Preview to verify how this will appear.
Š Print the spreadsheet.
Š Explore the other commands discussed in this lesson.
©1998-2013 Goodwill Community Foundation, Inc. All rights reserved.

Weitere ähnliche Inhalte

Was ist angesagt?

Lesson 10 working with charts
Lesson 10   working with chartsLesson 10   working with charts
Lesson 10 working with charts
guevarra_2000
 
Gl2010 m6 ex4_presentation
Gl2010 m6 ex4_presentationGl2010 m6 ex4_presentation
Gl2010 m6 ex4_presentation
Tracie King
 
Create A Chart In Excel
Create A Chart In ExcelCreate A Chart In Excel
Create A Chart In Excel
Brian Lowery
 
D I T211 Chapter 8 ( Lab 5)
D I T211    Chapter 8 ( Lab 5)D I T211    Chapter 8 ( Lab 5)
D I T211 Chapter 8 ( Lab 5)
askme
 
MS Word 2007 insert tables
MS Word 2007 insert tablesMS Word 2007 insert tables
MS Word 2007 insert tables
VTC
 
Publisher Brochure Tips
Publisher Brochure TipsPublisher Brochure Tips
Publisher Brochure Tips
lrmslibrary
 
Thin clients & office tips
Thin clients & office tipsThin clients & office tips
Thin clients & office tips
mohkatta
 

Was ist angesagt? (20)

Tables
TablesTables
Tables
 
Lesson 10 working with charts
Lesson 10   working with chartsLesson 10   working with charts
Lesson 10 working with charts
 
dr_3
dr_3dr_3
dr_3
 
Gl2010 m6 ex4_presentation
Gl2010 m6 ex4_presentationGl2010 m6 ex4_presentation
Gl2010 m6 ex4_presentation
 
Ex13 lesson03
Ex13 lesson03Ex13 lesson03
Ex13 lesson03
 
MS-Excel Working with Pivot Table
MS-Excel Working with Pivot TableMS-Excel Working with Pivot Table
MS-Excel Working with Pivot Table
 
Media log b group power point role 2
Media log b group power point role 2Media log b group power point role 2
Media log b group power point role 2
 
Eye chart
Eye chartEye chart
Eye chart
 
Create A Chart In Excel
Create A Chart In ExcelCreate A Chart In Excel
Create A Chart In Excel
 
5.5 Resizing Controls on Forms
5.5 Resizing Controls on Forms5.5 Resizing Controls on Forms
5.5 Resizing Controls on Forms
 
Chapter.11
Chapter.11Chapter.11
Chapter.11
 
07.bar and chats
07.bar and chats07.bar and chats
07.bar and chats
 
Create a Brochure with Publisher 2010
Create a Brochure with Publisher 2010Create a Brochure with Publisher 2010
Create a Brochure with Publisher 2010
 
Goal Status Dashboard
Goal Status DashboardGoal Status Dashboard
Goal Status Dashboard
 
D I T211 Chapter 8 ( Lab 5)
D I T211    Chapter 8 ( Lab 5)D I T211    Chapter 8 ( Lab 5)
D I T211 Chapter 8 ( Lab 5)
 
MS Word 2007 insert tables
MS Word 2007 insert tablesMS Word 2007 insert tables
MS Word 2007 insert tables
 
Publisher Brochure Tips
Publisher Brochure TipsPublisher Brochure Tips
Publisher Brochure Tips
 
An introduction to MS Publisher
An introduction to MS PublisherAn introduction to MS Publisher
An introduction to MS Publisher
 
Unit 010 Spreadsheets
Unit 010 SpreadsheetsUnit 010 Spreadsheets
Unit 010 Spreadsheets
 
Thin clients & office tips
Thin clients & office tipsThin clients & office tips
Thin clients & office tips
 

Andere mochten auch

Excel Lesson 1: Excel Basics
Excel Lesson 1: Excel BasicsExcel Lesson 1: Excel Basics
Excel Lesson 1: Excel Basics
Novus Business and IT Training Program
 

Andere mochten auch (18)

Print1
Print1Print1
Print1
 
Print6.pdf
Print6.pdfPrint6.pdf
Print6.pdf
 
Print8
Print8Print8
Print8
 
Print3
Print3Print3
Print3
 
Print18
Print18Print18
Print18
 
Print5
Print5Print5
Print5
 
Print13
Print13Print13
Print13
 
Print14
Print14Print14
Print14
 
Print17
Print17Print17
Print17
 
Print4
Print4Print4
Print4
 
Print11
Print11Print11
Print11
 
Print10
Print10Print10
Print10
 
Print16
Print16Print16
Print16
 
Print12
Print12Print12
Print12
 
Print15
Print15Print15
Print15
 
Print9
Print9Print9
Print9
 
Excel Lesson 1: Excel Basics
Excel Lesson 1: Excel BasicsExcel Lesson 1: Excel Basics
Excel Lesson 1: Excel Basics
 
Print2
Print2Print2
Print2
 

Ähnlich wie Print7

Chapter 7 - Finalizing a Worksheet
Chapter 7 - Finalizing a WorksheetChapter 7 - Finalizing a Worksheet
Chapter 7 - Finalizing a Worksheet
Beverly Murphy
 
Chapter.07
Chapter.07Chapter.07
Chapter.07
klivsie
 
Les15 Modifying Page Layout
Les15 Modifying Page LayoutLes15 Modifying Page Layout
Les15 Modifying Page Layout
guevarra_2000
 
Microsoft Publisher 2013 Quickstart
Microsoft Publisher 2013 QuickstartMicrosoft Publisher 2013 Quickstart
Microsoft Publisher 2013 Quickstart
comatsg
 

Ähnlich wie Print7 (20)

Spreadsheets Page Setup And Printing
Spreadsheets Page Setup And PrintingSpreadsheets Page Setup And Printing
Spreadsheets Page Setup And Printing
 
Chapter.07
Chapter.07Chapter.07
Chapter.07
 
Chapter 7 - Finalizing a Worksheet
Chapter 7 - Finalizing a WorksheetChapter 7 - Finalizing a Worksheet
Chapter 7 - Finalizing a Worksheet
 
Chapter.07
Chapter.07Chapter.07
Chapter.07
 
Printing tips for saving paper
Printing tips for saving paperPrinting tips for saving paper
Printing tips for saving paper
 
Printing Presentation - R.D.Sivakumar
Printing Presentation - R.D.SivakumarPrinting Presentation - R.D.Sivakumar
Printing Presentation - R.D.Sivakumar
 
Les15 Modifying Page Layout
Les15 Modifying Page LayoutLes15 Modifying Page Layout
Les15 Modifying Page Layout
 
Formatting and printing workshets
Formatting and printing workshetsFormatting and printing workshets
Formatting and printing workshets
 
Online business communication Assignment Help
Online business communication Assignment HelpOnline business communication Assignment Help
Online business communication Assignment Help
 
Week 2 ms word ait
Week 2 ms word   aitWeek 2 ms word   ait
Week 2 ms word ait
 
Microsoft office word 2003
Microsoft office word 2003Microsoft office word 2003
Microsoft office word 2003
 
Microsoft Publisher 2013 Quickstart
Microsoft Publisher 2013 QuickstartMicrosoft Publisher 2013 Quickstart
Microsoft Publisher 2013 Quickstart
 
Introduction to microsoft word 2007
Introduction to microsoft word 2007Introduction to microsoft word 2007
Introduction to microsoft word 2007
 
Lesson 6 printing
Lesson 6   printingLesson 6   printing
Lesson 6 printing
 
2020 Resume formatting Tips
2020 Resume formatting Tips 2020 Resume formatting Tips
2020 Resume formatting Tips
 
3rd topic creating flowchart and calendar
3rd topic creating flowchart and calendar3rd topic creating flowchart and calendar
3rd topic creating flowchart and calendar
 
Microsoft Office
Microsoft OfficeMicrosoft Office
Microsoft Office
 
Excel2007
Excel2007Excel2007
Excel2007
 
Ms Excel AZC
Ms Excel AZCMs Excel AZC
Ms Excel AZC
 
2010 09 Format Pages
2010 09  Format Pages2010 09  Format Pages
2010 09 Format Pages
 

Mehr von Hassan Samoon

presentation, analysis and interpretation of data by hassan samoon
presentation, analysis and interpretation of data by hassan samoonpresentation, analysis and interpretation of data by hassan samoon
presentation, analysis and interpretation of data by hassan samoon
Hassan Samoon
 

Mehr von Hassan Samoon (13)

Financial Management 4th and 5th chapters
Financial Management 4th and 5th chaptersFinancial Management 4th and 5th chapters
Financial Management 4th and 5th chapters
 
The Value of Money - problems and solutions
The Value of Money - problems and solutionsThe Value of Money - problems and solutions
The Value of Money - problems and solutions
 
Introduction to cost & management accounting
Introduction to cost & management accountingIntroduction to cost & management accounting
Introduction to cost & management accounting
 
Presentation on accounting cycle
Presentation on accounting cyclePresentation on accounting cycle
Presentation on accounting cycle
 
Business communication
Business communicationBusiness communication
Business communication
 
Business Communication Complete Topics
Business Communication Complete TopicsBusiness Communication Complete Topics
Business Communication Complete Topics
 
MIS MCQs by hassan samoon
MIS MCQs by hassan samoonMIS MCQs by hassan samoon
MIS MCQs by hassan samoon
 
Mason vs. burningham
Mason vs. burninghamMason vs. burningham
Mason vs. burningham
 
Hyde vs wrench. pptx
Hyde vs wrench. pptxHyde vs wrench. pptx
Hyde vs wrench. pptx
 
Mis 1st chapter notes foundation of is in business
Mis 1st chapter notes foundation of is in businessMis 1st chapter notes foundation of is in business
Mis 1st chapter notes foundation of is in business
 
presentation, analysis and interpretation of data by hassan samoon
presentation, analysis and interpretation of data by hassan samoonpresentation, analysis and interpretation of data by hassan samoon
presentation, analysis and interpretation of data by hassan samoon
 
Fielder Contingency theory of leadership by Hassan Samoon
Fielder Contingency theory of leadership by Hassan SamoonFielder Contingency theory of leadership by Hassan Samoon
Fielder Contingency theory of leadership by Hassan Samoon
 
Economic PPT
Economic PPTEconomic PPT
Economic PPT
 

Kürzlich hochgeladen

The basics of sentences session 3pptx.pptx
The basics of sentences session 3pptx.pptxThe basics of sentences session 3pptx.pptx
The basics of sentences session 3pptx.pptx
heathfieldcps1
 
Salient Features of India constitution especially power and functions
Salient Features of India constitution especially power and functionsSalient Features of India constitution especially power and functions
Salient Features of India constitution especially power and functions
KarakKing
 

Kürzlich hochgeladen (20)

The basics of sentences session 3pptx.pptx
The basics of sentences session 3pptx.pptxThe basics of sentences session 3pptx.pptx
The basics of sentences session 3pptx.pptx
 
On National Teacher Day, meet the 2024-25 Kenan Fellows
On National Teacher Day, meet the 2024-25 Kenan FellowsOn National Teacher Day, meet the 2024-25 Kenan Fellows
On National Teacher Day, meet the 2024-25 Kenan Fellows
 
TỔNG ÔN TẬP THI VÀO LỚP 10 MÔN TIẾNG ANH NĂM HỌC 2023 - 2024 CÓ ĐÁP ÁN (NGỮ Â...
TỔNG ÔN TẬP THI VÀO LỚP 10 MÔN TIẾNG ANH NĂM HỌC 2023 - 2024 CÓ ĐÁP ÁN (NGỮ Â...TỔNG ÔN TẬP THI VÀO LỚP 10 MÔN TIẾNG ANH NĂM HỌC 2023 - 2024 CÓ ĐÁP ÁN (NGỮ Â...
TỔNG ÔN TẬP THI VÀO LỚP 10 MÔN TIẾNG ANH NĂM HỌC 2023 - 2024 CÓ ĐÁP ÁN (NGỮ Â...
 
Micro-Scholarship, What it is, How can it help me.pdf
Micro-Scholarship, What it is, How can it help me.pdfMicro-Scholarship, What it is, How can it help me.pdf
Micro-Scholarship, What it is, How can it help me.pdf
 
How to Create and Manage Wizard in Odoo 17
How to Create and Manage Wizard in Odoo 17How to Create and Manage Wizard in Odoo 17
How to Create and Manage Wizard in Odoo 17
 
Understanding Accommodations and Modifications
Understanding  Accommodations and ModificationsUnderstanding  Accommodations and Modifications
Understanding Accommodations and Modifications
 
Wellbeing inclusion and digital dystopias.pptx
Wellbeing inclusion and digital dystopias.pptxWellbeing inclusion and digital dystopias.pptx
Wellbeing inclusion and digital dystopias.pptx
 
80 ĐỀ THI THỬ TUYỂN SINH TIẾNG ANH VÀO 10 SỞ GD – ĐT THÀNH PHỐ HỒ CHÍ MINH NĂ...
80 ĐỀ THI THỬ TUYỂN SINH TIẾNG ANH VÀO 10 SỞ GD – ĐT THÀNH PHỐ HỒ CHÍ MINH NĂ...80 ĐỀ THI THỬ TUYỂN SINH TIẾNG ANH VÀO 10 SỞ GD – ĐT THÀNH PHỐ HỒ CHÍ MINH NĂ...
80 ĐỀ THI THỬ TUYỂN SINH TIẾNG ANH VÀO 10 SỞ GD – ĐT THÀNH PHỐ HỒ CHÍ MINH NĂ...
 
ICT Role in 21st Century Education & its Challenges.pptx
ICT Role in 21st Century Education & its Challenges.pptxICT Role in 21st Century Education & its Challenges.pptx
ICT Role in 21st Century Education & its Challenges.pptx
 
Salient Features of India constitution especially power and functions
Salient Features of India constitution especially power and functionsSalient Features of India constitution especially power and functions
Salient Features of India constitution especially power and functions
 
Exploring_the_Narrative_Style_of_Amitav_Ghoshs_Gun_Island.pptx
Exploring_the_Narrative_Style_of_Amitav_Ghoshs_Gun_Island.pptxExploring_the_Narrative_Style_of_Amitav_Ghoshs_Gun_Island.pptx
Exploring_the_Narrative_Style_of_Amitav_Ghoshs_Gun_Island.pptx
 
COMMUNICATING NEGATIVE NEWS - APPROACHES .pptx
COMMUNICATING NEGATIVE NEWS - APPROACHES .pptxCOMMUNICATING NEGATIVE NEWS - APPROACHES .pptx
COMMUNICATING NEGATIVE NEWS - APPROACHES .pptx
 
General Principles of Intellectual Property: Concepts of Intellectual Proper...
General Principles of Intellectual Property: Concepts of Intellectual  Proper...General Principles of Intellectual Property: Concepts of Intellectual  Proper...
General Principles of Intellectual Property: Concepts of Intellectual Proper...
 
Application orientated numerical on hev.ppt
Application orientated numerical on hev.pptApplication orientated numerical on hev.ppt
Application orientated numerical on hev.ppt
 
Interdisciplinary_Insights_Data_Collection_Methods.pptx
Interdisciplinary_Insights_Data_Collection_Methods.pptxInterdisciplinary_Insights_Data_Collection_Methods.pptx
Interdisciplinary_Insights_Data_Collection_Methods.pptx
 
Fostering Friendships - Enhancing Social Bonds in the Classroom
Fostering Friendships - Enhancing Social Bonds  in the ClassroomFostering Friendships - Enhancing Social Bonds  in the Classroom
Fostering Friendships - Enhancing Social Bonds in the Classroom
 
Holdier Curriculum Vitae (April 2024).pdf
Holdier Curriculum Vitae (April 2024).pdfHoldier Curriculum Vitae (April 2024).pdf
Holdier Curriculum Vitae (April 2024).pdf
 
Towards a code of practice for AI in AT.pptx
Towards a code of practice for AI in AT.pptxTowards a code of practice for AI in AT.pptx
Towards a code of practice for AI in AT.pptx
 
FSB Advising Checklist - Orientation 2024
FSB Advising Checklist - Orientation 2024FSB Advising Checklist - Orientation 2024
FSB Advising Checklist - Orientation 2024
 
Basic Civil Engineering first year Notes- Chapter 4 Building.pptx
Basic Civil Engineering first year Notes- Chapter 4 Building.pptxBasic Civil Engineering first year Notes- Chapter 4 Building.pptx
Basic Civil Engineering first year Notes- Chapter 4 Building.pptx
 

Print7

  • 1. Excel 2007 Printing Workbooks Introduction Preparing to Print and Printing Watch the video! (10:14min) - Tips for watching our videos. Download the example to work along with the video. To View the Spreadsheet in Print Preview: Š Left-click the Microsoft Office Button. Š Select Print. Š Select Print Preview. The spreadsheet will appear in Print Preview view. Page 1 In Excel, there are many things you can do to prepare your workbook for printing. Many of these tasks make it easier to format the spreadsheet for the printed page. In this lesson you will learn how to view the spreadsheet in print preview, modify margins, change the page orientation, use the scale to fit feature, use the Print Titles command, insert breaks, and more. Page 2 ©1998-2013 Goodwill Community Foundation, Inc. All rights reserved.
  • 2. Click the Close Print Preview button to return to the Normal View. To make previewing your spreadsheet easier, add the Print Preview command to the Quick Access toolbar. Exploring Print Preview: Once you are in Print Preview, you can access many of the same features that you can from the Ribbon; however, in Print Preview you can see how the spreadsheet will appear in printed format. To Modify Margins, Column Width, or Row Height While in Print Preview: Š Click the Print Preview command on the Quick Access toolbar, or select Print Preview from the Microsoft Office Button menu. The spreadsheet opens in print preview mode. Š Hover your cursor over one of the black margin markers until a double arrow appears. ©1998-2013 Goodwill Community Foundation, Inc. All rights reserved.
  • 3. Š Left-click and drag the marker to the desired location. The change will be reflected in the spreadsheet. To Modify Margins: Š Select the Page Layout tab. Š Left-click the Margins command. Š Choose one of the predefined settings or enter custom margins. To Change Page Orientation: Š Select the Page Layout tab. Š Left-click the Orientation command. Š Select either Portrait or Landscape. Page 3 ©1998-2013 Goodwill Community Foundation, Inc. All rights reserved.
  • 4. Portrait orients the page vertically, while Landscape orients the page horizontally. To Use Scale to Fit: Š Select the Page Layout tab. Š Locate the Scale to Fit group. Š Enter a specific height and width, or use the percentage field to decrease the spreadsheet by a specific percent. Scale to Fit is a useful feature that can help you format spreadsheets to fit on a page. Be careful with how small you scale the information -- it can become difficult to read! To Change the Paper Size: Š Select the Page Layout tab. Š Click the Size command. Š Select a size option from the list. To Define a Print Area: Š Left-click and drag your mouse to select the cells you wish to print. Š Click the Print Area command. Š Choose Set Print Area. Š Now, only the selected cells will print. You can confirm this by viewing the spreadsheet in Print Preview. To return to the default setting, which is the entire worksheet, click the Print Area command and select Clear Print Area. ©1998-2013 Goodwill Community Foundation, Inc. All rights reserved.
  • 5. To Insert a Break: Š Select a cell below where you want the break to appear. Š Select the Breaks command. Š Select Insert Break. Click Print Preview to confirm the break appears in the correct place in your spreadsheet. To Use the Print Titles command: This is an important command to be familiar with if you intend to print your worksheets. It allows you to select specific rows and/or columns that will be repeated on each printed sheet. Imagine how difficult it would be to read page 48 of a printed spreadsheet if the column and row headings only appeared on the first page. Š Select the Page Layout tab. Š Click the Print Titles command. The Page Setup dialog box appears. Š Click the icon at the end of the field. Š Select the first row in the spreadsheet that you want to appear on each printed page. Š Repeat for the column, if necessary. Š Click OK. Page 4 ©1998-2013 Goodwill Community Foundation, Inc. All rights reserved.
  • 6. To Print from the Microsoft Office Button: Š Left-click the Microsoft Office Button. Š Select Print Print. The Print dialog box appears. Š Select a printer if you wish to use a printer other than the default setting. Š Click Properties to change any necessary settings. Š Choose whether you want to print specific pages, all of the worksheet, a selected area, the active sheet, or the entire workbook. Š Select the number of copies you'd like to print. Š Click OK. You can select Quick Print to bypass the Print dialog box. Challenge! Use the Budget or any Excel workbook you choose to complete this challenge. Page 5 Š View the spreadsheet in Print Preview. Š Change a column width in Print Preview. Š Insert a break. Š Use the Print Titles command to print a specific row or column on each printed page. Use Print Preview to verify how this will appear. Š Print the spreadsheet. Š Explore the other commands discussed in this lesson. ©1998-2013 Goodwill Community Foundation, Inc. All rights reserved.
  • 7. ©1998-2013 Goodwill Community Foundation, Inc. All rights reserved.