How to rename photos in batch for better organization
•Als DOCX, PDF herunterladen•
0 gefällt mir•153 views


Empfohlen
Weitere ähnliche Inhalte
Andere mochten auch
Andere mochten auch (12)
Kürzlich hochgeladen
Kürzlich hochgeladen (15)
How to rename photos in batch for better organization
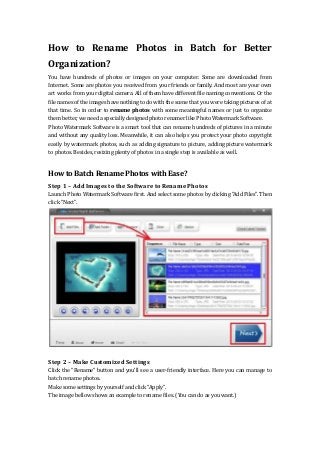
- 1. How to Rename Photos in Batch for Better Organization? You have hundreds of photos or images on your computer. Some are downloaded from Internet. Some are photos you received from your friends or family. And most are your own art works from your digital camera. All of them have different file naming conventions. Or the file names of the images have nothing to do with the scene that you were taking pictures of at that time. So in order to rename photos with some meaningful names or just to organize them better, we need a specially designed photo renamer like Photo Watermark Software. Photo Watermark Software is a smart tool that can rename hundreds of pictures in a minute and without any quality loss. Meanwhile, it can also helps you protect your photo copyright easily by watermark photos, such as adding signature to picture, adding picture watermark to photos. Besides, resizing plenty of photos in a single step is available as well. How to Batch Rename Photos with Ease? Step 1 – Add Images to the Software to Rename Photos Launch Photo Watermark Software first. And select some photos by clicking “Add Files”. Then click “Next”. Step 2 – Make Customized Settings Click the “Rename” button and you’ll see a user-friendly interface. Here you can manage to batch rename photos. Make some settings by yourself and click “Apply”. The image bellow shows an example to rename files. (You can do as you want.)
- 2. Step 3 – Start to Batch Rename Photos If the above 2 steps have been accomplished well, you can complete the final step. Click the “Next” button, choose an output folder and then hit “Run”. The whole task will be done in one minute. Note: Photo Watermark Software also enables you to batch convert image files to any pop image formats like JPG, BMP, TIF, TGA, GIF and more.