
Empfohlen
Weitere ähnliche Inhalte
Was ist angesagt?
Was ist angesagt? (20)
Ähnlich wie Spring boot jpa
Ähnlich wie Spring boot jpa (20)
Mehr von Hamid Ghorbani
Mehr von Hamid Ghorbani (16)
Kürzlich hochgeladen
Kürzlich hochgeladen (20)
Spring boot jpa
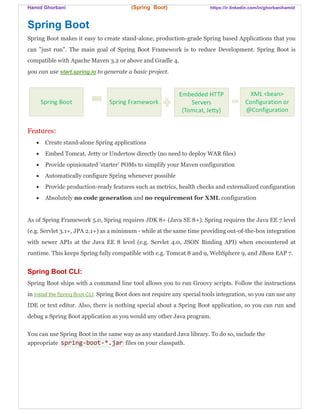
- 1. Hamid Ghorbani (Spring Boot) https://ir.linkedin.com/in/ghorbanihamid Spring Boot Spring Boot makes it easy to create stand-alone, production-grade Spring based Applications that you can "just run". The main goal of Spring Boot Framework is to reduce Development. Spring Boot is compatible with Apache Maven 3.2 or above and Gradle 4. you can use start.spring.io to generate a basic project. Features: Create stand-alone Spring applications Embed Tomcat, Jetty or Undertow directly (no need to deploy WAR files) Provide opinionated 'starter' POMs to simplify your Maven configuration Automatically configure Spring whenever possible Provide production-ready features such as metrics, health checks and externalized configuration Absolutely no code generation and no requirement for XML configuration As of Spring Framework 5.0, Spring requires JDK 8+ (Java SE 8+). Spring requires the Java EE 7 level (e.g. Servlet 3.1+, JPA 2.1+) as a minimum - while at the same time providing out-of-the-box integration with newer APIs at the Java EE 8 level (e.g. Servlet 4.0, JSON Binding API) when encountered at runtime. This keeps Spring fully compatible with e.g. Tomcat 8 and 9, WebSphere 9, and JBoss EAP 7. Spring Boot CLI: Spring Boot ships with a command line tool allows you to run Groovy scripts. Follow the instructions in install the Spring Boot CLI. Spring Boot does not require any special tools integration, so you can use any IDE or text editor. Also, there is nothing special about a Spring Boot application, so you can run and debug a Spring Boot application as you would any other Java program. You can use Spring Boot in the same way as any standard Java library. To do so, include the appropriate spring-boot-*.jar files on your classpath.
- 2. Hamid Ghorbani (Spring Boot) https://ir.linkedin.com/in/ghorbanihamid Developing Spring Boot web application: For developing a spring boot web application do the following steps: Creating a pom.xml: We need to start the project by creating a Maven pom.xml file. The pom.xml is the recipe that is used to build your project. There are 3 key points in pom.xml as shown below:
- 3. Hamid Ghorbani (Spring Boot) https://ir.linkedin.com/in/ghorbanihamid 1) ParentTag: To create a Spring Boot application, you first need to configure the spring-boot- starter-parent artifact in the parent section of the pom.xml. This way, you only need to specify the dependency version once for the parent. The value is then used to determine versions for most other dependencies – such as Spring Boot starters, Spring projects or common third-party libraries. Parent Poms allow you to manage the following things for multiple child projects and modules: Configuration : Java Version and Other Properties Depedency Management : Version of dependencies Default Plugin Configuration The advantage of this approach is that it eliminates potential errors related to incompatible library versions. When you need to update the Boot version, you only need to change a single, central version, and everything else gets implicitly updated. 2) Dependencies Tag: The dependency provides the capability to manipulate jars in the project. These dependencies are required to compile and run the application. Spring Boot provides a set of convenient dependency descriptors, called starters, which we can include in our application. For example, if we want to get started using Spring and JPA for database access, just include the spring-boot-starter-data-jpa dependency in your project. You do not need to provide a version for any of these dependencies in your build configuration as Spring Boot is managing that for you. When you upgrade Spring Boot itself, these dependencies will be upgraded as well in a consistent way. Starter should follow a naming pattern like: spring-boot-starter-*, where * is a particular type of application. For Example: Starter Name Description spring-boot-starter-web Used for building web, including RESTful, applications using Spring MVC. Uses Tomcat as the default embedded container. spring-boot-starter-jdbc Used for JDBC with the Tomcat JDBC connection pool. spring-boot-starter-mail Used to support Java Mail and Spring Framework's email sending. spring-boot-starter-aop used for aspect-oriented programming with Spring AOP and AspectJ. 3) Build Tag:This element is for configuring Build plugins.
- 4. Hamid Ghorbani (Spring Boot) https://ir.linkedin.com/in/ghorbanihamid create a main class for application: All Spring Boot applications have an entry point that works just like an ordinary Java program. It has a main method and everything. Your application is started by executing this class. The class must be annotated with @SpringBootApplication. The SpringApplication class provides a convenient way to bootstrap a Spring application that is started from a main() method. In many situations, you can delegate to the static SpringApplication.run method, as shown in the following example: @SpringBootApplication public class SpringBootWebApplication { public static void main(String[] args) throws Exception { SpringApplication.run(SpringBootWebApplication.class, args); } } @SpringBootApplication is equivalent to using all of the following annotations: @Configuration: makes the class as a source of bean definitions for the application context. @EnableAutoConfiguration: will scan the main package and its sub packages when executing the spring boot auto configuration feature for class path dependencies. @EnableWebMvc: Spring Boot adds this annotation automatically when it sees spring- webmvc on the classpath.This flags the application as a web application and activates key behaviors such as setting up a DispatcherServlet. @ComponentScan: tells Spring to look for other components, configurations, and services in the default package, allowing it to find the controllers.If specific packages are not defined, scanning will occur from the package of the class that declares this annotation. NOTE: If you want to get the maximum advantage of spring boot’s auto configuration feature, it is expected to put all your class packages under spring boot main application package (directly in main package or indirectly as sub packages). If any class or package that is outside from the main application package and it is required for completing auto configuration for some dependency, then should be declared in the main configuration class properly with related annotation.
- 5. Hamid Ghorbani (Spring Boot) https://ir.linkedin.com/in/ghorbanihamid create a controller class: @Controller public class WelcomeController { @RequestMapping("/") public String welcome(Map<String, Object> model) { model.put("message", "Hello World"); return "welcome"; } } As request first goes to dispatcherServlet and it redirects to the controller class. Here @Controller depicts that this is our controller class. @RequestMapper is used to map incoming HTTP request to handler method(welcome() in above controller). So welcome() method of WelcomeController.java will handle GET request from dispatcher.So when we call the url of "http://localhost:8080/welcome", then the welcome method will get called. Create property file: The next step is creating a application.properties file and putting it in src/main/resoures. Spring Boot provides rich set of Application Properties. So, we can use that in properties file of our project. It helps to organize application properties. Example: # BANNER banner.charset=UTF-8 // Banner file encoding. # LOGGING logging.config= // Location of the logging configuration file. // For instance `classpath:logback.xml` for Logback # AOP spring.aop.auto=true // Add @EnableAspectJAutoProxy. You can find a list of common Spring Boot properties and references at the following link: https://docs.spring.io/spring-boot/docs/current/reference/html/common-application-properties.html
- 6. Hamid Ghorbani (Spring Boot) https://ir.linkedin.com/in/ghorbanihamid Make your UI: Use popular web technologies to build a Hosted Web App. By default Spring Boot serves static contents like CSS or Javascript in the classpath at "/src/main/resources/static/" (or "/src/main/resources/public"). The index.html resource is special because it is used as a "welcome page" if it exists, which means it will be served up as the root resource. Using JSP as view: Default embedded servlet container for Spring Boot Starter Web is tomcat. To enable support for JSP’s, you need to add a dependency on tomcat-embed-jasper. <dependency> <groupId>org.apache.tomcat.embed</groupId> <artifactId>tomcat-embed-jasper</artifactId> <scope>provided</scope> </dependency> Keep you JSP files in the " src/main/webapp/WEB-INF/jsp/" path. Configuring a View Resolver: To configure the view resolver add the following property files to application.properties: spring.mvc.view.prefix=/WEB-INF/jsp/ spring.mvc.view.suffix=.jsp Remove Restarts: Normally you’d have to restart your server each time you make a change to your front-end which is a pain. Using Spring Boot’s developer tools allows us to get around this. Add the following dependency to your POM. <dependency> <groupId>org.springframework.boot</groupId> <artifactId>spring-boot-devtools</artifactId> <optional>true</optional> </dependency> Also add this configuration to your Spring Boot Maven Plugin: <configuration> <addResources>true</addResources> </configuration> Now, when you make a change to your application, or recompile any classes, it should update when you refresh your browser.
- 7. Hamid Ghorbani (Spring Boot) https://ir.linkedin.com/in/ghorbanihamid Running the Application: Use the Spring Boot Application class (mail class tha you created before) to launch your application. During running the application it produce the following output to the console. If you look at the console log, you can find the following log message: Started SpringBootExampleApplication in … seconds (JVM running for ….) This message shows that the application is started. Now, we can send HTTP request from the any browser to call the controller method.
- 8. Hamid Ghorbani (Spring Boot) https://ir.linkedin.com/in/ghorbanihamid Spring Boot Data: The Spring Framework consists of a collection of projects, and one of these projects is Spring Data. Spring Data provides extensive support for working with SQL databases, from direct JDBC access using JdbcTemplate to complete JPA technologies. JPA is the Java Persistence API, which is Java's standard API for object-relational mapping. JPA is only an specification, Hibernate is one of the most well- known and most used implementations of JPA, but there are others, such as EclipseLink JPA. Configuring DataSource in Spring: In Spring Boot, dataSource configuration can be done in two ways: using standard Spring Boot properties file using Java @Configuration class Using properties file: To configure the data source using a properties file, we have to set properties prefixed with spring.datasource. Spring Boot will automatically configure a data source based on those properties: spring.datasource.driver-class-name=com.mysql.jdbc.Driver spring.datasource.url=jdbc:mysql://localhost:3306/ TestDatabase?createDatabaseIfNotExist=true sring.datasource.username=yourUserName spring.datasource.password=yourPassword Using Java Configuration class: The Java configuration looks the same as it does in a standard Spring project: @Configuration @PropertySource(value = { "classpath:application.properties" }) public class DataSourceConfig { @Autowired private Environment env; @Bean public DataSource dataSource() { DriverManagerDataSource dataSource = new DriverManagerDataSource(); dataSource.setDriverClassName( env.getRequiredProperty("jdbc.driverClassName")); dataSource.setUsername(env.getRequiredProperty("jdbc.username")); dataSource.setPassword(env.getRequiredProperty("jdbc.password")); dataSource.setUrl(env.getRequiredProperty("jdbc.url")); return dataSource; }
- 9. Hamid Ghorbani (Spring Boot) https://ir.linkedin.com/in/ghorbanihamid Configuring Connection Pool: Spring Boot uses the following algorithm for choosing a specific implementation: - Spring boot prefers HikariCP for its performance and concurrency. If HikariCP is available, it is always a first choice. - Otherwise, if the Tomcat pooling DataSource is available, spring uses it. - If neither HikariCP nor the Tomcat pooling datasource are available and if Commons DBCP2 is available, spring uses it. If you use the spring-boot-starter-jdbc or spring-boot-starter-data-jpa “starters”, you automatically get a dependency to HikariCP. You can bypass that algorithm completely and specify the connection pool to use by setting the spring.datasource.type property. This is especially important if you run your application in a Tomcat container, as tomcat-jdbc is provided by default. You can customize the connection pooling settings, by using their prefix: for hikari: spring.datasource.hikari.* for tomcat : spring.datasource.tomcat.* . For example Tomcat connection pool will configure in application.properties as following: # The initial number of connections that are created when the pool is started. Default is 10 spring.datasource.tomcat. initialSize=100 #The indication of whether objects will be validated when a connection is first created. If an object fails to validate, it will be throw SQLException. Default value is false spring.datasource.tomcat.testOnConnect=true # Number of ms to wait before throwing an exception if no connection is available. spring.datasource.tomcat.max-wait=50000 # Maximum number of active connections that can be allocated from this pool at the same time. spring.datasource.tomcat.max-active=50 # Validate the connection before borrowing it from the pool. spring.datasource.tomcat.test-on-borrow=true # The maximum number of connections that should be kept in the pool at all times. Default value is maxActive:100 # Idle connections are checked periodically (if enabled) and connections that been idle for longer than minEvictableIdleTimeMillis will be released. spring.datasource.tomcat.max-idle=15 # The minimum number of established connections that should be kept in the pool at all times. The connection pool can shrink below this number if validation queries fail. Default value is derived from initialSize:10 spring.datasource.tomcat.min-idle=10 Connection to a JNDI DataSource
- 10. Hamid Ghorbani (Spring Boot) https://ir.linkedin.com/in/ghorbanihamid If you deploy your Spring Boot application to an Application Server, you might want to configure and manage your DataSource by using your Application Server’s built-in features and access it by using JNDI. The spring.datasource.jndi-name property can be used as an alternative to the (spring.datasource.url, spring.datasource.username, and spring.datasource.password) properties to access the DataSource from a specific JNDI location. For example, you can access a JBoss AS defined DataSource as following: spring.datasource.jndi-name=java:jboss/datasources/customers Spring Data JDBC: Spring Boot provides starter and libraries for connecting to our application with JDBC. Spring provides JdbcTemplate class for database operations using JDBC. Spring JDBC dependencies can be resolved by using the following dependencies: <dependency> <groupId>org.springframework.boot</groupId> <artifactId>spring-boot-starter-jdbc</artifactId> </dependency> Spring’s JdbcTemplate and NamedParameterJdbcTemplate classes are auto-configured, and you can @Autowire them directly into your own beans, as shown in the following example: @Repository public class UserRepository { @Autowired private JdbcTemplate jdbcTemplate; public UserInfo getUserDetails(String userName) { String sqlText = "select * from UserDetails where username = ?"; return jdbcTemplate.queryForObject(sqlText, new Object[]{userName}, new BeanPropertyRowMapper<>(UserDetails.class)); } } We can autowire JdbcTemplate in the classes annotated with spring stereotypes such as @Component, @Service, @Repository and @Controller. JdbcTemplate provides methods such as queryForObject(), query(), update() etc to perform database operations.
- 11. Hamid Ghorbani (Spring Boot) https://ir.linkedin.com/in/ghorbanihamid Spring Data JPA: Spring Data supports JPA via the Spring Data JPA subproject. Spring Data JPA aims to significantly improve the implementation of data access layers by reducing the effort to the amount that’s actually needed. The spring-boot-starter contains the necessary auto-configuration for Spring JPA: <dependency> <groupId>org.springframework.boot</groupId> <artifactId>spring-boot-starter-data-jpa</artifactId> </dependency> <dependency> Devlopring Repositories in Spring Boot: You can develop you repositories in spring data jpa in 2 way: - Using Spring Data Repositories. - Using an implementation of EntityManager. Spring Data Repositories: Spring Data JPA allows you to rapidly develop your data access layer through the use of Repository interfaces instead of using EntityManager. The goal of Spring Data repository abstraction is to significantly reduce the amount of boilerplate code required to implement data access layers for various persistence stores. The Spring Data core library ships with three interfaces that expose a dedicated set of functionalities: - CrudRepository - PagingAndSortingRepository - JpaRepository
- 12. Hamid Ghorbani (Spring Boot) https://ir.linkedin.com/in/ghorbanihamid CrudRepository: provides methods for CRUD operations, so it allows you to create, read, update and delete records without having to define your own methods. Spring provides CrudRepository implementation class automatically at runtime. It contains methods such as save, findById, delete, count etc. Extending CrudRepository needs two parameters: - The type of the entity that is managed by our repository. - The type of the entity’s id field. Custom Repository Methods: CrudRepository provides methods for generic CRUD operation and if we want to add custom methods in our interface that has extended CrudRepository, we can add in following ways: a. We can start our query method names with find...By, read...By, query...By, count...By, delete...By and etc. - Before By we can add expression such as Distinct . - After By we need to add property names of our entity. Example: countByLastname, findTitlesByFirstName b. To get data on the basis of more than one property we can concatenate property names using And and Or while creating method names. Example: countByLastnameAndFistName, findTitlesByFirstNameOrlastName c. If we want to use completely custom name for our method, we can use @Query annotation to write query.
- 13. Hamid Ghorbani (Spring Boot) https://ir.linkedin.com/in/ghorbanihamid Example: interface UserRepository extends CrudRepository<User, Long> { long countByLastName(String lastName); long deleteByfirstName(String firstname); // limiting the query result by FIRST List<User> findFirst10ByLastName(String lastName); // limiting the query result by TOP List<User> findTop10ByLastName(String lastName); List<User> findByEmailAddressOrPhoneNumber(String emailAddress,String phoneNumber); // Enables the distinct flag for the query List<User> findUsersDistinctByEmailAddressOrPhoneNumber(String emailAddress, String phoneNumber); // Enabling static IGNORE CASE for a query List<User> findByLastNameIgnoreCase(String lastName); // Enabling static ORDER BY for a query List<User> findByLastNameOrderByFirstNameAsc(String lastName); @Query("SELECT a FROM Users a WHERE a.firstName=:firstName AND a.lastName =:lastName") List<User> fetchUsers(@Param("firstName") String firstName, @Param("lastName") String lastName); } PagingAndSortingRepository: On top of the CrudRepository there is a PagingAndSortingRepository abstraction that adds additional methods to ease paginated access to entities. PagingAndSortingRepository provides options to - Sort your data using Sort interface - Paginate your data using Pageable interface, which provides methods for pagination: getPageNumber(), getPageSize(), next(), previousOrFirst() etc.
- 14. Hamid Ghorbani (Spring Boot) https://ir.linkedin.com/in/ghorbanihamid JpaRepository: provides some JPA related method such as flushing the persistence context and delete record in a batch. Because of the inheritance mentioned in above picture, JpaRepository will have all the functions of CrudRepository and PagingAndSortingRepository. So if you don't need the repository to have the functions provided by JpaRepository and PagingAndSortingRepository , use CrudRepository. @EnableJpaRepositories: This annotation will scan the package of the annotated configuration class for Spring Data repositories by default. If your repository package is outside from the main application package,and spring boot auto configuration couldn’t search it for some dependencies, then you should use this annotation to declare the repository package: @EnableJpaRepositories("com.soshiant.repository")
- 15. Hamid Ghorbani (Spring Boot) https://ir.linkedin.com/in/ghorbanihamid Using EntityManager: Sometimes you will need to access the EntityManager from Spring Data JPA. The purpose of the EntityManager is to interact with the persistence context. The persistence context will then manage entity instances and their associated lifecycle. JPA architecture can be represented in the diagram below: Entity : Entities are the persistence objects, stores as records in the database. you can designate any POJO class as a JPA entity. @Entity @Table(name = "EMPLOYEE") @NamedNativeQueries({ @NamedNativeQuery(name = "getAllEmployees", query = "SELECT EmployeeId, FirstName, LastName, EmailAddress,PhoneNumber,CreateDate FROM employee", resultClass=Employee.class ), @NamedNativeQuery(name = "getAllEmployeesByFirstName", query = "SELECT EmployeeId, FirstName, LastName, EmailAddress, PhoneNumber, CreateDate FROM employee WHERE FirstName=?", resultClass = Employee.class )}) public class Employee implements java.io.Serializable { @Id @GeneratedValue(strategy = GenerationType.SEQUENCE, generator = "EmployeeSequence") @SequenceGenerator(name = "EmployeeSequence", sequenceName = "employeeSeq", initialValue = 1000, allocationSize = 1 ) @Column(name = "EmployeeId") private Long employeeId; private String firstName; private String lastName; private String emailAddress; private String phoneNumber; Date createDate; public Employee() {} }
- 16. Hamid Ghorbani (Spring Boot) https://ir.linkedin.com/in/ghorbanihamid The default constructor only exists for the sake of JPA. You won’t use it directly, so it is designated as protected. @Entity annotation defines that the class is an entity. @EntityScan : If your enitities are not under the base package of application, you can customize entity scanning locations by using the @EntityScan(“com.soshiant.entity”) annotation. @Transient: The Transient annotation annotation is used to indicate that a field is not to be persisted in the database and its values are never stored in the database. @Table: This annotation allows you to specify the details of the table that will be used to persist the entity in the database. If the table name and entity name are the same, you can omit @Table annotation. @Id : The EmployeeId property is annotated with @Id so that JPA will recognize it as the object’s ID. The @GeneratedValue: EmployeeId property is also annotated with @GeneratedValue to indicate that the ID should be generated automatically. @SequenceGenerator: This annotation defines a primary key generator that may be referenced by name when a generator element is specified for the GeneratedValue annotation. A sequence generator may be specified on the entity class or on the primary key field or property. The scope of the generator name is global to the persistence unit (across all generator types). @Column: The @Column annotation is used to specify the details of the column to which a field or property will be mapped. If the property name and column name are the same, you can omit this annotation.You can use column annotation with the following most commonly used attributes: name attribute permits the name of the column to be explicitly specified. length attribute permits the size of the column used to map a value particularly for a String value. nullable attribute permits the column to be marked NOT NULL when the schema is generated. unique attribute permits the column to be marked as containing only unique values. @Temporal: This annotation is specified for Date and Calendar type persistent. It can have one of following three values DATE, TIME, and TIMESTAMP. Default is TIMESTAMP. @NamedNativeQuery: If you want to create a SQL query, you have to annotate your entity with the @NamedNativeQuery annotation. If you want to create more than one named query, then you have to wrap the queries inside the @NamedNativeQueries annotation. @NamedQuery: If you want to create a JPQL query, you have to annotate your entity with the @NamedQuery annotation. The name element of @NamedQuery specifies the name of the query that will be used with the createNamedQuery method. The query element of @NamedQuery is the query. If you want to create more than one named query, then you have to wrap the queries inside the @NamedQueries annotation.
- 17. Hamid Ghorbani (Spring Boot) https://ir.linkedin.com/in/ghorbanihamid Repository with EntityManger: @Transactional @Repository public class EmployeeRepositoryImpl implements EmployeeRepository { @PersistenceContext private EntityManager em; public Employee saveEmployee(Employee employee){ try{ em.persist(employee); em.flush(); return employee; } catch (Exception e){ e.printStackTrace(); return null; } } public List<Employee> getEmployeesByFirstName(String firstName){ return em.createNamedQuery("getAllEmployeesByFirstName",Employee.class). setParameter(0, firstName).getResultList(); } public List<Employee> getEmployeesByLastName(String lastName){ return em.createQuery("SELECT e FROM Employee e WHERE e.lastName ='" + lastName + "'", Employee.class).getResultList(); } } Persist method: New entity objects can be stored in the database by invoking the persist method. An explicit call to persist associates the object with an owner EntityManager em and changes its state to Managed. The new entity object is stored in the database when the transaction is committed. JPA’s persist is almost same as Hibernate’s save method. Both methods seem to do the same, but there are a few differences. Notice that JPA’s persist method returns void but auto generated Id’s will be available in the entity, after committing the transaction. Hibernate’s save method returns the primary key of the entity. Flush method: The EntityManager.flush() operation can be used the write all changes to the database before the transaction is committed. By default JPA does not normally write changes to the database until the transaction is committed. When you call persist, merge, or remove the database DML INSERT, UPDATE, DELETE is not executed, until commit, or until a flush is triggered. CreateQuery method: The createQuery method is used to create dynamic queries, which are queries defined directly within an application’s business logic.
- 18. Hamid Ghorbani (Spring Boot) https://ir.linkedin.com/in/ghorbanihamid CreateNamedQuery method: The createNamedQuery method is used to create static queries, or queries that are defined in metadata by using the javax.persistence.NamedQuery annotation. Named Parameters in Queries: Named parameters are query parameters that are prefixed with a colon (:). Named parameters in a query are bound to an argument by the following method: javax.persistence.Query.setParameter(String name, Object value) In the following example, the name argument to the findWithName business method is bound to the :custName named parameter in the query by calling Query.setParameter: public List findWithName(String name) { return em.createQuery( "SELECT c FROM Customer c WHERE c.name LIKE :custName") .setParameter("custName", name) .getResultList(); } Named parameters are case-sensitive and may be used by both dynamic and static queries. Positional Parameters in Queries: You may use positional parameters instead of named parameters in queries. Positional parameters are prefixed with a question mark (?) followed the numeric position of the parameter in the query. The Query.setParameter(integer position, Object value) method is used to set the parameter values. In the following example, the findWithName business method is rewritten to use input parameters: public List findWithName(String name) { return em.createQuery( “SELECT c FROM Customer c WHERE c.name LIKE ?1”) .setParameter(1, name) .getResultList(); } The Related Example on Github: https://github.com/ghorbanihamid/SpringBoot_AOP_JPA_Example
- 19. Hamid Ghorbani (Spring Boot) https://ir.linkedin.com/in/ghorbanihamid Resources: https://docs.spring.io/spring/docs/current/spring-framework-reference/overview.html https://www.javatpoint.com/spring-boot-tutorial https://docs.spring.io/spring-boot/docs/current/reference/html/common-application-properties.html https://www.concretepage.com/spring-5/spring-data-crudrepository-example https://www.tutorialspoint.com/jpa/jpa_architecture.htm https://docs.spring.io/spring-data/jpa/docs/current/reference/html/ h ps://springbootdev.com/2017/11/13/what-are-the-uses-of-entityscan-and-enablejparepositories-annotations/