08448380779 Call Girls In Civil Lines Women Seeking Men
Office 2007 introduction
1. Introduction to Microsoft 2007 Office
Created: 9 October 2006
Introduction
Welcome to the “new world” of Microsoft 2007 Office. As you may have heard, 2007 Office is a
major change from previous Office versions. If you are new to Microsoft Office you will find
2007 very intuitive. When you click on “something,” like an image, text, or spreadsheet area,
special Ribbons, customized to your selection, will appear to assist you.
For this reason, we are creating an introduction to some of the new features of several Office
applications. First, we’ll take you through the Microsoft Office Button, the Quick Access
Toolbar, Ribbons, Tabs and Groups – to familiarize you with these common features. Then we’ll
show you some of the unique Ribbons, Tabs and Groups of each application.
If you have 2007 Office installed on your computer here are a couple of hints on how we’ll
proceed.
To open an application, Double click quickly on the application icon (Word, PowerPoint,
Excel, etc.) on the Windows desktop. Or, click the Start button, in the lower left corner of the
screen, then click All Programs, move the cursor over Microsoft Office and select the
application you desire.
In this tutorial, when we indicate that you need to click a mouse button, it will mean to click the
left mouse button – unless we indicate that you should click the RIGHT mouse button. So,
always move the cursor over the “place” we indicate and “click left” unless we tell you otherwise.
The Microsoft Office Button
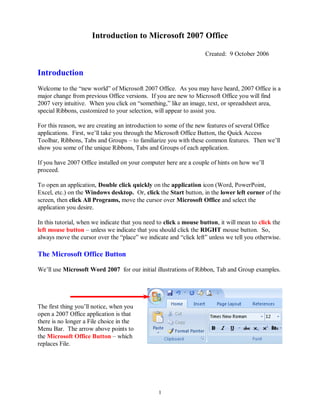
We’ll use Microsoft Word 2007 for our initial illustrations of Ribbon, Tab and Group examples.
The first thing you’ll notice, when you
open a 2007 Office application is that
there is no longer a File choice in the
Menu Bar. The arrow above points to
the Microsoft Office Button – which
replaces File.
1
2. As you move your cursor over the Microsoft
Office Button a preview image (image on right)
will appear.
Click the Microsoft Office button.
When you click the Microsoft Office
button, it will turn orange and a “File like”
menu will appear (similar to the image on
the right).
You’ll notice that you now have little
images for choices and that some of them
have little arrows pointing to the right.
These arrows indicate that there are
additional choices for a selection.
We’ll show you one of these on the next
page.
On the right side of the Microsoft Office
Button menu screen you will see your
most recently used files – Recent
Documents (see arrow above on right).
Each Microsoft Office Button menu is
tailored to its Office application (Word,
Excel, PowerPoint, etc).
2
3. 2.
Move your cursor over the
arrow to the right of the Print 3.
button ( 1. ), a menu of print
choices will appear on the
right – under Preview and
print the document ( 2. )
(image on right).
Click Print ( 3.) at the top of
the Menu. 1.
A standard Print Menu screen will
appear.
It is suggested that you spend a few minutes clicking the various choices in the Microsoft
Office Button menu screen to familiarize yourself with what they do.
If you look at the bottom of
the Microsoft Office
Button menu screen you
will see two buttons. Since
we’re using Word, the
buttons indicate Word
Options and Exit Word.
The buttons change with each application (e.g. PowerPoint will indicate PowerPoint Options).
3
4. When you click the Word Options button the image below will appear. Notice, on the left
side of the menu screen there are a number of choices (e.g. Personalize, Display, Proofing, etc.).
when you click a choice on the left side of the screen, the options for that choice appear on the
right. Take a few minutes and move through these choices to familiarize yourself with this
menu screen. You will see that Microsoft has placed a lot of resources that were under File-
Tools-Options, in previous versions of Office, in this menu.
The last choice – Resources – furnishes a lot of online resources for the application which you are
using. We clicked the Microsoft Word Resources text link and the image below appeared.
Notice all of the useful online resources available to you.
4
5. Quick Access Toolbar
In the upper left corner – to the right of the Microsoft
Office Button - you will see an area called the Quick
Access Toolbar (image on left). This area is quite
handy as it currently contains several of the most used
buttons in Office applications – Save, Undo, Redo, Print and Print Preview. You can customize
this toolbar by adding and removing as many Quick Access button choices as you desire.
In the Quick Access Toolbar (on the left) you can see
we added the Insert Picture button – since we are using
it a lot for this tutorial.
To add this button to the toolbar we first
clicked the Insert Tab and then RIGHT clicked
the Insert Picture button. One of the choices
was Add to Quick Access Toolbar. When we
clicked this choice the Insert Picture button was
added. You can add any button you choose by doing this.
To remove buttons from
the Quick Access Toolbar
just RIGHT click on the
button you desire to
remove and choose
Remove from Quick
Access Toolbar.
Ribbons
This is the new term you hear a lot about in 2007 Office. Ribbons stretch across the top of your
application screen with features to assist you as you click the Ribbon Tabs. To us, Tabs and
Ribbons are the same. It like unreeling holiday ribbon from a spool and seeing new images on the
ribbon – very cool! So, we’ll cover Tabs/Ribbons in great detail.
Tabs
Tab
Below the Microsoft Office Button and Quick Access Toolbar we see a series of
Tabs/Ribbons.
5
6. Tabs are similar to the Drop Down Menu choices in previous versions of Office. The Tabs are,
logically, a bit different for each 2007 Office application to assist you with the most common
features of that application. All the 2007 Office applications begin with the Home tab.
The Home Tab/Ribbon for Word 2007 looks like the image below. Ribbon
Group
The Home Tab/Ribbon for PowerPoint 2007 looks like the image below.
The Home Tab/Ribbon for Excel 2007 looks like the Image below.
The Home Tab/Ribbon for Access 2007 looks like the Image below.
You’ll quickly notice that the Home Tab/Ribbon for each application shows the Clipboard as
the left “Group” (except in Access) In Word and Excel, the Font Tab/Ribbon is to the right, but
in PowerPoint, because working with slides is paramount, the Slides Tab/Ribbon comes next. If
you have 2007 Office installed on your computer, open these four applications and take a few
minutes looking at each application’s Home Tab/Ribbon.
Notice, the Tabs to the right of the Home Tab/Ribbon are tailored to each application. We’ll
work a bit with this in a little while.
6
7. Groups
In the image below, the arrows point to a new topic – Groups.
Clipboard Font Paragraph Styles Editing
Clipboard Group
The Tab/Ribbon bar images (in this tutorial) are hard to read, so we’ve placed arrows (in the
image above) for the Groups in the Word Home Tab/Ribbon. Again, the Tabs/Ribbons, and
Groups,will vary depending on the application you’re using. Let’s look a bit at the Groups in
Word.
The first Group on the Word Home Tab is
Clipboard. To open a Group you move your
cursor over the little down pointing arrow in
the lower right corner of a group.
This arrow is enlarged in the image below. Open Group
Close Group
When you click this arrow the image on the
right appears. Notice that the Clipboard
appears on the left side of your screen and
shows any text or images you’ve copied. To
close this group, click the “X” in the upper right
corner of the Group.
7
8. Font
Notice, in the Font Group area (above), you
have the most used Font features. However,
if you desire all of the font features, just click
the Open Group arrow to the right of Font.
An old friend – the Font menu screen appears
(when you click the Open Group arrow).
You’ll see this a lot as your learn more about
2007 Office. Many of the “tried and true”
menu screens will appear in logical places.
Select Text Mini Toolbar
When you’re working with text and fonts a really ingenious “new thing” occurs as you highlight
text - a Select Text Mini Toolbar appears!
In the image on the right we
highlighted - Highlight Text. When
we paused the cursor over the
highlight, a “shadow like” toolbar
appeared. When we move our
cursor over the toolbar, it is ready
for us to use it to modify our text. This is really handy as many of text formatting features are in
the Mini Toolbar. The first time you try this, be patient, it sometimes takes a few tries.
Paragraph
Notice in the Paragraph Group area
(left) you again have the most used
Paragraph features. However, if you
desire all of the paragraph features,
just click the Open Group arrow to the
right of Paragraph.
8
9. The Paragraph menu screen appears when you click
the Open Group arrow to the right of the Paragraph
Group. You should now have a “feel” for how the
Tabs/Ribbons and Groups work together to assist you.
Styles
Hang on! The next Group on the Word Home Tab/Ribbon is Styles. If you go back to Page 6
and glance at the Word, PowerPoint and Excel Home Tabs, you’ll see that the right portion of a
Tab is where the application selections change to fit the application. In Word you can now
select a style from the Styles Group (image below). If you click the More arrow in the lower
right corner of the Styles group, you will see additional choices.
More Arrow
When you click the More arrow you will see an image similar to the one below. Notice that we
are in Times New Roman – Normal. On the next page we’ll show you one of the really, really
neat new features in 2007 Office.
9
10. Fasten your seatbelts!
We’re going to highlight this paragraph (when we have finished typing it). Then we’re going
to open the Styles Group. When the Group is open we’ll move our cursor over the choices,
and as we do, you’ll see, in the images below, that the entire paragraph changes to that Style!
We selected this Style. Look
how the text now appears!
And another………..
Other Tabs/Ribbons –
When you move to the other Tabs/Ribbons, you’ll notice that they contain their own Groups –
associated with that Tab. The Insert Tab/Ribbon (below) has logical “things” that you would
insert into a document – Shapes, Pages, Tables, Illustrations, Links, Headers/Footers, Text and
Symbols. Again, depending on your choices, many selections allow you to “preview” what
you’ve highlighted – similar to the two illustrations above.
It is suggested that you click the Tabs/Ribbons in each application you’ll be using to get a
“feel” for them.
10
11. The Page Layout Tab/Ribbon also has logical selections – Themes, Page Setup, Page
Background, Paragraph and Arrange.
The References Tab/Ribbon will really come in handy for those publishing long documents,
articles or books – Table of Contents, Footnotes, Citations & Bibliography, Captions, Index, and
Table of Authorities.
The Mailings Tab/Ribbon lets you work with Envelops, Labels, Mail Merge, Fields and
Preview. It includes Create, Start Mail Merge, Write and Insert Fields, Preview Results and
Finish.
The Review Tab/Ribbon has the Proofing Tools, Comments, Tracking, Changes, Compare and
Protect features.
The View Tab/Ribbon allows you to change the document Views, do Show/Hide, Zoom and
arrange your Windows.
This gives you a “feel” for how the Tabs/Ribbons work in Word 2007. Again, it would be
prudent to look at the other 2007 Office applications you will be using - to get a similar
sense for these new features.
Now we’ll look at several other neat features of 2007 Office.
11
12. Picture Tools
Currently, when you click an image in Word 2007, PowerPoint 2007 or Excel 2007, a Picture
Tools Tab/Ribbon will be available to you. We placed a Microsoft Clip Art frog on the left.
When we click the frog a Picture Tools Tab appears above of the other Tabs/Ribbons.
When you click the Picture Tools Tab (we’re still in Word) the Picture
Tools Ribbon below appears.
Notice, like the other Ribbons, that Picture Tools also has its own Groups – Picture Tools,
Shadow Effects, Border, Arrange, and Size.
You can click the Open Group arrow at the
lower right of some groups to see more of the
Group.
We clicked the Open Group arrow on the
Size Group and the Format Picture Menu
Screen appeared.
If we are in PowerPoint – and click an image – Picture Tools becomes available. The image
below shows that there are different selections since we are now using PowerPoint.
12
13. SmartArt
In the Insert Ribbon/Tab at the bottom of Page 10 there is a new selection that improves on the
“old” Drawing Toolbar – especially SmartArt. SmartArt is a part of Word, Excel and
PowerPoint.
We’ve enlarged the Word Insert
Ribbon/Tab (right) to show the
SmartArt selection. When you
click SmartArt a Choose a
SmartArt Graphic menu (image
below) will appear.
If you have used SmartArt in the past, you’ll quickly see that it has been greatly enhanced.
We’ll click on the Pyramid and then click the OK button.
A Pyramid Diagram, similar to the one on
the right, will appear. Now it gets
exciting!
When you click the Pyramid you’ll
notice a new SmartArt Tools
Ribbon/Tab appears (top of next page).
13
14. Similar to Picture Tools, you’ll notice several Layout and SmartArt Styles Groups designed for
enhancing the Pyramid on which you’re working.
If you click the Change
Colors button in the
SmartArt Styles Group an
image like the one the right
will appear. As you move
your cursor arrow over the
Primary Theme Colors,
you’ll see that the Pyramid
changes to that color. We
chose the one you see marked
by the arrow on the right.
Our Pyramid now has this
shading!
If you now move your cursor
arrow over one of the images in
SmartArt Styles you’ll see an image
similar to the one on the right.
Comparable to the Text Styles on
Page 10, you can see how 2007
Office is enhanced to assist you with
these great previews.
We’ll work with these in the
individual 2007 Office tutorials.
14
15. Other Ribbons/Tabs/Tools
Excel
If you are in Excel, you can now
highlight a row, column or
entire spreadsheet with really
eye-opening effects.
In the image on the right we
opened the spreadsheet
developed with the Excel 2007
tutorial. We highlighted the
December column and then
clicked Conditional
Formatting. The drop down
menu you see on the right
appeared. We then clicked
Color Scales and, when the area
to the right of Color Scales
appeared, we moved our
cursor over the selections. As
with other 2007 applications,
when you move your cursor over
the choices you will get a
temporary preview of how
your selection will appear.
Notice, in Conditional
Formatting, there are also Data Bars and Icon Sets selections. If you were to choose these you
would see small bar charts or little flags, smiley faces, etc. appear in the area you highlighted.
And the list goes on and on. Really awesome!
PowerPoint
You saw on Page 12 that Picture Tools is a significant part of PowerPoint 2007. Text and titles
are also very important. If you click a Text Box an image (similar to the one below) will
appear. Notice that a Drawing Tools Tab/Ribbon is available.
15
16. We clicked the Drawing
Tools Tab then clicked
the More arrow to the
lower right of the Shape
Styles Group. An image
More
similar to the one below Arrow
appeared.
As with other Tools Tabs/Ribbons, when you move your cursor arrow over a selection in the
Format area – a preview of how your text will look with that selection appears. We chose the
one marked by the arrow below and our title looks like the one on the right of the image.
More
Also, in the Drawing Tools Arrow
Tab/Ribbon, is the Group –
WordArt Styles.
We clicked the More arrow
to the right of WordArt Styles
and the image on the right
appeared. Once again, as we
moved our cursor over the
choices, a preview of our title
appeared in that WordArt
Style.
We’ll work with these Styles,
and more, in the PowerPoint
tutorial.
16
17. The Lower Right Corner
Another efficient feature of 2007 Office is in the lower right corner of Word, Excel, PowerPoint
and Access. When you open these applications you will see that the “zoom” feature is now
available, as well as other logical “view” features for each application.
Word
Master Document View Draft View Zoom
The image on the
right is the Word
View Toolbar Page Layout View
(located on the
bottom Right of
the Word Full Screen View Web Layout View
screen).
You’ll notice that normal Word document views and zoom features are available.
PowerPoint
Slide Sorter View Zoom
The PowerPoint
View Toolbar
looks similar to
the image on the
right. Normal View Slide View
Access
Form View PivotTable View Layout View
The Access
View Toolbar
looks similar to
the image on
the right.
Datasheet View PivotChart View Design View
17
18. Excel
Page Layout View Zoom
The Excel View
Toolbar looks
similar to the image
on the right.
Normal View Page Break View
We have found these View toolbars to be very handy as we’ve worked in these applications.
More Excel
Page Layout View
While we’re in the Excel View
Toolbar we’ll mention the new
Page Layout View.
When you click the Page Layout View button, an image similar to the one below will appear.
This view is similar to Print Layout View in Word. Now you have it in Excel! It’s really great
as it not only gives you a “mini” print preview of your spreadsheet, it also allows you to work
with your Headers and Footers “interactively” by clicking the Header or Footer area!
18
19. We clicked in the center Header area and the image below appeared. Notice that a Header
and Footers Tools Tab/Ribbon is available – with all of the Header and Footer Groups – and
easy to use buttons.
Center Header Area
Notice the Auto Header and Auto Footer buttons to the left of the Ribbon. You can use
these, or the Header & Footer elements, or simply type your header. This is really flexible and
you see your choices instantly.
You can see that 2007 Office is working with you more than ever. As we create the 2007 Office
tutorials, we’ll introduce you to, and show you how to use these Ribbons, Tabs, Groups, and
Toolbars unique to each application.
At the moment Word, Excel, PowerPoint, Access and creating messages in Outlook Mail contain
these new features. 2007 Publisher is fairly similar to Publisher 2003 – but has Publisher Tasks to
assist you in creating Publications. FrontPage has changed its name and moved to a new family
called Expression – with a new name – Microsoft Expression Web Designer
Microsoft Office Tutorials
In addition to this tutorial, other Office tutorials are available at:
http://www.officetutorials.com
This site is updated frequently with tutorial revisions as well as tutorials from a number of
collegiate institutions. Please feel free to visit and download as you desire.
This has been an introduction to several features of 2007 Office. If you have any questions about
2007 Office, or comments on this tutorial, please contact:
murray.t@lynchburg.edu
Thank you for your patience and good luck.
19