EVANNEX AutoLift Parcel Shelf Installation Guide
•
0 gefällt mir•66,660 views

Installation Instructions for the AutoLift for Tesla Model S

Empfohlen
Empfohlen
Weitere ähnliche Inhalte
Mehr von EVANNEX Aftermarket Tesla Accessories
Mehr von EVANNEX Aftermarket Tesla Accessories (20)
Kürzlich hochgeladen
Kürzlich hochgeladen (20)
EVANNEX AutoLift Parcel Shelf Installation Guide
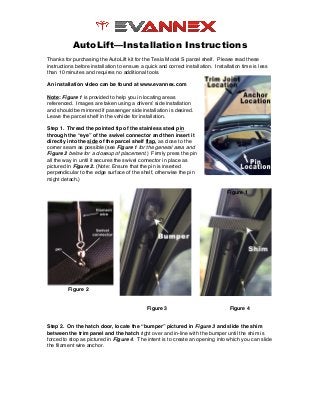
- 1. AutoLift—Installation Instructions Thanks for purchasing the AutoLift kit for the Tesla Model S parcel shelf. Please read these instructions before installation to ensure a quick and correct installation. Installation time is less than 10 minutes and requires no additional tools. An installation video can be found at www.evannex.com Note: Figure 1 is provided to help you in locating areas referenced. Images are taken using a drivers’ side installation and should be mirrored if passenger side installation is desired. Leave the parcel shelf in the vehicle for installation. Step 1. Thread the pointed tip of the stainless steel pin through the “eye” of the swivel connector and then insert it directly into the side of the parcel shelf flap, as close to the corner seam as possible (see Figure 1 for the general area and Figure 2 below for a closeup of placement.) Firmly press the pin all the way in until it secures the swivel connector in place as pictured in Figure 2. (Note: Ensure that the pin is inserted perpendicular to the edge surface of the shelf, otherwise the pin might detach.) Figure 2 Figure 3 Figure 4 Step 2. On the hatch door, locate the “bumper” pictured in Figure 3 and slide the shim between the trim panel and the hatch right over and in-line with the bumper until the shim is forced to stop as pictured in Figure 4. The intent is to create an opening into which you can slide the filament wire anchor. Figure 1 Figure 3 Figure 4
- 2. AutoLift Installation Instructions Evannex is not responsible for any damage that might occur as a consequence of these Installation Instructions. Please consult a qualified professional if you are uncomfortable with any of the operations described herein. Step 3. Insert the “arch” part of the anchor in the opening created on the left side of the shim as seen in Figure 5. Then slide the anchor down the trim piece (toward the floor of the trunk) until it is 1 – 3 inches from the original insertion point. Note: The location of the anchor can be adjusted up or down to get the best tension on the AutoLift filament wire. The general location of the anchor is shown in Figure 1 with a close-up view shown in Figure 6. Step 4. Remove the shim and press the trim panel firmly to ensure it is still seated. Step 5. insert the filament connector to the hook part of the anchor by inserting it through the small opening at the top as seen in Figure 6. That’s it! Your AutoLift is now ready for use. Figure 5 Figure 6 Notes: 1. If you need to remove your parcel shelf at anytime, simply disconnect it from the hook part of the anchor on the hatch door and remove the parcel shelf. Do not disconnect the pin and swivel connector. 2. The filament line may rest on the weather strip when the hatch closes. The braided line has a nylon coating on it to protect your paint and ensure the weather strip can create a tight seal even if it lays on it. 3. In the unlikely event that the filament bends in a manner that causes it to protrude outside the hatch, remove the filament wire from the anchor hook and reverse the direction of the anchor hook. Then re-attach the wire. This will often correct the problem.