1. There are three brushes used on the PlateRunner; one in the Pre-wash and two in the Developer Section. The Pre-
wash Brush removes the plate’s protective cover before processing. In the Developer Section, two brushes assist the
development by mechanically removing emulsion from unexposed areas.
The brushes are set at the factory to work with Xante materials. Their settings need to be checked as the type of plate
and developer change, adjustments may be required.
The procedures for setting these brushes are described below.
NOTE: Correct brush pressure is critical to optimal performance of the PlateRunner. Brush pressure must be
adjusted as part of the processor setup procedure. A 5 and 6 mm Allen wrench and the calibration kit from Xante are
necessary for proper calibration.
Read through the entire procedure before attempting to set the brush pressures.
Setting the Pre-wash Brush
1. Bring the Processor to operating temperature and raise the Top Cover. Remove the Side Covers of the processor
and put the Main Cover Switch in Service Mode. Remove the Pre-wash Splashguard and place it on the input
tray to trigger the sensor.
2. Turn off the water supply and remove the Spraybar. Removing the roller assembly may make it easier to
perform the oeprations.
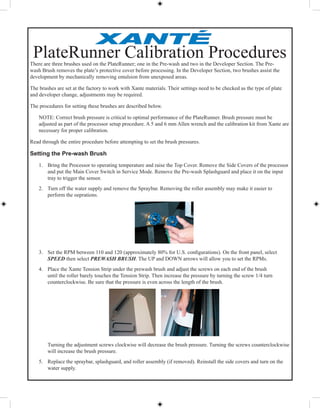
3. Set the RPM between 110 and 120 (approximately 80% for U.S. configurations). On the front panel, select
SPEED then select PREWASH BRUSH. The UP and DOWN arrows will allow you to set the RPMs.PREWASH BRUSH. The UP and DOWN arrows will allow you to set the RPMs.PREWASH BRUSH
4. Place the Xante Tension Strip under the prewash brush and adjust the screws on each end of the brush
until the roller barely touches the Tension Strip. Then increase the pressure by turning the screw 1/4 turn
counterclockwise. Be sure that the pressure is even across the length of the brush.
Turning the adjustment screws clockwise will decrease the brush pressure. Turning the screws counterclockwise
will increase the brush pressure.
5. Replace the spraybar, splashguard, and roller assembly (if removed). Reinstall the side covers and turn on the
water supply.
PlateRunner Calibration Procedures
2. Setting the Developer Brush
1. Bring the Processor to operating temperature and raise the Top Cover. Remove the Side Covers of the
processor and put the Main Cover Switch in Service Mode. Remove the Developer Splashguard and place it
on the input tray to trigger the sensor.
2. Turn off the water supply and remove the rollers located before and after the developer brush rollers. (If the
developer tank does not have developer or is a new installation - fill the developer tank with water to set the
brush pressure.)
3. Set the RPM between 110 and 120 (approximately 54% for U.S. configurations). On the front panel, select
SPEED then select DEVELOPER BRUSH. The UP and DOWN arrows will allow you to set the RPMs.BRUSH. The UP and DOWN arrows will allow you to set the RPMs.BRUSH
4. Feed the Tension Strip under the front of the brush and attach the AccuWeigh scale to the Tension Strip.
While the processor is running, set the scale’s pressure to 12.5oz. Hold the scale at a steady point and allow
the Tension Strip to feed under the roller. Adjust the screws on either end of the brush until the Tension
Strip begins to “slip” at 12.5oz. (or around 355g.). If using water in the developer tank - set the pressure to
14.5oz. (or 410g.).
Adjust both sides and check the pressure again after the adjustments are made. Check the pressure under
each side and in the middle (the middle may be slightly different than the side measurements).
5. The second brush is set similarly, however, the Tension Strip must be fed from the back of the brush because
of the spin direction of the brush.
Feed the Tension Strip under the back of the brush while the processor is running and set the scale’s pressure
to 9.5oz. (270g.). Hold the scale at a steady point and allow the Tension Strip to feed under the roller. Adjust
the screws in the brush pan, until the Tension Strip begins to “slip” at 9.5oz. (or around 270g.). For water,
set the pressure to 10.5oz. (or 300g.).
Turning the adjustment screws clockwise will decrease the brush pressure. Turning the screws
counterclockwise will increase the brush pressure. The adjustment screws for the second brush are located in
the brush pan, as shown in the photo above.
6. Replace the rollers and splashguards. Reinstall the side covers and turn on the water supply.
Rev-1: 11-28-2007