1. TiO2 Coatings for Degradation of Organics by Photocatalysis
TiO2 Coatings for Degradation of Organics by Photocatalysis
by David Sharp
During my placement I was part of an investigation into the treatment of water using
photocatalysis after activating titanium dioxide nanoparticles under UV light.This involved
investigating curing and deposition techniques of coatings with a view to integrating this
concept into future factory builds and design.
Introduction
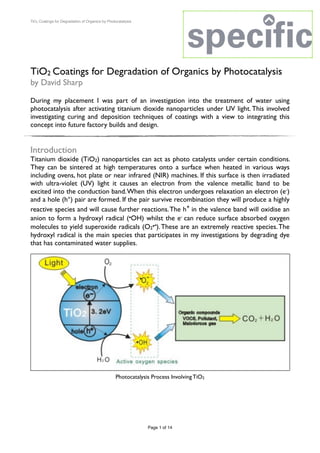
Titanium dioxide (TiO2) nanoparticles can act as photo catalysts under certain conditions.
They can be sintered at high temperatures onto a surface when heated in various ways
including ovens, hot plate or near infrared (NIR) machines. If this surface is then irradiated
with ultra-violet (UV) light it causes an electron from the valence metallic band to be
excited into the conduction band.When this electron undergoes relaxation an electron (e-)
and a hole (h+) pair are formed. If the pair survive recombination they will produce a highly
reactive species and will cause further reactions.The h+ in the valence band will oxidise an
anion to form a hydroxyl radical (.OH) whilst the e- can reduce surface absorbed oxygen
molecules to yield superoxide radicals (O2
.-).These are an extremely reactive species.The
hydroxyl radical is the main species that participates in my investigations by degrading dye
that has contaminated water supplies.
Page of1 14
Photocatalysis Process Involving TiO2
2. TiO2 Coatings for Degradation of Organics by Photocatalysis
The dye we predominantly investigated was indigo carmine (C16H8N2Na2O8S2).This dye is
used as a model dye and has other uses such as in jeans, milk and biscuits. However in high
concentrations it is an irritant and can cause permanent injury to the cornea and
conjunctiva.
During my placement I had the opportunity to experience many new and advanced
processes such as making TiO2 pastes, coating the substrate, sintering the sample, testing
the sample by dye degradation, scaling up the testing to use the SPECIFICS water
evaluation technique (SWET), running a line trial, using 3D modelling software to design
and print a sample holder to aid testing, running thermogravimetric analysis (TGA), as well
as making up aerogel precursors and taking these supercritical to make aerogels. My
placement was at SPECIFIC research labs (sustainable product engineering centre for
innovative functional industrial coatings) at the Baglan Bay Innovation Centre (BBIC).
However most of my time was spent across the road in SPECIFIC’s PMRC (pilot
manufacturing resource centre) building where they aim to take new concepts and scale
them up to industrial proportions where prototypes can be tested. My mentors for the
placement were Mr. Ashley Pursglove and Dr. Rachel Woods who are both technology
transfer fellows at SPECIFIC.
Page of2 14
Indigo Carmine Molecule
Baglan Bay Innovation Centre Pilot Manufacturing Resource Centre
3. TiO2 Coatings for Degradation of Organics by Photocatalysis
Testing and the Set Up
To make the samples I cut the substrate to a size of 80x80mm, the materials we used were
either: glass plates, glass fibre
mesh (GFM), stainless steel mesh
(SSM), an extremely fine stainless
steel mesh (FSSM) or a ‘self-
cleaning’ grout. Next I made the
the TiO2 paste that is the coating.
The paste is made up from a
mixture of water, polymer binder
and TiO2 nanoparticle powder.
The TiO2 nanoparticles are in the
P25 form which is seen as the
best photoactive blend between
the rutile phase and anatase
phase of TiO2.The paste must be
viscous but also have flowable
characteristics. Next you must
secure a piece of white roll to a
clip board and secure the
substrate to the white roll by
using sellotape or scotch tape. I
put the tape at the top and
bottom of the sample as I could
use the top piece of tape to pour
the paste onto it in excess
without compromising the
sample. I used a glass rod to coat
the substrate with the paste using
the draw down method. Whilst
spreading the paste you must
push down firmly onto the
substrate whilst maintaining a
constant and steady speed to
ensure the draw provides a thin
coating with complete coverage.
The thickness of the coating is
negligible as only the top layer of
nanoparticles will be activated
under the UV so to save money
and supply of the coating the
thinnest coating possible is
desirable. Next comes the sintering stage where you must place the sample in an oven or
on a hotplate for an hour at 500oC, this is to remove any water or polymer binder from
the coating to ensure full dispersion of the nanoparticles which maximises surface area.You
can also sinter using an NIR oven, I will elaborate on this practise later in my results.The
substrate will be left with a thin TiO2 coating in the P25 form and is ready for testing.
Page of3 14
Samples from top left to bottom right: SSM non-sintered, GFM,
FSSM & SSM sintered
‘Self-cleaning’ Grout Sample
4. TiO2 Coatings for Degradation of Organics by Photocatalysis
To test the samples I arranged the apparatus in the following set-up. I used a shaker plate to
act as the base of the equipment, it shook the dish containing the dye and sample at a
constant rate for the duration of the test, this is designed to keep the water constantly
disturbed to allow thorough mixing of the solution during the breaking down of the dye.
This means regardless of where I took a sample of the solution the absorbance value for
the dye was representative for the test situation. Next a clamp stand is used to hold the
curved 6 UV lamp holder. The holder is curved to allow maximum UV photons to
penetrate and be absorbed by the entirety of the sample to maximise efficiency of the
photocatalysis.The UV lamps provide light intensity at a constant strength as well as being
kept the same distance above the sample regardless of which test was running to control
any variables.The dimensions of the petri dish containing the dye and sample was also kept
consistent throughout. Next the sample was washed before testing to remove any excess
dust or any non-adhered nanoparticles
that could remain in suspension within
the solution and could affect any
absorbance value recorded. One more
step before testing was to place the
sample in 100ml of distilled water in the
petri dish to take a zero value for
absorbance of the solution. The water
sample was transferred in a cuvette and
placed in the UV/VIS machine shown left.
Careful attention was paid to ensure that
no fingermarks, smudges or air bubbles
were present on the parallel sides of the
cuvette that the absorbance reading was
taken across so a true value was
measured.The solution I used was 100ml
and 10ppm of indigo carmine dye, this means 10mg of indigo carmine was dissolved in one
litre of water, these values were also kept constant.An initial value was recorded before the
sample and dye were placed under the lamps, this absorbance value was usually around
0.375 at 610nm wavelength.The test was run until the absorbance value at 610nm was zero
or three concordant values were recorded in succession with an discrepancy of around
0.002 being allowed.Values for absorbance were recorded every minute for the first ten
minutes then every two minutes from thereafter. The degradation showed a first order
decay so this plan was suitable.
Page of4 14
FSSM Sintered GFM Sintered SSM Sintered
Perkin Elmer UV/VIS Lambda XLS
5. TiO2 Coatings for Degradation of Organics by Photocatalysis
Another method of testing involves using a portable UV/VIS with an Ocean Optics optical
fibre to record the results automatically as shown above however we encountered a few
problems during my placement and could not use this system to record enough results. In
this set up a sample holder is required which allowed me the opportunity to use Inventor, a
3D modelling and design computer program, to design a new stand and clamp to hold the
sample. I used a MakerBot 3D printer to print my design and the stand will now be used in
future testing.
Page of5 14
Testing Set Up
3D Design & Printing of a Sample Stand with a Clamp
6. TiO2 Coatings for Degradation of Organics by Photocatalysis
During another stage of the placement I was required to run
thermogravimetric analysis (TGA).This was to ensure the in-house paste
we used for the coatings had the same make-up as a bought-in paste
from BASF. For our testing to be valid the results from the TGA
instrument must have matched each other. I gained experience in setting
up the analysis program as well as loading the crucible in which the paste
was placed for analysis.
In the last couple of weeks of the project it was time that we scaled up
the testing we had done from 80x80mm samples to both 220x100mm
and 1000x1000mm samples.This involved running both a SWET test and
a line trial. The SWET allows 2 types of substrates to be tested
simultaneously as three 220x100mm samples of each substrate are placed
in the machine whilst 6 litres of dye is run over the samples and under
UV lamps. The line trial involved the coating of 1000x1000mm GFM
samples using a roller coater and drying over before being placed under
the NIR to sinter the samples.The samples produced are then tested in
direct sunlight on the ‘big rig’ where the sun provides both the UV to
commence the degradation and the solar power to provide charge to run
the pump that ensures the dyed water is irrigated over the sample and
collected at the bottom and re-fed through the rig until the water has
been completely cleaned. Although this was quite spectacular, in practice
due to time constraints and weather we were unable to record any
results from the samples that were made in the line trial. Despite this, it
was an invaluable experience to see industry on a larger scale and have
an insight into the ultimate goal of this project.
Page of6 14
Thermogravimetric
Analysis
SWET Sample
220x100mm
Line Trial Showing Left to Right: Roller Coated, Drying Oven & NIR
‘Big Rig’ with 1x1m Sample During a Run
7. TiO2 Coatings for Degradation of Organics by Photocatalysis
Investigating the Method
Another part of my placement was investigating stages within the method to obtain
information that would optimise the process of making a sample. The first test was to
establish which temperature provides the best sintering temperature to run at for an hour
to maximise photo activity of the sample. I can suggest this is due to the best samples
having the greatest surface area. I believe how quickly the polymer binder is evaporated off
will determine the dispersion of the nanoparticles.
The results show a clear trend with only one exception. As the sintering temperature
increases from 300oC to 600oC the rate at which degradation occurs increases with only
the 500oC sample providing an exception. I think that this is due to either a faulty sample,
incomplete coverage of the coating or physical damage to the coating; this means repeats
are needed.The disadvantage to this data is that all of these samples were heated on the
hot plate and as the rate is increasing up to 600oC, you need to test samples above this
temperature to find the level at which the temperature is at its optimum, however the hot
plate is limited to 600oC.The way to get around this is to use the Carbolite oven which can
reach temperatures of up to 1100oC.We set a cap of 800oC to the samples as we know
above this the samples will undertake permanent damage. Before I finished the placement I
made up samples of both GFM and SSM from 300oC to 800oC in the oven at 50oC
intervals, however I was unable to test them due to time constraints
Page of7 14
Testing of Different Sintering Temperatures on GFM
8. TiO2 Coatings for Degradation of Organics by Photocatalysis
The next test was into the effectiveness of of the types of paste used to coat each
substrate.The stock paste used in all of the tests so far is of the P25 type of TiO2 a mix of
both the anatase phase and rutile phase of TiO2 and is generally thought to provide the best
photo activity throughout the scientific world. Anatase however is the most photoactive
phase of TiO2 so we decided it would be best for the research to compare a paste made up
of pure anatase to a paste made of a P25 mix. I coated a sample of GFM and SSM with both
anatase paste and P25 paste, these were the results:
The initial rates of each substrate shows P25 providing the faster degradation. However the
final points of each curve contradict one another. With the SSM, the P25 is clearly faster
and at every point the curve is ahead of the anatase paste, however with the GFM the
anatase paste overtakes the P25 paste, this is a confusing result as it is not what we would
expect. More testing is required to find if this is a genuine trend or an anomaly of a sample.
Page of8 14
L: Samples I Made for Further Testing After My Placement
R: Polymer Binder Instantly Combusting Due to Heat at 750oC
Anatase Paste vs. P25 Paste
9. TiO2 Coatings for Degradation of Organics by Photocatalysis
Another test we decided to carry out was one into ‘self-cleaning’ grout.We theorised that
if it claimed to be self-cleaning it must contain a photocatalyst.To investigate the potential
in using grout for water treatment we made a 0%, 5%, 10%, 15% by weight P25 and grout
mixture and put them to the test under our standard conditions.We would expect that the
rate would increase as the percentage of P25 in the grout did. However we would also
expect to see an increase in the amount that the tiles would break up due to ablation as
we increased P25 due to poor binding between the grout and TiO2 the results are shown
below:
As you can see the results are as expected, the rate of degradation of the dye increases as
the percentage of P25 increase with the purple 15% line on the bottom and blue 0% line on
the top. The decrease in the 0% grout can be explained by adsorption of dye onto the
surface and also the presence of a photocatalyst as was theorised.A trend can also be seen
in the final point of the curves being further from zero as the percentage increases. Again
this can be explained by the 15% tile ablating leaving grout in suspension which affected the
absorbance value even when all of the dye has broken down. Although potential can be
recognised from the results massive ablation cannot be allowed to occur so more testing is
still required.
The final investigation into the method concerns the sintering technique, do we use a hot
plate, Carbolite oven or NIR? As shown by my previous results the hot plate is useful but is
limited to 600oC which is not desirable especially if the optimum temperature lies between
600oC and 800oC.The NIR is what is used to sinter the largest scale samples as it is the
easiest to sinter large samples within a short timeframe making it the most time efficient,
however when using the NIR we found it burnt/melted the GFM so further testing is
required into the viability of this process.
Page of9 14
Grout Samples Degradation Tests
10. TiO2 Coatings for Degradation of Organics by Photocatalysis
Results
The thermogravimetric analysis (TGA) results are shown below:
These results show that the in-house paste is very similar to the BASF sent paste, this lends
credibility to the results which are valid so the retests are not required.This was a positive
result.
Another method I used to confirm the accuracy of the results was to degrade acetone in
the Fourier transform infrared (FTIR) spectrometer.The acetone is degraded because it is
an organic compound like the dye, however the acetone is in a gaseous phase after
injection into the tubing of the machine.The same principle would apply that the faster the
acetone concentration reduced or the carbon dioxide concentration increased the more
effective the sample is. The graph below is to show how as time goes on the acetone is
degraded to carbon dioxide due to photocatalytic reactions after the activation of the
sample surface by UV photons.
Page of10 14
Water Loss
Polymer Binder Being Removed
TiO2 Remains TiO2 Remains
TGA Analysis BASF (left) vs. In-house (right)
Acetone Degradation Using FTIR
11. TiO2 Coatings for Degradation of Organics by Photocatalysis
The results for all the FTIR samples are shown below.As you can see the best sample is the
SSM that has been coated twice. I believe this is because the test is in the gaseous phase, a
thicker coating would improve the diffusion of the acetone within the sample for
degradation however with an aqueous organic this would be a disadvantage as a second
coat would be wasted
product. The four very
similar samples are the P25
on glass, SSM both one layer
of coating and two layers, and
the BASF P25, all have an
almost identical degradation
pattern. The differences are
so slight retesting must be
completed to allow certainty
in any conclusions drawn
between them. The four NIR
samples performed the
worst, this is a surprising
result as it seems to suggest
oven sintering is much more
effective than NIR sintering.
Again I will be cautious in any
conclusion drawn as these are preliminary results but certainly interesting ones.The poor
performance by the NIR samples could potentially be caused by too high NIR intensity that
caused damage to the substrate or has caused the P25 to turn partially to rutile which is
less photoactive which can happen at high temperatures. Alternatively, the intensity may
have been too low and not all of the polymer binder has been removed causing the surface
area of the P25 to be less than is achievable on the samples.
We saw earlier that the grout
samples we had made up gave us
the results we would expect, the
samples with a higher percentage
of P25 were more photoactive
but how did they compare to the
rest of our samples?
The Grout samples are shown in
orange where the other samples
are shown in grey. This clearly
shows the grout has been
outperformed by most of the
other samples. However this is
the first test done with the grout
so with a bit of optimisation this
method does show potential and
testing into it will continue.
Page of11 14
FTIR All Degradation Results
Grout vs. Other Degradation Testing
12. TiO2 Coatings for Degradation of Organics by Photocatalysis
The graph above shows a directly comparable test as the conditions were constant for all
of the samples I made. This is the major test I carried out during my project and it gives
clear and incredibly useful results. The SSM with P25 has outperformed all of the other
samples, next is also the SSM with anatase, so I can say with certainty that the SSM is the
best substrate to coat out of all the substrates used so far. Despite having the fastest initial
rate, third is the FSSM with P25 which comes in before both GFM samples. The final 4
samples are the grout samples.This means I can suggest that the order of effectiveness is;
the best sample is the SSM then FSSM followed by GFM and finally the grout. The other
comment I can make is that the adhesion of the coating to the substrate is excellent in the
SSM, FSSM and GFM samples as all of the samples have got close enough to zero that we
can be happy with them. Overall, the SSM with P25 has ultimately performed the best.
The next step is to measure and record the
results in a scaled up test, this is what I did by
running them in the SWET this time with a
different dye, brilliant yellow.The test was run
with three 220x100mm samples of each
substrate simultaneously. The results show a
familiar trend as again the SSM outperforms
the GFM which would go along with the
conclusion that the SSM with P25 is the best
substrate and coating combination.
Page of12 14
All Samples Comparable Degradation Testing
SWET Results
13. TiO2 Coatings for Degradation of Organics by Photocatalysis
Further Testing
A new type of coating was being experimented with as I finished my placement and testing
will continue on it into the future. I have initial results for sol-gel coatings and the results
are intriguing as they seem to outperform the P25 which is used as standard at the
moment. Sol-gels are solids produced by fabricating titanium oxides. Monomers are made
into a solution which acts as a precursor to the growth of a network of titanium dioxide
nano-structures.
Another test is in the pipeline where the dyes are tested in a salt solution to mimic sea
water as realistically the water that is going to be treated will not always be fresh or
distilled water.This brings in the question of rust, which obviously should not be a problem
with SSM and GFM. However, it must be tested to examine whether the samples will
behave in the same way.
Finally an exciting new development is the exploration of aerogels. I
was fortunate enough to be involved in an initial production of some
silicon dioxide aerogels during my placement. Aerogels are around
99.8% void space and the substance they are made from acts as a fine
scaffolding that has an incredibly high surface area, up to 3,000 square
metres per gram. That means a one cubic inch aerogel will have a
bigger surface area than a football field.They have been found to hold
up to 4,000x its own weight. They also have truly special thermal
properties. Due to its lightness it can be held by a blow torch flame
and it is such a good insulator, a flower sustains no damage.
Page of13 14
Sol-gel Testing
Aerogels
14. TiO2 Coatings for Degradation of Organics by Photocatalysis
The possibilities for aerogels are endless, however in photocatalysis they could
revolutionise water treatment as their surface area would increase the rate of degradation
ten fold.Whether they could be left as cylinders or crushed to a powder to adhere to a
substrate is unknown. However, the machine needed to make them costs $80,000 and
despite their relatively low cost to make the machinery is very expensive and it is a very
slow and inefficient batch process as an alcogel precursor must be made and solvent
exchanged with methanol for a week beforehand. In the vessel the methanol is exchanged
with liquid carbon dioxide at 100 bar pressure, the samples are then taken supercritical
before being degassed slowly to preserve the complex structure. The samples must be
taken supercritical because if the liquid to gas boundary is crossed then an aerogel will
splinter and be crushed under its own capillary forces. A supercritical fluid is a gas with
liquid properties.We believe a precursor has been found to form the alcogel required to
form a titanium dioxide aerogel, testing is set to commence shortly and the results are
eagerly anticipated.
Personal Experience
The placement for me has been invaluable and given me the opportunity to experience a
working lab. I have taken part in projects and experiments containing complex chemistry
and learned the practical things you cannot read in a text book about the workings of a
research environment. I must thank Dr. Ian Mabbett for handling the paperwork to allow
me to complete this project, but mostly Dr. Rachel Woods and Mr.Ashley Pursglove whose
passion for their project was infectious. I could not help but be drawn into the excitement
and enthusiasm that comes along with a project which has the potential to save many lives
and be very successful. I am sure this project will succeed and am proud to be able to say I
was a brief part of it. More than anything else though, it has re-affirmed my desire to follow
this field as it has shown me the possibility to make a real difference and revolutionise a
practise performed worldwide is available for those who are ready to work hard for it.
References
Treatment of Methyl Orange by Photocatalysis Floating Bed by Enqiang Wang, Qiaoli Zheng, Shihong Xu & Dengxin Li
Porous Titanium Dioxide Coatings Obtained by Anodic Oxidation for Photocatalytic Applications by Hernán Traid & MaríaVera
Effect of metal-doping of TiO2 nanoparticles on their photocatalytic activities toward removal of organic dyes by M. Khairy
Synthesis of Silica Aerogel by Supercritical Drying Method by Tomasz Błaszczyński ,Agnieszka Ślosarczyk & Maciej Morawski
Page of14 14
Aerogel Production - SupercriticalVessel & Aerogel Results