1. Do you want to make your Overview
Section look like a Whiteboard??
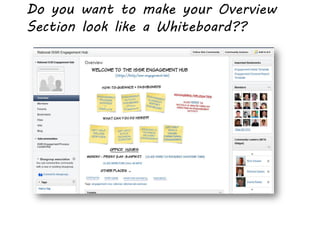
2. BASIC STEPS …
1. Start with a blank “whiteboard” – I start with a blank white page in
PowerPoint or Symphony
2. Using writing fonts (like the ones I’m using MV Boli or Frank the Architect)
and blank sticky images (you can use the ones I’ve shown here in this deck),
create a mockup page.
3. Using a screen capture tool, capture the image of your mockup page
4. Crop sections of your page and save each as an image. I have an example in
this deck showing the “sections” that I used. The main thing you will need
to think about is whether you want a link behind the image … like a sticky
image. So each sticky is it’s own image.
5. Make sure that the sizes of your entire whiteboard image will fit on your
page. I usually try and keep the entire whiteboard space less than 650px
wide. You can adjust the size of your images that you cropped using a
drawing tool (like Paint) I figure out the size of the whiteboard area and
adjust the size of each image by the same percentage.
6. Upload each image to your blog (in the File Uploads section as part of the
Settings) – this will give you a url for each image.
7. Build your whiteboard on a wiki page – adding one image at a time.
8. Add links to any images that you want to make hot
9. Copy and paste from wiki page to your overview section (Edit Community)
3. A STARTING POINT …
COMMUNITY BANNER SPACE
LINK 1 | LINK 2 | LINK 3 | LINK 4