Let’s get real: An introduction to AR, VR, MR, XR and more
VR Chess Game Allows Immersive Online Play
1. Applications in Virtual Reality Project
Brendan John Chinar Patil James Pieszala
ABSTRACT
In this paper we present an immersive virtual
environment that can be shared between multi-
ple users. Specifically a game of chess that can
be played between two users. To enter this vir-
tual environment a user puts on a virtual reality
headset, and uses gestures to interact with the
scene. This project is a small portion of a term
long project in an Applications in Virtual Real-
ity course offered at the Rochester Institute of
Technology (RIT).
1. INTRODUCTION
For this project we have developed a program
that allows two users to play chess with each
other in a virtual space. By this nature they
do not have to be in the same room physi-
cally, or even the same city. The program is
networked, allowing users to play with anyone
that has internet access. The game we chose to
build was chess, however with enough time and
effort most board games could be designed for
this system.
As mentioned before, the motivation for this
work is a term long virtual reality project. For
the project the class is given the challenge of
designing a virtual stage where performers, in-
struments, and the audience are integrated into
one common virtual space. While other stu-
dents are working on those other features our
group was tasked with designing a more im-
mersive virtual reality experience, using a head
mounted display (HMD) for 3D viewing and
other technologies to interact with the virtual
environment.
To accomplish this task we chose to implement
a chess game that can be played by two players
at two separate computers. Each user will have
a virtual reality headset to view the application
and a hand tracking device to input into the
application.
2. RELATED WORKS
To design our system we looked into the cur-
rently available technologies that could be used.
Specifically we researched the Oculus Rift head
mounted displays, Microsoft Kinect depth sen-
sor, and Leap Motion hand gesture device.
2.1 Interactive Technology
First, we looked into using a Microsoft Kinect
to put the player into the virtual space. This
might be useful for scanning a body part, or
tracking body movement, however for something
as small as hand and finger movements it might
not be accurate enough. Even with the Mi-
crosoft Kinect Version 2 few hand gestures can
be identified and individual fingers are not nec-
essarily tracked. Due to this we turned to the
Leap Motion device.
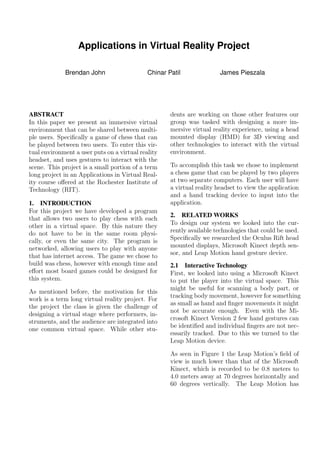
As seen in Figure 1 the Leap Motion’s field of
view is much lower than that of the Microsoft
Kinect, which is recorded to be 0.8 meters to
4.0 meters away at 70 degrees horizontally and
60 degrees vertically. The Leap Motion has
2. Figure 1: Shown is the field of view of a Leap Motion
Device.
range just under 3 feet, with significantly bet-
ter fields of view around the device. Because
it has a smaller range the level of detail in the
depth image is higher. Also, the Leap Motion
succeeds because it is designed specifically for
hand tracking. Due to this the Leap Motion
SDK provides a detailed 3D hand model than
can be used in our application.
Several papers have been published that look at
the performance of the Leap Motion. For ex-
ample, one paper reported that the Leap has an
inconsistent sampling rate, and error increases
as you move away from the sensor [4]. The Leap
Motion developers have looked for a threshold
to which latency will no longer be noticed, re-
porting a value around 30 ms [1]. This value
of course changes by person as it is based on
the users visual and nervous system. Based on
this work most of the latency in the program is
from the transferring of data through USB con-
nection. Overall, the Leap Motion still creates
a believable virtual reality experience.
2.2 Virtual Reality
Next, we looked into what head mounted dis-
plays we could possibly use for the project. Due
to it’s popularity we first looked into the Ocu-
lus Rift Dev Kit 1 and 2, and due to it’s cheap
price and versatility looked at the new Google
Cardboard.
The Oculus Rift was a natural choice due to
it’s performance, accessibility, and availability
of an SDK. The device first came out in 2012
and has been improved on ever since. Cur-
rently, the Dev Kit 2 is available for purchase
and provides many improvements over the orig-
inal including screen resolution, head tracking,
and even added a positional tracking compo-
nent. With the changes the device has become
more robust and leads to a much more immer-
sive experience.
Studies with the device are mostly centered on
latency and rendering time, as these are major
factors in believable virtual reality, while also
preventing motion sickness from using the de-
vice. Many have worked on optimizing the head
tracking portion of the device, as when the user
turns his head, the image needs to update fast
enough to accommodate this perceived move-
ment in the virtual scene. Specifically, this pa-
per cited a latency of around 20 ms being ideal
for a good virtual reality experience [6].
Also, optimization must be performed on the
rendering side of things. While a high resolu-
tion screen helps, the virtual scene being ren-
dered must have realistic lighting, and a high
level of detail to be perceived as a real scene.
This is possible with the help of many rendering
frameworks such as OpenGL and Direct X. For
example, an application designed to help users
with amblyopia, also known as a lazy eye, has
been used to help users to improve stereoscopic
vision and potentially correct other errors in vi-
sion [2]. This remains to be tested, however the
initial results with the application suggest the
rendering is realistic enough to make at least a
temporary difference in tricking the users visual
system.
3. SYSTEM DESIGN
Our system is designed to utilize 2 HMDs and 2
Leap Motion devices to encapsulate 2 users into
an interactive virtual space. To utilize these
technologies together an application is built us-
ing the Unity game engine. Our application is
built solely inside the Unity game editor.
3.1 Hardware Used
3. Figure 2: Pictured is a mapping of sampling as used
by a ray traced rendering in an Oculus Rift headset.
To create our virtual environment we utilized
2 Oculus Rift head mounted display. Currently
our system has been tested with an Oculus Rift
DK1 and an Oculus Rift DK2. However, any
combination of Oculus Rift HMD versions. The
main differences between these two versions is
the resolution of the display, and the tracking
of the HMD.
The Oculus Rift DK2 features improved ori-
entation tracking, as well as adding positional
tracking to the device. To perform this posi-
tional tracking a camera is placed on top of
the display, or anywhere with view of the head-
set. The camera feeds this data into the ap-
plication and movements such as leaning for-
ward/backward, and turning side to side are
reflected in the virtual space. This is a vast im-
provement on the Oculus Rift DK1 which fea-
tures orientation tracking only, reflecting which
way the user turns their head and nothing else.
Next, to perform hand tracking and gesture in-
put the Leap Motion device is used. This de-
cision was made due to quality and accuracy
of the 3D model produced, and the low latency
of the Leap Motion device. Also, a recently
released attachment for the Oculus Rift allows
the Leap Motion to be attached to the HMD,
and perform overhead hand tracking.
3.2 Software
Unity was selected for development due to its
ease of use, it features a free development ver-
sion, and compatibility with the selected virtual
reality hardware. Unity also features a robust
networking service, allowing easy set up of a
client based application [3, 5]. The Oculus Rift
SDK and Leap Motion SDK are also used to
create our application.
Unity features a full fledged rigid body physics
system, 3D scene construction, 3D animation,
and various other features needed to build a vir-
tual environment. Unity applications are cross
platform, which allows us to create Windows
and Mac versions of the application that can
interact with each other seamlessly. It also pro-
vides an IDE for editing code, and debugging
of the application as it is running.
The Oculus Rift features a publicly available
SDK, and a recently released plugin that works
with the free version of Unity. This allows the
Oculus Rift device to be integrated with an ap-
plication by simply replacing the scene camera
with an Oculus Rift camera object. By using
this plugin the rendering to the Oculus Rift is
handled by Unity, including the barrel distor-
tion effect necessary for a full stereoscopic ex-
perience. Best of all, this game object is inde-
pendent of which version of the Oculus Rift is
being used allowing for use with different com-
binations of Oculus Rift versions.
Next, the Leap Motion SDK is publicly avail-
able as with a Unity plugin for the device. The
Unity plugin allows us to access prefabricated
3D hand models provided with Leap Motion
example projects. These example projects also
feature code for pinching objects, hand gestures,
and other physics based functions. Scripts from
these projects were used as a building block for
our application.
3.3 Networking
Next, through the use of Unity networking we
developed a simple peer to peer application that
uses 2 designated clients. This allows us to have
1 player start the game, and then a player func-
tioning as the other client can connect and play.
This can be seen in Figure 3.
Information about where the 3D objects in the
4. Figure 3: Illustrated is the system design. 2 users
functioning as clients interact with each other over
a network to update game logic, and reflect changes
in the other player, and the other player’s pieces.
Locally each client handles rendering to the specific
Oculus Rift, and taking input from the Leap Motion
devices.
scene are is relayed between each instance via
Unity networking, using a function that ob-
serves movement of both the chess pieces, and
the 3D models of each player. Network calls
are defined that locally update the gameflow
and game logic data structures of each client.
4. IMPLEMENTATION
The game can be seen in Figure 4. The game
is setup such that both skeletons are playing a
game of chess against each other in a varying
3D environment.
4.1 Leap Motion Interaction
4.1.1 Chess Piece Pinching
Leap motion device has some inconsistencies in
holding on to objects. It happens that the ob-
ject slowly slides from the hand and thats not
what we want as it would ruin player experi-
ence. In some cases, if the piece has rigid body,
it flies away or does not fall on the correct lo-
cation. When there is no rigid body assigned
to a piece, it floats. Due to these factors it was
important to manipulate the pieces and make
them move where they are supposed to move.
So, in order to hold on to a piece until the player
wants to release it, we implemented a magnetic
pinch functionality. This was implemented in
one of the leap examples which we modified for
our purpose. On pinch gesture, the closest piece
to the pinch is accelerated towards the pinch
and it stays there until released. For the player
to know which piece would be picked, we change
the color of the piece that would be picked.
Figure 4: Views from each player, whos turn is in-
dicated by color of the 2 cylinders at the middle of
the table.
Figure 5: Pictured is the scene when moving a piece.
Illuminated tiles represent what spots are a valid
move.
After releasing a piece, it has to move to one
of its valid locations. When a piece is pinched,
all of its valid locations are highlighted and the
player can move to one of those locations. To
figure out on which location the piece would be
dropped on releasing, we change the color of
that location. This can be seen in Figure 5
4.1.2 3D Modeling
Modeling for this project focuses on what vir-
tual object representations are required to facil-
itate the virtual reality interactions and expe-
rience. In utilizing Leap Motion to track hand
movements it is obvious that some type of vir-
5. tual hand models will be required. Leap Unity
Assets that Leap Motion has made freely avail-
able, contains a number of hand models that
are either object rigged or skin rigged in mesh
models. Also contained in the Leap Unity tools
are basic auto rig scripts that interface the Leap
API with the Unity3D models. These supplied
modules work on the assumption that when the
hands enter the sensors range the models are in-
stantiated and correspondingly destroyed when
the hands leave. This supplied framework is
sufficient for a static camera view focusing on
the sensor range’s virtual space, as any hands
outside the sensor range cannot be seen anyway.
As this project is utilizing multiple roving views,
some type of persistence was desirable to pre-
vent the hand models from magically appear-
ing and disappearing in a participants camera
view. One solution that was considered was to
mount the Leap Motion device directly on the
front of the Oculus Rift; whereby, the hands
would always be tracked relative to the users
camera view. This technique however was in-
sufficient for our purposes because our applica-
tion is mostly focused on forward hand grabs
that would have suffered from occlusion. The
solution we chose was to instead have a de-
fault rest state for the hand models for when
the physical hands are not being tracked and
engage them accordingly when they are. This
solution also allows us the ability to model a
persistent avatar with certain rigged features
inferred from the hand and arm movements. In
order to accomplish this, it was immediately
evident that none of the Leap supplied models
would be able to be used, as none contain as
associated body avatar. Also the Leap inter-
face was reworked to allow for persistence by
reanimating static models as opposed to their
dynamic counterparts.
In choosing a suitable model we have restricted
our search to models with more anatomically
correct proportions so that they would map well
with the native Leap rigging. As an obvious
solution we have chosen a skeletal representa-
tion, shown in figure 6. In order to utilize the
Figure 6: 3D model of the skeleton
Leap template structure, each bone of the hand
shown in figure 7, had to be individually cen-
tered, scaled and oriented into the correspond-
ing Leap default bone settings. Once each bone
is registered into a hand template the Leap in-
terface animates each bone’s transform by its
native rigging algorithms. As for the rigging
of the rest of the skeleton, our present imple-
mentation has no data relating to these physi-
cal locations. As a workable solution we’ve as-
sumed that the player will be positioned at a
certain orientation relative the Leap sensor and
attached the upper bone between the tracked
lower arm and shoulder accordingly.
4.2 Oculus Rift
Integrating the Oculus Rift is fairly easy using
the Unity editor. Once the package is down-
loaded from the Oculus Rift developer site im-
porting it into a project is a menu selection
away. Once this is loaded into the project you
can add the HMD object into the scene. Once
added to the scene Unity handles all of the
stereoscopic rendering, head tracking, positional
tracking, and display functions. When building
executables Unity automatically builds a ”di-
rectToRift” version, and a normal version to be
used with the Oculus Rift direct mode and ex-
tend mode respectively.
6. Figure 7: 3D model of the hand
Next, the Oculus Rift package includes a few
sample Unity projects. From these projects a
GUI system is implemented, as seen in Figure
10. By default the HMD object will respond to
the key inputs of spacebar and R. Spacebar is
used to display the HUD, and R is used to reset
orientation of the camera. This means that the
direction the HMD is currently facing becomes
correspondent to the direction the HMD object
is facing in the Unity scene.
Environment spheres were added to facilitate
scene views for all Oculus camera movement.
Figure 8 displays the gesture to change the en-
vironment sphere; which is a touching of index
fingers.
4.3 Game Design
Since this is a two player game, there is no ar-
tificial intelligence implemented to move pieces
as it would have to be in a one player game.
To move the pieces to their valid locations we
use cubes, which are illuminated depending on
the piece picked. These cubes are instantiated
below the chess board at runtime and are in-
visible. Also, the cube closest to the pinched
piece is highlighted with a different color so the
player knows where the piece will be dropped
on releasing.
Figure 8: Scene Change Gesture: Touch Index Fin-
gers
Figure 9: Player Turn Gesture: Cross Hands
One of the player starts the server and the other
joins in. It is a turn based game, so while one
player is making his move, the other will not
be able to move his pieces. Player turns can be
changed either by crossing hands or by pinching
the cylindrical object to the right of the player.
Figure 9 show images in which the player turn
gesture is preformed.
A player cannot make two moves in the same
turn. If the player wants to change his move,
he can undo the previous move by turning both
hands over and then make the new move. He
can do this as long as it is his turn.
7. We have also implemented a reset function which
resets the board. All the pieces are moved back
to their starting positions. This is done by
pressing ’R’. The turn remains with the guy
who resets the board.
4.4 Networking
The networking model we’ve employed is ba-
sically peer-to-peer with a combination of au-
thoritative and non-authoritative networking tech-
niques. As this is a virtual reality application
any type of network lag associated with first
person movements is completely unacceptable;
and in this regard, a player’s movements must
be fully non-authoritative. This project also be-
ing an experiment in a shared virtual space, we
also need a certain level of synchronized physics
and game state. Due to network lag, no solu-
tion completely allows for both of these criteria
to be completely met without undesirable side
effects. To this end, we’ve chosen a solution
where players must take turns when interact-
ing with common game state objects (i.e. chess
pieces).
Using Unity3D’s built in networking the basic
connection between instances starts in a type
of client-server architecture. Any objects in-
stantiated on startup that are to be network
synchronized are owned and controlled by the
server only. In order for a client to obtain these
privileges for their objects it must first propose
a new network identifier and request the server
to re-designate each object as such. After the
server does so, the client is free to apply these
changes locally and gains an equal footing.
The graphical interface for starting peer-to-peer
setup can bee seen in Figure 10. Upon loading
the game a pop up menu can be summoned
with the spacebar. In this menu the user can
press S, to host a server themselves, or press H
to connect to an open server.
5. TEST CASES
As described in Section 3.2 Unity builds cross
platform applications, meaning both Windows
and Macs can play the game together. This was
one of our test cases, and was validated easily.
Figure 10: Menu for Oculus version used to start a
server, or join a host.
The next logical test case was to test out the
Unity networking feature. Originally we had
tested the application using 2 laptops, and the
university Wifi connection. Despite the fact the
Wifi connection is fast we still experienced lag.
We hypothesized that this was due to the lap-
tops themselves, however it was quickly discov-
ered that the Wifi network had caused a major-
ity of the latency. The current setup uses two
Windows 8 desktop machines, and has mini-
mal amounts of latency. Unfortunately, due to
Unity the game representation does not ”catch
up” to the other player once latency is expe-
rienced. For example, if one client is continu-
ously waving has hands around when latency
hits, and stops after 5 seconds, for the next 5
seconds his opponent gets a steady 5 seconds
of hand waving. This is not ideal, as when la-
tency hits the opponent might make a move,
which the user will then have to wait for in his
instance of the game before being able to start
his turn.
6. FUTURE WORKS
This project is merely one possible implemen-
tation in an endless sea of creative possibilities
for sharing virtual spaces. A couple of proposed
extensions on the present design are:
1. Realistic modeling with the continual im-
pressiveness of 3D scanned hands, arms,
and bodies with appropriate rigging.
2. Merging a body capture technique with the
Leap hand capture for full avatar tracking.
8. 3. Adding more functionality to the game logic
such as check mate and castling.
4. Integrate the application with the chess.com
game servers, allowing the user to play against
either a bot, or live person through TCP/IP.
5. Google Cardboard represents a novel so-
lution to allow users to experience virtual
reality without having to commit to a more
expensive head mounted display. Although
rendering speeds on phones will undoubt-
edly limit the visual complexity of scenes,
being wireless has its advantages.
6. Add more games and virtual environments.
7. CONCLUSIONS
Lastly, this implementation of chess is the first
in a list of possible environments and scenarios
for virtual reality. While this implementation is
only a simple game it provides the experience
of sharing a virtual environment with someone
who may or may not be in the same physical
location. This has many applications includ-
ing work meetings, virtual lectures, social talks,
and other scenarios. While this implementation
takes place in virtual reality, it does not hold
the effect that augmented reality would. Being
able to see a virtual representation of your pro-
fessor standing in front of a lecture hall would
have considerable effect as well. Overall this
environment has room to build, and results in
the future look promising due to the advances
in HMD and other interactive technology.
8. REFERENCES
[1] R. Bedikian. Understanding latency.
http://blog.leapmotion.com/
understanding-latency-part-1/, 2013.
[2] J. Blaha and M. Gupta. Diplopia: A
virtual reality game designed to help
amblyopics. In Virtual Reality (VR), 2014
iEEE, pages 163–164. IEEE, 2014.
[3] P. Games. Unity networking tutorial.
http:
//www.palladiumgames.net/tutorials/
unity-networking-tutorial/.
[4] J. Guna, G. Jakus, M. Pogaˇcnik,
S. Tomaˇziˇc, and J. Sodnik. An analysis of
the precision and reliability of the leap
motion sensor and its suitability for static
and dynamic tracking. Sensors,
14(2):3702–3720, 2014.
[5] T. Jokiniemi et al. Unity networking:
Developing a single player game into a
multiplayer game. 2014.
[6] S. M. LaValle, A. Yershova, M. Katsev,
and M. Antonov. Head tracking for the
oculus rift. In Robotics and Automation
(ICRA), 2014 IEEE International
Conference on, pages 187–194. IEEE, 2014.
![Figure 1: Shown is the field of view of a Leap Motion
Device.
range just under 3 feet, with significantly bet-
ter fields of view around the device. Because
it has a smaller range the level of detail in the
depth image is higher. Also, the Leap Motion
succeeds because it is designed specifically for
hand tracking. Due to this the Leap Motion
SDK provides a detailed 3D hand model than
can be used in our application.
Several papers have been published that look at
the performance of the Leap Motion. For ex-
ample, one paper reported that the Leap has an
inconsistent sampling rate, and error increases
as you move away from the sensor [4]. The Leap
Motion developers have looked for a threshold
to which latency will no longer be noticed, re-
porting a value around 30 ms [1]. This value
of course changes by person as it is based on
the users visual and nervous system. Based on
this work most of the latency in the program is
from the transferring of data through USB con-
nection. Overall, the Leap Motion still creates
a believable virtual reality experience.
2.2 Virtual Reality
Next, we looked into what head mounted dis-
plays we could possibly use for the project. Due
to it’s popularity we first looked into the Ocu-
lus Rift Dev Kit 1 and 2, and due to it’s cheap
price and versatility looked at the new Google
Cardboard.
The Oculus Rift was a natural choice due to
it’s performance, accessibility, and availability
of an SDK. The device first came out in 2012
and has been improved on ever since. Cur-
rently, the Dev Kit 2 is available for purchase
and provides many improvements over the orig-
inal including screen resolution, head tracking,
and even added a positional tracking compo-
nent. With the changes the device has become
more robust and leads to a much more immer-
sive experience.
Studies with the device are mostly centered on
latency and rendering time, as these are major
factors in believable virtual reality, while also
preventing motion sickness from using the de-
vice. Many have worked on optimizing the head
tracking portion of the device, as when the user
turns his head, the image needs to update fast
enough to accommodate this perceived move-
ment in the virtual scene. Specifically, this pa-
per cited a latency of around 20 ms being ideal
for a good virtual reality experience [6].
Also, optimization must be performed on the
rendering side of things. While a high resolu-
tion screen helps, the virtual scene being ren-
dered must have realistic lighting, and a high
level of detail to be perceived as a real scene.
This is possible with the help of many rendering
frameworks such as OpenGL and Direct X. For
example, an application designed to help users
with amblyopia, also known as a lazy eye, has
been used to help users to improve stereoscopic
vision and potentially correct other errors in vi-
sion [2]. This remains to be tested, however the
initial results with the application suggest the
rendering is realistic enough to make at least a
temporary difference in tricking the users visual
system.
3. SYSTEM DESIGN
Our system is designed to utilize 2 HMDs and 2
Leap Motion devices to encapsulate 2 users into
an interactive virtual space. To utilize these
technologies together an application is built us-
ing the Unity game engine. Our application is
built solely inside the Unity game editor.
3.1 Hardware Used](data:image/gif;base64,R0lGODlhAQABAIAAAAAAAP///yH5BAEAAAAALAAAAAABAAEAAAIBRAA7)