Accessing upload wizard from campaign detail page to add leads and import
•
0 gefällt mir•203 views

This document provides instructions for enabling the Data Import Wizard (DIW) to import leads for campaigns. It involves: 1) Creating a button on the campaign record detail page that links to the DIW with the campaign ID pre-populated. 2) Adding the new button to the campaign page layout. 3) Testing that clicking the button launches the DIW to import leads and associate them with the campaign.

Empfohlen
Weitere ähnliche Inhalte
Andere mochten auch
Andere mochten auch (16)
Ähnlich wie Accessing upload wizard from campaign detail page to add leads and import
Ähnlich wie Accessing upload wizard from campaign detail page to add leads and import (20)
Kürzlich hochgeladen
Kürzlich hochgeladen (20)
Accessing upload wizard from campaign detail page to add leads and import
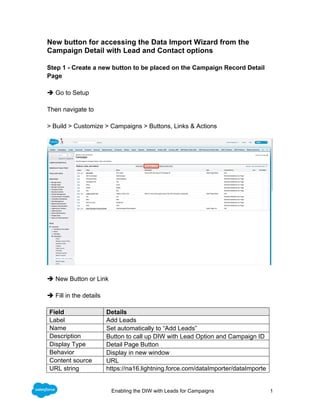
- 1. 1Enabling the DIW with Leads for Campaigns New button for accessing the Data Import Wizard from the Campaign Detail with Lead and Contact options Step 1 - Create a new button to be placed on the Campaign Record Detail Page è Go to Setup Then navigate to > Build > Customize > Campaigns > Buttons, Links & Actions è New Button or Link è Fill in the details Field Details Label Add Leads Name Set automatically to “Add Leads” Description Button to call up DIW with Lead Option and Campaign ID Display Type Detail Page Button Behavior Display in new window Content source URL URL string https://na16.lightning.force.com/dataImporter/dataImporte
- 2. 2Enabling the DIW with Leads for Campaigns r.app?objectSelection=Lead&isFromCampaignPage=true &{!Campaign.Id} Please note: You need to choose your instance to replace XXXX in the URL example used above. The instance of your org is represented by the first 4 characters of the URL, locate XXXX in this example URL: https://XXXX.lightning.force.com/dataImporter/dataImporter.app?objectSelection =Lead&isFromCampaignPage=true&{!Campaign.Id} " {!Campaign. ID} " represents an Insert Field and automatically selects the Campaign ID of the Campaign from which you call up the DIW with this button. Step 2 - Add the button to the Campaign Page Layout è Go to Setup Then navigate to: > Build > Customize > Campaigns > Page Layouts
- 3. 3Enabling the DIW with Leads for Campaigns è Select the Page Layout you want to edit è Select Buttons in the top left selection list The button “Add Leads” appears in the list of available buttons è Drag the button “Add Leads” to the section “Custom Buttons” on the Campaign Detail header
- 4. 4Enabling the DIW with Leads for Campaigns è Save Step 3 - Test the page layout and custom button è View the details of a Campaign èVerify the button “Add Leads” is available
- 5. 5Enabling the DIW with Leads for Campaigns è Click the button “Add Leads” The Data Import Wizard appears in a new window. è Start the import process to create new Leads and add them to a Campaign. è Perform one small data import to verify everything works properly. è Done!