Veneering - Movil
•Als PPTX, PDF herunterladen•
0 gefällt mir•472 views

2nd version android/ipad

Empfohlen
Weitere ähnliche Inhalte
Was ist angesagt?
Was ist angesagt? (12)
Andere mochten auch
Andere mochten auch (17)
Ähnlich wie Veneering - Movil
Ähnlich wie Veneering - Movil (20)
Kürzlich hochgeladen
Kürzlich hochgeladen (20)
Veneering - Movil
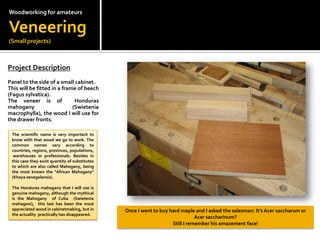
- 1. Woodworking for amateurs Veneering (Small projects) Project Description Panel to the side of a small cabinet. This will be fitted in a frame of beech (Fagus sylvatica). The veneer is of Honduras mahogany (Swietenia macrophylla), the wood I will use for the drawer fronts. The scientific name is very important to know with that wood we go to work. The common names vary according to countries, regions, provinces, populations, warehouses or professionals. Besides in this case they exist quantity of substitutes to which are also called Mahogany, being the most known the "African Mahogany" (Khaya senegalensis). The Honduras mahogany that I will use is genuine mahogany, although the mythical is the Mahogany of Cuba (Swietenia mahagoni), this last has been the most appreciated wood in cabinetmaking, but in Once I went to buy hard maple and I asked the salesman: It’s Acer saccharum or the actuality practically has disappeared. Acer saccharinum? Still I remember his amazement face!
- 2. Woodworking for amateurs Veneering (Small projects) Materials and tools
- 3. Woodworking for amateurs Veneering (Small projects) Wood to use Mahogany (Swietenia macrophylla) Veneer of 0.6 mm. Ilomba (Pycnanthus angolensis) 16 mm plywood. Is often popularly called "marine plywood" the veneer that form it are bonded with phenolic glue, that do it resistant to moisture. In the Manuel Soler’s website: http://www.xiloteca.com/ you can find related more than three thousand wood species, with his scientific and common names.
- 4. Woodworking for amateurs Veneering (Small projects) Interest rules • The board larger than the panel. • The veneer larger than the board. In this case, we can appreciate that a side of the board protrudes to the veneer. It doesn't fulfill the second rule of the billed, but I take one that I had in that size- At the end it was us useful, being able to cut it when we want.
- 5. Woodworking for amateurs Veneering (Small projects) Gluing utilities Glue Varnish roller Masking tape Transparent polyethylene film Glue: The more classic woodworkers will use hide glue in flakes, for afterwards melt it. The more restless will use contact adhesive. The more practical the "white glue" (PVA) . But I have chosen a special veneering glue. Masking tape: I have choose the blue, because it adheres less than the yellow, the risk that damage the wood is minimum. Transparent film: Yes, that! Yes, that! The one who we have in the kitchen.
- 6. Woodworking for amateurs Veneering (Small projects) Surface to glue We delimit the surface to glue. It’s necessary to avoid apply glue in the no covered part by the veneer. Afterwards it would cause us problems to the hour of press it.
- 7. Woodworking for amateurs Veneering (Small projects) Surface to glue We apply glue to the board. The special glue for veneer allows us work calm.
- 8. Woodworking for amateurs Veneering (Small projects) Surface to glue With the varnish roller we extend the glue. The use of the roller facilitates a lot this work. I learned this practical gluing method watching a video of Steve Latta, a renowned teacher of woodworking in the USA. Very entertaining!
- 9. Woodworking for amateurs Veneering (Small projects) Surface to glue We must achieve a uniform coat. As you can see, the glue covers the whole of the surface to veneer.
- 10. Woodworking for amateurs Veneering (Small projects) Trick If we wrap well the roller with transparent film, we will avoid that it dry during a month at least.
- 11. Woodworking for amateurs Veneering (Small projects) Gluing We put the veneer on the board already glued. The veneer is placed so that it protrudes by as many edges as possible.. As you can see, it looks a little of glue. No problem!
- 12. Woodworking for amateurs Veneering (Small projects) Warning We must avoid that the board will bond to that we use for pressing. The polyethylene film prevents bleeding through the open grain, our panel can be bond to the board use for pressing. Be careful! Este truco lo he visto en … ¡ no me acuerdo!
- 13. Woodworking for amateurs Veneering (Small projects) Pressing Tools 4 1 - Plywood of equal or greater size 3 than the future panel. 2 - Strong strips, in this case they are of beech (Fagus sylvatica). 3 - Bench Holddowns. 2 4 - Bar clamps. 1
- 14. Woodworking for amateurs Veneering (Small projects) Pressing Now, we press the panel between a board and the workbench surface. Pressing time depends of the glue used. Consult the product label.
- 15. Woodworking for amateurs Veneering (Small projects) Pressing If we do not have a workbench or some holddowns, this is a good alternative: the panel is pressed between two thick boards. We will use six bar clamps and six wooden strips. Here I've used quick clamps, but I prefer the traditional bar clamps.
- 16. Woodworking for amateurs Veneering (Small projects) After the pressing time, the board is thus ready for the next steps.
- 17. Woodworking for amateurs Veneering (Small projects) Removing the excess 1st part In this section we proceed to remove A2 the A1 and A2 excess. A1
- 18. Woodworking for amateurs Veneering (Small projects) Removing the excess 1st part (Tools) Mallet Chisel The chisel very sharpened and better when wider, because we will do fewer cuts and we will get a better finish. In this task I used one of 40 mm, about 1 ½”. This is the link of my friend’s video Julio Alonso, where you can see the better mode I know to sharpen a chisel. http://www.youtube.com/watch?v=fG1VjV-ZtOA
- 19. Woodworking for amateurs Veneering (Small projects) Removing the excess 1st part Place the blade on the remainder. Pressed the blade with your index finger against the edge of the board, so the cut can be flatter. With thumb and index finger control the verticality of the tool.
- 20. Woodworking for amateurs Veneering (Small projects) Removing the excess 1st part A blow with the mallet. A workbench covered with wounds, is a sign of experience, but the wrinkles on the face too. For this reason I prefer to look after it, within an order, for it has time to grow old. I have placed the cut surface over a board, plywood of course, I keep it for these cases.
- 21. Woodworking for amateurs Veneering (Small projects) Removing the excess 1st part Here we can see the surplus as follows. Blow by blow we will finish the edge.
- 22. Woodworking for amateurs Veneering (Small projects) nd Removing the excess 2 part (Tools): Top table saw. 1 I will use a small top table saw, the cutting height is just over 2 cm (about 3/8”), so it is suitable for small projects and modeling. Nothing else! I've had to adapt a homemade fence (1) to extensible Guide (2). Of origin it can only make cuts about 10 cm (about 4”) width, in this case we need 24.6 cm (about 9 11/16”). 2
- 23. Woodworking for amateurs Veneering (Small projects) Removing the excess B2 2nd part With the chisel, we have cut the excess in the cross direction of the grain. Sides A1 & A2. A1 A2 With the saw, we will do it in the right direction of the grain. Sides B1 and B2. B1
- 24. Woodworking for amateurs Veneering (Small projects) Removing the excess 2nd part B1 As you can see, on this edge the veneer protrudes above and under, so with the chisel we don’t work well, on the first face we will work with the tool angle and would not be straight edge.
- 25. Woodworking for amateurs Veneering (Small projects) Removing the excess 2nd part B2 You can see that with a cut removes the two remaining. B1 By having a edge without veneer (B2), we have a perfect support on the fence and therefore a straight sawing.
- 26. Woodworking for amateurs Veneering (Small projects) Removing the excess 2nd part When we will remove the extra edge (B2), the panel will be the final width.
- 27. Woodworking for amateurs Veneering (Small projects) Removing the excess 2nd B1 part We sawed flat on the side B1.
- 28. Woodworking for amateurs Veneering (Small projects) END OF TASK Here is our finished panel.