1. 531
Automated Tasks
En Linux, las tareas pueden configurarse para que se ejecuten de forma automática en un período de
tiempo concreto y en las fechas indicadas o cuando el promedio de carga del sistema está por debajo
de un número dado. Red Hat Enterprise Linux es preconfigurado para ejecutar determinadas tareas
del sistema de modo que éste se mantenga actualizado. Por ejemplo, la base de datos slocate
utilizada por el comando locate,se actualiza diariamente. Un administrador del sistema puede
utilizar las tareas automáticas para realizar copias de seguridad periódicas, controlar el sistema y
ejecutar scripts personalizados, entre otras tareas.
Red Hat Enterprise Linux contiene varias utilidades de tareas automáticas: cron, at y batch.
35.1. Cron
Cron es un demonio que sirve para ejecutar tareas programadas según una combinación de la hora,
día del mes, mes, día de la semana y semana.
Cron assumes that the system is on continuously. If the system is not on when a task is scheduled, it
is not executed. To schedule one-time tasks, refer to Sección 35.2, “At y Batch”.
Para usar el servicio cron, debe de tener el paquete RPM vixie-cron instalado y el servicio crond
debe estar en funcionamiento. Para determinar si el paquete está instalado,use el comando rpm -
q vixie-cron. Para determinar si el servicio está funcionando, utilice el comando /sbin/service
crond status.
35.1.1. Configuración de una tarea Cron
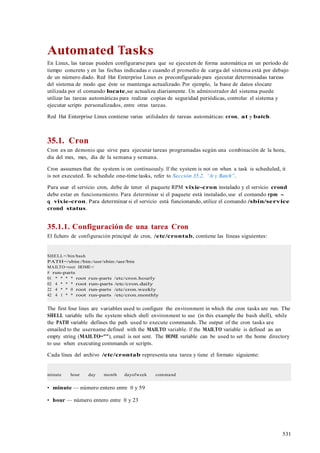
El fichero de configuración principal de cron, /etc/crontab, contiene las líneas siguientes:
SHELL=/bin/bash
PATH=/sbin:/bin:/usr/sbin:/usr/bin
MAILTO=root HOME=/
# run-parts
01 * * * * root run-parts /etc/cron.hourly
02 4 * * * root run-parts /etc/cron.daily
22 4 * * 0 root run-parts /etc/cron.weekly
42 4 1 * * root run-parts /etc/cron.monthly
The first four lines are variables used to configure the environment in which the cron tasks are run. The
SHELL variable tells the system which shell environment to use (in this example the bash shell), while
the PATH variable defines the path used to execute commands. The output of the cron tasks are
emailed to the username defined with the MAILTO variable. If the MAILTO variable is defined as an
empty string (MAILTO=""), email is not sent. The HOME variable can be used to set the home directory
to use when executing commands or scripts.
Cada línea del archivo /etc/crontab representa una tarea y tiene el formato siguiente:
minute hour day month dayofweek command
• minute — número entero entre 0 y 59
• hour — número entero entre 0 y 23
2. 532
Control de acceso a Cron
• day — número entero entre 1 y 31 (debe ser un día válido si se especificaun mes)
• month — número entero entre 1 y 12 (o nombre corto del mes, por ejemplo, ene, feb, etc.)
• dayofweek — número entero entre 0 y 7, donde 0 o 7 corresponde a Domingo (o el nombre corto
del día de la semana, por ejemplo, dom, lun, etc.)
• command — the command to execute (the command can either be a command such as ls /proc
>> /tmp/proc or the command to execute a custom script)
En cualquiera de los valores antes indicados,se puede utilizar un asterisco (*) para especificar
todos los valores válidos. Por ejemplo, un asterisco para el valor de mes significa que el comando se
ejecutará cada mes dentro de las limitaciones del resto de los valores.
Un guión (-) entre los números enteros indica un intervalo de números enteros. Por ejemplo, 1-4
significa los números enteros 1, 2, 3 y 4.
Una lista de valores separados por comas (,) especifica una lista. Por ejemplo, 3, 4, 6, 8 indica
esos cuatro números enteros.
The forward slash (/) can be used to specify step values. The value of an integer can be skipped within
a range by following the range with /<integer>. For example, 0-59/2 can be used to define every
other minute in the minute field. Step values can also be used with an asterisk. For instance, the value
*/3 can be used in the month field to run the task every third month.
Las líneas que empiezan por almohadilla o símbolo numeral (#) son comentarios y no se procesan.
Como se muestra en el archivo /etc/crontab, el script run-parts ejecuta los scripts en
los directorios /etc/cron.hourly, /etc/cron.daily, /etc/cron.weekly, y /etc/
cron.monthly cada hora, diariamente, semanalmente o mensualmente, respectivamente. Los
archivos en estos directorios deben ser scripts de shell.
If a cron task is required to be executed on a schedule other than hourly, daily, weekly, or monthly, it
can be added to the /etc/cron.d/ directory. All files in this directory use the same syntax as /etc/
crontab. Refer to Ejemplo 35.1, “Ejemplos de Crontab” for examples.
# record the memory usage of the system every monday
# at 3:30AM in the file /tmp/meminfo
30 3 * * mon cat /proc/meminfo >> /tmp/meminfo
# run custom script the first day of every month at 4:10AM
10 4 1 * * /root/scripts/backup.sh
Ejemplo 35.1. Ejemplos de Crontab
Users other than root can configure cron tasks by using the crontab utility. All user-defined crontabs
are stored in the /var/spool/cron/ directory and are executed using the usernames of the users
that created them. To create a crontab as a user, login as that user and type the command crontab
-e to edit the user's crontab using the editor specified by the VISUAL or EDITOR environment
variable. The file uses the same format as /etc/crontab. When the changes to the crontab
are saved, the crontab is stored according to username and written to the file /var/spool/
cron/username.
El demonio cron controla el fichero etc/crontab, el directorio etc/cron.d/ y el directorio /var/
spool/cron cada minuto para cada cambio. Si se encuentra algún cambio, estos se cargan en la
memoria. De este modo, el demonio no necesita ser reiniciado si se cambia un fichero crontab.
3. 533
Control de acceso a Cron
35.1.2. Control de acceso a Cron
Los ficheros /etc/cron.allow y /etc/cron.deny se usan para restringir el acceso a cron. El
formato de los dos ficheros de acceso es un nombre de usuario en cada línea. No está permitido
espacio en blanco en ninguno de los ficheros. El demonio cron (crond) no deberá ser reiniciado si los
ficheros de control de acceso se modifican. Los ficheros de control de acceso se leen cada vez que el
usuario intenta añadir o borrar una tarea cron.
El usuario root puede utilizar siempre cron, sin prestar atención a los nombres de usuarios listados en
los ficheros de control de acceso.
Si existe el fichero cron.allow, tan sólo se permitirá a los usuarios presentes en la lista utilizar cron
y el fichero cron.deny se ignorará.
Si cron.allow no existe, a todos los usuarios listados en cron.deny no se les permite usar cron.
35.2. At y Batch
Mientras que cron es utilizado para programar tareas recurrentes, el comando at se usa para
programar una única tarea en un tiempo específico. El comando batch se usa para programar que
se ejecute una única tarea cuando la carga promediode los sistemas esten por debajo de 0.8.
Para poder usar at o batch debe tener el paquete RPM at instalado y el servicio atd en
funcionamiento. Para determinar si el paquete está instalado, utilice el comando rpm -q at. Para
determinar si el servicio se está ejecutando,utilice el comando /sbin/service atd status.
35.2.1. Configuración de tareas
Para programaruna tarea no repetitiva en un tiempo específico, escriba el comando at time, en el
que time es el tiempo para ejecutar el comando.
El argumento time puede ser uno de los siguientes:
• Formato HH:MM — Por ejemplo,04:00señala las 4:00AM. Si se inserta el tiempo, se ejecuta en la
hora específica del siguiente día.
• midnight — Especifica 12:00 a.m.
• noon — Especifica 12:00 p.m.
• teatime — Especifica las 4:00 p.m.
• Formato del nombre-mes, día y año — Por ejemplo, Enero 15 del año 2002. El año es opcional.
• Formato MMDDYY, MM/DD/YY, o MM.DD.YY — Por ejemplo, 011502 para el día 15 de Enero del
2002.
• now + time — el tiempo está en minutos, horas, días o semanas. Por ejemplo, now + 5 días,
especifica que el comando debería ser ejecutado a la misma hora en 5 días.
The time must be specified first, followed by the optional date. For more information about the time
format, read the /usr/share/doc/at-<version>/timespec text file.
After typing the at command with the time argument, the at> prompt is displayed. Type the command
to execute, press Enter, and type Ctrl+D . Multiple commands can be specified by typing each
4. 534
Control de acceso a Cron
command followed by the Enter key. After typing all the commands, press Enter to go to a blank line
and type Ctrl+D . Alternatively, a shell script can be entered at the prompt, pressing Enter after each
line in the script, and typing Ctrl+D on a blank line to exit. If a script is entered, the shell used is the
shell set in the user's SHELL environment, the user's login shell, or /bin/sh (whichever is found first).
Si la configuración de comandos o el script intentan visualizar información, la salida de datos será
enviada vía correo electrónico al usuario.
Use the command atq to view pending jobs. Refer to Sección 35.2.3, “Visualización de las tareas
pendientes” for more information.
Usage of the at command can be restricted. For more information, refer to Sección 35.2.5, “Control
de acceso a At y Batch” for details.
35.2.2. Configuración de tareas Batch
Para ejecutar una tarea no repetitiva cuando el promedio de carga está por debajo de 0.8, utilice el
comando batch.
After typing the batch command, the at> prompt is displayed. Type the command to execute, press
Enter, and type Ctrl+D . Multiple commands can be specified by typing each command followed by
the Enter key. After typing all the commands, press Enter to go to a blank line and type Ctrl+D .
Alternatively, a shell script can be entered at the prompt, pressing Enter after each line in the script,
and typing Ctrl+D on a blank line to exit. If a script is entered, the shell used is the shell set in the
user's SHELLenvironment, the user's login shell, or /bin/sh (whichever is found first). As soon as
the load average is below 0.8, the set of commands or script is executed.
Si la configuración de comandos o el script intentan visualizar información, la salida de datos será
enviada vía correo electrónico al usuario.
Use the command atq to view pending jobs. Refer to Sección 35.2.3, “Visualización de las tareas
pendientes” for more information.
Usage of the batch command can be restricted. For more information, refer to Sección 35.2.5,
“Control de acceso a At y Batch” for details.
35.2.3. Visualización de las tareas pendientes
Para visualizar las tareas pendientes at y batch, use el comando atq. Muestra una lista de las
tareas pendientes, con cada trabajo en una línea. Cada línea sigue el formato de número de tarea,
la fecha, la hora, el tipo de tarea y nombre de usuario. Los usuarios tan sólo pueden ver sus propias
tareas. Si el usuario root ejecuta el comando atq, se visualizarán todas las tareas de todos los
usuarios.
35.2.4. Opciones adicionales de la línea de comandos
Opciones adicionales de la línea de comandos para at y batch incluyen:
Opciones Descripción
-f Lee los comandos o script del shell desde un archivo en vez de ser
especificados en el intérprete de comandos.
-m Envía un email al usuario cuando se ha completado la tarea.
5. 535
Control de acceso a Cron
Opciones Descripción
-v Muestra la hora en la que la tarea será
ejecutada. Tabla 35.1. Opciones de línea de comandos at y batch
35.2.5. Control de acceso a At y Batch
Los ficheros /etc/at.allow y /etc/at.deny pueden ser usados para restringir el
acceso a los comandos at y batch. El formato de ambos ficheros de control de acceso es
un nombre de usuario en cada línea. El espacio en blanco no está permitido en ningún
fichero. El (atd) demonio at no deberá ser reiniciado si los ficheros de control de acceso
son modificados. Los ficheros de control de acceso se leen cada vez que un usuario intenta
ejecutar los comandos at y batch.
El usuario root siempre puede ejecutar los comandos at y batch, sin tener en cuenta los
ficheros de control de acceso.
Si existe el fichero at.allow tan sólo se permitirá a los usuarios listados usar at o
batch y el fichero at.deny será ignorado.
Si at.allow no existe, a los usuarios listados en at.deny no se les permitirá usar at o
batch.
35.3. Recursos adicionales
Para obtener más información sobre cómo configurar tareas automáticas, consulte los
recursos siguientes.
35.3.1. Documentación instalada
• Página del manual decron — descripción general de cron.
• Páginas del manual de crontab en las secciones 1 y 5 — la página del manual de la
sección 1 contiene una descripción del fichero crontab. La página del manual de la
sección 5 contiene el formato del fichero y algunos ejemplos de entradas.
• /usr/share/doc/at-<version>/timespec contains more detailed information about
the times that can be specified for cron jobs.
• Página de manual at — descripción de at y batch y las opciones de la línea de comandos.