Weitere ähnliche Inhalte
Ähnlich wie Monomal doc (20)
Monomal doc
- 1. Monomal
documentation
v.3.72
developped by Anomes and
Concept
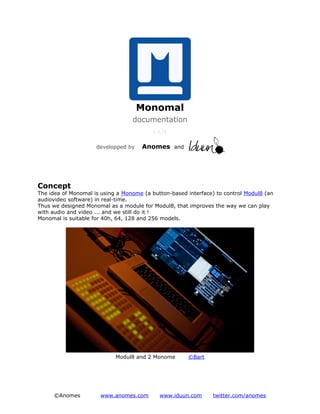
The idea of Monomal is using a Monome (a button-based interface) to control Modul8 (an
audiovideo software) in real-time.
Thus we designed Monomal as a module for Modul8, that improves the way we can play
with audio and video ... and we still do it !
Monomal is suitable for 40h, 64, 128 and 256 models.
Modul8 and 2 Monome ©Bart
©Anomes www.anomes.com www.iduun.com twitter.com/anomes
- 2. Table of contents
1. Press Start .......................................................................................... 3
2. The graphic interface .......................................................................... 4
The Media tab .................................................................................... 4
The Settings tab................................................................................. 5
The Help tab ...................................................................................... 5
The About tab .................................................................................... 6
3. Use your Monome ! ............................................................................. 8
Pagination ......................................................................................... 8
Media Page ........................................................................................ 9
MLR Page .......................................................................................... 9
Group-Loop Page............................................................................... 10
Sequencer Page ................................................................................ 11
Color Page........................................................................................ 12
Effects Page...................................................................................... 13
4. Settings ............................................................................................ 15
Monome ........................................................................................... 15
Monomal .......................................................................................... 16
Connection ....................................................................................... 16
5. Partition mode .................................................................................. 18
Create your partition.......................................................................... 19
Record audiovideo loops ..................................................................... 20
©Anomes www.anomes.com www.iduun.com twitter.com/anomes
- 3. Press Start
First of all, you need to get a authorized version of Modul8 : the demo version will not work
because it cannot access the online library. Please contact us at contact@anomes.com if you
only have the demo version : we will send you the module without using the online library.
You need an internet connection as well.
Note : you do not need a Monome to test Monomal, as you can use a module that creates a
virtual Monome.
Before you start playing around, here are the steps to launch everything :
1. If you have a Monome, plug in it
2. Launch Modul8
3. In the menubar, choose Modules > Online Library ... > Public Library
4. Install the Monomal module
5. If you do not have a Monome, install the Virtual Monome module as well
Note : When a newer version of Monomal will be available, you will be notified.
Note : The settings of the module are saved in the Modul8 project file (so you can have a
different settings on each project).
©Anomes www.anomes.com www.iduun.com twitter.com/anomes
- 4. The graphic interface
Once you got the module, you see 4 tabs.
The Media tab
This tab has 2 modes : mediaset and partition.
The mediaset mode one gives you an overview of your mediasets (each quarter is a
mediaset). The partition mode is explained in a following chapter.
This tab contains as well the BPM pie that matches the tempo of you music or your visual
(or both). You can reset the BPM by clicking on the pie and change it by entering a value in
the field beside. On the next chapter, you will see how to "tap" the BPM.
Mediaset 1
©Anomes www.anomes.com www.iduun.com twitter.com/anomes
- 5. The Settings tab
This tab is totally explained in a following chapter. Here, you can tweak the module.
The Help tab
This is a very important one !
It tells you which feature of Monomal you are currently using, and shows you how the
buttons of your Monome are mapped.
©Anomes www.anomes.com www.iduun.com twitter.com/anomes
- 6. The About tab
From this tab, you see the version number of Monomal.
But you can also donate or request a feature ! Even visit www.anomes.com :)
By the way, press the Changelog button to get an history of the module ...
©Anomes www.anomes.com www.iduun.com twitter.com/anomes
- 7. ©Anomes www.anomes.com www.iduun.com twitter.com/anomes
- 8. Use your Monome !
Pagination
Monomal uses a pagination system, where each page represents a configuration of the
Monome, and controls a different aspect of Modul8 (speed, color, media, ...).
Only the last line of the Monome remains always the same and is used for the pagination
system (and fader and BPM).
Look on the help tab : you can change the page with the buttons colored in red. Each time
you change the page, the help tab is updated.
If you press a button a bit longer than normal, when releasing it, you will come back to the
previous page : it is exactly like on OS X Exposé !
Buttons that change the page on your Monome
Next to the pagination buttons, you got the fader button.
Modul8 has two groups of layer : A and B. You can choose to superpose them or to mix
from one to the another one with the Modul8's crossfader. You can press the fader button
(see the green one on the help page) to use the group A or the group B.
The fader button
Modul8's crossfader
And next to the fader button, you got the BPM button.
This button is blinking and follows the tempo set in the media tab (the BPM pie). You can
set the BPM by "tapping" the tempo on the button.
The BPM button The BPM pie
©Anomes www.anomes.com www.iduun.com twitter.com/anomes
- 9. Media Page
And the corresponding mediasets
(the last line is not used)
This page assignes media to layer : the first quarter of buttons assignes media to first layer
and so on. However, if you used the fader button and if the group B is selected, the first
quarter will assignes media to the first of the group B (the sixth layer in total).
First, the mediaset 1 to 4 are displayed in the media tab : if you want to use the mediaset 5
to 8, press the ad hoc button :
MLR Page
©Anomes www.anomes.com www.iduun.com twitter.com/anomes
- 10. This page controls the first 4 layers : group A or group B depending on the position of the
Modul8's crossfader.
Controlling the time position is very simple. The line of the buttons represents the timeline :
if you press the first button of the line, the media goes to the beginning, if you press the
fifth button, the media goes to the middle, and so on. It allows you to jump quickly to a
time position, and event play with sound : it is called MLR.
Controling alpha and speed is also very simple : every column controls the alpha or the
speed of one layer. If you press a lower button, the alpha or speed decreases, if you press a
higher button, it increases.
Note : you wil notice that if you let your finger on a alpha or speed button, the value
increases (or decreases) slowly, whereas if you release the button, the value moves shortly.
You will see in the next chapter how to set up this.
Group-Loop Page
©Anomes www.anomes.com www.iduun.com twitter.com/anomes
- 11. First of all, you can make loops from this page. Press 2 buttons simulteanously on the same
line and itt will set the media's in/out points (depending on the order you pressed the
buttons, the media will go backwards or forwards) :
Secondly, you can change the selected layerset of group A or B (fifth and seventh lines) or
use the Modul8's crossfader in a more accurate fashion than the fader button (sixth line).
The selected layerset of group A or B
Modul8's crossfader
Sequencer Page
©Anomes www.anomes.com www.iduun.com twitter.com/anomes
- 12. Ho, this one is fun !
First, assign media to your layers : each line of the sequencer represents a layer (so you
can use the entire group A or B). Then create a pattern and press the on/off button : you
will see the line called timeline going forward.
The sequencer is synchronized with the BPM : try to tap a new BPM and see the effects.
You can also play with the timeline by pressing a button of it : you will play with the
sequencer pattern exactly the same you do with the media's timeline in MLR page.
Once you got a nice pattern, you can save it : select the right memory slot and press the
save slot button. To load it again, press the load slot button.
When you finish playing with the sequencer, press the on/off button to stop it.
Color Page
©Anomes www.anomes.com www.iduun.com twitter.com/anomes
- 13. The Modul8's colors
Use this page to change the color of your layer in a very fluid fashion.
First of all, choose your layer with the buttons on the right.
Then, you can substract (top colors) or add (bottom) color to this layer : each time you
choose a color, Monomal does an interpolation to reach this color, so it does seems jerky.
You can set the speed of this interpolation with the interpolation time buttons.
Effects Page
©Anomes www.anomes.com www.iduun.com twitter.com/anomes
- 14. This page is experimental : it apply various effects on your layer. The effects are
synchronized with the BPM.
First of all, choose your layer with the buttons on the right.
Now you can apply 5 types of effects to this layer :
• Repeat : it repeats a short part of the media (the lower is the button, the shorter is
the part)
• Blur : it blurs the layer (the first 3 buttons blurs with 'Fast X' method, the 4 others
with the 'Box' method)
• Cut : it sets the alpha alternatively to 1 and 0 (the first button cuts when pressing
it, the second removes the cut effect, the 5 others cuts synchronously with the BPM)
• Scratch : it interpolates the speed to zero or backwards (the first 3 buttons
interpolates the speed to zero, the 3 following interpolates the speed backwards,
and the last one sets the direction backwards or forwards)
• Light : it flashes or blinks the layers (the first 3 buttons flashes, the 4 others blinks)
If you cannot understand these definitions, the best is to test these effects.
©Anomes www.anomes.com www.iduun.com twitter.com/anomes
- 15. Settings
In the Settings tab, you can tweak Monomal.
At any time, you can reset the settings by using the reset settings button :
Monome
In this part, you can choose the size of your Monome : each size has optimized pages.
The last 2 choices (installations) are special set ups for Iduun.
Exemple of a page for a Monome 128
The button /sys/prefix/40h is used change the prefix in MonomeSerial. But you probably do
not need to click on it.
©Anomes www.anomes.com www.iduun.com twitter.com/anomes
- 16. Monomal
This part sets the behavior of Monomal
The 'force position' feature is useful when playing in 8/3 format. Otherwise, it should be
disabled. It forces the layers 1 and 3 to be aligned on left, and layers 2 and 4 to be aligned
on the right. It is very useful when playing with both 4/3 and 8/3 movies.
The 'speed is BPM controlled' feature will synchronize the speed with the BPM. The more you
increase the BPM, the more the speed increases.
The 'press' and 'release time interpolation' bars defines the time that Monomal takes, to set
a value from 0 to 1 when pressing or releasing a button.
The 'fading MLR' feature can be activated or disactivated on each layer. It will fade out the
layer when releasing a button on the MLR page, and fade in it when pressing a button.
The 'MLR reset speed' feature can be activated or disactivated on each layer. It resets the
speed each time you press a button on the MLR page.
The 'Fading press' feature can be activated or disactivated on each quarter on the Media
page. It will fade out the corresponding layer when releasing a button on the Media page,
and fade in it when pressing a button.
Connection
There is 2 way of connection your Monome(s) : directly or through OSC.
©Anomes www.anomes.com www.iduun.com twitter.com/anomes
- 17. If you use direct connection, plug your Monome then click on the 'Refresh' button : your
Monome appears in the list and you can configure it.
If you use OSC connection, plug your Monome then run MonomeSerial or Serial-Pyio. You
should not change the other parameters, unless you know what you do.
©Anomes www.anomes.com www.iduun.com twitter.com/anomes
- 18. Partition mode
Partition is an experimental feature for live performance that can be sequenced.
The principle is simple : you can divide your performance in up to 8 parts. These parts are
your partition.
Each part is a special configuration of media. Each quarter is linked to a layer (like with the
normal Media page).
When you finish the first part of your performance, you switch to the second part with the
needed configuration of media. And so on.
In addition, you can record and play audiovideo loops. These ones can be based on the BPM
or not.
©Anomes www.anomes.com www.iduun.com twitter.com/anomes
- 19. Create your partition
First of all, activate the partition mode in the media tab :
Then build every part of your partition by drag'n droping media from the small mediasets to
the partition. Use the preview checkbox to view in the output what you selected.
When you finished with a part, go to the next one with the part selector :
You can also copy, cut and paste part with the ad hoc buttons :
©Anomes www.anomes.com www.iduun.com twitter.com/anomes
- 20. Record audiovideo loops
Once you partition is set, use it like you do with the normal media page and switch from one
to another part.
However, you notice that you got two more buttons for audiovideo loops : record and play.
After pressing the record button, this one will blink : it means it is recording everything
about layer (selected media and alpha, speed, time-position values). To stop recording the
loop, just press record again or the play button.
After pressing the play button, this one will blink as well, meaning that the loop is currently
playing : now you can play with the alpha, speed or time-position of the loop with the MLR
page. To stop playing the loop, just press play again.
To get accurate timing on loops, you can synchronize them with the BPM.
Set the quantize option to start recording or playing the loops on the beat.
Set the record size option to record a time-fixed loop.
If you activate the loop set BPM option, you will need to set record size to value different
than 'none' : after you recorded a loop, Monomal will calculate the right BPM of the loop.
©Anomes www.anomes.com www.iduun.com twitter.com/anomes