SlideShare ist ein Scribd-Unternehmen logo
1 von 14
Downloaden Sie, um offline zu lesen
Securing Windows Remote Desktop with CopSSH
                                     Presented by DrNathan@teamhackaday.com
                     If you enjoyed this article, please consider joining our Folding@Home team

I like having the ability to remotely access my PC at home while I am away in case I want to grab an important file I have
left there, or if I need to finish something I didn’t quite get around to. For ages I simply set port forwarding on my router
allowing port 3389 to be directed to my desktop PC, which let me connect to my computer using Microsoft Remote
Desktop Protocol (RDP). While this was not the most secure method of doing so, it worked, and I did not want to change
how I did things.

That’s not to say that RDP is not secure – it does use 128 bit RC4 according to Microsoft. However, with man-in-the-
middle attacks being relatively easy to carry out, I thought there had to be a better (and more secure) way of connecting to
my oh so precious home network.

In the end, I decided that I could route my RDP sessions through an SSH tunnel and sleep a little easier at night. If you
follow the directions below, you can too.

Going forward in this document, I will use the term “Server” to refer to the remote computer (in my case, my home PC)
that we will be connecting to. I will use the term “Client” to refer to my local computer, the computer I will be connecting
from.


                                                  Installing CopSSH
    1) Download CopSSH from here: http://www.itefix.no/i2/node/27

        Download Putty and Puttygen from here: http://www.chiark.greenend.org.uk/~sgtatham/putty/download.html


    2) Execute the CopSSH installer, click Next to proceed, then click I agree to accept the license agreement.


                     http://drnathan.teamhackaday.com/2009/02/17/securing-windows-remote-desktop-with-copssh/
3) Select the installation directory as shown below. Click Install to proceed.

    Note: With the release of CopSSH v2.0, the default installation directory has changed from C:Program
    FilesCopSSH to C:Program FilesICW.


4) CopSSH requires that Windows add a Service Account in order to run CopSSH as a service. Click Install at the
   Service Account prompt unless you want to change the user name CopSSH creates.


                http://drnathan.teamhackaday.com/2009/02/17/securing-windows-remote-desktop-with-copssh/
5) Once all of the files are copied and the service has been started, you will receive the following message stating
   that no users are enabled on the server. This is a security precaution – you will need to manually activate each
   user who you wish to allow access via SSH.


6) To add a user, open the Start Menu, locate the CopSSH folder, and launch the Activate a User application.
   Select the user you wish to activate from the drop down box shown. Before you click Next, you can deselect the
   option to Create keys for public key authentication if you wish to generate the keys separately. I will
   demonstrate how to generate keys separately, so deselect the box if you wish to follow along.


7) Upon clicking Next, you will receive a message stating that the selected user has been activated and can access
   the machine via SSH.


                http://drnathan.teamhackaday.com/2009/02/17/securing-windows-remote-desktop-with-copssh/
SSH Key Pair Generation
1) Start Puttygen, enter 4096 into the Number of bits in a generated key field, then click Generate to begin the key
   creation process.


2) Move the mouse as requested to add randomness to the key generation. Once you have generated enough
   random movements, your key will be created. Add a Key Comment if you wish, then enter a key passphrase two
   times as shown – the more complex, the better.


               http://drnathan.teamhackaday.com/2009/02/17/securing-windows-remote-desktop-with-copssh/
3) Highlight all of the text in the Public key for pasting into OpenSSH authorized_keys file box and paste the
   data into a text editor. Save the file to the C:Program FilesICWhome<UserID>.ssh folder on your Server,
   naming the file authorized_keys with no extension.

   This naming is important unless you change the key file that CopSSH looks for in the SSHD configuration file.
   For the Administrator account shown, you would save the file as:
           C:Program FilescopsshhomeAdministrator.sshauthorized_keys.

   Note: You cannot simply click the Save Public Key button to generate this file - CopSSH will not accept that file
   format as a key. You must manually copy and paste the public key as noted above.


4) Now click Save Private Key. save the private key then close Puttygen. You will want to copy this key to any PC
   you are using as a Client, as it is required by Putty to make the connection to the SSH server. I would suggest
   backing this key up so you do not have to repeat this process in the future.


               http://drnathan.teamhackaday.com/2009/02/17/securing-windows-remote-desktop-with-copssh/
Configuring CopSSH
1) Now we need to reconfigure CopSSH to use a port other than 22 for connectivity. Changing the port number
   adds a bit of security through obfuscation to your SSH install. Since port 22 is commonly used for SSH, changing
   the port in your installation makes it just a bit harder for someone looking to exploit something.

    To change this setting, we need to open the SSHD configuration file. It is located at
    C:Program FilesICWetcsshd_config. You can open it in Wordpad or any text editor. Notepad really is not the
    right tool for this job.

2) In the file, the first value you can change is Port. Change it to something that you will remember, uncomment the
   line by removing the pound sign at the beginning of the line, then save and close the file.


               http://drnathan.teamhackaday.com/2009/02/17/securing-windows-remote-desktop-with-copssh/
3) The next values you want to change control how users can authenticate to the SSH server. This is a detail that I
   missed in my first write-up that an astute reader noticed was overlooked.

     This configuration change is very important as it disallows any user from authenticating to your SSH server
    without a key file. If you do not change these values, users can connect to the server simply using their logon
    name and regular password.

    You need to enable the PasswordAuthentication and PermitEmptyPasswords settings by removing the pound
    sign to uncomment the line, and assigning a value of “no” to both settings.


                http://drnathan.teamhackaday.com/2009/02/17/securing-windows-remote-desktop-with-copssh/
4) Restart the OpenSSHD service via Windows’ Services panel to allow the configuration changes to be applied.


5) If you have a router with firewall capabilities installed, you should log on to the administration web page and
   forward the SSH port you just defined to the computer on which you installed CopSSH. I will assume that you
   know what you are doing and let you take care of this on your own.


                http://drnathan.teamhackaday.com/2009/02/17/securing-windows-remote-desktop-with-copssh/
Configuring Putty
Now we need to configure Putty to connect to our SSH server. This is a pretty straightforward process that you
should do on the Client computer from which you want to connect.

1) Launch Putty. Under Session settings, we will adjust 2 items:

        a) Set your Host Name or Host IP for connection. I use DD-WRT on my router, and it supports DynDNS –
           so I just entered my DynDNS host name here.

        b) Set the Port number to reflect the port number you configured in the sshd_config file earlier.


                http://drnathan.teamhackaday.com/2009/02/17/securing-windows-remote-desktop-with-copssh/
2) Under Connection -> Data, we will adjust one item:

       a) Set the Auto-login Username value to reflect the user you enabled on the SSH server


3) Under the main SSH section, we will adjust two items:

       a) Check the Enable Compression box under Protocol Options section

       b) Select 2 only under the Preferred SSH protocol version section


               http://drnathan.teamhackaday.com/2009/02/17/securing-windows-remote-desktop-with-copssh/
4) Expand the SSH section and select Auth. In this section, we will set the Private key file for authentication to
   the location of the private key you created earlier.


5) Under the Tunnels section of the SSH section, we will establish the tunneling settings for your remote desktop
   sessions. This where the real work gets done.

    You must create an entry for each computer you want to connect to at the other end of the SSH tunnel. To do
    this, you will need RDP enabled on the target computer, as well as the host name of the target computer. Once
    you have entered the proper values, click Add to add the port forwarding to the configuration.


                http://drnathan.teamhackaday.com/2009/02/17/securing-windows-remote-desktop-with-copssh/
In the previous picture, you should note two things:

    a) The Source port refers to the port you are connecting to on your local computer, i.e. the port that Putty
       will listen to for connections while you have the SSH tunnel established. I usually set this to 3390 for the
       first host I want to RDP to, and then count up from there. In Windows 7, port 3390 is already in use by
       the system, so I suggest using port 3391 instead.

    b) In the Destination section, you will need to enter the name of the remote server you want to connect to,
       followed by a colon, then the RDP port number. For hosts using the default Windows RDP configuration,
       this is always 3389. If you have changed this value, adjust as necessary.


You can pretty much add as many hosts as you can keep straight in your head:


            http://drnathan.teamhackaday.com/2009/02/17/securing-windows-remote-desktop-with-copssh/
5) Return to the main Sessions section of Putty and give the configured session a name as seen below. Click Save
       to save your configuration – it will then appear in the list of saved session configurations.


    6) Finally, when you want to RDP into your remote computer, you can launch the Putty console to establish the
       connection, or you can simply run “putty.exe –load <session name here>” from the command line to launch
       Putty and connect to your remote host. For example, I would type “putty.exe –load Home Network” if I wanted
       to launch this particular connection.

    7) After you authenticate using the passphrase you created earlier, you can simply RDP into your remote computer
       by connecting to localhost:3390 from the Remote Desktop Connection application as shown below:


Note: You can always test SSH connectivity locally by replacing your SSH host’s IP address with localhost and
launching Putty. In fact, I recommend you do this to ensure that your key pair is working properly before you attempt to
connect remotely.


                    http://drnathan.teamhackaday.com/2009/02/17/securing-windows-remote-desktop-with-copssh/
Tunneling for VNC
Some people have inquired as to whether or not you can secure VNC in the same fashion as Windows RDP. The answer
is “Absolutely”. To do so, pick any Source Port you like, and substitute 5900 as the destination port number for the
remote server. It’s as simple as that.

The next time you fire up VNC, you merely need to enter localhost as the host name, followed by a colon, then the port
number you picked.

Note: This process can get tricky depending on the VNC client you are using.

For instance, TightVNC uses a strange port numbering system where you need to subtract 5900 from the port number
you wish to connect to if it is different than port 5900. As an example, if I was connecting to port 5901 on my local
machine, I would enter localhost:1 as the VNC server address. If instead I selected port 222 as my tunneling port, I
would enter localhost:-5678 as the VNC server address.


Hopefully this document helped you in your journey to safer, more secure remote communications. If you have any
questions, comments, or additions, please drop by http://teamhackaday.com/chat and ask for DrNathan. I’m usually
there.


                    http://drnathan.teamhackaday.com/2009/02/17/securing-windows-remote-desktop-with-copssh/

Weitere ähnliche Inhalte

Was ist angesagt?

Software-Defined Networking (SDN): Unleashing the Power of the Network
Software-Defined Networking (SDN): Unleashing the Power of the NetworkSoftware-Defined Networking (SDN): Unleashing the Power of the Network
Software-Defined Networking (SDN): Unleashing the Power of the Network
Robert Keahey
 
Chassis Cluster Configuration
Chassis Cluster ConfigurationChassis Cluster Configuration
Chassis Cluster Configuration
Kashif Latif
 

Was ist angesagt? (20)

Security in distributed systems
Security in distributed systems Security in distributed systems
Security in distributed systems
 
11. dfs
11. dfs11. dfs
11. dfs
 
Network Virtualization
Network VirtualizationNetwork Virtualization
Network Virtualization
 
Software-Defined Networking (SDN): Unleashing the Power of the Network
Software-Defined Networking (SDN): Unleashing the Power of the NetworkSoftware-Defined Networking (SDN): Unleashing the Power of the Network
Software-Defined Networking (SDN): Unleashing the Power of the Network
 
Cloud computing
Cloud computingCloud computing
Cloud computing
 
CISCO HSRP VRRP GLBP
CISCO HSRP VRRP GLBPCISCO HSRP VRRP GLBP
CISCO HSRP VRRP GLBP
 
Models of Distributed System
Models of Distributed SystemModels of Distributed System
Models of Distributed System
 
Computer Ports
Computer PortsComputer Ports
Computer Ports
 
Chassis Cluster Configuration
Chassis Cluster ConfigurationChassis Cluster Configuration
Chassis Cluster Configuration
 
Media Access Control (MAC Layer)
Media Access Control (MAC Layer)Media Access Control (MAC Layer)
Media Access Control (MAC Layer)
 
Layer 3 redundancy hsrp
Layer 3 redundancy   hsrpLayer 3 redundancy   hsrp
Layer 3 redundancy hsrp
 
Cc unit 2 ppt
Cc unit 2 pptCc unit 2 ppt
Cc unit 2 ppt
 
Storage Virtualization
Storage VirtualizationStorage Virtualization
Storage Virtualization
 
Virtual Machine provisioning and migration services
Virtual Machine provisioning and migration servicesVirtual Machine provisioning and migration services
Virtual Machine provisioning and migration services
 
Routing algorithm
Routing algorithmRouting algorithm
Routing algorithm
 
03. non-functional-attributes-introduction-4-slides
03. non-functional-attributes-introduction-4-slides03. non-functional-attributes-introduction-4-slides
03. non-functional-attributes-introduction-4-slides
 
Packet switching
Packet switchingPacket switching
Packet switching
 
Cluster computing
Cluster computingCluster computing
Cluster computing
 
Multiple Access in Computer Network
Multiple Access in Computer NetworkMultiple Access in Computer Network
Multiple Access in Computer Network
 
Cloud Computing
Cloud ComputingCloud Computing
Cloud Computing
 

Andere mochten auch

Mystery Of God & Deities Dr. Shriniwas J. Kashalikar
Mystery Of God & Deities Dr. Shriniwas J. KashalikarMystery Of God & Deities Dr. Shriniwas J. Kashalikar
Mystery Of God & Deities Dr. Shriniwas J. Kashalikar
shriniwaskashalikar
 
More About Equality Dr. Shriniwas Kashalikar
More About Equality Dr. Shriniwas KashalikarMore About Equality Dr. Shriniwas Kashalikar
More About Equality Dr. Shriniwas Kashalikar
shriniwaskashalikar
 
Super Happiness Dr. Shriniwas Kashalikar
Super Happiness Dr. Shriniwas KashalikarSuper Happiness Dr. Shriniwas Kashalikar
Super Happiness Dr. Shriniwas Kashalikar
shriniwaskashalikar
 
Concept Of Healthy Aging Dr. Shriniwas Kashalikar
Concept Of Healthy Aging  Dr. Shriniwas KashalikarConcept Of Healthy Aging  Dr. Shriniwas Kashalikar
Concept Of Healthy Aging Dr. Shriniwas Kashalikar
shriniwaskashalikar
 
Pras第1回事例共有・研究発表大会予稿集
Pras第1回事例共有・研究発表大会予稿集Pras第1回事例共有・研究発表大会予稿集
Pras第1回事例共有・研究発表大会予稿集
河井 孝仁
 
東海大学広報メディア学科河井ゼミ フリーペーパー2014
東海大学広報メディア学科河井ゼミ フリーペーパー2014東海大学広報メディア学科河井ゼミ フリーペーパー2014
東海大学広報メディア学科河井ゼミ フリーペーパー2014
河井 孝仁
 
S H U N S U I C I D E L I V E H A P P I L Y Dr
S H U N  S U I C I D E   L I V E  H A P P I L Y  DrS H U N  S U I C I D E   L I V E  H A P P I L Y  Dr
S H U N S U I C I D E L I V E H A P P I L Y Dr
shriniwaskashalikar
 
Holisticmanagement Of Global Recession Dr. Shriniwas Kashalikar
Holisticmanagement Of Global Recession Dr. Shriniwas KashalikarHolisticmanagement Of Global Recession Dr. Shriniwas Kashalikar
Holisticmanagement Of Global Recession Dr. Shriniwas Kashalikar
shriniwaskashalikar
 
De patient José Van Der Schoor
De patient   José Van Der SchoorDe patient   José Van Der Schoor
De patient José Van Der Schoor
MijnZorgnet
 
Seo And Search Engine Ranking Report Splinternetmarketing.Com Seo And Interne...
Seo And Search Engine Ranking Report Splinternetmarketing.Com Seo And Interne...Seo And Search Engine Ranking Report Splinternetmarketing.Com Seo And Interne...
Seo And Search Engine Ranking Report Splinternetmarketing.Com Seo And Interne...
SEO, LLC dba www.SplinternetMarketing.com
 

Andere mochten auch (16)

Mystery Of God & Deities Dr. Shriniwas J. Kashalikar
Mystery Of God & Deities Dr. Shriniwas J. KashalikarMystery Of God & Deities Dr. Shriniwas J. Kashalikar
Mystery Of God & Deities Dr. Shriniwas J. Kashalikar
 
More About Equality Dr. Shriniwas Kashalikar
More About Equality Dr. Shriniwas KashalikarMore About Equality Dr. Shriniwas Kashalikar
More About Equality Dr. Shriniwas Kashalikar
 
Super Happiness Dr. Shriniwas Kashalikar
Super Happiness Dr. Shriniwas KashalikarSuper Happiness Dr. Shriniwas Kashalikar
Super Happiness Dr. Shriniwas Kashalikar
 
Key Developments in Emerging Markets
Key Developments in Emerging MarketsKey Developments in Emerging Markets
Key Developments in Emerging Markets
 
Concept Of Healthy Aging Dr. Shriniwas Kashalikar
Concept Of Healthy Aging  Dr. Shriniwas KashalikarConcept Of Healthy Aging  Dr. Shriniwas Kashalikar
Concept Of Healthy Aging Dr. Shriniwas Kashalikar
 
Risk Assessment
Risk AssessmentRisk Assessment
Risk Assessment
 
AMC WIT MARMER COLLECTIE
AMC WIT MARMER COLLECTIEAMC WIT MARMER COLLECTIE
AMC WIT MARMER COLLECTIE
 
Pras第1回事例共有・研究発表大会予稿集
Pras第1回事例共有・研究発表大会予稿集Pras第1回事例共有・研究発表大会予稿集
Pras第1回事例共有・研究発表大会予稿集
 
東海大学広報メディア学科河井ゼミ フリーペーパー2014
東海大学広報メディア学科河井ゼミ フリーペーパー2014東海大学広報メディア学科河井ゼミ フリーペーパー2014
東海大学広報メディア学科河井ゼミ フリーペーパー2014
 
S H U N S U I C I D E L I V E H A P P I L Y Dr
S H U N  S U I C I D E   L I V E  H A P P I L Y  DrS H U N  S U I C I D E   L I V E  H A P P I L Y  Dr
S H U N S U I C I D E L I V E H A P P I L Y Dr
 
Ranking analysis-12-20-2011-1
Ranking analysis-12-20-2011-1Ranking analysis-12-20-2011-1
Ranking analysis-12-20-2011-1
 
Holisticmanagement Of Global Recession Dr. Shriniwas Kashalikar
Holisticmanagement Of Global Recession Dr. Shriniwas KashalikarHolisticmanagement Of Global Recession Dr. Shriniwas Kashalikar
Holisticmanagement Of Global Recession Dr. Shriniwas Kashalikar
 
De patient José Van Der Schoor
De patient   José Van Der SchoorDe patient   José Van Der Schoor
De patient José Van Der Schoor
 
Seo And Search Engine Ranking Report Splinternetmarketing.Com Seo And Interne...
Seo And Search Engine Ranking Report Splinternetmarketing.Com Seo And Interne...Seo And Search Engine Ranking Report Splinternetmarketing.Com Seo And Interne...
Seo And Search Engine Ranking Report Splinternetmarketing.Com Seo And Interne...
 
Seo, Llc Dba Www.Splinternet Marketing.Com Search Engine Rankings On 4 14 2011
Seo, Llc Dba Www.Splinternet Marketing.Com Search Engine Rankings On 4 14 2011Seo, Llc Dba Www.Splinternet Marketing.Com Search Engine Rankings On 4 14 2011
Seo, Llc Dba Www.Splinternet Marketing.Com Search Engine Rankings On 4 14 2011
 
Netbeans Open GL Installation Tutorials
Netbeans Open GL Installation Tutorials Netbeans Open GL Installation Tutorials
Netbeans Open GL Installation Tutorials
 

Ähnlich wie Securing Windows Remote Desktop With Copssh

Manual 70-410 _Yves
Manual 70-410 _YvesManual 70-410 _Yves
Manual 70-410 _Yves
Yves Mukusa
 
Linux conf-admin
Linux conf-adminLinux conf-admin
Linux conf-admin
badamisri
 
Raspi_TOR_Access_Point_BenMoore
Raspi_TOR_Access_Point_BenMooreRaspi_TOR_Access_Point_BenMoore
Raspi_TOR_Access_Point_BenMoore
Benjamin Moore
 
Tutorial CentOS 5 untuk Webhosting
Tutorial CentOS 5 untuk WebhostingTutorial CentOS 5 untuk Webhosting
Tutorial CentOS 5 untuk Webhosting
Beni Krisbiantoro
 

Ähnlich wie Securing Windows Remote Desktop With Copssh (20)

Howto Pxeboot
Howto PxebootHowto Pxeboot
Howto Pxeboot
 
R server and spark
R server and sparkR server and spark
R server and spark
 
Remote Login
Remote LoginRemote Login
Remote Login
 
snortinstallguide
snortinstallguidesnortinstallguide
snortinstallguide
 
Complete MPICH2 Clustering Manual in Ubuntu
Complete MPICH2 Clustering Manual in UbuntuComplete MPICH2 Clustering Manual in Ubuntu
Complete MPICH2 Clustering Manual in Ubuntu
 
Manual 70-410 _Yves
Manual 70-410 _YvesManual 70-410 _Yves
Manual 70-410 _Yves
 
Drupal Continuous Integration with Jenkins - Deploy
Drupal Continuous Integration with Jenkins - DeployDrupal Continuous Integration with Jenkins - Deploy
Drupal Continuous Integration with Jenkins - Deploy
 
Quick-Start Guide: Deploying Your Cloudian HyperStore Hybrid Storage Service
Quick-Start Guide: Deploying Your Cloudian HyperStore Hybrid Storage ServiceQuick-Start Guide: Deploying Your Cloudian HyperStore Hybrid Storage Service
Quick-Start Guide: Deploying Your Cloudian HyperStore Hybrid Storage Service
 
Linux conf-admin
Linux conf-adminLinux conf-admin
Linux conf-admin
 
Linux conf-admin
Linux conf-adminLinux conf-admin
Linux conf-admin
 
Linux Conf Admin
Linux Conf AdminLinux Conf Admin
Linux Conf Admin
 
Openvpn
OpenvpnOpenvpn
Openvpn
 
Securing the tunnel with Raccoon
Securing the tunnel with RaccoonSecuring the tunnel with Raccoon
Securing the tunnel with Raccoon
 
Software Instructions
Software InstructionsSoftware Instructions
Software Instructions
 
Bsd routers
Bsd routersBsd routers
Bsd routers
 
Raspi_TOR_Access_Point_BenMoore
Raspi_TOR_Access_Point_BenMooreRaspi_TOR_Access_Point_BenMoore
Raspi_TOR_Access_Point_BenMoore
 
Project Pt1
Project Pt1Project Pt1
Project Pt1
 
Dating Pro Installation Instructions
Dating Pro Installation InstructionsDating Pro Installation Instructions
Dating Pro Installation Instructions
 
Cracking CTFs - Sysbypass CTF Walkthrough
Cracking CTFs - Sysbypass CTF WalkthroughCracking CTFs - Sysbypass CTF Walkthrough
Cracking CTFs - Sysbypass CTF Walkthrough
 
Tutorial CentOS 5 untuk Webhosting
Tutorial CentOS 5 untuk WebhostingTutorial CentOS 5 untuk Webhosting
Tutorial CentOS 5 untuk Webhosting
 

Kürzlich hochgeladen

Artificial Intelligence: Facts and Myths
Artificial Intelligence: Facts and MythsArtificial Intelligence: Facts and Myths
Artificial Intelligence: Facts and Myths
Joaquim Jorge
 
+971581248768>> SAFE AND ORIGINAL ABORTION PILLS FOR SALE IN DUBAI AND ABUDHA...
+971581248768>> SAFE AND ORIGINAL ABORTION PILLS FOR SALE IN DUBAI AND ABUDHA...+971581248768>> SAFE AND ORIGINAL ABORTION PILLS FOR SALE IN DUBAI AND ABUDHA...
+971581248768>> SAFE AND ORIGINAL ABORTION PILLS FOR SALE IN DUBAI AND ABUDHA...
?#DUbAI#??##{{(☎️+971_581248768%)**%*]'#abortion pills for sale in dubai@
 
Histor y of HAM Radio presentation slide
Histor y of HAM Radio presentation slideHistor y of HAM Radio presentation slide
Histor y of HAM Radio presentation slide
vu2urc
 

Kürzlich hochgeladen (20)

From Event to Action: Accelerate Your Decision Making with Real-Time Automation
From Event to Action: Accelerate Your Decision Making with Real-Time AutomationFrom Event to Action: Accelerate Your Decision Making with Real-Time Automation
From Event to Action: Accelerate Your Decision Making with Real-Time Automation
 
Finology Group – Insurtech Innovation Award 2024
Finology Group – Insurtech Innovation Award 2024Finology Group – Insurtech Innovation Award 2024
Finology Group – Insurtech Innovation Award 2024
 
[2024]Digital Global Overview Report 2024 Meltwater.pdf
[2024]Digital Global Overview Report 2024 Meltwater.pdf[2024]Digital Global Overview Report 2024 Meltwater.pdf
[2024]Digital Global Overview Report 2024 Meltwater.pdf
 
presentation ICT roal in 21st century education
presentation ICT roal in 21st century educationpresentation ICT roal in 21st century education
presentation ICT roal in 21st century education
 
Handwritten Text Recognition for manuscripts and early printed texts
Handwritten Text Recognition for manuscripts and early printed textsHandwritten Text Recognition for manuscripts and early printed texts
Handwritten Text Recognition for manuscripts and early printed texts
 
Scaling API-first – The story of a global engineering organization
Scaling API-first – The story of a global engineering organizationScaling API-first – The story of a global engineering organization
Scaling API-first – The story of a global engineering organization
 
2024: Domino Containers - The Next Step. News from the Domino Container commu...
2024: Domino Containers - The Next Step. News from the Domino Container commu...2024: Domino Containers - The Next Step. News from the Domino Container commu...
2024: Domino Containers - The Next Step. News from the Domino Container commu...
 
Real Time Object Detection Using Open CV
Real Time Object Detection Using Open CVReal Time Object Detection Using Open CV
Real Time Object Detection Using Open CV
 
Artificial Intelligence: Facts and Myths
Artificial Intelligence: Facts and MythsArtificial Intelligence: Facts and Myths
Artificial Intelligence: Facts and Myths
 
A Year of the Servo Reboot: Where Are We Now?
A Year of the Servo Reboot: Where Are We Now?A Year of the Servo Reboot: Where Are We Now?
A Year of the Servo Reboot: Where Are We Now?
 
Bajaj Allianz Life Insurance Company - Insurer Innovation Award 2024
Bajaj Allianz Life Insurance Company - Insurer Innovation Award 2024Bajaj Allianz Life Insurance Company - Insurer Innovation Award 2024
Bajaj Allianz Life Insurance Company - Insurer Innovation Award 2024
 
+971581248768>> SAFE AND ORIGINAL ABORTION PILLS FOR SALE IN DUBAI AND ABUDHA...
+971581248768>> SAFE AND ORIGINAL ABORTION PILLS FOR SALE IN DUBAI AND ABUDHA...+971581248768>> SAFE AND ORIGINAL ABORTION PILLS FOR SALE IN DUBAI AND ABUDHA...
+971581248768>> SAFE AND ORIGINAL ABORTION PILLS FOR SALE IN DUBAI AND ABUDHA...
 
HTML Injection Attacks: Impact and Mitigation Strategies
HTML Injection Attacks: Impact and Mitigation StrategiesHTML Injection Attacks: Impact and Mitigation Strategies
HTML Injection Attacks: Impact and Mitigation Strategies
 
Apidays Singapore 2024 - Building Digital Trust in a Digital Economy by Veron...
Apidays Singapore 2024 - Building Digital Trust in a Digital Economy by Veron...Apidays Singapore 2024 - Building Digital Trust in a Digital Economy by Veron...
Apidays Singapore 2024 - Building Digital Trust in a Digital Economy by Veron...
 
Apidays New York 2024 - Scaling API-first by Ian Reasor and Radu Cotescu, Adobe
Apidays New York 2024 - Scaling API-first by Ian Reasor and Radu Cotescu, AdobeApidays New York 2024 - Scaling API-first by Ian Reasor and Radu Cotescu, Adobe
Apidays New York 2024 - Scaling API-first by Ian Reasor and Radu Cotescu, Adobe
 
Advantages of Hiring UIUX Design Service Providers for Your Business
Advantages of Hiring UIUX Design Service Providers for Your BusinessAdvantages of Hiring UIUX Design Service Providers for Your Business
Advantages of Hiring UIUX Design Service Providers for Your Business
 
Mastering MySQL Database Architecture: Deep Dive into MySQL Shell and MySQL R...
Mastering MySQL Database Architecture: Deep Dive into MySQL Shell and MySQL R...Mastering MySQL Database Architecture: Deep Dive into MySQL Shell and MySQL R...
Mastering MySQL Database Architecture: Deep Dive into MySQL Shell and MySQL R...
 
Histor y of HAM Radio presentation slide
Histor y of HAM Radio presentation slideHistor y of HAM Radio presentation slide
Histor y of HAM Radio presentation slide
 
🐬 The future of MySQL is Postgres 🐘
🐬  The future of MySQL is Postgres   🐘🐬  The future of MySQL is Postgres   🐘
🐬 The future of MySQL is Postgres 🐘
 
04-2024-HHUG-Sales-and-Marketing-Alignment.pptx
04-2024-HHUG-Sales-and-Marketing-Alignment.pptx04-2024-HHUG-Sales-and-Marketing-Alignment.pptx
04-2024-HHUG-Sales-and-Marketing-Alignment.pptx
 

Securing Windows Remote Desktop With Copssh

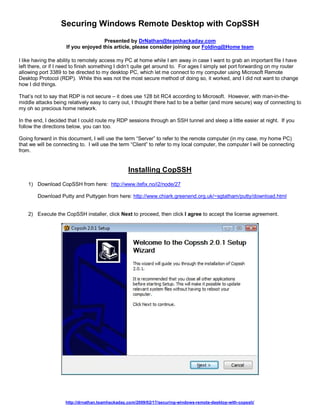
  • 1. Securing Windows Remote Desktop with CopSSH Presented by DrNathan@teamhackaday.com If you enjoyed this article, please consider joining our Folding@Home team I like having the ability to remotely access my PC at home while I am away in case I want to grab an important file I have left there, or if I need to finish something I didn’t quite get around to. For ages I simply set port forwarding on my router allowing port 3389 to be directed to my desktop PC, which let me connect to my computer using Microsoft Remote Desktop Protocol (RDP). While this was not the most secure method of doing so, it worked, and I did not want to change how I did things. That’s not to say that RDP is not secure – it does use 128 bit RC4 according to Microsoft. However, with man-in-the- middle attacks being relatively easy to carry out, I thought there had to be a better (and more secure) way of connecting to my oh so precious home network. In the end, I decided that I could route my RDP sessions through an SSH tunnel and sleep a little easier at night. If you follow the directions below, you can too. Going forward in this document, I will use the term “Server” to refer to the remote computer (in my case, my home PC) that we will be connecting to. I will use the term “Client” to refer to my local computer, the computer I will be connecting from. Installing CopSSH 1) Download CopSSH from here: http://www.itefix.no/i2/node/27 Download Putty and Puttygen from here: http://www.chiark.greenend.org.uk/~sgtatham/putty/download.html 2) Execute the CopSSH installer, click Next to proceed, then click I agree to accept the license agreement. http://drnathan.teamhackaday.com/2009/02/17/securing-windows-remote-desktop-with-copssh/
  • 2. 3) Select the installation directory as shown below. Click Install to proceed. Note: With the release of CopSSH v2.0, the default installation directory has changed from C:Program FilesCopSSH to C:Program FilesICW. 4) CopSSH requires that Windows add a Service Account in order to run CopSSH as a service. Click Install at the Service Account prompt unless you want to change the user name CopSSH creates. http://drnathan.teamhackaday.com/2009/02/17/securing-windows-remote-desktop-with-copssh/
  • 3. 5) Once all of the files are copied and the service has been started, you will receive the following message stating that no users are enabled on the server. This is a security precaution – you will need to manually activate each user who you wish to allow access via SSH. 6) To add a user, open the Start Menu, locate the CopSSH folder, and launch the Activate a User application. Select the user you wish to activate from the drop down box shown. Before you click Next, you can deselect the option to Create keys for public key authentication if you wish to generate the keys separately. I will demonstrate how to generate keys separately, so deselect the box if you wish to follow along. 7) Upon clicking Next, you will receive a message stating that the selected user has been activated and can access the machine via SSH. http://drnathan.teamhackaday.com/2009/02/17/securing-windows-remote-desktop-with-copssh/
  • 4. SSH Key Pair Generation 1) Start Puttygen, enter 4096 into the Number of bits in a generated key field, then click Generate to begin the key creation process. 2) Move the mouse as requested to add randomness to the key generation. Once you have generated enough random movements, your key will be created. Add a Key Comment if you wish, then enter a key passphrase two times as shown – the more complex, the better. http://drnathan.teamhackaday.com/2009/02/17/securing-windows-remote-desktop-with-copssh/
  • 5. 3) Highlight all of the text in the Public key for pasting into OpenSSH authorized_keys file box and paste the data into a text editor. Save the file to the C:Program FilesICWhome<UserID>.ssh folder on your Server, naming the file authorized_keys with no extension. This naming is important unless you change the key file that CopSSH looks for in the SSHD configuration file. For the Administrator account shown, you would save the file as: C:Program FilescopsshhomeAdministrator.sshauthorized_keys. Note: You cannot simply click the Save Public Key button to generate this file - CopSSH will not accept that file format as a key. You must manually copy and paste the public key as noted above. 4) Now click Save Private Key. save the private key then close Puttygen. You will want to copy this key to any PC you are using as a Client, as it is required by Putty to make the connection to the SSH server. I would suggest backing this key up so you do not have to repeat this process in the future. http://drnathan.teamhackaday.com/2009/02/17/securing-windows-remote-desktop-with-copssh/
  • 6. Configuring CopSSH 1) Now we need to reconfigure CopSSH to use a port other than 22 for connectivity. Changing the port number adds a bit of security through obfuscation to your SSH install. Since port 22 is commonly used for SSH, changing the port in your installation makes it just a bit harder for someone looking to exploit something. To change this setting, we need to open the SSHD configuration file. It is located at C:Program FilesICWetcsshd_config. You can open it in Wordpad or any text editor. Notepad really is not the right tool for this job. 2) In the file, the first value you can change is Port. Change it to something that you will remember, uncomment the line by removing the pound sign at the beginning of the line, then save and close the file. http://drnathan.teamhackaday.com/2009/02/17/securing-windows-remote-desktop-with-copssh/
  • 7. 3) The next values you want to change control how users can authenticate to the SSH server. This is a detail that I missed in my first write-up that an astute reader noticed was overlooked. This configuration change is very important as it disallows any user from authenticating to your SSH server without a key file. If you do not change these values, users can connect to the server simply using their logon name and regular password. You need to enable the PasswordAuthentication and PermitEmptyPasswords settings by removing the pound sign to uncomment the line, and assigning a value of “no” to both settings. http://drnathan.teamhackaday.com/2009/02/17/securing-windows-remote-desktop-with-copssh/
  • 8. 4) Restart the OpenSSHD service via Windows’ Services panel to allow the configuration changes to be applied. 5) If you have a router with firewall capabilities installed, you should log on to the administration web page and forward the SSH port you just defined to the computer on which you installed CopSSH. I will assume that you know what you are doing and let you take care of this on your own. http://drnathan.teamhackaday.com/2009/02/17/securing-windows-remote-desktop-with-copssh/
  • 9. Configuring Putty Now we need to configure Putty to connect to our SSH server. This is a pretty straightforward process that you should do on the Client computer from which you want to connect. 1) Launch Putty. Under Session settings, we will adjust 2 items: a) Set your Host Name or Host IP for connection. I use DD-WRT on my router, and it supports DynDNS – so I just entered my DynDNS host name here. b) Set the Port number to reflect the port number you configured in the sshd_config file earlier. http://drnathan.teamhackaday.com/2009/02/17/securing-windows-remote-desktop-with-copssh/
  • 10. 2) Under Connection -> Data, we will adjust one item: a) Set the Auto-login Username value to reflect the user you enabled on the SSH server 3) Under the main SSH section, we will adjust two items: a) Check the Enable Compression box under Protocol Options section b) Select 2 only under the Preferred SSH protocol version section http://drnathan.teamhackaday.com/2009/02/17/securing-windows-remote-desktop-with-copssh/
  • 11. 4) Expand the SSH section and select Auth. In this section, we will set the Private key file for authentication to the location of the private key you created earlier. 5) Under the Tunnels section of the SSH section, we will establish the tunneling settings for your remote desktop sessions. This where the real work gets done. You must create an entry for each computer you want to connect to at the other end of the SSH tunnel. To do this, you will need RDP enabled on the target computer, as well as the host name of the target computer. Once you have entered the proper values, click Add to add the port forwarding to the configuration. http://drnathan.teamhackaday.com/2009/02/17/securing-windows-remote-desktop-with-copssh/
  • 12. In the previous picture, you should note two things: a) The Source port refers to the port you are connecting to on your local computer, i.e. the port that Putty will listen to for connections while you have the SSH tunnel established. I usually set this to 3390 for the first host I want to RDP to, and then count up from there. In Windows 7, port 3390 is already in use by the system, so I suggest using port 3391 instead. b) In the Destination section, you will need to enter the name of the remote server you want to connect to, followed by a colon, then the RDP port number. For hosts using the default Windows RDP configuration, this is always 3389. If you have changed this value, adjust as necessary. You can pretty much add as many hosts as you can keep straight in your head: http://drnathan.teamhackaday.com/2009/02/17/securing-windows-remote-desktop-with-copssh/
  • 13. 5) Return to the main Sessions section of Putty and give the configured session a name as seen below. Click Save to save your configuration – it will then appear in the list of saved session configurations. 6) Finally, when you want to RDP into your remote computer, you can launch the Putty console to establish the connection, or you can simply run “putty.exe –load <session name here>” from the command line to launch Putty and connect to your remote host. For example, I would type “putty.exe –load Home Network” if I wanted to launch this particular connection. 7) After you authenticate using the passphrase you created earlier, you can simply RDP into your remote computer by connecting to localhost:3390 from the Remote Desktop Connection application as shown below: Note: You can always test SSH connectivity locally by replacing your SSH host’s IP address with localhost and launching Putty. In fact, I recommend you do this to ensure that your key pair is working properly before you attempt to connect remotely. http://drnathan.teamhackaday.com/2009/02/17/securing-windows-remote-desktop-with-copssh/
  • 14. Tunneling for VNC Some people have inquired as to whether or not you can secure VNC in the same fashion as Windows RDP. The answer is “Absolutely”. To do so, pick any Source Port you like, and substitute 5900 as the destination port number for the remote server. It’s as simple as that. The next time you fire up VNC, you merely need to enter localhost as the host name, followed by a colon, then the port number you picked. Note: This process can get tricky depending on the VNC client you are using. For instance, TightVNC uses a strange port numbering system where you need to subtract 5900 from the port number you wish to connect to if it is different than port 5900. As an example, if I was connecting to port 5901 on my local machine, I would enter localhost:1 as the VNC server address. If instead I selected port 222 as my tunneling port, I would enter localhost:-5678 as the VNC server address. Hopefully this document helped you in your journey to safer, more secure remote communications. If you have any questions, comments, or additions, please drop by http://teamhackaday.com/chat and ask for DrNathan. I’m usually there. http://drnathan.teamhackaday.com/2009/02/17/securing-windows-remote-desktop-with-copssh/