

Empfohlen
Weitere ähnliche Inhalte
Was ist angesagt?
Was ist angesagt? (20)
Andere mochten auch
Andere mochten auch (12)
Ähnlich wie How to connect to cisco asa
Ähnlich wie How to connect to cisco asa (20)
Mehr von IT Tech
Mehr von IT Tech (20)
Kürzlich hochgeladen
Kürzlich hochgeladen (20)
How to connect to cisco asa
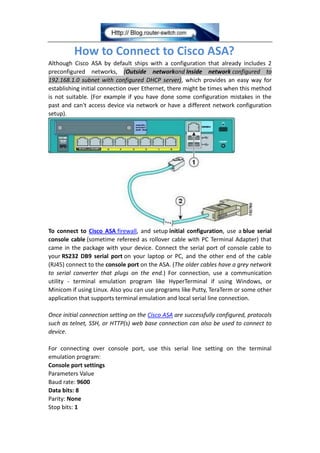
- 1. How to Connect to Cisco ASA? Although Cisco ASA by default ships with a configuration that already includes 2 preconfigured networks, (Outside networkand Inside network configured to 192.168.1.0 subnet with configured DHCP server), which provides an easy way for establishing initial connection over Ethernet, there might be times when this method is not suitable. (For example if you have done some configuration mistakes in the past and can't access device via network or have a different network configuration setup). To connect to Cisco ASA firewall, and setup initial configuration, use a blue serial console cable (sometime refereed as rollover cable with PC Terminal Adapter) that came in the package with your device. Connect the serial port of console cable to your RS232 DB9 serial port on your laptop or PC, and the other end of the cable (RJ45) connect to the console port on the ASA. (The older cables have a grey network to serial converter that plugs on the end.) For connection, use a communication utility - terminal emulation program like HyperTerminal if using Windows, or Minicom if using Linux. Also you can use programs like Putty, TeraTerm or some other application that supports terminal emulation and local serial line connection. Once initial connection setting on the Cisco ASA are successfully configured, protocols such as telnet, SSH, or HTTP(s) web base connection can also be used to connect to device. For connecting over console port, use this serial line setting on the terminal emulation program: Console port settings Parameters Value Baud rate: 9600 Data bits: 8 Parity: None Stop bits: 1
- 2. Flow control: none USB to Serial Connector If you don't have a serial port on your laptop, you can use a USB-to-serial converter adapter with DB9 at the one and USB connector at the other end of the cable (like the one on the picture below). For this you will have to install driver which adds another COM (serial) port on your PC. This way you will be able to connect to console port from laptop's USB interface. (The driver usually comes in package with USB-to-serial converter, and installation is pretty simple.) Steps to Connect to Cisco ASA 1. Connect a console port on the ASA to the serial port on Your laptop/PC with the blue console cable. (If you don’t have a console port on your PC, use USB-to-serial adapter connector, see above):
- 3. 2. Open terminal emulation program like HyperTerminal, TerraTerm or Putty, and onnect to COM serial port on PC (port should be created automatically from the driver): 3. On successful connection You should see ASA command line CLI prompt:
- 4. (From CLI You are able to do some basic and advanced ASA firewall configuration.) ASDM Web Access Guide: 1. On the PC connected to the ASA, launch a web browser. (Verify that Java and JavaScript are enabled in your web browser) 2. In the Address field, enter the following (default) URL: https://192.168.1.1/admin 3. Run Startup Wizard (notice that by default username and password are not set so if you are connecting for the first time, leave them empty)
- 5. More Cisco ASA Tips and Guides: Cisco ASA 5520 Basic Configuration Guide Site-to-Site IPSEC VPN between Two Cisco ASA 5520 Simple Steps to Connect a Remote Office to Cisco ASA 5510 How to Configure Cisco ASA 5505 Firewall? How to Configure Cisco PIX Firewall?