How to configure cisco 1242 wireless ap
•Als DOCX, PDF herunterladen•
2 gefällt mir•6,700 views

Cisco Aironet 1242, How to configure cisco 1242 wireless ap

Empfohlen
Weitere ähnliche Inhalte
Was ist angesagt?
Was ist angesagt? (20)
Ähnlich wie How to configure cisco 1242 wireless ap
Ähnlich wie How to configure cisco 1242 wireless ap (20)
Mehr von IT Tech
Mehr von IT Tech (20)
Kürzlich hochgeladen
Kürzlich hochgeladen (20)
How to configure cisco 1242 wireless ap
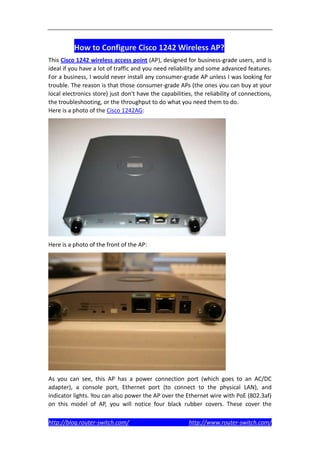
- 1. How to Configure Cisco 1242 Wireless AP? This Cisco 1242 wireless access point (AP), designed for business-grade users, and is ideal if you have a lot of traffic and you need reliability and some advanced features. For a business, I would never install any consumer-grade AP unless I was looking for trouble. The reason is that those consumer-grade APs (the ones you can buy at your local electronics store) just don't have the capabilities, the reliability of connections, the troubleshooting, or the throughput to do what you need them to do. Here is a photo of the Cisco 1242AG: Here is a photo of the front of the AP: As you can see, this AP has a power connection port (which goes to an AC/DC adapter), a console port, Ethernet port (to connect to the physical LAN), and indicator lights. You can also power the AP over the Ethernet wire with PoE (802.3af) on this model of AP, you will notice four black rubber covers. These cover the http://blog.router-switch.com/ http://www.router-switch.com/
- 2. connectors for the wireless antennas (two on the front and two on the back). On the front of the AP are the two antenna connectors for the 2.4Ghz network, with the right connector being the primary. On the back are the connectors for the 5Ghz network. These antennas can be bought separately and are required only if you want to extend the range in some way or do point-to-point bridging between APs. In a business network, you often want to extend or shape the wireless range, both for coverage and security. In that case, you would want to investigate and use the external antennas. The Cisco 1242 offers the following: A, B and G wireless protocols in the 2.4Ghz and 5Ghz wireless ranges A long list of security protocols that you won't find in consumer-grade APs Intrusion detection and prevention Hardware-assisted AES encryption Locking mounting bracket and a rugged NEMA metal case Compatibility with Cisco's wireless management applications That Cisco IOS CLI look and feel that we are used to configuring (or a Web browser interface if you so desire) You can find more specifics on these APs at the Cisco homepage for the Aironet 1242 series. Configuring the Cisco 1242 wireless APStep by Step Here are the steps I took to get my wireless AP functioning on my network: 1. Connect to power and LAN Ethernet 2. AP obtains IP address from DHCP server. I went to my DHCP server and found the IP address that it had obtained: http://blog.router-switch.com/ http://www.router-switch.com/
- 3. Alternatively, you can configure a static IP address on the AP using the console port, like this: 3. Point your Web browser to the AP. In my case, the DHCP-obtained IP address was 192.168.1.106. The default login (console or Web) is Cisco and Cisco (not cisco and cisco) for the username and password. Here is what I saw: Notice how both the 2.4Ghz and 5Ghz radios show to be "down." On APs with version 12.3(4)JA and above, the wireless radio is disabled by default, and there is no SSID configured. This is for security reasons. Also, note on the menu selections for the interface that there are options for Express Setup and Express Security. If these are available, why not use them? 4. Click on Express Setup. Notice the changes I made in the following screen. Not all of these are required. I changed the AP's name, set it to a static IP, changed the SNMP community string, and took the default of "Access Point" for both radios. http://blog.router-switch.com/ http://www.router-switch.com/
- 4. Next, I clicked Apply. I was redirected to the new IP address of the AP and I had to log in again. 5. Next, I clicked on Express Security and set the SSID, the SSID to be broadcast, and 40bit WEP encryption with a static key (basic, I know -- but just an example). 6. There are two important things still left to do -- change the admin password and enable the radios. To enable the radios, I clicked in Network Interfaces, on the left. In my case, I was only using the 2.4Ghz radio so I clicked on Radio0-802.11G, then on http://blog.router-switch.com/ http://www.router-switch.com/
- 5. the Settings tab. I clicked on Enable for the radio and took all the other default settings. At the bottom of the page, I clicked "Apply." 7. Finally, let's change the admin password so that no one else can get into our AP. To do this, I clicked on Security on the left hand side, then Admin Access. From here, I changed the default Authentication password and clicked Apply. I had to reauthenticate to the AP. Then I created a new account called Admin with a secure password, and Read-Write capability (clicked Apply). After that, I deleted the default Cisco account (clicked Apply). Here is what it looked like: http://blog.router-switch.com/ http://www.router-switch.com/
- 6. Note that we still have a single global password for all users. You may want to change this so that individual users will have their own passwords. 8. At this point, I could see the wireless network from my Windows computer and could successfully connect to it using the configured WEP key. My computer received a DHCP IP address from my DHCP server. More Related Cisco Aironet 1240 AG Series Password Recovery on Cisco 1242 Access Point http://blog.router-switch.com/ http://www.router-switch.com/