1. /home/sas/dad/AdventNet/ZohoViewer/webapps/zv/store/j/j0abYj/j0abYj http://viewer.zoho.com//store/j/j0abYj/j0abYj.htm
Digital audio for video
Just as you create a finished video product with color correction, you can polish the audio, so that
sound levels and tonal quality is consistent throughout, and transitions between audio elements
are smooth. And just as effects add an element of magic to your video, you can sweeten the audio
track with music, sound effects, and additional dialogue or voice-overs.
You can use Adobe Premiere Pro to perform basic audio sweetening, and then open your editing
project in Adobe Audition for more advanced control of your audio. By using Audition, you can
work easily with multiple audio tracks and elements, add audio effects and processing, and then
fine-tune the mix.
sweetening and mixing audio
Sweetening means adding audio elements, such as music, sound effects, and additional dialogue,
and processing the audio with software or hardware to change the tonal quality and volume of
the sound. The final stage of sweetening is mixing, when you combine the elements by adjusting
the audio levels of each track to create an overall balanced sound. For example, you might mix
dialogue clips with ambient background sounds and a music track.
You can perform any combination of the following tasks in Adobe Premiere Pro:
• Adding audio elements and tracks: Just as you can add and edit video clips on the timeline, you
can add and edit audio elements. All of the same tools and techniques apply to audio clips, such
as setting In and Out points, speed, and duration. For example, you can add an audio track for
sound effects, and then add the sound of a door closing. You can then use the editing tools to
adjust the In and Out points of the clip, and change its position on the timeline to synchronize
(sync) with the video.
• Fading audio clips over time: While watching the video program, you can increase or decrease
the audio gain (volume levels) of an audio track at precise time points in the Adobe Premiere
Pro Timeline panel or by using the volume faders in the Audio Mixer to adjust and record
the volume levels for each audio track. The mixer channels include automation, so the level
changes you make are reproduced exactly when you preview or render a timeline.
• Panning/balancing stereo clips: When panning an audio clip, you create the illusion of a
sound coming from somewhere between the speakers by adjusting the amount of sound that
is sent to each speaker. For example, as you increase the amount sent to the right channel and
decrease the amount sent to the left, the sound appears to move to the right. If the audio level
is equal in both speakers, the sound appears to be centered. You could use panning to match a
dialogue clip to a person’s movement in the video frame. You can adjust pan and balance in the
Timeline panel, or by using the Pan control in the Audio Mixer to precisely position audio in a
stereo channel.
• Adding audio effects: Adobe Premiere Pro provides a wide range of built-in controls for pro-
cessing audio. For example, the Compressor/Expander effect fine-tunes dynamic range; the
Notch/Hum effect removes distracting hum; the Reverb effect acoustically simulates an envi-
ronment, like a large hall, and the Parametric Equalizer effect lets you tweak specific frequency
ranges. Like video effects, you can add multiple effects to a single audio clip, and use keyframes
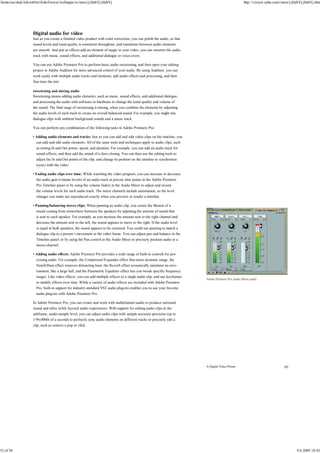
Adobe Premiere Pro Audio Mixer panel
to modify effects over time. While a variety of audio effects are included with Adobe Premiere
Pro, built-in support for industry-standard VST audio plug-ins enables you to use your favorite
audio plug-ins with Adobe Premiere Pro.
In Adobe Premiere Pro, you can create and work with multichannel audio to produce surround
sound and other richly layered audio experiences. With support for editing audio clips at the
subframe, audio-sample level, you can adjust audio clips with sample-accurate precision (up to
1/96,000th of a second) to perfectly sync audio elements on different tracks or precisely edit a
clip, such as remove a pop or click.
A Digital Video Primer
33 of 58 9.6.2009 18:42
2. /home/sas/dad/AdventNet/ZohoViewer/webapps/zv/store/j/j0abYj/j0abYj http://viewer.zoho.com//store/j/j0abYj/j0abYj.htm
When you import or capture a video clip that contains audio, the audio and video tracks are
linked by default, so that they move together in order to maintain sync. When you edit or move
a video clip linked to an audio clip, the changes apply to both the audio and video. However,
there are situations when you may want to work with the audio and video as separate clips. Then
you can unlink the tracks, make your separate edits, and then relink the clips if you want. For
example, you can unlink clips to create an L-cut.
You can process an audio clip in several ways: choose a menu command for a selected clip, apply
an audio effect, or adjust volume and pan/balance levels either directly in the timeline or by using
the Audio Mixer. The Adobe Premiere Pro Audio Mixer supports many features. Use the Audio
Mixer to capture audio directly to the timeline. For example, you can record live professional
voiceovers to the timeline as it plays back or record notes about an edit sequence as you watch it.
Adobe Premiere Pro automatically records the voiceover live as the video plays and inserts a new
clip on the specified track.
Advanced audio post-production
Adobe Premiere Pro is primarily a video editing application. When your production requires
more advanced audio editing and processing, you can hand-off the audio to Adobe Audition,
which specializes in audio production. Adobe Audition includes support for the Edit Original
command found in both After Effects and Adobe Premiere Pro. When working in either of those
programs, select an audio file or clip in your project and use the Edit Original command to open
either that single file or the entire session that created it in Adobe Audition. The process is seam-
less, with Adobe Premiere Pro taking care of all the necessary file management.
Adobe Audition
Lets you create and mix audio in a professional multi-
track recording studio environment while watching
your video.
The integrated wave editing view in Adobe Audition means you don’t need to leave the application for any of
your digital audio tests.
Adobe Audition is comprehensive and versatile enough to satisfy the demands of broadcast
sound engineers and professional musicians, but intuitive enough for anyone to grasp. Adobe
Audition can be thought of as a professional multitrack recording studio on a computer, which
means you can record, play, edit, process, and mix multiple tracks of audio with the same high
level of quality you would expect in a professional studio. To build a complete studio, you can
add multichannel audio hardware to your computer, microphones and a studio space. Then you
can sweeten your video with musical underscores, music beds, foley effects, and replace and
synchronize dialogue.
A Digital Video Primer
34 of 58 9.6.2009 18:42
3. /home/sas/dad/AdventNet/ZohoViewer/webapps/zv/store/j/j0abYj/j0abYj http://viewer.zoho.com//store/j/j0abYj/j0abYj.htm
You can import AVI files and sweeten audio tracks while you watch video playback, then resave
the AVI file with a new audio track. The editing tools in Adobe Audition enable you to be as
precise in your cuts as you like, with editing control down to the sample level and automatic
zero-crossing detection to avoid pops when you make cuts. You can also add crossfades
and automation envelopes to smooth transitions and balance the over-all volume; and you can
change tempo without shifting pitch or shift pitch without changing tempo.
When you need to produce audio quickly, you can build a soundtrack from thousands of high-
quality royalty-free loops that are included with Adobe Audition. The loops come in a wide
variety of musical styles, and exceptional looping controls in Adobe Audition make them easy to
work with. In addition, the loops automatically conform to the global session tempo and key.
The tools in Adobe Audition give you the power to create rich, nuanced audio at 32-bit resolu-
tion using any sample rate up to 10 MHz. Precise sample rate conversion guarantees high-quality
results, and is ideal for upsampling CD material from 44.1 kHz to 48 kHz for video or 96 kHz for
audio DVD. Adobe Audition also includes sophisticated audio restoration features. When you’re
ready for the final mix, you can use the powerful mastering and analysis tools, which all run
natively at 32-bit resolution. Batch processing tools save you time by automating repetitive tasks,
such as file format conversion, and matching the volume of multiple files. With the multichannel
encoder, you can easily transform any mix into a surround sound experience.
Adobe Audition provides extensive support for industry-standard audio file formats, including WAV, AIFF, MP3,
mp3PRO, WMA, and WMAPro.
synchronization issues
To make sure the audio tracks synchronize properly with the video, you need to consider audio
sample rates in relation to the timebase and frame rate of your project. It is a common mistake
to create a movie at 30 fps with audio at 44.1 kHz, and then play back the movie at 29.97 fps (for
NTSC video). With the video playing at 29.97 fps and the audio at 30 fps, at some point you will
notice that the audio starts to get ahead of the video. The difference in frame rates results in a
synchronization discrepancy that appears at a rate of one frame per 1000 frames, or one frame
per 33.3 seconds (just under two frames per minute). If you notice audio and video drifting apart
at about this rate, check for a project frame rate that doesn’t match the timebase.
A Digital Video Primer
35 of 58 9.6.2009 18:42
4. /home/sas/dad/AdventNet/ZohoViewer/webapps/zv/store/j/j0abYj/j0abYj http://viewer.zoho.com//store/j/j0abYj/j0abYj.htm
Visual effects and motion graphics
Adobe Premiere Pro provides a wide range of transitions and effects, as well as powerful capabili-
ties for titling, motion graphics, transparency, and compositing. However, just as Adobe Audition
enables you to do more with your audio, Adobe After Effects gives you more control over the
visual aspects of your production, providing the tools to work with effects and create motion
graphics. After Effects lets you do more advanced tasks, including sophisticated compositing of
moving imagery and precisely controlled 2D and 3D animations.
After Effects offers the speed, precision, and creative control you need to produce superb motion
graphics and visual effects for film, video, multimedia, or the web. With its professional com-
positing tools, keyframe-based animation system, and extensive selection of visual effects, After
Effects delivers an unparalleled set of powerful production tools for generating dynamic openers,
bumpers, titles, games, web animations, and more. After Effects has also spawned an entire After Effects
category of third-party software and training support products.
At almost any time, the work of After Effects artists can be seen in broadcast, cable, and satellite
programming in every part of the world. The list of major motion pictures that have been cre-
ated with the help of After Effects is extensive, including effects-heavy films such as The Aviator, CHOOSE THE EDITION THAT’S RIGHT FOR YOU
Monsters Inc., Gladiator, Tomb Raider, Hannibal, Spy Kids 3D, Hulk, Bruce Almighty, The Italian After Effects is available in two editions: Standard and
Professional. You can find a detailed description of
Job, Cold Mountain, and Hollow Man.
the features of both editions at www.adobe.com/
products/aftereffects/matrix.html.
If you are new to the art of motion graphics and visual effects, some of what you are going to
read about in the next few pages may sound pretty complicated, but After Effects makes it easy to
learn. Context-sensitive menus make commands available right where you need them, and tool
tips help new users see what a tool or option does.
Composition panel
Character and
Paragraph panels
Project panel
Motion Sketch and
Time Control panels
Effects & Presets panel
Timeline panel
Commonly used panels in After Effects
A Digital Video Primer
36 of 58 9.6.2009 18:42
5. /home/sas/dad/AdventNet/ZohoViewer/webapps/zv/store/j/j0abYj/j0abYj http://viewer.zoho.com//store/j/j0abYj/j0abYj.htm
Video compositing
Compositing is the process of combining two or more images to yield a resulting, enriched
image. Composites can be made with still or moving images. Compositing simply means playing
one clip on top of another.
The terms keying and matting, in video and film production, refer to specific compositing techniques:
• Keying uses different types of transparency keys to find pixels in an image that match a speci-
fied color or brightness and makes those pixels transparent or semitransparent. For example, if
you have a clip of a weatherman standing in front of a blue-screen background, you can key out
the blue using a blue-screen key, and replace it with a weather map.
• Matting uses a mask or matte to apply transparency or semitransparency to specified areas
of an image. By using keying or matting to apply transparency to portions of an image that is
layered on top of another image, portions of the lower image are revealed.
The Auto-trace feature in After Effects converts alpha channels into vector-based masks. This feature makes it
easy to use the edge of an object or any key you’ve created as a path. For example, you can use an alpha channel
from a green-screen shot to create an animated vector shape or use as the basis for text on a path.
Combining diverse types of media elements is one of the things for which After Effects is best known.
After Effects is the optimal program for layering media in motion because of its extensive transfer
mode support (just like in Photoshop), and its powerful masking capabilities, along with its wide
selection of keying methodologies.
editing: In order to composite video clips, you first edit and assemble them onto a timeline. Place
the clips to which you want to apply keys or mattes on superimpose tracks above the Video 1
track footage. After Effects includes tools and commands that streamline the process of con-
structing and refining compositions by turning time-consuming manual tasks into operations
that can be completed with a simple tool or command.
masking: You can create, edit, and animate an unlimited number of masks on every layer in
After Effects. Draw paths to create transparencies or add new objects to an animation such as
stroked lines. Combine paths to make unusual shapes using operations such as Add, Subtract, and
Intersect. Rotate and scale masks, and apply opacity settings to make masks appear and disap-
pear over time. Lock masks to protect them from change. Extensive masking capabilities give
you extraordinary control:
• edit masks in the Composition panel: Copy and paste masks into your compositions from Illustrator
and Photoshop, or create masks on the fly by drawing them directly in the After Effects Composi-
tion window. This process saves time and can make it easier to adjust a mask precisely, relative to
other layers. You can also continue to create masks in the Layer panel.
• Assign mask colors: Assign colors to masks for easy identification.
• Feather the mask edge: Create and adjust the inner or outer feather of a mask by insetting or We applied the Glow and Stroke effects to the
outsetting the mask edge from the mask shape. mask created by the Auto-trace command.
Because the alpha channel is traced in each
• Apply motion blur: By adding motion blur to masks, you create realistic-looking mask animations. frame, the mask animates smoothly.
A Digital Video Primer
37 of 58 9.6.2009 18:42
6. /home/sas/dad/AdventNet/ZohoViewer/webapps/zv/store/j/j0abYj/j0abYj http://viewer.zoho.com//store/j/j0abYj/j0abYj.htm
2D and 3D compositing: You can animate images in either 2 or 3 dimensions. With either type,
you can move objects horizontally (x axis) or vertically (y axis), but 3D animation enables you
to add depth (z axis), such as change the z-position, z-rotation, and orientation or perspective.
And you can animate the object to interact with light direction, shadows, and cameras (points of
view). In addition, you can use different types of animation on each layer. For example, you could
composite a 2D title animation over a 3D animation that synchronizes movement with video on
a third layer.
Animating
Making things move is only one aspect of animation. After Effects offers a wide range of features
and tools to augment your animation capabilities.
Timeline implementation: Animation revolves around the concept of elements changing over
time. The ability to selectively display control curves with linear keyframe information directly
inside the Timeline panel lets you fine-tune timings of multiple elements. The Timeline panel
provides flexibility for viewing and editing all object parameters.
Keyframe control: Keyframes are the heart and soul of moving objects, and After Effects provides
precise control over keyframe type, generation, placement, and all other aspects of keyframe
functionality. Full curve-based editing of keyframe data delivers the ability to exactly tweak
motion and animation data to fit a desired requirement for all aspects of motion and effects over
time. Use the Graph Editor in the Timeline panel to view and work with changes in effects and
animations as a two-dimensional graph.
Motion Sketch and Smoother: Plotting complex motion can be difficult if you must enter
keyframes manually. By using the Motion Sketch panel, you can draw animation paths on the
screen, varying the velocity of a path by adjusting your drawing speed. After Effects, then, auto-
matically creates the keyframes for you. Use the Smoother to smooth the shape of the path and
fine-tune it until the animation moves exactly as you want.
Parenting: You can synchronize the motion and other properties of objects in two or more layers
by defining a parent layer and one or more child layers. By defining a parent-child relationship
between layers, you ensure that the child layers inherit all of the transformations applied to the
parent. Parenting is useful for making objects in multiple layers appear to move and change as
one object. For example, when the scale and position of the parent layer are animated, the child
layers behave the same way. Parent-child relationships aren’t limited to footage layers. You can
also define relationships between light and camera layers in 3D compositions. For example,
define a camera as the child to a key footage element in a composition, so the camera will auto-
matically track the movement of that element. Or, a light might have a camera as a parent, so the
elements that a camera is pointing at are always illuminated.
Parent-child relationships are defined between different layers to quickly create a dancing skeleton. As a parent
part moves (the upper arm), so do its children (the lower arm and hand.)
A Digital Video Primer
38 of 58 9.6.2009 18:42
7. /home/sas/dad/AdventNet/ZohoViewer/webapps/zv/store/j/j0abYj/j0abYj http://viewer.zoho.com//store/j/j0abYj/j0abYj.htm
text/character generation: With After Effects, you can type and edit text directly in the Compo-
sition panel using the Adobe-standard Type tool, and format text using familiar, Adobe-standard
Character and Paragraph panels, as well as keyboard shortcuts. You can then composite or
animate the text, like any other video source. If you’ve ever worked with text in Photoshop or
Illustrator, you’ll be right at home using the text tools in After Effects. You can fine-tune the look
of text using kerning, tracking, baseline shift, and other interactive options that provide instant
visual feedback.
3D image created in After Effects
A single text layer and only two keyframes were used to create this 2D text animation. Scale, Opacity, Rotation, WORKING IN 3D
and Character Offset properties were animated for a single text selector, so that the property changes resolve The tools in After Effects make it easy to create elabo-
into a clear, recognizable word. rate 3D motion graphics and visual effects.
View D compositions from different perspec-
text animation: Animating text used to be a labor-intensive process, in which every letter was tives: View a composition from six different preset
placed on a separate layer and individually animated. With After Effects, you can animate char- vantage points (front, back, top, bottom, left, and
acters, words, or lines within a single text layer, animate properties that move smoothly across right), the active camera, and three additional user-
definable custom views. You can switch views easily
the same range, and animate the entire text layer as a unit. Animated text remains fully
with keyboard shortcuts.
editable throughout the design process, so making late-stage copy changes is easy. To choose
Define cameras and lenses: Create one or more
which part of a text layer you want to animate, you define a selector that applies to specific
cameras to define the perspectives from which your
characters or a certain percentage range of the overall text string. Because you can animate the audience views your 3D animation, and then cut
selector, for example, by moving it from the start of the text to the end, it’s easy to create anima- between cameras to create complex scenes. For
tions that ripple a property change, such as a change in color or scale, across the text on a layer. example, you might define a camera using a wide
Each selector you create can animate multiple properties, from standard ones, such as position angle 15mm preset, then cut to a second camera
created using a 200mm lens to capture close-ups
and opacity, to text-specific options, such as baseline shift and tracking. You can animate a ran-
from a different perspective. In addition to standard
dom wiggle across a range of text, and you can also apply a wiggle to other animated properties preset lenses, you can create and save custom camera
that apply to text. For example, you could create an animation in which a random scale change presets.
ripples across an entire range of text, and, at the same time, wiggle the rotation of each letter in Define lights to illuminate layers in D space:
the range. Create as many lights as you need, and then adjust
and animate each light’s properties, controlling its
Adding effects illumination and color, as well as the shadow it casts.
After Effects provides precision tools for creating a limitless range of visual and audio effects For example, spotlights provide dramatic lighting
from the most utilitarian color correction and audio sweetening tools to extremely sophisticated effects by pointing a cone of light at the point you
define.
distortion and time-remapping features. After Effects comes with hundreds of effect plug-ins and
animation presets, and you can expand your effects toolkit even further with numerous third- Control how layers interact with light sources:
Specify material properties that define how a light
party plug-ins. You can apply an unlimited number of effects to every layer, and save your most
affects the surface of a layer, as well as how layers
frequently used effects (including keyframes) as animation presets. interact with lights. You can define and animate
Ambient, Diffusion, Specular, and Shininess values.
Animate D layer properties: Animate many prop-
erties of 3D layers, lights and cameras, such as position,
rotation, and orientation, to create a wide range of
effects. You can also automatically orient 3D layers
towards a camera, or animate lights and cameras
along a path or towards a point of interest you define.
A Digital Video Primer
39 of 58 9.6.2009 18:42
8. /home/sas/dad/AdventNet/ZohoViewer/webapps/zv/store/j/j0abYj/j0abYj http://viewer.zoho.com//store/j/j0abYj/j0abYj.htm
Visual excitement: For each effect that comes with After Effects or that you add to your toolkit,
there are an unlimited number of ways to apply that effect. The effects functionality in Adobe
Premiere Pro is based on the toolset in After Effects and they work quite similarly. You organize
your effects in the Effects & Presets panel, and manipulate the properties of effects in the Effect
Controls panel.
Using the Scribble effect, you can vary the look of
animated scribbles by adjusting how much the fill
wiggles, where the fill starts and ends, where it is
applied to a mask, how it is composited with the layer,
and how random the variations in the fill appear.
The Effect Controls panel in After Effects
• liquify: When you apply Liquify, you can distort footage using brush-based Liquify tools
similar to those in Photoshop. For example, the Turbulence tool smoothly scrambles pixels
and is great for creating clouds, smoke, and other similar effects. The Clone Stamp tool makes
it easy to clone the distortion from one part of an image to another, and the Twirl tools rotate
pixels clockwise or counter-clockwise. You can use the Shift Pixels and Reflection tools to
move pixels perpendicular to the brush stroke to create the effect of reflections in water. Work
with the Reconstruction tool to make dramatic distortions more subtle or return the footage to
its original state. You can customize settings for each tool, and use masks to protect, or freeze
areas of the footage so that the Liquify tools don’t modify them. You can control how quickly
a distortion animates by setting keyframes for Distortion Percentage; if you want to apply a
distortion to tracked footage, you can offset the distortion mesh by applying tracking data to
the Distortion Mesh Offset property.
• Warp: Transform layers with a Warp effect. Fifteen preset warp styles give you options that
range from transforming layers into regular geometric shapes, such as Arcs, Wave, and Flag,
to simulating the look of objects viewed through a fisheye lens or inflated like a balloon. You
can animate the effect easily by setting keyframes for the Bend and Distortion properties, and
you can customize each Warp Style by changing its axis and specifying a more or less extreme
Bend value.
The Liquify tool was used to make the
cat’s eyes bulge and to add a small smile.
A Digital Video Primer 0
40 of 58 9.6.2009 18:42