
Empfohlen
Weitere ähnliche Inhalte
Was ist angesagt?
Was ist angesagt? (20)
Ähnlich wie Ardunio
Ähnlich wie Ardunio (20)
Kürzlich hochgeladen
Kürzlich hochgeladen (20)
Ardunio
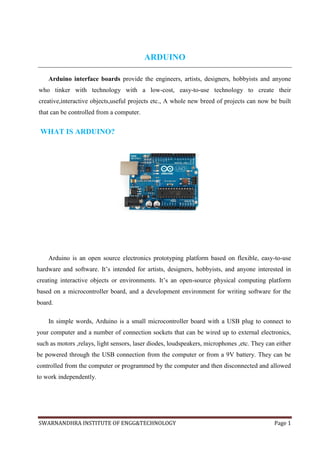
- 1. SWARNANDHRA INSTITUTE OF ENGG&TECHNOLOGY Page 1 ARDUINO Arduino interface boards provide the engineers, artists, designers, hobbyists and anyone who tinker with technology with a low-cost, easy-to-use technology to create their creative,interactive objects,useful projects etc., A whole new breed of projects can now be built that can be controlled from a computer. WHAT IS ARDUINO? Arduino is an open source electronics prototyping platform based on flexible, easy-to-use hardware and software. It’s intended for artists, designers, hobbyists, and anyone interested in creating interactive objects or environments. It’s an open-source physical computing platform based on a microcontroller board, and a development environment for writing software for the board. In simple words, Arduino is a small microcontroller board with a USB plug to connect to your computer and a number of connection sockets that can be wired up to external electronics, such as motors ,relays, light sensors, laser diodes, loudspeakers, microphones ,etc. They can either be powered through the USB connection from the computer or from a 9V battery. They can be controlled from the computer or programmed by the computer and then disconnected and allowed to work independently.
- 2. SWARNANDHRA INSTITUTE OF ENGG&TECHNOLOGY Page 2 Anyone can buy this device through online auction site or search engine. Since the Arduino is an open-source hardware designs and create their own clones of the Arduino and sell them, so the market for the boards is competitive. An official Arduino costs about $30 and a clone often less than $20. The name “Arduino” is reserved by the original makers. However, clone Arduino designs often Have the letters “dui no” on the end of their name, for example, Fredonia or DFRduino. The software for programming your Arduino is easy to use and also freely available for Windows, Mac, and LINUX computers at no cost. HISTORY OF ARDUINO : While teaching a physical computing class at the Interaction Design Institute Ivrea in 2005, Massimo Banzi’s students were unwilling to spend the 76 euros for the BASIC Stamp microcontrollers commonly used in such applications. Banzi and his colleagues looked for alternatives, finally settling on the wiring platform developed by one of Banzi’s students. In his own words: “…we started to figure out how we could make the whole platform even simpler, even cheaper, and even easier to Use. And then we started to essentially implement the whole thing as an open source project.” Once they had a prototype, a student wrote the software that would allow wiring programs to run on the new platform. Upon seeing the project, visiting professor Casey Rees suggested that there might be wider applications than just design schools for the new product. The prototype was redesigned for mass production and a test run of 200 boards was made. Orders began coming in from other design schools and the students looking for Arduinos, and the Arduino project was born and Massimo Banzi and David Cuartielles became its founders.”ARDUINO” is an Italian word, meaning “STRONG FRIEND”. The English version of the name is “Hardin”. As of May 2011, more than 300,000 Arduino units are “in the wild”
- 3. SWARNANDHRA INSTITUTE OF ENGG&TECHNOLOGY Page 3 Arduino UNO This is the latest revision of the basic Arduino USB board. It connects to the computer with a standard USB cable and contains everything else you need to program and use the board. It can be extended with a variety of shields: custom daughter-boards with specific features. It is similar to the Duemilanove, but has a different USB-to-serial chip the ATMega8U2, and newly designed labeling to make inputs and outputs easier to identify The UNO is the best board to get started with electronics and coding. If this is your first experience tinkering with the platform, the UNO is the most robust board you can start playing with. The UNO is the most used and documented board of the whole Arduino & Genuino family.
- 4. SWARNANDHRA INSTITUTE OF ENGG&TECHNOLOGY Page 4 Technical specs: Microcontroller ATmega328P Operating Voltage 5V Input Voltage (recommended) 7-12V Input Voltage (limit) 6-20V Digital I/O Pins 14 (of which 6 provide PWM output) PWM Digital I/O Pins 6 Analog Input Pins 6 DC Current per I/O Pin 20 mA DC Current for 3.3V Pin 50 mA Flash Memory 32 KB (ATmega328P) of which 0.5 KB used by bootloader SRAM 2 KB (ATmega328P) EEPROM 1 KB (ATmega328P) Clock Speed 16 MHz Length 68.6 mm Width 53.4 mm Weight 25 g
- 5. SWARNANDHRA INSTITUTE OF ENGG&TECHNOLOGY Page 5 Arduino Mega 2560 The MEGA 2560 is designed for more complex projects. With 54 digital I/O pins, 16 analog inputs and a larger space for your sketch it is the recommended board for 3D printers and robotics projects. This gives your projects plenty of room and opportunities The Mega 2560 is a microcontroller board based on the ATmega2560. It has 54 digital input/output pins (of which 15 can be used as PWM outputs), 16 analog inputs, 4 UARTs (hardware serial ports), a 16 MHz crystal oscillator, a USB connection, a power jack, an ICSP header, and a reset button. It contains everything needed to support the microcontroller; simply connect it to a computer with a USB cable or power it with a AC-to-DC adapter or battery to get started. The Mega 2560 board is compatible with most shields designed for the Uno and the former boards Duemilanove or Diecimila. .
- 6. SWARNANDHRA INSTITUTE OF ENGG&TECHNOLOGY Page 6 Technical specs: Microcontroller ATmega2560 Operating Voltage 5V Input Voltage (recommended) 7-12V Input Voltage (limit) 6-20V Digital I/O Pins 54 (of which 15 provide PWM output) Analog Input Pins 16 DC Current per I/O Pin 20 mA DC Current for 3.3V Pin 50 mA Flash Memory 256 KB of which 8 KB used by bootloader SRAM 8 KB EEPROM 4 KB Clock Speed 16 MHz Length 101.52 mm Width 53.3 mm Weight 37 g
- 7. SWARNANDHRA INSTITUTE OF ENGG&TECHNOLOGY Page 7 Arduino Leonardo The Arduino Leonardo is a microcontroller board based on the ATmega32u4 (datasheet). It has 20 digital input/output pins (of which 7 can be used as PWM outputs and 12 as analog inputs), a 16 MHz crystal oscillator, a micro USB connection, a power jack, an ICSP header, and a reset button. It contains everything needed to support the microcontroller; simply connect it to a computer with a USB cable or power it with a AC-to-DC adapter or battery to get started. The Leonardo differs from all preceding boards in that the ATmega32u4 has built-in USB communication, eliminating the need for a secondary processor. This allows the Leonardo to appear to a connected computer as a mouse and keyboard, in addition to a virtual (CDC) serial / COM port. It also has other implications for the behavior of the board; these are detailed on the getting started page.
- 8. SWARNANDHRA INSTITUTE OF ENGG&TECHNOLOGY Page 8 Technical specs: Microcontroller ATmega32u4 Operating Voltage 5V Input Voltage (recommended) 7-12V Input Voltage (limits) 6-20V Digital I/O Pins 20 PWM Channels 7 Analog Input Channels 12 DC Current per I/O Pin 40 mA DC Current for 3.3V Pin 50 mA Flash Memory 32 KB (ATmega32u4) of which 4 KB used by bootloader SRAM 2.5 KB (ATmega32u4) EEPROM 1 KB (ATmega32u4) Clock Speed 16 MHz Length 68.6 mm Width 53.3 mm Weight 20g
- 9. SWARNANDHRA INSTITUTE OF ENGG&TECHNOLOGY Page 9 Arduino LilyPad The LilyPad Arduino is designed for e-textiles and wearables projects. It can be sewn to fabric and similarly mounted power supplies, sensors and actuators with conductive thread The LilyPad Arduino Main Board is based on the ATmega168V (the low-power version of theATmega168) or the ATmega328V. The LilyPad Arduino was designed and developed by Leah Buechley and SparkFun Electronics. The LilyPad Arduino can be powered via the USB connection or with an external power supply. If an external power supply is used, it should provide between 2.7 and 5.5 volts. This can come either from an AC-to-DC adapter (wall-wart) or battery. Again, don't power the LilyPad Arduino with more than 5.5 volts, or plug the power in backwards: you'll kill it.
- 10. SWARNANDHRA INSTITUTE OF ENGG&TECHNOLOGY Page 10 Technical Specs: Microcontroller ATmega168 or ATmega328V Operating Voltage 2.7-5.5 V Input Voltage 2.7-5.5 V Digital I/O Pins 14 PWM Channels 6 Analog Input Channels 6 DC Current per I/O Pin 40 mA Flash Memory 16 KB (of which 2 KB used by bootloader) SRAM 1 KB EEPROM 512 bytes Clock Speed 8 MHz
- 11. SWARNANDHRA INSTITUTE OF ENGG&TECHNOLOGY Page 11 Arduino MICRO The Micro is the smallest board of the family, easy to integrate it in everyday objects to make them interactive. The Micro is based on the ATmega32U4 microcontroller featuring a built-in USB which makes the Micro recognisable as a mouse or keyboard. The Micro is a microcontroller board based on the ATmega32U4 (datasheet), developed in conjunction with Adafruit. It has 20 digital input/output pins (of which 7 can be used as PWM outputs and 12 as analog inputs), a 16 MHz crystal oscillator, a micro USB connection, an ICSP header, and a reset button. It contains everything needed to support the microcontroller; simply connect it to a computer with a micro USB cable to get started. It has a form factor that enables it to be easily placed on a breadboard.
- 12. SWARNANDHRA INSTITUTE OF ENGG&TECHNOLOGY Page 12 Technical specs: Microcontroller ATmega32U4 Operating Voltage 5V Input Voltage (recommended) 7-12V Input Voltage (limit) 6-20V Digital I/O Pins 20 PWM Channels 7 Analog Input Channels 12 DC Current per I/O Pin 20 mA DC Current for 3.3V Pin 50 mA Flash Memory 32 KB (ATmega32U4) of which 4 KB used by bootloader SRAM 2.5 KB (ATmega32U4) EEPROM 1 KB (ATmega32U4) Clock Speed 16 MHz Length 48 mm Width 18 mm Weight 13 g
- 13. SWARNANDHRA INSTITUTE OF ENGG&TECHNOLOGY Page 13 Arduino Yún Arduino YÚN is the perfect board to use when designing connected devices and, more in general, Internet of Things projects. It combines the power of Linux with the ease of use of Arduino The Arduino Yún is a microcontroller board based on the ATmega32u4 and the Atheros AR9331. The Atheros processor supports a Linux distribution based on OpenWrt named OpenWrt-Yun. The board has built-in Ethernet and WiFi support, a USB-A port, micro-SD card slot, 20 digital input/output pins (of which 7 can be used as PWM outputs and 12 as analog inputs), a 16 MHz crystal oscillator, a micro USB connection, an ICSP header, and a 3 reset buttons.
- 14. SWARNANDHRA INSTITUTE OF ENGG&TECHNOLOGY Page 14 Technical specs: Because the Yún has two processors, this section shows the characteristics of each one in two separate tables. AVR Arduino microcontroller Microcontroller ATmega32U4 Operating Voltage 5V Input Voltage 5 Digital I/O Pins 20 PWM Channels 7 Analog Input Pins 12 DC Current per I/O Pin 40 mA DC Current for 3.3V Pin 50 mA Flash Memory 32 KB (of which 4 KB used by bootloader) SRAM 2.5 KB EEPROM 1 KB Clock Speed 16 MHz
- 15. SWARNANDHRA INSTITUTE OF ENGG&TECHNOLOGY Page 15 Linux Microprocessor Processor Atheros AR9331 Architecture MIPS @400MHz Operating Voltage 3.3V Ethernet IEEE 802.3 10/100Mbit/s WiFi IEEE 802.11b/g/n USB Type-A 2.0 Host Card Reader Micro-SD only RAM 64 MB DDR2 Flash Memory 16 MB SRAM 2.5 KB EEPROM 1 KB Clock Speed 16 MHz PoE compatible 802.3af card support See Power
- 16. SWARNANDHRA INSTITUTE OF ENGG&TECHNOLOGY Page 16 Howdoesthearduinowork? The smaller chip is an Atmega8U2 (or 16U2 on revision 3 of the board) that converts USB input to serial; you don't program this chip (also known as a bootloader); you program the big one on the DIL14 socket(28pins). And yes, it's removable; if you happen to toast the chip you can replace it with a similar part. The pins labelled ICSP (in circuit serial programming) should never be touched as a beginner unless you have a dedicated chip programmer for the Atmel chips-- tbh, i recommend not soldering them for absolute beginners... one thing to note when doing electronics is that most things in a circuit are relatively redundant: they improve the stability of the circuit, but they don't necessarily add functionality. For instance, let's take the power section (upper right corner) of the diagram or lower left of the board. Sure, you can power up the Arduino with 2 random batteries and forego all that circuitry.
- 17. SWARNANDHRA INSTITUTE OF ENGG&TECHNOLOGY Page 17 But USB works with up to 5.5V and some parts require 3.3V... here is where IC1 (IC1 is the big 4pin chip right above the power jack) and IC2 come in, they are called "linear DC regulators" and step down the voltage so that your Arduino never gets cooked by accident. Note: they can get very hot (100C+), and that's perfectly normal. See all those attached capacitors? PC1 PC2 and C2? --you can't miss them on the board - they're the big solid electrolytic, rounded ones --well, the circuit works fine without them. They role is for filtering, stability and 'AC decoupling'. See that diode under the big capacitors (labelled M7 here or D1 on schematic) - this is called an anti-moron device. It prevents you from injecting the wrong polarity into the Arduino board, which would damage everything. If you put a plug and the board isn't powered up, reverse the wires into the jack (or flick a polarity switch, if you have one on your wall cube). See that big rounded metallic package?(XT1) - has a distinctive symbol that looks like a resistor sandwiched between a capacitor-- That's a crystal oscillator. You inject a small AC wave and it starts to resonate (the chip does that for you), and in this case at a peak frequency of 16MHz. Won't be exactly 16Mhz, but typically within 30 parts per million of that. Normally not a problem, but if you're trying to make a real time clock measuring seconds, you need to know how accurate you're going to be. There is a much smaller crystal near the removable chip (XT2). Because crystal oscillators are cheap and accurate enough, they are a very popular solution to generating clocks in electronics. Most are a piece of lab grown silicon dioxide, cut at very precise dimensions. In the distant past they used natural quartz (hence watches with a quartz crystal). High frequency crystals like these require external capacitors to work. They are usually in the low picofarad range. They remove some DC bias and also filter excessive noise from going into the ground, but also help the crystal oscillate at the precise frequency quicker. The rest are resistors that limit the current going into a certain part of the circuit. For instance above the Tx/Rx LEDs there is a pack of 4 reistors (8 pins) labelled 102 = 10^2=100 Ohm (if the notation follows standard labelling). The Tx/Rx stands for transmit/receive. if we didn't have resistors before the LED, they would eventually burn up due to self-heating. There are various switches, jumpers and contacts hidden on the board (don't worry about them at first), of which the most obvious one is the reset push-button,
- 18. SWARNANDHRA INSTITUTE OF ENGG&TECHNOLOGY Page 18 ATmega8(Microcontroller): 16 MHz 8 Kbyte Flash RAM(1K taken by the boot loader) 1 Kbyte RAM(eg.for auto/local variables and stack) 14 digital Input/Output Ports Pin description of ATMEGA328P The Arduino UNO R3’s processing power is provided by the ATmega328. The pin out diagram and block diagram for this processor are provided in Figures 1.4 and 1.5. In this section, we provide additional detail on the systems aboard the processor.
- 19. SWARNANDHRA INSTITUTE OF ENGG&TECHNOLOGY Page 19 ATmega328 block diagram: Bulk programmable flash EEPROM is used to store programs. It can be erased and programmed as a single unit. Also, should a program require a large table of constants, it may be included as a global variable within a program and programmed into flash EEPROM with the rest of the program. Flash EEPROM is nonvolatile meaning memory contents are retained when microcontroller power is lost. The ATmega328 is equipped with 32K bytes of onboard reprogrammable flash memory. This memory component is organized into 16K locations with 16 bits at each location. :
- 20. SWARNANDHRA INSTITUTE OF ENGG&TECHNOLOGY Page 20 Advantages of Ardunio: 1.Ready to Use: The biggest advantage of Arduino is its ready to use structure. As Arduino comes in a complete package form which includes the 5V regulator, a burner, an oscillator, a micro-controller, serial communication interface, LED and headers for the connections. You don't have to think about programmer connections for programming or any other interface. Just plug it into USB port of your computer and that's it. Your revolutionary idea is going to change the world after just few words of coding. 2. Examples of codes: Another big advantage of Arduino is its library of examples present inside the software of Arduino. I'll explain this advantage using an example of voltage measurement. For example if you want to measure voltage using ATmega8 micro-controller and want to display the output on computer screen then you have to go through the whole process. The process will start from learning the ADC's of micro-controller for measurement, went through the learning of serial communication for display and will end at USB – Serial converters. 3.Effortless functions: During coding of Arduino, you will notice some functions which make the life so easy. Another advantage of Arduino is its automatic unit conversion capability. You can say that during debugging you don't have to worry about the units conversions. Just use your all force on the main parts of your projects. You don't have to worry about side problems 4. Large community: There are many forums present on the internet in which people are talking about the Arduino. Engineers, hobbyists and professionals are making their projects through Arduino. You can easily find help about everything.
- 21. SWARNANDHRA INSTITUTE OF ENGG&TECHNOLOGY Page 21 Dis Advantages of Ardunio: 1. Structure: Yes, the structure of Arduino is its disadvantage as well. During building a project you have to make its size as small as possible. But with the big structures of Arduino we have to stick with big sized PCB’s. If you are working on a small micro-controller like ATmega8 you can easily make your PCB as small as possible. 2.Cost: The most important factor which you cannot deny is cost. This is the problem which every hobbyist, Engineer or Professional has to face. Now, we must consider that the Arduino is cost effective or not. Applications: Domestic appliances Industrial appliances Medical appliances Automation
- 22. SWARNANDHRA INSTITUTE OF ENGG&TECHNOLOGY Page 22 Conclusion Over the years, Arduino has went out to become a huge success and a common name among students. With google deploying it, people’s imagination has went out to much higher level than before. A developer in the annual GOOGLE IO conference said “when Arduino and Android coming together, this really proves “INFINITY EXISTS” in the future”. I think a study on Arduino and practical experiments on Arduino must be added for UG courses of engineering, to help students to leverage their talents, and imagination.
- 23. SWARNANDHRA INSTITUTE OF ENGG&TECHNOLOGY Page 23 REFERENCES 1. http://www.arduino.cc -Arduino Official webpage 2. http://en.wikipedia.org/wiki/Arduino -wikipedia 3. Jonathan Oxer,Hugh Blemings “Practical Arduino-cool projects for open source hardware” 4.Simon monk “30 ARDUINO PROJECTS for the EVIL GENIUS”. 5. http://www.arduino.cc/playground/Projects/ArduinoUsers 6.http://www.arduinothedocumentary.org 7.http://www.google.com 8.http://www.accessories.android.com