
Empfohlen
Empfohlen
Weitere ähnliche Inhalte
Mehr von valari_
Mehr von valari_ (20)
Kürzlich hochgeladen
Kürzlich hochgeladen (20)
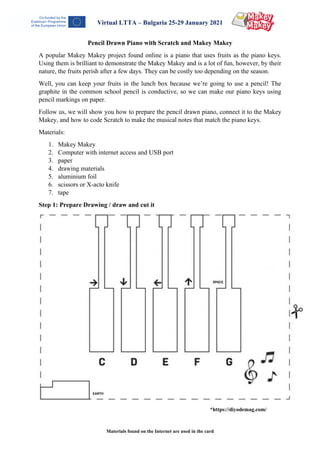
Pencil Drawn Piano with Scratch and Makey Makey
- 1. Materials found on the Internet are used in the card Virtual LTTA – Bulgaria 25-29 January 2021 Pencil Drawn Piano with Scratch and Makey Makey A popular Makey Makey project found online is a piano that uses fruits as the piano keys. Using them is brilliant to demonstrate the Makey Makey and is a lot of fun, however, by their nature, the fruits perish after a few days. They can be costly too depending on the season. Well, you can keep your fruits in the lunch box because we’re going to use a pencil! The graphite in the common school pencil is conductive, so we can make our piano keys using pencil markings on paper. Follow us, we will show you how to prepare the pencil drawn piano, connect it to the Makey Makey, and how to code Scratch to make the musical notes that match the piano keys. Materials: 1. Makey Makey 2. Computer with internet access and USB port 3. paper 4. drawing materials 5. aluminium foil 6. scissors or X-acto knife 7. tape Step 1: Prepare Drawing / draw and cut it *https://diyodemag.com/
- 2. Materials found on the Internet are used in the card Virtual LTTA – Bulgaria 25-29 January 2021 Step 2: Prepare Piano Sounds Click on the Sounds Tab. This Sounds area is where we will add in the C, D, E, F, and G piano key sounds into our program, along with a clapping sound effect. Select the speaker icon in the bottom left of the screen. You should notice white blocks appear in the screen which represent all different sounds. If you hover your mouse over these blocks a sound will play. First, search for the D piano sound by searching for "D piano". Select that ‘D Piano’ note to add it to your sound’s library. Repeat this process for the C, E, F and G keys. Finally, search and add the sound for “Clapping”. Step 3: Code Piano Click the Code tab so we can start adding code blocks to our script area. Drag and drop all of the code blocks to match what we show here. Make sure you match the piano sound with the chosen button. For example, make sure the ‘F Piano’ sound plays when the ‘up arrow’ key is pressed. With the code already we can now move onto the final step of assembling the Makey Makey piano. Step 4: Assembling the Makey Makey Piano You should now have your pencil drawn piano ready and the Scratch script on your computer prepared. We can now wire up our Makey Makey to the piano. Grab your Makey Makey, USB cable and six Alligator clip leads. Follow the wiring diagram we show below to run wires from the Makey Makey to the piano. Make sure you match the keys on the Makey Makey to the correct pencil piano key on the piano. For example, make sure the down arrow on the Makey Makey goes to the D key on the piano. Don't forget to connect an Alligator lead from the Earth on the Makey Makey to the Earth on the bottom left corner of our piano.
- 3. Materials found on the Internet are used in the card Virtual LTTA – Bulgaria 25-29 January 2021 Plug in the USB lead from your Makey Makey to your computer. If any pop-up windows appear you can close or ignore them. You are now ready to test your piano. *https://diyodemag.com/ Try playing the following keys in sequence: C - D - E - F - G - F - E - D - C If you play the notes F, E, D, C in a row correctly you will activate the sequence Event Block in our Scratch code. You should hear the sound of an audience clapping. *https://diyodemag.com/