Felted Sheep Instructions
•Als PPTX, PDF herunterladen•
0 gefällt mir•2,149 views

These slides contain step by step directions on how to felt a sheep out of our Dorset wool. The Spicy Lamb Farm has kits available to go with these instructions.

Empfohlen
Weitere ähnliche Inhalte
Was ist angesagt?
Was ist angesagt? (20)
Ähnlich wie Felted Sheep Instructions
Ähnlich wie Felted Sheep Instructions (20)
Kürzlich hochgeladen
Kürzlich hochgeladen (20)
Felted Sheep Instructions
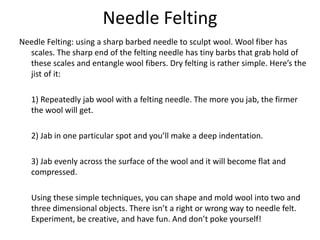
- 1. Needle Felting Needle Felting: using a sharp barbed needle to sculpt wool. Wool fiber has scales. The sharp end of the felting needle has tiny barbs that grab hold of these scales and entangle wool fibers. Dry felting is rather simple. Here’s the jist of it: 1) Repeatedly jab wool with a felting needle. The more you jab, the firmer the wool will get. 2) Jab in one particular spot and you’ll make a deep indentation. 3) Jab evenly across the surface of the wool and it will become flat and compressed. Using these simple techniques, you can shape and mold wool into two and three dimensional objects. There isn’t a right or wrong way to needle felt. Experiment, be creative, and have fun. And don’t poke yourself!
- 2. Start with a piece of white wool approximately 10 in. long and 5 in. wide. This will be the body of the sheep. 1
- 3. Roll the piece of wool into a sausage shape; tuck and fold in the edges as you tightly roll the wool. 2
- 4. Needle all over the surface of the body to hold the shape. The finished piece should measure about 2 ½ in. long and 1 ½ in. wide. 3
- 5. Take another piece of white wool that measures approximately 6 in. long and 4 in. wide. This will be the head of the sheep. 4
- 6. Roll the wool into a cone shape. Make one end wider than the other. Keep the fibers loose at the wide end for attaching the head to the body. 5
- 7. Needle all over the surface of the head to keep the shape. The finished piece should measure 1 ½ in. long and ½ to 1 in. wide. 6
- 8. Take the head piece and position the wide part (loose fibers) on top of the body. 7
- 9. Needle the loose fibers of the head onto and into the body; needle all around the edge of the head to attach. It may take some shaping with the needle to get the form you like. 8
- 10. To make the legs, start with a piece of white wool that measures 7 in. long and 3 in. wide. Divide this into four equal parts. 9
- 11. With each of the four parts, fold the wool in from the edges to make a round shape. 10
- 12. Turn the piece over and continue to fold in from the edges and needle until compact. 11
- 13. Roll the leg piece tightly around the skewer, the middle tighter than the edges. 12
- 14. Slide the leg off of the skewer and needle the surface of the leg piece. Leave the fibers loose on one end to attach to the body. 13
- 15. On the other end of the leg piece, needle the fibers from the edges into the center and flatten into a hoof. 14
- 16. Make three more legs the same way. 15
- 17. Place one of the legs on the side of the body about halfway up on the chest and needle the loose fibers to attach. 16
- 18. Needle all around the leg until it is firmly attached to the body. If it seems too floppy, add more wool around the inside of the leg and needle. 17
- 19. Attach the other legs to the body in the same way. 18
- 20. Use a quarter sized piece of white wool to make the ears. Fold the edges in (as you did with the legs) and needle the ear shape. It should be about the size and shape of a pinky fingernail. Leave the fibers on one end loose. 19
- 21. Position the ear on the side of the head and needle the loose fibers of the ear to the top side of the head. Repeat on the other side for the other ear. 20
- 22. Sew on the bead eyes with black embroidery floss, and use the remaining floss to stitch a mouth and nose. 21
- 23. Voila! You’re done! If you wish, you can make a tail the same way as the ears and needle it onto the rear end of your sheep. Thread the ribbon through the bell and tie it around the sheep’s neck for a finishing touch. 22