
Recommended
More Related Content
Viewers also liked
Similar to A guide to setting up a weblog
Similar to A guide to setting up a weblog (20)
Recently uploaded
Recently uploaded (20)
A guide to setting up a weblog
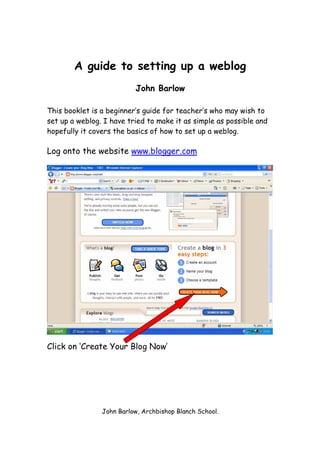
- 1. A guide to setting up a weblog John Barlow This booklet is a beginner’s guide for teacher’s who may wish to set up a weblog. I have tried to make it as simple as possible and hopefully it covers the basics of how to set up a weblog. Log onto the website www.blogger.com Click on ‘Create Your Blog Now’ John Barlow, Archbishop Blanch School.
- 2. You will need to create a Google Account At the bottom of the screen there is an ‘orange continue’ arrow. Click this. John Barlow, Archbishop Blanch School.
- 3. Give your blog a title and a web address. This name will appear at the top of your blog as its title Think of a memorable address for your blog. Make it similar to your Click on continue blog title. John Barlow, Archbishop Blanch School.
- 4. Pick a template for your blog. This can be altered later if you decide that you picked one that isn’t suitable. There is a selection of templates to choose from. Just decide which one you like and select it. Click on continue John Barlow, Archbishop Blanch School.
- 5. Click on start posting To start posting to your blog, just input the information that you want people/pupils to read. At this stage it is very similar to writing an e-mail. Please see the next page John Barlow, Archbishop Blanch School.
- 6. Hyperlink Numbered or Text Colour Bullet List Font type Text Size Bold or Italic Align Text Spell-check Insert a picture or image Add labels to your post. These could be keywords so that when someone searches on your post all posts with the same keyword will be located. Or use ‘years’ so that posts can relate to each year group e.g. Year 7, Year 8, and Year 11 Publish your post to your blog for Save your post as a immediate viewing draft and change it later John Barlow, Archbishop Blanch School.
- 7. Your first post has now been published To customise your To add a new post to your blog. blog. All of your posts will be automatically placed into a blog archive. Your profile will also be displayed automatically. John Barlow, Archbishop Blanch School.
- 8. Clicking on ‘Customise’ will take you to this screen Change your blog template Clear any changes Preview your that you have made changes Change the font and colours of your text Your blog archive and profile are already listed as ‘Page Elements’. Click on Add a Page Element to add more Click on Edit to change features on your blog John Barlow, Archbishop Blanch School.
- 9. Clicking on ‘Add a Page Element’ will take you to this screen Add a list. Possibly keyword Create a link list. Maybe to provide pupils with links to other geography websites Add a picture Add text to your blog e.g. a welcome message Add HTML/JavaScrip t e.g. A Clustr Google Adsense will allow map to show you to place sponsored visitors to your adverts onto your site to site earn you money Add content from another site e.g. BBC News Show all of your labels. If you have website used labels such as Year 7, Year 8, Year 10. Pupils will be able to click on their year and view all posts. Add a Blogger logo John Barlow, Archbishop Blanch School.
- 10. Clicking on ‘Fonts and Colours will take you to this screen Blogger automatically supplies you with colours that your blog already uses and colours that match your blog Each text feature to your blog is listed with its current colour. To change a colour just click on what aspect you want to change and pick a colour John Barlow, Archbishop Blanch School.