
Empfohlen
Weitere ähnliche Inhalte
Andere mochten auch
Ähnlich wie Comic life in the classroom
Ähnlich wie Comic life in the classroom (20)
Mehr von Suzie Vesper
Mehr von Suzie Vesper (20)
Comic life in the classroom
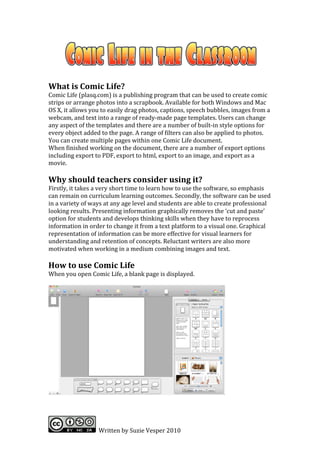
- 1. What is Comic Life? Comic Life (plasq.com) is a publishing program that can be used to create comic strips or arrange photos into a scrapbook. Available for both Windows and Mac OS X, it allows you to easily drag photos, captions, speech bubbles, images from a webcam, and text into a range of ready-‐made page templates. Users can change any aspect of the templates and there are a number of built-‐in style options for every object added to the page. A range of filters can also be applied to photos. You can create multiple pages within one Comic Life document. When finished working on the document, there are a number of export options including export to PDF, export to html, export to an image, and export as a movie. Why should teachers consider using it? Firstly, it takes a very short time to learn how to use the software, so emphasis can remain on curriculum learning outcomes. Secondly, the software can be used in a variety of ways at any age level and students are able to create professional looking results. Presenting information graphically removes the ‘cut and paste’ option for students and develops thinking skills when they have to reprocess information in order to change it from a text platform to a visual one. Graphical representation of information can be more effective for visual learners for understanding and retention of concepts. Reluctant writers are also more motivated when working in a medium combining images and text. How to use Comic Life When you open Comic Life, a blank page is displayed. Written by Suzie Vesper 2010
- 2. To start, drop one of the page templates onto it from the ‘Libraries’ tab on the right. Shapes of image placeholders on the page can be changed by clicking and dragging the corners of the panels. Unwanted panels can be deleted. After choosing a template, the iPhoto library (Mac) or My Pictures folder (PC) becomes available on the right hand side – simply drag and drop photos into the panels on the page. Should you want an image from another placed on your computer, either the ‘Finder’ button (Mac) or ‘Explorer’ button (PC) at the bottom of the right hand panel will provide access to other folders. The ‘Capture’ button will turn on your iSight or webcam to take a photo within the application for you to use. You can also drag on words, speech bubbles and text boxes from below the page preview. Hovering your mouse over an object, will give you blue corners to Written by Suzie Vesper 2010
- 3. resize each point of the object. Clicking on the object will give you green corners for resizing the entire object. Clicking on the ‘Details’ tab gives you options for customising the object you have selected on the page. There are options for every kind of object; the page itself, the panels on the page, photos within panels, and all the objects you can drag onto the page from the beneath the page preview. Export options can be found under ‘File’ and then ‘Export’. Most of the options are self-‐explanatory. The QuickTime option allows you to create a movie that plays through the pages within your ComicLife file. If you have the PC version of Comic Life, your export options will look a little different. The one I use the most is ‘Export to Image’. If you want to put Comic Life work onto a website, choose ‘Export to Image’ and then select the following options: Written by Suzie Vesper 2010
- 4. The image of a single page I created using these settings was 82 Kb in size and the quality was good enough for websites. A high quality jpeg at 72 dpi created a file that was 369 Kb in size and I couldn’t see much difference to the average quality image. A high quality image at the highest setting of 600 dpi (for printing not putting on websites) was 12 Mb in size. Note that the name you choose when exporting to an image will actually be the name of the folder that Comic Life creates to house the images for each page. The page names inside the folder will have the format of Page_1.jpg. Remember to rename these pages before uploading them to the internet. Written by Suzie Vesper 2010
- 5. Examples of Comic Life in action Recounts of current or historical events – For younger students, this will involve being able to sequence images correctly which is an early literacy skill. Older students can show their understanding of key events. Image used with permission from the page of ‘Other examples’ on the website http://comiclife.com/education Biographies and Autobiographies – At Point England School, students made a visual mihi. By uploading this to Flickr, students were able to add more information about each section of their mihi through the use of pop up notes. Image used with permission from Point England School. Flickr link is http://www.flickr.com/photos/extpes/2381801530/ Written by Suzie Vesper 2010
- 6. Science reports and labelled science diagrams – These can easily be created within Comic Life. Students can also photograph stages in a science experiment to write up in Comic Life. Images used with permission from Debra Hicks from her wiki http://debsplace.wikispaces.com/Comic+Life Illustrating a poem or story – Pupils can use images to complement the message of their story or poem such as this example combining photography and poetry by a Year 6 student. Image used with permission from Jacqui Sharp from her wiki http://writingandpublishing.wikispaces.com/Aanan Written by Suzie Vesper 2010
- 7. Summarising key information or identifying key events – In this secondary example, Year 12 students summarised the key information from the Karl Fisch video, ‘Shift Happens’ using Comic Life. Image used with permission from Andrew Churches at Kristin School Other uses – There are many other possible uses, including: o Creating visual instructions such as how to use a software application o Collecting images of things starting with the letter of the week o Retelling a story in visual form o Creating posters of 2D or 3D shapes o Charting the journey of food through the digestive system o Showing the life cycle of an insect o Illustrating a saying, metaphor or new vocabulary term o Creating a visual diary – a day in the life of… o Showing examples of cause and effect o Explaining how to solve a geometric maths puzzle o Creating a travel guide for a city or region o Showing solutions to problems that can happen in the playground o Identifying the key events in a narrative o Labelling the parts of a computer o Storyboarding a video production o Producing language for different situations in a second language eg ordering food in a cafe o Sports reports Written by Suzie Vesper 2010