1. How to “socialize” your documents on LinkedIn
Author:Suzy Tonini
8/12/2011
Summary:
You would like to keep your LinkedIn contacts informed of important newsletters and documents
that don’t have an online presence. Using an application on LinkedIn, called Box.net, it’s easy to
“socialize” your documents, whether Word, PDF or Excel. This tutorial will show you how to
share these documents as a Status Update, ensuring your network is alerted to the news
immediately. Here are the steps.
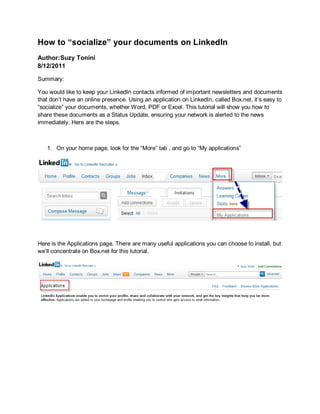
1. On your home page, look for the “More” tab , and go to “My applications”
Here is the Applications page. There are many useful applications you can choose to install, but
we’ll concentrate on Box.net for this tutorial.
2. 2. This is the Box.net application you will want to download
3. Go back to your home page, look in the “More” tab and you will see the application
installed. This is the best way to access the application moving forward. You can choose
to display the Box.net application on your profile (more here) and if so, it will display at
the bottom of your profile.
3. 4. Once in MyBox.net, you can create a new folder where you can store your documents.
It’s not mandatory, but it helps in organizing. You can create multiple folders, as well. If
you need more storage space, you might want to think about upgrading to the paid
version which gives you 50GB of storage. Viewers who visit your LinkedIn profile can
see these folders as well (more on Folders here).
5. If you have a Word doc, it’s strongly suggested you convert it to PDF before publishing
on the web. This inhibits people editing your documents. Name your documents
something intuitive, as that is what will be displayed to the public. In this case, we are
calling our PDF document “Weekly Bulletin August 2008”. This is assuming you have
saved it on your hard drive somewhere, like the below example.
4. 6. Now that your document is saved on your hard drive, go back to Box.net, click Upload,
and browse to your file.
7. This is what a Successful Upload message should look like.
5. 8. This is how the file is displayed within your Box.net application. As you can see, the PDF
file is there. You can choose to move it to the Folder right away by dragging into the
External Newsletters folder, or skip this step for now. We will skip this step for now.
9. The drop down menu next to the file has several options, but we will concentrate on
generating a web link. Click Get W eb link.
6. 10. A web link is generated, click copy (more on how to use url shorteners to track your link
clicks in the Appendix).
11. Now we are ready to paste the link in your Status Update. Go to your Home tab, Share
an update is usually the default, and click Attach a link
7. 12. When you paste the link you copied previously, you can choose to share with only your
Connections or Visible to anyone. Once the link is copied, click Attach. You can also
choose to post a short message introducing the content- that is your Status Update.
13. This is what the initial message looks like. The default message in the box underneath
contains promotional verbiage, so click edit as you will want to customize this area. As
you can see, a PDF icon is also generated. It is up to you to keep the icon or not. But
let’s assume you don’t, so clicking Edit will give you options.
8. 14. In the box beneath your document title, you can summarize or add a few more words
that describe the content. If you uncheck Include photo, the PDF icon will be removed.
Click Preview.
15. This is how your Status update will look like to your connections. If you are satisfied and
ready to share with you network, click Share. Note there is also an option to share on
Twitter by checking the box.
9. 16. And here is the final outcome- this is exactly how your network will see your
message/update when they log in to their accounts
10. 17. And by clicking on the PDF link, the document will open up as a PDF for your contacts to
save.
11. 18. Now we can go back and move our new document to the folder you created. Click Move.
12. 19. And the message is self-explanatory-you just drag the document into the folder just like
on your hard-drive.
13. APPENDIX:
Should you want to track the link that you generate, there is a tool called Bit.ly. It shortens links
into shorter links (useful especially for Twitter). You need to register to be able to track your
links.
So if you copied and pasted the link generated by Box.net, like this example- I pasted a long link
in the box, it automatically generated a short link.
14. You would then paste the generated shortened URL in the Status Update as an attachment.
When you are ready to go back to bit.ly, you can check some stats, and here is an example: