SlideShare a Scribd company logo
1 of 43
Download to read offline
Lab Practical 1.
To create a simple Resume in MS word.
1. Open the Document in MS word as follows.
2. Go on to the Start-> Click on Windows Start up-> Click on MS word.
3. Click on Save As to save the Document after typing the file name.
.
4. Save the Document onto Desired location in the Computer after specifying its name. Click onto
Save.
5. Create the Resume as follows.
Lab Practical 2.
To create a Notice in the MS word.
1. Open the Document in MS word as follows.
2. Go on to the Start-> Click on Windows Start up-> Click on MS word.
3. Draw a Notice as follows.
Lab Practical 3.
To write a Formal letter using MS word.
1. Open the Document in MS word as follows.
2. Go on to the Start-> Click on Windows Start up-> Click on MS word.
3. Type the letter as follows.
Lab Practical 4.
To write an Event Report using MS word.
1. Open the Document in MS word as follows.
2. Go on to the Start-> Click on Windows Start up-> Click on MS word.
3. Type the Event report as follows.
Lab Practical 5.
To write a MEMO using MS word.
1. Open the Document in MS word as follows.
2. Go on to the Start-> Click on Windows Start up-> Click on MS word.
3. Type the MEMO in Word as follows.
Lab Practical 6.
To create a MS PowerPoint Slide presentation.
1. Open the PowerPoint Document.
2. Go to Start-> Select MS Office-> Select PowerPoint->
3. Start by opening a "Blank presentation" in PowerPoint.
4. Select the "Title Slide" option.
5. Type in your title and subtitle.
6. Select a background for the entire presentation.
7. Add new slides.
8. Set the transitions for your slides. ...
9. Add some more to your presentation with animation.
Lab Practical 7
To Use Mail Merge in Microsoft Word
Mail Merge is most often used to print or email form letters to multiple recipients. Using Mail
Merge, you can easily customize form letters for individual recipients. Mail merge is also used to
create envelopes or labels in bulk.
This feature works the same in all modern versions of Microsoft Word: 2010, 2013, and 2016.
3. In a blank Microsoft Word document, click on the Mailings tab, and in the Start Mail
Merge group, click Start Mail Merge.
4. Click Step-by-Step Mail Merge Wizard.
5. Select your document type. In this demo we will select Letters. Click Next: Starting
document.
6. Select the starting document. In this demo we will use the current (blank) document.
Select Use the current document and then click Next: Select recipients.
1. Note that selecting Start from existing document (which we are not doing in this
demo) changes the view and gives you the option to choose your document. After
you choose it, the Mail Merge Wizard reverts to Use the current document.
7. Select recipients. In this demo we will create a new list, so select Type a new list and then
click Create.
1. Create a list by adding data in the New Address List dialog box and clicking OK.
2. Save the list.
Note that now that a list has been created, the Mail Merge Wizard reverts to Use an
existing list and you have the option to edit the recipient list.
3. Selecting Edit recipient list opens up the Mail Merge Recipients dialog box, where
you can edit the list and select or unselect records. Click OK to accept the list as is.
4. Click Next: Write your letter.
8. Write the letter and add custom fields.
1. Click Address block to add the recipients' addresses at the top of the document.
2. In the Insert Address Block dialog box, check or uncheck boxes and select options
on the left until the address appears the way you want it to.
3. Note that you can use Match Fields to correct any problems. Clicking Match
Fields opens up the Match Fields dialog box, in which you can associate the fields
from your list with the fields required by the wizard.
9. Press Enter on your keyboard and click Greeting line... to enter a greeting.
In the Insert Greeting Line dialog box, choose the greeting line format by clicking the drop-
down arrows and selecting the options of your choice, and then click OK.
10. Note that the address block and greeting line are surrounded by chevrons (« »). Write a short
letter and click next: Preview your letters.
Preview your letter and click next: Complete the merge.
 Click Print to print your letters or Edit individual letters to further personalize some or
all of the letters.
Lab Practical 8
To insert Header & Footer into MSWORD.
Introduction
You can make your document look professional and polished by utilizing the header and footer sections.
The header is a section of the document that appears in the top margin, while the footer is a section of
the document that appears in the bottom margin. Headers and footers generally contain information such
as the page number, date, and document name.
Headers and footers can help keep longer documents organized and make them easier to read. Text
entered in the header or footer will appear on each page of the document.
1. To insert a header or footer:
1. Select the Insert tab.
2. Click either the Header or Footer command. A drop-down menu will appear.
3. From the drop-down menu, select Blank to insert a blank header or footer, or choose one
of the built-in options.
1. The Design tab will appear on the Ribbon, and the header or footer will appear in
the document.
2. Type the desired information into the header or footer.
3. When you're finished, click Close Header and Footer in the Design tab, or hit
the Esc key.
After you close the header or footer, it will still be visible, but it will be locked. To edit it again,
just double-click anywhere on the header or footer, and it will become unlocked.
To insert the date or time into a header or footer:
1. Double-click anywhere on the header or footer to unlock it. The Design tab will
appear.
2. From the Design tab, click the Date & Time command.
3. Select a date format in the dialog box that appears.
4. Place a check mark in the Update Automatically box if you would like it to
always reflect the current date. Otherwise, it will not change when the document
is opened at a later date.
5. Click OK. The date and time now appears in the document.
To remove content controls:
By default, some of the built-in headers and footers have snippets of text that are called content
controls. Content controls can contain information such as the document title or company
name, and they allow you to enter this information into a form field.
However, you'll often just want to type a normal header without any content controls. To do this,
you'll need to remove any content control fields from the header or footer.
1. With the header or footer section active, right-click the content control field you
want to remove. A drop-down menu will appear.
2. Click Remove Content Control. The content control field will disappear.
Other header and footer options
There are many other header and footer options you can use to design these sections of your
document. You can review the Header & Footer Tools Design tab to view and explore these
options.
Adding page numbers
Word can automatically label each page with a page number and place it in a header, footer,
or side margin. You can add page numbers to an existing header or footer, or you can insert
page numbers into a new header or footer.
To add page numbers to an existing header or footer:
1. Select the header or footer. The Design tab will appear.
2. Place the insertion point where you want the page number to be. You can place
it anywhere except inside a content control field.
3. From the Design tab, select the Page Number command.
4. Click Current Position, and then select the desired style. The page number will
appear in the document.
If you've already typed information into your header or footer, it's important to place the page
number at the Current Position to avoid losing anything. If you select a page number from Top
of Page or Bottom of Page, it will delete anything you've already added to the header or
footer.
To insert page numbers into a new header or footer:
1. From the Insert tab, click Page Number. A drop-down menu will appear.
2. Select the desired page number style, and it will appear in your document.
To hide the page number on the first page:
In some documents, you may not want the first page to show the page number. You can hide the
first page number without affecting the rest of the pages.
1. Select the header or footer that contains the page number.
2. From the Design tab, place a check mark next to Different First Page. The
header and footer will disappear from the first page. If you want, you can type
something new in the header or footer, and it will only affect the first page.
If you're unable to select Different First Page, it may be because an object within the header or footer
is selected. Click in an empty area within the header or footer to make sure nothing is selected.
To format page numbers:
1. Select the header or footer that contains the page number.
2. From the Design tab, select the Page Number command.
3. Click Format Page Numbers.
1. From the dialog box, select the desired Number format.
2. Next to Start at, enter the number you want the page numbers to
start with.
Lab Practical 9
Creating a Table within Excel
1. Open the Excel spreadsheet.
2. Use your mouse to select the cells that contain the information for the table.
3. Click the "Insert" tab > Locate the "Tables" group.
4. Click "Table". A "Create Table" dialog box will open.
5. If you have column headings, check the box "My table has headers".
6. Verify that the range is correct > Click [OK].
7. Resize your columns to make the headings visible.
Lab Practical 10
To create table showing the Students Result in MS Excel
1. Open the Excel spreadsheet.
2. Create the table as follows:
3. Calculate the Sum as =SUM(A2:G2)
4. Calculate Average of the Subjects as
=AVERAGE (C2:F2)
Lab Practical 11
To use a filter Function in a table showing the Students Result in MS Excel
1. Open the Excel spreadsheet.
2. Create the table as follows:
3. Go onto Data-> Select Filter
The Table will appear in the following format.
4. If you want to filter by Name then
5. The resultant table will appear as follows
Lab Practical 12
To use a Chart Function in a table showing the Students Result in MS Excel
1. Open the Excel spreadsheet.
3. Create the table as follows:
4. Choose the following Chart function
5. As per Column Function
6. As per Line Pie Chart Function
7. As per pie Chart Function
8. As per Bar function

More Related Content

What's hot

Teaching Excel
Teaching ExcelTeaching Excel
Teaching Excel
sam ran
 
Excel PowerPoint
Excel PowerPointExcel PowerPoint
Excel PowerPoint
nhumar
 
Basics of Microsoft Word
Basics of Microsoft WordBasics of Microsoft Word
Basics of Microsoft Word
annakjones
 
Excel Pivot Tables April 2016.pptx
Excel Pivot Tables April 2016.pptxExcel Pivot Tables April 2016.pptx
Excel Pivot Tables April 2016.pptx
RaviAr5
 
Microsoft Powerpoint
Microsoft PowerpointMicrosoft Powerpoint
Microsoft Powerpoint
Mi L
 
Access lesson 04 Creating and Modifying Forms
Access lesson 04 Creating and Modifying FormsAccess lesson 04 Creating and Modifying Forms
Access lesson 04 Creating and Modifying Forms
Aram SE
 
Access 2016 module 1 ppt presentation
Access 2016 module 1 ppt presentationAccess 2016 module 1 ppt presentation
Access 2016 module 1 ppt presentation
dgdotson
 

What's hot (20)

Teaching Excel
Teaching ExcelTeaching Excel
Teaching Excel
 
Clase excel 1
Clase excel 1Clase excel 1
Clase excel 1
 
Excel PowerPoint
Excel PowerPointExcel PowerPoint
Excel PowerPoint
 
Excel presentation data validation
Excel presentation   data validationExcel presentation   data validation
Excel presentation data validation
 
Excel Lecture
Excel LectureExcel Lecture
Excel Lecture
 
MS Excel 2nd
MS Excel 2ndMS Excel 2nd
MS Excel 2nd
 
Basics of Microsoft Word
Basics of Microsoft WordBasics of Microsoft Word
Basics of Microsoft Word
 
Excel Pivot Tables April 2016.pptx
Excel Pivot Tables April 2016.pptxExcel Pivot Tables April 2016.pptx
Excel Pivot Tables April 2016.pptx
 
Microsoft Powerpoint
Microsoft PowerpointMicrosoft Powerpoint
Microsoft Powerpoint
 
Data validation - Excel
Data validation - ExcelData validation - Excel
Data validation - Excel
 
Excel for beginner
Excel for beginnerExcel for beginner
Excel for beginner
 
microsoft excel
microsoft excelmicrosoft excel
microsoft excel
 
Ms PowerPoint 2003 Introducton
Ms PowerPoint 2003 IntroductonMs PowerPoint 2003 Introducton
Ms PowerPoint 2003 Introducton
 
Ms excel basic about Data, graph and pivot table
Ms excel basic about Data, graph and pivot table Ms excel basic about Data, graph and pivot table
Ms excel basic about Data, graph and pivot table
 
Access lesson 04 Creating and Modifying Forms
Access lesson 04 Creating and Modifying FormsAccess lesson 04 Creating and Modifying Forms
Access lesson 04 Creating and Modifying Forms
 
Ms excel
Ms excelMs excel
Ms excel
 
Access 2016 module 1 ppt presentation
Access 2016 module 1 ppt presentationAccess 2016 module 1 ppt presentation
Access 2016 module 1 ppt presentation
 
Introduction to microsoft excel 2007
Introduction to microsoft excel 2007Introduction to microsoft excel 2007
Introduction to microsoft excel 2007
 
Access 2007 lecture notes students
Access 2007 lecture notes studentsAccess 2007 lecture notes students
Access 2007 lecture notes students
 
Hospital database management_system_sql
Hospital database management_system_sqlHospital database management_system_sql
Hospital database management_system_sql
 

Similar to Computer application lab file

MS WORD.pptxMS WORD.pptxMS WORD.pptxMS WORD.pptxMS WORD.pptxMS WORD.pptxMS WO...
MS WORD.pptxMS WORD.pptxMS WORD.pptxMS WORD.pptxMS WORD.pptxMS WORD.pptxMS WO...MS WORD.pptxMS WORD.pptxMS WORD.pptxMS WORD.pptxMS WORD.pptxMS WORD.pptxMS WO...
MS WORD.pptxMS WORD.pptxMS WORD.pptxMS WORD.pptxMS WORD.pptxMS WORD.pptxMS WO...
RegineManuel2
 
Open Office Writer : Lesson 03
Open Office Writer : Lesson 03Open Office Writer : Lesson 03
Open Office Writer : Lesson 03
thinkict
 
Word 2010 tutorial
Word 2010 tutorialWord 2010 tutorial
Word 2010 tutorial
valjuniel
 
Directions for Developing Forms Using Word 2013NOTE The form .docx
Directions for Developing Forms Using Word 2013NOTE The form .docxDirections for Developing Forms Using Word 2013NOTE The form .docx
Directions for Developing Forms Using Word 2013NOTE The form .docx
duketjoy27252
 

Similar to Computer application lab file (20)

1121.pdf
1121.pdf1121.pdf
1121.pdf
 
How to use microsoft word
How to use microsoft wordHow to use microsoft word
How to use microsoft word
 
CLASS VI COMPUTERS
CLASS VI COMPUTERS CLASS VI COMPUTERS
CLASS VI COMPUTERS
 
chapter1computers2-160923133049.pdf
chapter1computers2-160923133049.pdfchapter1computers2-160923133049.pdf
chapter1computers2-160923133049.pdf
 
Microsoft Word 2010
Microsoft Word 2010Microsoft Word 2010
Microsoft Word 2010
 
MS WORD.pptxMS WORD.pptxMS WORD.pptxMS WORD.pptxMS WORD.pptxMS WORD.pptxMS WO...
MS WORD.pptxMS WORD.pptxMS WORD.pptxMS WORD.pptxMS WORD.pptxMS WORD.pptxMS WO...MS WORD.pptxMS WORD.pptxMS WORD.pptxMS WORD.pptxMS WORD.pptxMS WORD.pptxMS WO...
MS WORD.pptxMS WORD.pptxMS WORD.pptxMS WORD.pptxMS WORD.pptxMS WORD.pptxMS WO...
 
Apa paper setup
Apa paper setupApa paper setup
Apa paper setup
 
Ms word 2013 Training
Ms word 2013 TrainingMs word 2013 Training
Ms word 2013 Training
 
technology-transfer-planning empowe.pptx
technology-transfer-planning empowe.pptxtechnology-transfer-planning empowe.pptx
technology-transfer-planning empowe.pptx
 
Microsoft Word 2010
Microsoft Word 2010Microsoft Word 2010
Microsoft Word 2010
 
ftw.pdfThik h mai aa rha hu par presentation nhi dunga
ftw.pdfThik h mai aa rha hu par presentation nhi dungaftw.pdfThik h mai aa rha hu par presentation nhi dunga
ftw.pdfThik h mai aa rha hu par presentation nhi dunga
 
Open Office Writer : Lesson 03
Open Office Writer : Lesson 03Open Office Writer : Lesson 03
Open Office Writer : Lesson 03
 
chapter1computers2-160923133049.pptx
chapter1computers2-160923133049.pptxchapter1computers2-160923133049.pptx
chapter1computers2-160923133049.pptx
 
Word2016.pptx
Word2016.pptxWord2016.pptx
Word2016.pptx
 
Libre Office Writer Lesson 5: Mail Merge
Libre Office Writer Lesson 5: Mail MergeLibre Office Writer Lesson 5: Mail Merge
Libre Office Writer Lesson 5: Mail Merge
 
Word 2010 tutorial
Word 2010 tutorialWord 2010 tutorial
Word 2010 tutorial
 
Word 2010 tutorial
Word 2010 tutorialWord 2010 tutorial
Word 2010 tutorial
 
Word 2010 tutorial
Word 2010 tutorialWord 2010 tutorial
Word 2010 tutorial
 
Advance word-processing-skills final
Advance word-processing-skills finalAdvance word-processing-skills final
Advance word-processing-skills final
 
Directions for Developing Forms Using Word 2013NOTE The form .docx
Directions for Developing Forms Using Word 2013NOTE The form .docxDirections for Developing Forms Using Word 2013NOTE The form .docx
Directions for Developing Forms Using Word 2013NOTE The form .docx
 

More from Dr. Prashant Vats

More from Dr. Prashant Vats (20)

Multiplexers
MultiplexersMultiplexers
Multiplexers
 
C lab programs
C lab programsC lab programs
C lab programs
 
Financial fucntions in ms e xcel
Financial fucntions in ms e xcelFinancial fucntions in ms e xcel
Financial fucntions in ms e xcel
 
4. text functions in excel
4. text functions in excel4. text functions in excel
4. text functions in excel
 
3. lookup functions in excel
3. lookup functions in excel3. lookup functions in excel
3. lookup functions in excel
 
2. date and time function in excel
2. date and time function in excel2. date and time function in excel
2. date and time function in excel
 
1. statistical functions in excel
1. statistical functions in excel1. statistical functions in excel
1. statistical functions in excel
 
3. subtotal function in excel
3. subtotal function in excel3. subtotal function in excel
3. subtotal function in excel
 
2. mathematical functions in excel
2. mathematical functions in excel2. mathematical functions in excel
2. mathematical functions in excel
 
RESOLVING CYBERSQUATTING DISPUTE IN INDIA
RESOLVING CYBERSQUATTING DISPUTE IN INDIARESOLVING CYBERSQUATTING DISPUTE IN INDIA
RESOLVING CYBERSQUATTING DISPUTE IN INDIA
 
India: Meta-Tagging Vis-À-Vis Trade Mark Misuse: An Overview
India: Meta-Tagging Vis-À-Vis Trade Mark Misuse: An OverviewIndia: Meta-Tagging Vis-À-Vis Trade Mark Misuse: An Overview
India: Meta-Tagging Vis-À-Vis Trade Mark Misuse: An Overview
 
Trademark Cases Arise from Meta-Tags, Frames: Disputes Involve Search-Engine ...
Trademark Cases Arise from Meta-Tags, Frames: Disputes Involve Search-Engine ...Trademark Cases Arise from Meta-Tags, Frames: Disputes Involve Search-Engine ...
Trademark Cases Arise from Meta-Tags, Frames: Disputes Involve Search-Engine ...
 
Scheme for Notifying Examiner of Electronic Evidence Under section 79A of the...
Scheme for Notifying Examiner of Electronic Evidence Under section 79A of the...Scheme for Notifying Examiner of Electronic Evidence Under section 79A of the...
Scheme for Notifying Examiner of Electronic Evidence Under section 79A of the...
 
METHODS OF RESOLVING CYBERSQUATTING DISPUTE IN INDIA
METHODS OF RESOLVING CYBERSQUATTING DISPUTE IN INDIAMETHODS OF RESOLVING CYBERSQUATTING DISPUTE IN INDIA
METHODS OF RESOLVING CYBERSQUATTING DISPUTE IN INDIA
 
Computer Software and Related IPR Issues
Computer Software and Related IPR Issues Computer Software and Related IPR Issues
Computer Software and Related IPR Issues
 
Amendments to the Indian Evidence Act, 1872 with respect to IT ACT 2000
Amendments to the Indian Evidence Act, 1872 with respect to IT ACT 2000Amendments to the Indian Evidence Act, 1872 with respect to IT ACT 2000
Amendments to the Indian Evidence Act, 1872 with respect to IT ACT 2000
 
Trademark Issues in cyberspace
Trademark Issues in cyberspace Trademark Issues in cyberspace
Trademark Issues in cyberspace
 
Trade-Related Aspects of Intellectual Property Rights (TRIPS)
Trade-Related Aspects of Intellectual Property Rights (TRIPS)Trade-Related Aspects of Intellectual Property Rights (TRIPS)
Trade-Related Aspects of Intellectual Property Rights (TRIPS)
 
How to Copyright a Website to Protect It under IPR and copyright act
How to Copyright a Website to Protect It under IPR and copyright actHow to Copyright a Website to Protect It under IPR and copyright act
How to Copyright a Website to Protect It under IPR and copyright act
 
International Treaties for protection of IPR
International Treaties for protection of IPRInternational Treaties for protection of IPR
International Treaties for protection of IPR
 

Recently uploaded

Gardella_Mateo_IntellectualProperty.pdf.
Gardella_Mateo_IntellectualProperty.pdf.Gardella_Mateo_IntellectualProperty.pdf.
Gardella_Mateo_IntellectualProperty.pdf.
MateoGardella
 
Making and Justifying Mathematical Decisions.pdf
Making and Justifying Mathematical Decisions.pdfMaking and Justifying Mathematical Decisions.pdf
Making and Justifying Mathematical Decisions.pdf
Chris Hunter
 
Russian Escort Service in Delhi 11k Hotel Foreigner Russian Call Girls in Delhi
Russian Escort Service in Delhi 11k Hotel Foreigner Russian Call Girls in DelhiRussian Escort Service in Delhi 11k Hotel Foreigner Russian Call Girls in Delhi
Russian Escort Service in Delhi 11k Hotel Foreigner Russian Call Girls in Delhi
kauryashika82
 

Recently uploaded (20)

Presentation by Andreas Schleicher Tackling the School Absenteeism Crisis 30 ...
Presentation by Andreas Schleicher Tackling the School Absenteeism Crisis 30 ...Presentation by Andreas Schleicher Tackling the School Absenteeism Crisis 30 ...
Presentation by Andreas Schleicher Tackling the School Absenteeism Crisis 30 ...
 
ICT Role in 21st Century Education & its Challenges.pptx
ICT Role in 21st Century Education & its Challenges.pptxICT Role in 21st Century Education & its Challenges.pptx
ICT Role in 21st Century Education & its Challenges.pptx
 
microwave assisted reaction. General introduction
microwave assisted reaction. General introductionmicrowave assisted reaction. General introduction
microwave assisted reaction. General introduction
 
Unit-V; Pricing (Pharma Marketing Management).pptx
Unit-V; Pricing (Pharma Marketing Management).pptxUnit-V; Pricing (Pharma Marketing Management).pptx
Unit-V; Pricing (Pharma Marketing Management).pptx
 
Gardella_Mateo_IntellectualProperty.pdf.
Gardella_Mateo_IntellectualProperty.pdf.Gardella_Mateo_IntellectualProperty.pdf.
Gardella_Mateo_IntellectualProperty.pdf.
 
Making and Justifying Mathematical Decisions.pdf
Making and Justifying Mathematical Decisions.pdfMaking and Justifying Mathematical Decisions.pdf
Making and Justifying Mathematical Decisions.pdf
 
SECOND SEMESTER TOPIC COVERAGE SY 2023-2024 Trends, Networks, and Critical Th...
SECOND SEMESTER TOPIC COVERAGE SY 2023-2024 Trends, Networks, and Critical Th...SECOND SEMESTER TOPIC COVERAGE SY 2023-2024 Trends, Networks, and Critical Th...
SECOND SEMESTER TOPIC COVERAGE SY 2023-2024 Trends, Networks, and Critical Th...
 
Z Score,T Score, Percential Rank and Box Plot Graph
Z Score,T Score, Percential Rank and Box Plot GraphZ Score,T Score, Percential Rank and Box Plot Graph
Z Score,T Score, Percential Rank and Box Plot Graph
 
Unit-IV; Professional Sales Representative (PSR).pptx
Unit-IV; Professional Sales Representative (PSR).pptxUnit-IV; Professional Sales Representative (PSR).pptx
Unit-IV; Professional Sales Representative (PSR).pptx
 
psychiatric nursing HISTORY COLLECTION .docx
psychiatric  nursing HISTORY  COLLECTION  .docxpsychiatric  nursing HISTORY  COLLECTION  .docx
psychiatric nursing HISTORY COLLECTION .docx
 
Web & Social Media Analytics Previous Year Question Paper.pdf
Web & Social Media Analytics Previous Year Question Paper.pdfWeb & Social Media Analytics Previous Year Question Paper.pdf
Web & Social Media Analytics Previous Year Question Paper.pdf
 
Application orientated numerical on hev.ppt
Application orientated numerical on hev.pptApplication orientated numerical on hev.ppt
Application orientated numerical on hev.ppt
 
Unit-IV- Pharma. Marketing Channels.pptx
Unit-IV- Pharma. Marketing Channels.pptxUnit-IV- Pharma. Marketing Channels.pptx
Unit-IV- Pharma. Marketing Channels.pptx
 
Russian Escort Service in Delhi 11k Hotel Foreigner Russian Call Girls in Delhi
Russian Escort Service in Delhi 11k Hotel Foreigner Russian Call Girls in DelhiRussian Escort Service in Delhi 11k Hotel Foreigner Russian Call Girls in Delhi
Russian Escort Service in Delhi 11k Hotel Foreigner Russian Call Girls in Delhi
 
Sports & Fitness Value Added Course FY..
Sports & Fitness Value Added Course FY..Sports & Fitness Value Added Course FY..
Sports & Fitness Value Added Course FY..
 
This PowerPoint helps students to consider the concept of infinity.
This PowerPoint helps students to consider the concept of infinity.This PowerPoint helps students to consider the concept of infinity.
This PowerPoint helps students to consider the concept of infinity.
 
Key note speaker Neum_Admir Softic_ENG.pdf
Key note speaker Neum_Admir Softic_ENG.pdfKey note speaker Neum_Admir Softic_ENG.pdf
Key note speaker Neum_Admir Softic_ENG.pdf
 
Ecological Succession. ( ECOSYSTEM, B. Pharmacy, 1st Year, Sem-II, Environmen...
Ecological Succession. ( ECOSYSTEM, B. Pharmacy, 1st Year, Sem-II, Environmen...Ecological Succession. ( ECOSYSTEM, B. Pharmacy, 1st Year, Sem-II, Environmen...
Ecological Succession. ( ECOSYSTEM, B. Pharmacy, 1st Year, Sem-II, Environmen...
 
fourth grading exam for kindergarten in writing
fourth grading exam for kindergarten in writingfourth grading exam for kindergarten in writing
fourth grading exam for kindergarten in writing
 
Advanced Views - Calendar View in Odoo 17
Advanced Views - Calendar View in Odoo 17Advanced Views - Calendar View in Odoo 17
Advanced Views - Calendar View in Odoo 17
 

Computer application lab file

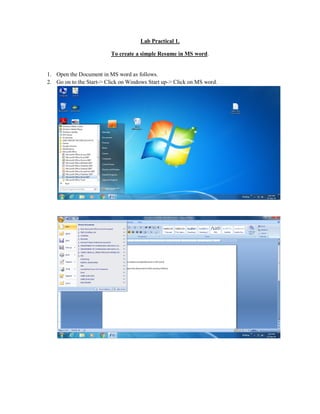
  • 1. Lab Practical 1. To create a simple Resume in MS word. 1. Open the Document in MS word as follows. 2. Go on to the Start-> Click on Windows Start up-> Click on MS word.
  • 2. 3. Click on Save As to save the Document after typing the file name. . 4. Save the Document onto Desired location in the Computer after specifying its name. Click onto Save.
  • 3. 5. Create the Resume as follows.
  • 4. Lab Practical 2. To create a Notice in the MS word. 1. Open the Document in MS word as follows. 2. Go on to the Start-> Click on Windows Start up-> Click on MS word. 3. Draw a Notice as follows.
  • 5. Lab Practical 3. To write a Formal letter using MS word. 1. Open the Document in MS word as follows. 2. Go on to the Start-> Click on Windows Start up-> Click on MS word. 3. Type the letter as follows.
  • 6.
  • 7. Lab Practical 4. To write an Event Report using MS word. 1. Open the Document in MS word as follows. 2. Go on to the Start-> Click on Windows Start up-> Click on MS word. 3. Type the Event report as follows.
  • 8.
  • 9. Lab Practical 5. To write a MEMO using MS word. 1. Open the Document in MS word as follows. 2. Go on to the Start-> Click on Windows Start up-> Click on MS word. 3. Type the MEMO in Word as follows.
  • 10. Lab Practical 6. To create a MS PowerPoint Slide presentation. 1. Open the PowerPoint Document. 2. Go to Start-> Select MS Office-> Select PowerPoint-> 3. Start by opening a "Blank presentation" in PowerPoint.
  • 11. 4. Select the "Title Slide" option. 5. Type in your title and subtitle. 6. Select a background for the entire presentation.
  • 12. 7. Add new slides. 8. Set the transitions for your slides. ... 9. Add some more to your presentation with animation.
  • 13. Lab Practical 7 To Use Mail Merge in Microsoft Word Mail Merge is most often used to print or email form letters to multiple recipients. Using Mail Merge, you can easily customize form letters for individual recipients. Mail merge is also used to create envelopes or labels in bulk. This feature works the same in all modern versions of Microsoft Word: 2010, 2013, and 2016. 3. In a blank Microsoft Word document, click on the Mailings tab, and in the Start Mail Merge group, click Start Mail Merge. 4. Click Step-by-Step Mail Merge Wizard.
  • 14. 5. Select your document type. In this demo we will select Letters. Click Next: Starting document. 6. Select the starting document. In this demo we will use the current (blank) document. Select Use the current document and then click Next: Select recipients.
  • 15. 1. Note that selecting Start from existing document (which we are not doing in this demo) changes the view and gives you the option to choose your document. After you choose it, the Mail Merge Wizard reverts to Use the current document. 7. Select recipients. In this demo we will create a new list, so select Type a new list and then click Create.
  • 16. 1. Create a list by adding data in the New Address List dialog box and clicking OK.
  • 17. 2. Save the list. Note that now that a list has been created, the Mail Merge Wizard reverts to Use an existing list and you have the option to edit the recipient list.
  • 18. 3. Selecting Edit recipient list opens up the Mail Merge Recipients dialog box, where you can edit the list and select or unselect records. Click OK to accept the list as is.
  • 19. 4. Click Next: Write your letter. 8. Write the letter and add custom fields.
  • 20. 1. Click Address block to add the recipients' addresses at the top of the document. 2. In the Insert Address Block dialog box, check or uncheck boxes and select options on the left until the address appears the way you want it to.
  • 21. 3. Note that you can use Match Fields to correct any problems. Clicking Match Fields opens up the Match Fields dialog box, in which you can associate the fields from your list with the fields required by the wizard.
  • 22. 9. Press Enter on your keyboard and click Greeting line... to enter a greeting. In the Insert Greeting Line dialog box, choose the greeting line format by clicking the drop- down arrows and selecting the options of your choice, and then click OK.
  • 23. 10. Note that the address block and greeting line are surrounded by chevrons (« »). Write a short letter and click next: Preview your letters.
  • 24. Preview your letter and click next: Complete the merge.  Click Print to print your letters or Edit individual letters to further personalize some or all of the letters.
  • 25. Lab Practical 8 To insert Header & Footer into MSWORD. Introduction You can make your document look professional and polished by utilizing the header and footer sections. The header is a section of the document that appears in the top margin, while the footer is a section of the document that appears in the bottom margin. Headers and footers generally contain information such as the page number, date, and document name. Headers and footers can help keep longer documents organized and make them easier to read. Text entered in the header or footer will appear on each page of the document. 1. To insert a header or footer: 1. Select the Insert tab. 2. Click either the Header or Footer command. A drop-down menu will appear. 3. From the drop-down menu, select Blank to insert a blank header or footer, or choose one of the built-in options. 1. The Design tab will appear on the Ribbon, and the header or footer will appear in the document.
  • 26. 2. Type the desired information into the header or footer. 3. When you're finished, click Close Header and Footer in the Design tab, or hit the Esc key. After you close the header or footer, it will still be visible, but it will be locked. To edit it again, just double-click anywhere on the header or footer, and it will become unlocked. To insert the date or time into a header or footer: 1. Double-click anywhere on the header or footer to unlock it. The Design tab will appear. 2. From the Design tab, click the Date & Time command. 3. Select a date format in the dialog box that appears.
  • 27. 4. Place a check mark in the Update Automatically box if you would like it to always reflect the current date. Otherwise, it will not change when the document is opened at a later date. 5. Click OK. The date and time now appears in the document. To remove content controls: By default, some of the built-in headers and footers have snippets of text that are called content controls. Content controls can contain information such as the document title or company name, and they allow you to enter this information into a form field. However, you'll often just want to type a normal header without any content controls. To do this, you'll need to remove any content control fields from the header or footer. 1. With the header or footer section active, right-click the content control field you want to remove. A drop-down menu will appear. 2. Click Remove Content Control. The content control field will disappear.
  • 28. Other header and footer options There are many other header and footer options you can use to design these sections of your document. You can review the Header & Footer Tools Design tab to view and explore these options. Adding page numbers Word can automatically label each page with a page number and place it in a header, footer, or side margin. You can add page numbers to an existing header or footer, or you can insert page numbers into a new header or footer. To add page numbers to an existing header or footer: 1. Select the header or footer. The Design tab will appear. 2. Place the insertion point where you want the page number to be. You can place it anywhere except inside a content control field.
  • 29. 3. From the Design tab, select the Page Number command. 4. Click Current Position, and then select the desired style. The page number will appear in the document. If you've already typed information into your header or footer, it's important to place the page number at the Current Position to avoid losing anything. If you select a page number from Top of Page or Bottom of Page, it will delete anything you've already added to the header or footer. To insert page numbers into a new header or footer: 1. From the Insert tab, click Page Number. A drop-down menu will appear. 2. Select the desired page number style, and it will appear in your document.
  • 30. To hide the page number on the first page: In some documents, you may not want the first page to show the page number. You can hide the first page number without affecting the rest of the pages. 1. Select the header or footer that contains the page number. 2. From the Design tab, place a check mark next to Different First Page. The header and footer will disappear from the first page. If you want, you can type something new in the header or footer, and it will only affect the first page. If you're unable to select Different First Page, it may be because an object within the header or footer is selected. Click in an empty area within the header or footer to make sure nothing is selected. To format page numbers: 1. Select the header or footer that contains the page number.
  • 31. 2. From the Design tab, select the Page Number command. 3. Click Format Page Numbers. 1. From the dialog box, select the desired Number format. 2. Next to Start at, enter the number you want the page numbers to start with.
  • 32. Lab Practical 9 Creating a Table within Excel 1. Open the Excel spreadsheet.
  • 33. 2. Use your mouse to select the cells that contain the information for the table.
  • 34. 3. Click the "Insert" tab > Locate the "Tables" group. 4. Click "Table". A "Create Table" dialog box will open. 5. If you have column headings, check the box "My table has headers". 6. Verify that the range is correct > Click [OK]. 7. Resize your columns to make the headings visible.
  • 35. Lab Practical 10 To create table showing the Students Result in MS Excel 1. Open the Excel spreadsheet.
  • 36. 2. Create the table as follows: 3. Calculate the Sum as =SUM(A2:G2)
  • 37. 4. Calculate Average of the Subjects as =AVERAGE (C2:F2)
  • 38. Lab Practical 11 To use a filter Function in a table showing the Students Result in MS Excel 1. Open the Excel spreadsheet.
  • 39. 2. Create the table as follows: 3. Go onto Data-> Select Filter The Table will appear in the following format. 4. If you want to filter by Name then
  • 40. 5. The resultant table will appear as follows
  • 41. Lab Practical 12 To use a Chart Function in a table showing the Students Result in MS Excel 1. Open the Excel spreadsheet. 3. Create the table as follows:
  • 42. 4. Choose the following Chart function 5. As per Column Function 6. As per Line Pie Chart Function
  • 43. 7. As per pie Chart Function 8. As per Bar function