Ch8 v70 os_en
•Download as PPT, PDF•
12 likes•5,879 views

TREINAMENTO EM AUTOMAÇÃO INDUSTRIAL SIEMENS PCS7

Recommended
More Related Content
What's hot
What's hot (20)
Viewers also liked
Viewers also liked (19)
Similar to Ch8 v70 os_en
Similar to Ch8 v70 os_en (20)
More from confidencial
More from confidencial (10)
Recently uploaded
Recently uploaded (20)
Ch8 v70 os_en
- 1. Date: 12.12.2006 File:ST-PCS7SYS_V70B&B.1 SIMATIC PCS 7 Siemens AG 2001. All rights reserved. SITRAIN Training for Automation and Drives Using the OS for Operator Control and Monitorimg
- 2. Date: 12.12.2006 File:ST-PCS7SYS_V70B&B.2 SIMATIC PCS 7 Siemens AG 2001. All rights reserved. SITRAIN Training for Automation and Drives
- 3. Date: 12.12.2006 File:ST-PCS7SYS_V70B&B.3 SIMATIC PCS 7 Siemens AG 2001. All rights reserved. SITRAIN Training for Automation and Drives System Configurations Plant and production control level Corporate management level Process and production control level Automation level PC network SIMATIC NET S5 S7 Single station configurations with PC and OP Multi-station configurations with server and client S5/S7 S5/S7S5/S7 S505 S505 ... Server / R serverClientClient (Web server) Server 12 SIM ATIC N ET system bus ServerClientClient CAS Client Server 1 ... Firewall
- 4. Date: 12.12.2006 File:ST-PCS7SYS_V70B&B.4 SIMATIC PCS 7 Siemens AG 2001. All rights reserved. SITRAIN Training for Automation and Drives WinCC Multi-Station Systems OS client 1 OS client 2 OS client 32 Terminal bus (PC network LAN)Terminal bus (PC network LAN) System busSystem bus WinCC OS server
- 5. Date: 12.12.2006 File:ST-PCS7SYS_V70B&B.5 SIMATIC PCS 7 Siemens AG 2001. All rights reserved. SITRAIN Training for Automation and Drives Configuration of Operator Control and Monitoring for SIMATIC PCS 7 Modern operator control and monitoring system family: Low-end performance range based on a standard PC Mid- and high-end performance range based on a multi-station configuration SIMATIC NET: Industrial Ethernet AS systems Terminal bus Multi-station system Single station system SIMATIC NET: Industrial Ethernet System bus OS server Reference OS Single station system
- 6. Date: 12.12.2006 File:ST-PCS7SYS_V70B&B.6 SIMATIC PCS 7 Siemens AG 2001. All rights reserved. SITRAIN Training for Automation and Drives OS systems with multiple servers SIMATIC NET: Industrial Ethernet AS systems Terminal bus OS servers 1..11 and CAS, (12 without CAS) WinCC OS clients 1..32 CAS
- 7. Date: 12.12.2006 File:ST-PCS7SYS_V70B&B.7 SIMATIC PCS 7 Siemens AG 2001. All rights reserved. SITRAIN Training for Automation and Drives Central Engineering Plant section 1 Plant section 2 Terminal bus Engineering Operator station Automation system SIMATIC NET: Industrial Ethernet Server AS
- 8. Date: 12.12.2006 File:ST-PCS7SYS_V70B&B.8 SIMATIC PCS 7 Siemens AG 2001. All rights reserved. SITRAIN Training for Automation and Drives number () float cou begin if value > 0 start cou = cou + 1 end end Programming interface SIMATIC PCS 7 - Operator Station = Process visualizationProcess visualization WinCC + Options Valve closed Gate closed Motor ON Alarm Logging (message system) Reports ReportSystem (reporting) Process communication Standard interfaces Tag logging (archiving)
- 9. Date: 12.12.2006 File:ST-PCS7SYS_V70B&B.9 SIMATIC PCS 7 Siemens AG 2001. All rights reserved. SITRAIN Training for Automation and Drives WinCC Editors (Standard) Graphics Designer - A vector-oriented graphics program for creating process pictures Alarm Logging - Records and archives events Tag Logging - Used to transfer data from running processes and prepare them for display in trends and tables as well as to archive them. Report Designer - Integrated reporting system with user-defined layouts for time-controlled or event-driven documentation of messages, operations, and archive contents Global Script General term for functions and actions that, depending on the type, can be used project-wide or even across several projects. As an alternative you can use the editors for C script or VB script. Text Library - This is where the foreign language output texts are defined for the configured message texts. The foreign language texts are then output in the selected runtime language. User Administrator - Used during active runtime to assign and check users' access permissions to the individual editors in the configuration system and runtime system. Cross-Reference - Used to locate and display all points of use of objects such as tags, pictures and functions.
- 10. Date: 12.12.2006 File:ST-PCS7SYS_V70B&B.10 SIMATIC PCS 7 Siemens AG 2001. All rights reserved. SITRAIN Training for Automation and Drives Process Control Software OS Project Editor Layout (monitor configuration, PCS 7 screen layout) Message configuration (PCS 7 message system, setting for message lists and group displays) Areas (definition of the visible areas with preview) Runtime window (setting for max. number of windows to be opened) Basic data (selection of pictures, faceplates and scripts for replacement) General (OS Project Editor settings for "Download changes“ and report settings) Picture Tree Manager (plant hierarchy with authorization) Lifebeat Monitoring (monitoring of AS/OS for failure) Time-of-day synchronization (without hardware) (same clock time for all AS/OS) Audio alarm
- 11. Date: 12.12.2006 File:ST-PCS7SYS_V70B&B.11 SIMATIC PCS 7 Siemens AG 2001. All rights reserved. SITRAIN Training for Automation and Drives WinCC (PCS 7 - Basic Options) SFC Visualization - The SFC visualization provides the operator with the option of monitoring and controlling the SFC chart in SFC-compatible view mode on the OS, e.g. Start, Hold and Stop the sequencer. Client Server - The client server functionality in WinCC provides the capability to operate multiple coordinated operator control and monitoring stations in one common group with networked automation systems. Redundancy - Redundancy provides the capability to operate two interconnected server PCs in parallel, so the PCs can monitor each other. Both OS servers will operate in parallel and have their own process connections to the ASs. To avoid an "unbalance" in the client supply, clients can be distributed among both servers. If one of the two server computers fails, the second server assumes control of the entire system including the supply of all connected clients. After the failed server is restored, the contents of all the message value archives and process value archives are copied to the other (now operative) server. User Archives - User archives are a database system that users can configure themselves. This allows you to continuously save data from technical processes to a server PC and display the data online in runtime. In addition, it is possible to store recipes and setpoint specifications for the connected controllers in the user archives and to transfer this data to the controllers if required.
- 12. Date: 12.12.2006 File:ST-PCS7SYS_V70B&B.12 SIMATIC PCS 7 Siemens AG 2001. All rights reserved. SITRAIN Training for Automation and Drives OS Optional Packages Storage Plus Signal module Multi-VGA graphics card Chip card reader Time synchronization hardware/software
- 13. Date: 12.12.2006 File:ST-PCS7SYS_V70B&B.13 SIMATIC PCS 7 Siemens AG 2001. All rights reserved. SITRAIN Training for Automation and Drives WinCC Explorer: Overview Editors Project Computer Tag management (process connections and individual tags) Structure types (combined tags) Summary of process objects
- 14. Date: 12.12.2006 File:ST-PCS7SYS_V70B&B.14 SIMATIC PCS 7 Siemens AG 2001. All rights reserved. SITRAIN Training for Automation and Drives Tag Management Channel DLL (communication driver for S7) Channel unit (physical path) Logical connection (to the AS) Process tags Structure types
- 15. Date: 12.12.2006 File:ST-PCS7SYS_V70B&B.15 SIMATIC PCS 7 Siemens AG 2001. All rights reserved. SITRAIN Training for Automation and Drives Editors Editors/Options Objects for the selected editor (such as pictures created with Graphics Designer)
- 16. Date: 12.12.2006 File:ST-PCS7SYS_V70B&B.16 SIMATIC PCS 7 Siemens AG 2001. All rights reserved. SITRAIN Training for Automation and Drives Compile OS 1 2 3 4 3
- 17. Date: 12.12.2006 File:ST-PCS7SYS_V70B&B.17 SIMATIC PCS 7 Siemens AG 2001. All rights reserved. SITRAIN Training for Automation and Drives Result of the OS Compilation 1 2 3 4 5 6
- 18. Date: 12.12.2006 File:ST-PCS7SYS_V70B&B.18 SIMATIC PCS 7 Siemens AG 2001. All rights reserved. SITRAIN Training for Automation and Drives Faceplates Faceplate displays: Icon picturefor display in process pictures: batch blocks, operator control blocks, technological blocks Control field for detailed view in process and group pictures with multiple bodies: standard, maintenance, parameters, limits, batch, etc. Loop display for detailed view in process and group pictures Activate loop display Typicals
- 19. Date: 12.12.2006 File:ST-PCS7SYS_V70B&B.19 SIMATIC PCS 7 Siemens AG 2001. All rights reserved. SITRAIN Training for Automation and Drives User Interface Overview area Work area (process image area) Key set
- 20. Date: 12.12.2006 File:ST-PCS7SYS_V70B&B.20 SIMATIC PCS 7 Siemens AG 2001. All rights reserved. SITRAIN Training for Automation and Drives Preparing the OS for Compilation How to proceed: SIMATIC Manager PH: - Remove any pictures you do not need - Picture properties: Deactivate derivation of block icons (if not required) - Adapt picture names
- 21. Date: 12.12.2006 File:ST-PCS7SYS_V70B&B.21 SIMATIC PCS 7 Siemens AG 2001. All rights reserved. SITRAIN Training for Automation and Drives Deriving Block Icons Split windows Right-click
- 22. Date: 12.12.2006 File:ST-PCS7SYS_V70B&B.22 SIMATIC PCS 7 Siemens AG 2001. All rights reserved. SITRAIN Training for Automation and Drives Create Block Icons (Settings) V3 TICA1 V3, TICA1 etc. etc.
- 23. Date: 12.12.2006 File:ST-PCS7SYS_V70B&B.23 SIMATIC PCS 7 Siemens AG 2001. All rights reserved. SITRAIN Training for Automation and Drives OS Configuration Steps - Example Reactor A Setting up the OS, single station system Graphics Designer, Adapt image size Modify process pictures Create dynamic pictures Operating faceplate Tag Logging, Set up process value archives, Adapting trend pictures Online trends Compile OS Connection test, runtime test SFC visualization, group display hierarchy OS Project Editor, OS basic settings Set up/check AS OS connection Alarm Logging (control restart) Lifebeat monitoring: AS monitoring Set up users and user groups I. Set up the OS II. Process images III. Alarm and Tag Logging Lifebeat, User Administration
- 24. Date: 12.12.2006 File:ST-PCS7SYS_V70B&B.24 SIMATIC PCS 7 Siemens AG 2001. All rights reserved. SITRAIN Training for Automation and Drives Set Up OS: Single Station/Multi-Station System Changeover 1. 2.
- 25. Date: 12.12.2006 File:ST-PCS7SYS_V70B&B.25 SIMATIC PCS 7 Siemens AG 2001. All rights reserved. SITRAIN Training for Automation and Drives Set Up OS: Setting Computer Properties
- 26. Date: 12.12.2006 File:ST-PCS7SYS_V70B&B.26 SIMATIC PCS 7 Siemens AG 2001. All rights reserved. SITRAIN Training for Automation and Drives Set Up OS: OS Project Editor - Layout
- 27. Date: 12.12.2006 File:ST-PCS7SYS_V70B&B.27 SIMATIC PCS 7 Siemens AG 2001. All rights reserved. SITRAIN Training for Automation and Drives Set Up OS: OS Project Editor - Message Configuration
- 28. Date: 12.12.2006 File:ST-PCS7SYS_V70B&B.28 SIMATIC PCS 7 Siemens AG 2001. All rights reserved. SITRAIN Training for Automation and Drives Set Up OS: OS Project Editor - Message Display WARNING BOX!
- 29. Date: 12.12.2006 File:ST-PCS7SYS_V70B&B.29 SIMATIC PCS 7 Siemens AG 2001. All rights reserved. SITRAIN Training for Automation and Drives Set Up OS: OS Project Editor - Area
- 30. Date: 12.12.2006 File:ST-PCS7SYS_V70B&B.30 SIMATIC PCS 7 Siemens AG 2001. All rights reserved. SITRAIN Training for Automation and Drives Set Up OS: Set Up/Check AS-OS Connection 1.1. NetProNetPro ViewView Cross-Cross- Project Network ViewProject Network View 2.2. Select S7 CPU, and checkSelect S7 CPU, and check connectionconnection 3.3. Select WinCC applicationSelect WinCC application and checkand check 4.4. Download to target systemsDownload to target systems if necessaryif necessary
- 31. Date: 12.12.2006 File:ST-PCS7SYS_V70B&B.31 SIMATIC PCS 7 Siemens AG 2001. All rights reserved. SITRAIN Training for Automation and Drives Data Management with SIMATIC PCS 7 - Compile OS CFC SCL SFC SIMATIC Manager Project database OS database WinCC Wizards Faceplates Offline (ES view) Offline and Online Pictures Compile OS Connections Tags Messages Picture hierarchy SFC visualization WinCC tag (view)
- 32. Date: 12.12.2006 File:ST-PCS7SYS_V70B&B.32 SIMATIC PCS 7 Siemens AG 2001. All rights reserved. SITRAIN Training for Automation and Drives OS Simulation ES Simulating the OS
- 33. Date: 12.12.2006 File:ST-PCS7SYS_V70B&B.33 SIMATIC PCS 7 Siemens AG 2001. All rights reserved. SITRAIN Training for Automation and Drives Exercise: Setting Up the OS (1 - Multi-Station System) SIMATIC NET: Industrial Ethernet AS systems Terminal bus System bus Multi-station system Single station system SIMATIC NET: Industrial Ethernet
- 34. Date: 12.12.2006 File:ST-PCS7SYS_V70B&B.34 SIMATIC PCS 7 Siemens AG 2001. All rights reserved. SITRAIN Training for Automation and Drives Exercise: Setting up the OS (2 - OS Project Editor Basic Settings) Desired resolution Monitor configuration
- 35. Date: 12.12.2006 File:ST-PCS7SYS_V70B&B.35 SIMATIC PCS 7 Siemens AG 2001. All rights reserved. SITRAIN Training for Automation and Drives Exercise: Setting up the OS (3 - Checking the AS-OS Connection) Dou ble- click Righ t- click
- 36. Date: 12.12.2006 File:ST-PCS7SYS_V70B&B.36 SIMATIC PCS 7 Siemens AG 2001. All rights reserved. SITRAIN Training for Automation and Drives Exercise: Setting up the OS (4 - OS Compilation with Block Symbols) 1 2 2a Right-click 3
- 37. Date: 12.12.2006 File:ST-PCS7SYS_V70B&B.37 SIMATIC PCS 7 Siemens AG 2001. All rights reserved. SITRAIN Training for Automation and Drives Exercise: Setting up the OS (5 - Connection Test/Runtime Test)
- 38. Date: 12.12.2006 File:ST-PCS7SYS_V70B&B.38 SIMATIC PCS 7 Siemens AG 2001. All rights reserved. SITRAIN Training for Automation and Drives SFC Visualization Option Double-click Double-click
- 39. Date: 12.12.2006 File:ST-PCS7SYS_V70B&B.39 SIMATIC PCS 7 Siemens AG 2001. All rights reserved. SITRAIN Training for Automation and Drives Option SFC Visualization - Status Information LMC LMC
- 40. Date: 12.12.2006 File:ST-PCS7SYS_V70B&B.40 SIMATIC PCS 7 Siemens AG 2001. All rights reserved. SITRAIN Training for Automation and Drives Option SFC Visualization - States Step Control Modes T with Transition T or O with Transition or Operation T and O with Transition and Operation B with Operation T/T and O with step-specific operation (via END step) Hold Restart Abort Start Commands Stop Continue (See Operating State Logic in Chapter SFC)
- 41. Date: 12.12.2006 File:ST-PCS7SYS_V70B&B.41 SIMATIC PCS 7 Siemens AG 2001. All rights reserved. SITRAIN Training for Automation and Drives Exercise: Setting up the OS (6 - SFC Visualization/Runtime Test)
- 42. Date: 12.12.2006 File:ST-PCS7SYS_V70B&B.42 SIMATIC PCS 7 Siemens AG 2001. All rights reserved. SITRAIN Training for Automation and Drives Exercise: Setting up the OS (7 - Adapt Process Picture Size) Desired group Double-click on desired property or right-click and select Edit Graphics object type, here Picture Graphics object type, here Picture Object name for properties, here picture name Object name for properties, here picture name
- 43. Date: 12.12.2006 File:ST-PCS7SYS_V70B&B.43 SIMATIC PCS 7 Siemens AG 2001. All rights reserved. SITRAIN Training for Automation and Drives Creating Pictures in Graphics Designer
- 44. Date: 12.12.2006 File:ST-PCS7SYS_V70B&B.44 SIMATIC PCS 7 Siemens AG 2001. All rights reserved. SITRAIN Training for Automation and Drives Configuring Objects (Example)
- 45. Date: 12.12.2006 File:ST-PCS7SYS_V70B&B.45 SIMATIC PCS 7 Siemens AG 2001. All rights reserved. SITRAIN Training for Automation and Drives Exercise: Graphics Designer (1 - Picture Size) Picture height e.g. 1200 Picture width e.g. 1600 Window height e.g. 967 Main screen: @screen.pdl Picture window @win12 with picture @1001.pdl Picture window height to be adapted: SIMATIC standard 1024 * 768 Height: 616 pixels SIMATIC standard 1152 * 864 Height: 696 pixels SIMATIC standard 1280 * 1024 Height: 825 pixels SIMATIC standard 1600 * 1200 Height: 967 pixels Picture window height to be adapted: SIMATIC standard 1024 * 768 Height: 616 pixels SIMATIC standard 1152 * 864 Height: 696 pixels SIMATIC standard 1280 * 1024 Height: 825 pixels SIMATIC standard 1600 * 1200 Height: 967 pixels
- 46. Date: 12.12.2006 File:ST-PCS7SYS_V70B&B.46 SIMATIC PCS 7 Siemens AG 2001. All rights reserved. SITRAIN Training for Automation and Drives Valve V2 (Example) V2
- 47. Date: 12.12.2006 File:ST-PCS7SYS_V70B&B.47 SIMATIC PCS 7 Siemens AG 2001. All rights reserved. SITRAIN Training for Automation and Drives Mixer (Example)
- 48. Date: 12.12.2006 File:ST-PCS7SYS_V70B&B.48 SIMATIC PCS 7 Siemens AG 2001. All rights reserved. SITRAIN Training for Automation and Drives Temperature Control (Example) 109,35109,35 Right-click and select Configuration dialog...
- 49. Date: 12.12.2006 File:ST-PCS7SYS_V70B&B.49 SIMATIC PCS 7 Siemens AG 2001. All rights reserved. SITRAIN Training for Automation and Drives Type Picture (Faceplate) with Process Tag
- 50. Date: 12.12.2006 File:ST-PCS7SYS_V70B&B.50 SIMATIC PCS 7 Siemens AG 2001. All rights reserved. SITRAIN Training for Automation and Drives Direct Connection (Example)
- 51. Date: 12.12.2006 File:ST-PCS7SYS_V70B&B.51 SIMATIC PCS 7 Siemens AG 2001. All rights reserved. SITRAIN Training for Automation and Drives Group Display (Function) (7) "Reactors" area picture Reactors Area overview (1) (5) Detail picture UnitA (3) Detail picture UnitB Unit A (6) (4) Unit B (2)
- 52. Date: 12.12.2006 File:ST-PCS7SYS_V70B&B.52 SIMATIC PCS 7 Siemens AG 2001. All rights reserved. SITRAIN Training for Automation and Drives Connecting the Group Display to a Process Tag (Example)
- 53. Date: 12.12.2006 File:ST-PCS7SYS_V70B&B.53 SIMATIC PCS 7 Siemens AG 2001. All rights reserved. SITRAIN Training for Automation and Drives Exercise: Graphics Designer (1 - Group Display) 1 2 3 Picture reactors Picture reactors
- 54. Date: 12.12.2006 File:ST-PCS7SYS_V70B&B.54 SIMATIC PCS 7 Siemens AG 2001. All rights reserved. SITRAIN Training for Automation and Drives Exercise: Graphics Designer (2 - Process Picture Unit A Reactor A) From HMI library Polygon Block icon I/O field Group display Static text Block icon Block icon Bar Reactor A
- 55. Date: 12.12.2006 File:ST-PCS7SYS_V70B&B.55 SIMATIC PCS 7 Siemens AG 2001. All rights reserved. SITRAIN Training for Automation and Drives Exercise: Graphics Designer (3 - REACTORS Area Picture) Static text Group display (automatically generated) From "HMI Library" I/O field Static text Bar Unit A Unit D
- 56. Date: 12.12.2006 File:ST-PCS7SYS_V70B&B.56 SIMATIC PCS 7 Siemens AG 2001. All rights reserved. SITRAIN Training for Automation and Drives Reconnecting
- 57. Date: 12.12.2006 File:ST-PCS7SYS_V70B&B.57 SIMATIC PCS 7 Siemens AG 2001. All rights reserved. SITRAIN Training for Automation and Drives Exercise: Graphics Designer (5 - Runtime Test Process Pictures)
- 58. Date: 12.12.2006 File:ST-PCS7SYS_V70B&B.58 SIMATIC PCS 7 Siemens AG 2001. All rights reserved. SITRAIN Training for Automation and Drives Operating a Faceplate (PID Controller) LMC
- 59. Date: 12.12.2006 File:ST-PCS7SYS_V70B&B.59 SIMATIC PCS 7 Siemens AG 2001. All rights reserved. SITRAIN Training for Automation and Drives Exercise: Setting up Users
- 60. Date: 12.12.2006 File:ST-PCS7SYS_V70B&B.60 SIMATIC PCS 7 Siemens AG 2001. All rights reserved. SITRAIN Training for Automation and Drives User Administration under SIMATIC Logon Same names as the Windows user groups on the PC Windows login FIRST
- 61. Date: 12.12.2006 File:ST-PCS7SYS_V70B&B.61 SIMATIC PCS 7 Siemens AG 2001. All rights reserved. SITRAIN Training for Automation and Drives Online Trends
- 62. Date: 12.12.2006 File:ST-PCS7SYS_V70B&B.62 SIMATIC PCS 7 Siemens AG 2001. All rights reserved. SITRAIN Training for Automation and Drives Creating Online Trend Groups
- 63. Date: 12.12.2006 File:ST-PCS7SYS_V70B&B.63 SIMATIC PCS 7 Siemens AG 2001. All rights reserved. SITRAIN Training for Automation and Drives Message System (1/5) New messages Old messages Exited messages Process control messages Operating messages Journal Alarm Hiding Return to previous operating screen Confirmation buttons Horn / message Message line "New messages" Print message sequence report Reset SQL filter
- 64. Date: 12.12.2006 File:ST-PCS7SYS_V70B&B.64 SIMATIC PCS 7 Siemens AG 2001. All rights reserved. SITRAIN Training for Automation and Drives Message System (2/5) Table windowTable window Navigation window Navigation window Editor windowEditor window
- 65. Date: 12.12.2006 File:ST-PCS7SYS_V70B&B.65 SIMATIC PCS 7 Siemens AG 2001. All rights reserved. SITRAIN Training for Automation and Drives Message System (3/5)
- 66. Date: 12.12.2006 File:ST-PCS7SYS_V70B&B.66 SIMATIC PCS 7 Siemens AG 2001. All rights reserved. SITRAIN Training for Automation and Drives Message System (4/5) - Disabling Messages X Area-based Tag-based Disable messages of selected area or selected tag Enable messages of selected area or selected tag 1 2 MSG_LOCK on the AS block Process-based
- 67. Date: 12.12.2006 File:ST-PCS7SYS_V70B&B.67 SIMATIC PCS 7 Siemens AG 2001. All rights reserved. SITRAIN Training for Automation and Drives Message System (5/5) - Alarm Hiding 1 2 45 Setting in the Project Editor Hiding an alarm 3
- 68. Date: 12.12.2006 File:ST-PCS7SYS_V70B&B.68 SIMATIC PCS 7 Siemens AG 2001. All rights reserved. SITRAIN Training for Automation and Drives Automatic Alarm Hiding
- 69. Date: 12.12.2006 File:ST-PCS7SYS_V70B&B.69 SIMATIC PCS 7 Siemens AG 2001. All rights reserved. SITRAIN Training for Automation and Drives OS Archive System Long-term archive view Runtime databasesRuntime databases Process value archives Message archives Time expired or fill level reached Short-term archive view = Long-term view + current messages Master databaseMaster database OS01RT.mdf TagLogging Slow TagLogging Fast Segment 1 Segment 2 Segment m Segment 1 Segment 2 Segment n Segment 1 Segment 2 Segment x Current message
- 70. Date: 12.12.2006 File:ST-PCS7SYS_V70B&B.70 SIMATIC PCS 7 Siemens AG 2001. All rights reserved. SITRAIN Training for Automation and Drives OS Archive System - Data StorageCS databaseCS database OS01.mdf CS database Alarm Logging OS project path Master databaseMaster database OS01RT.mdf CS database Tag Logging
- 71. Date: 12.12.2006 File:ST-PCS7SYS_V70B&B.71 SIMATIC PCS 7 Siemens AG 2001. All rights reserved. SITRAIN Training for Automation and Drives Creating OS Measured Value Archive (1-1) Default setting
- 72. Date: 12.12.2006 File:ST-PCS7SYS_V70B&B.72 SIMATIC PCS 7 Siemens AG 2001. All rights reserved. SITRAIN Training for Automation and Drives CAS - Principle of Operation
- 73. Date: 12.12.2006 File:ST-PCS7SYS_V70B&B.73 SIMATIC PCS 7 Siemens AG 2001. All rights reserved. SITRAIN Training for Automation and Drives Creating OS Measured Value Archive (1-2) Default settings for OS properties when using a CAS.
- 74. Date: 12.12.2006 File:ST-PCS7SYS_V70B&B.74 SIMATIC PCS 7 Siemens AG 2001. All rights reserved. SITRAIN Training for Automation and Drives Creating OS Measured Value Archive (1-3)
- 75. Date: 12.12.2006 File:ST-PCS7SYS_V70B&B.75 SIMATIC PCS 7 Siemens AG 2001. All rights reserved. SITRAIN Training for Automation and Drives OS Measured Value Archive: Assigning Parameters for Archive Tags
- 76. Date: 12.12.2006 File:ST-PCS7SYS_V70B&B.76 SIMATIC PCS 7 Siemens AG 2001. All rights reserved. SITRAIN Training for Automation and Drives Configuration of OS Measured Value Archive
- 77. Date: 12.12.2006 File:ST-PCS7SYS_V70B&B.77 SIMATIC PCS 7 Siemens AG 2001. All rights reserved. SITRAIN Training for Automation and Drives Exercise: Set Up Online Trends and Archives
- 78. Date: 12.12.2006 File:ST-PCS7SYS_V70B&B.78 SIMATIC PCS 7 Siemens AG 2001. All rights reserved. SITRAIN Training for Automation and Drives
- 79. Date: 12.12.2006 File:ST-PCS7SYS_V70B&B.79 SIMATIC PCS 7 Siemens AG 2001. All rights reserved. SITRAIN Training for Automation and Drives Exercise: Archive Multiproject / Subproject / Library Subproject Multiproject Master data library
- 80. Date: 12.12.2006 File:ST-PCS7SYS_V70B&B.80 SIMATIC PCS 7 Siemens AG 2001. All rights reserved. SITRAIN Training for Automation and Drives Notes
- 81. Date: 12.12.2006 File:ST-PCS7SYS_V70B&B.81 SIMATIC PCS 7 Siemens AG 2001. All rights reserved. SITRAIN Training for Automation and Drives AS/OS Monitoring using Lifebeat Monitoring
- 82. Date: 12.12.2006 File:ST-PCS7SYS_V70B&B.82 SIMATIC PCS 7 Siemens AG 2001. All rights reserved. SITRAIN Training for Automation and Drives Time-of-day synchronization (typical) SIMATIC NET: Industrial Ethernet AS systems Terminal bus OS servers WinCC OS clients Active time master Time slaves Passive time master Time slaves
- 83. Date: 12.12.2006 File:ST-PCS7SYS_V70B&B.83 SIMATIC PCS 7 Siemens AG 2001. All rights reserved. SITRAIN Training for Automation and Drives Time-of-day synchronization of OS (1 / 2) OS server OS client
- 84. Date: 12.12.2006 File:ST-PCS7SYS_V70B&B.84 SIMATIC PCS 7 Siemens AG 2001. All rights reserved. SITRAIN Training for Automation and Drives Time-of-day synchronization of AS (2 / 2) HW Config In the WinCC project, Computer properties
- 85. Date: 12.12.2006 File:ST-PCS7SYS_V70B&B.85 SIMATIC PCS 7 Siemens AG 2001. All rights reserved. SITRAIN Training for Automation and Drives Exercise: Time-of-Day Synchronization (1 / 2) WinCC Computer properties WinCCRT SIMATIC Manager Select CPU Right-click PLC Set Time of Day
- 86. Date: 12.12.2006 File:ST-PCS7SYS_V70B&B.86 SIMATIC PCS 7 Siemens AG 2001. All rights reserved. SITRAIN Training for Automation and Drives Additional Exercise: Time-of-Day Synchronization (2 / 2) On ES in the OS project On OS computer in SIMATIC NET Set PC station
- 87. Date: 12.12.2006 File:ST-PCS7SYS_V70B&B.87 SIMATIC PCS 7 Siemens AG 2001. All rights reserved. SITRAIN Training for Automation and Drives Exercise: Horn Configuration
- 88. Date: 12.12.2006 File:ST-PCS7SYS_V70B&B.88 SIMATIC PCS 7 Siemens AG 2001. All rights reserved. SITRAIN Training for Automation and Drives Report System • Feedback documentation • Message sequence report • Message archive reports • Measured value archive trend reports • Measured value archive table reports • . . .
- 89. Date: 12.12.2006 File:ST-PCS7SYS_V70B&B.89 SIMATIC PCS 7 Siemens AG 2001. All rights reserved. SITRAIN Training for Automation and Drives Report System - Message Reporting Archive report Online report Message sequence report
- 90. Date: 12.12.2006 File:ST-PCS7SYS_V70B&B.90 SIMATIC PCS 7 Siemens AG 2001. All rights reserved. SITRAIN Training for Automation and Drives Report System - Create Layout for Message Sequence Report Page layout Static part Do ub le- cli ck Dynamic part
- 91. Date: 12.12.2006 File:ST-PCS7SYS_V70B&B.91 SIMATIC PCS 7 Siemens AG 2001. All rights reserved. SITRAIN Training for Automation and Drives Report System - Create/Adapt Print Job Page layout @alrtmef.rpl
- 92. Date: 12.12.2006 File:ST-PCS7SYS_V70B&B.92 SIMATIC PCS 7 Siemens AG 2001. All rights reserved. SITRAIN Training for Automation and Drives Exercise: Setting Up a Message Sequence Report
- 93. Date: 12.12.2006 File:ST-PCS7SYS_V70B&B.93 SIMATIC PCS 7 Siemens AG 2001. All rights reserved. SITRAIN Training for Automation and Drives Additional Exercise: Batch Report (1)
- 94. Date: 12.12.2006 File:ST-PCS7SYS_V70B&B.94 SIMATIC PCS 7 Siemens AG 2001. All rights reserved. SITRAIN Training for Automation and Drives Additional Exercise: Batch Report (2)
- 95. Date: 12.12.2006 File:ST-PCS7SYS_V70B&B.95 SIMATIC PCS 7 Siemens AG 2001. All rights reserved. SITRAIN Training for Automation and Drives Additional Exercise: Batch Report (3)
- 96. Date: 12.12.2006 File:ST-PCS7SYS_V70B&B.96 SIMATIC PCS 7 Siemens AG 2001. All rights reserved. SITRAIN Training for Automation and Drives Additional Exercise: Print Job 4 5 3 6
- 97. Date: 12.12.2006 File:ST-PCS7SYS_V70B&B.97 SIMATIC PCS 7 Siemens AG 2001. All rights reserved. SITRAIN Training for Automation and Drives Additional Exercise: Test To fileTo file "WinCC Documentation Viewer"
- 98. Date: 12.12.2006 File:ST-PCS7SYS_V70B&B.98 SIMATIC PCS 7 Siemens AG 2001. All rights reserved. SITRAIN Training for Automation and Drives Additional Exercise: Start Script (1 / 2) ReacA1_DB CHA1_Ready START END
- 99. Date: 12.12.2006 File:ST-PCS7SYS_V70B&B.99 SIMATIC PCS 7 Siemens AG 2001. All rights reserved. SITRAIN Training for Automation and Drives Additional Exercise: Start Script (2 / 2) Compile
- 100. Date: 12.12.2006 File:ST-PCS7SYS_V70B&B.100 SIMATIC PCS 7 Siemens AG 2001. All rights reserved. SITRAIN Training for Automation and Drives Customized Object Instance 1 Permanently instantiate 1st copy Instance 2 Customized object Prototyping Permanently instantiate 2nd copy
- 101. Date: 12.12.2006 File:ST-PCS7SYS_V70B&B.101 SIMATIC PCS 7 Siemens AG 2001. All rights reserved. SITRAIN Training for Automation and Drives Exercise: Creating a Customized Object (1) CTRL_SYMB CO
- 102. Date: 12.12.2006 File:ST-PCS7SYS_V70B&B.102 SIMATIC PCS 7 Siemens AG 2001. All rights reserved. SITRAIN Training for Automation and Drives Exercise: Creating a Customized Prototype Object (2) Save in the WinCC project library Prototype
- 103. Date: 12.12.2006 File:ST-PCS7SYS_V70B&B.103 SIMATIC PCS 7 Siemens AG 2001. All rights reserved. SITRAIN Training for Automation and Drives Exercise: Connecting the CO Prototype to a Structure (2) Result Double-click
- 104. Date: 12.12.2006 File:ST-PCS7SYS_V70B&B.104 SIMATIC PCS 7 Siemens AG 2001. All rights reserved. SITRAIN Training for Automation and Drives Programming Actions in C Script Static text Right-click Button Right-click Right-click: C Action...
- 105. Date: 12.12.2006 File:ST-PCS7SYS_V70B&B.105 SIMATIC PCS 7 Siemens AG 2001. All rights reserved. SITRAIN Training for Automation and Drives Programming Actions in the C Script Editor Edit window Function window Function definition Start compiling Function body
- 106. Date: 12.12.2006 File:ST-PCS7SYS_V70B&B.106 SIMATIC PCS 7 Siemens AG 2001. All rights reserved. SITRAIN Training for Automation and Drives Programming Actions in C Script - Function Calls
- 107. Date: 12.12.2006 File:ST-PCS7SYS_V70B&B.107 SIMATIC PCS 7 Siemens AG 2001. All rights reserved. SITRAIN Training for Automation and Drives Exercise: C Action - Show/Hide Help Right-click
- 108. Date: 12.12.2006 File:ST-PCS7SYS_V70B&B.108 SIMATIC PCS 7 Siemens AG 2001. All rights reserved. SITRAIN Training for Automation and Drives Programming Actions in VB Script Static text Right-click Button Right-click Left-click: VBS Action...
- 109. Date: 12.12.2006 File:ST-PCS7SYS_V70B&B.109 SIMATIC PCS 7 Siemens AG 2001. All rights reserved. SITRAIN Training for Automation and Drives Programming Actions in the VB Script Editor Edit window Module window Function definition Debug syntax Function body
- 110. Date: 12.12.2006 File:ST-PCS7SYS_V70B&B.110 SIMATIC PCS 7 Siemens AG 2001. All rights reserved. SITRAIN Training for Automation and Drives Programming Actions in C Script - Pointer to Objects Left-click: VBS Action... Static text: "Operator_VBS_Text" Pointer to object Transfer object properties "visible"
- 111. Date: 12.12.2006 File:ST-PCS7SYS_V70B&B.111 SIMATIC PCS 7 Siemens AG 2001. All rights reserved. SITRAIN Training for Automation and Drives Exercise: VBS Action - Show/Hide Help Left-click
- 112. Date: 12.12.2006 File:ST-PCS7SYS_V70B&B.112 SIMATIC PCS 7 Siemens AG 2001. All rights reserved. SITRAIN Training for Automation and Drives Maintenance Station (Asset Management)
- 113. Date: 12.12.2006 File:ST-PCS7SYS_V70B&B.113 SIMATIC PCS 7 Siemens AG 2001. All rights reserved. SITRAIN Training for Automation and Drives Additional Exercise: Setting up MS
- 114. Date: 12.12.2006 File:ST-PCS7SYS_V70B&B.114 SIMATIC PCS 7 Siemens AG 2001. All rights reserved. SITRAIN Training for Automation and Drives Result of Diagnostics Structure "Diagnostics area on the MS-OS" "Diagnostics of AS" "Diagnostics of DP master" "Diagnostics of ET 200M" "Diagnostics of network objects" "Diagnostics of PC stations"
- 115. Date: 12.12.2006 File:ST-PCS7SYS_V70B&B.115 SIMATIC PCS 7 Siemens AG 2001. All rights reserved. SITRAIN Training for Automation and Drives Diagnostics with the MS
- 116. Date: 12.12.2006 File:ST-PCS7SYS_V70B&B.116 SIMATIC PCS 7 Siemens AG 2001. All rights reserved. SITRAIN Training for Automation and Drives Navigation in the MS
- 117. Date: 12.12.2006 File:ST-PCS7SYS_V70B&B.117 SIMATIC PCS 7 Siemens AG 2001. All rights reserved. SITRAIN Training for Automation and Drives Module diagnostics
- 118. Date: 12.12.2006 File:ST-PCS7SYS_V70B&B.118 SIMATIC PCS 7 Siemens AG 2001. All rights reserved. SITRAIN Training for Automation and Drives Module Faceplate
- 119. Date: 12.12.2006 File:ST-PCS7SYS_V70B&B.119 SIMATIC PCS 7 Siemens AG 2001. All rights reserved. SITRAIN Training for Automation and Drives Maintenance Request (1 /2) 1 2 3 4
- 120. Date: 12.12.2006 File:ST-PCS7SYS_V70B&B.120 SIMATIC PCS 7 Siemens AG 2001. All rights reserved. SITRAIN Training for Automation and Drives Maintenance Request (2 /2) Local repair successful 5 6 7
- 121. Date: 12.12.2006 File:ST-PCS7SYS_V70B&B.121 SIMATIC PCS 7 Siemens AG 2001. All rights reserved. SITRAIN Training for Automation and Drives Logging of the operations
Editor's Notes
- ContentPage System Configurations ....................................................................................................................3 WinCC Multi-Station Systems..........................................................................................................4 Configuration of Operator Control and Monitoring for SIMATIC PCS 7 ...............................................5 OS systems with multiple servers.....................................................................................................6 Central Engineering.........................................................................................................................7 SIMATIC PCS 7 - Operator Station ................................................................................................8 WinCC Editors (Standard)................................................................................................................9 Process Control Software.................................................................................................................10 WinCC (PCS 7 - Basic Options).......................................................................................................11 OS Optional Packages.....................................................................................................................12 WinCC Explorer: Overview...............................................................................................................13 Tag Management.............................................................................................................................14 Editors.............................................................................................................................................15 Compile OS.....................................................................................................................................16 Result of the OS Compilation...........................................................................................................17 Faceplates.......................................................................................................................................18 User Interface...................................................................................................................................20 Deriving Block Icons.........................................................................................................................21 Create Block Icons (Settings)...........................................................................................................22 OS Configuration Steps - Example Reactor A...................................................................................23 Set Up OS: Single Station/Multi-Station System Changeover.........................................................24 Set Up OS: Setting Computer Properties........................................................................................25 Set Up OS: OS Project Editor - Layout..........................................................................................26 Set Up OS: OS Project Editor - Message Configuration...............................................................27 Set Up OS: OS Project Editor - Message Display..........................................................................28
- Set Up OS: OS Project Editor - Area.............................................................................................29 Set Up OS: Set Up/Check AS-OS Connection................................................................................30 Data Management with SIMATIC PCS 7 - Compile OS....................................................................31 Exercise: Setting Up the OS (1 - Multi-Station System).....................................................................33 Exercise: Setting up the OS (2 - OS Project Editor Basic Settings)...................................................34 Exercise: Setting up the OS (3 - Checking the AS-OS Connection)..................................................35 Exercise: Setting up the OS (4 - OS Compilation with Block Symbols)..............................................36 Exercise: Setting up the OS (5 - Connection Test/Runtime Test)......................................................37 SFC Visualization Option.................................................................................................................38 Exercise: Setting up the OS (6 - SFC Visualization/Runtime Test)....................................................41 Exercise: Setting up the OS (7 - Adapt Process Picture Size)...........................................................42 Creating Pictures in Graphics Designer............................................................................................43 Configuring Objects (Example).........................................................................................................44 Exercise: Graphics Designer (1 - Picture Size).................................................................................45 Valve V2 (Example).........................................................................................................................46 Mixer (Example)...............................................................................................................................47 Temperature Control (Example) ......................................................................................................48 Type Picture (Faceplate) with Process Tag......................................................................................49 Direct Connection (Example)............................................................................................................50 Group Display (Function).................................................................................................................51 Connecting the Group Display to a Process Tag (Example)..............................................................52 Exercise: Graphics Designer (1 - Group Display)..............................................................................53 Exercise: Graphics Designer (2 - Process Picture Unit A Reactor A)................................................54 Exercise: Graphics Designer (3 - REACTORS Area Picture)...........................................................55 Reconnecting...................................................................................................................................56 Exercise: Graphics Designer (5 - Runtime Test Process Pictures)...................................................57 Operating a Faceplate (PID Controller).............................................................................................58 Exercise: Setting up Users.............................................................................................................59 User Administration under SIMATIC Logon......................................................................................60 Online Trends...................................................................................................................................61 Creating Online Trend Groups..........................................................................................................62 Message System .....................................................................................................................63 Automatic Alarm Hiding....................................................................................................................68 OS Archive System..........................................................................................................................69 CAS - Principle of Operation............................................................................................................72 Configuration of OS Measured Value Archive...................................................................................76 Exercise: Set Up Online Trends and Archives..................................................................................77 Exercise: Archive Multiproject / Subproject / Library........................................................................79 Notes...............................................................................................................................................80 AS/OS Monitoring using Lifebeat Monitoring.....................................................................................81 Time-of-day synchronization (typical)...............................................................................................82 Exercise: Time-of-Day Synchronization (1 / 2)..................................................................................85 Additional Exercise: Time-of-Day Synchronization (2 / 2)..................................................................86 Exercise: Horn Configuration............................................................................................................87 Exercise: Setting Up a Message Sequence Report.........................................................................92 Additional Exercise: Batch Report (1).............................................................................................93 Additional Exercise: Print Job...........................................................................................................96 Additional Exercise: Test..................................................................................................................97 Exercise: Creating a Customized Prototype Object (2)....................................................................102 Maintenance Station (Asset Management).......................................................................................112 Additional Exercise: Setting up MS...................................................................................................113 Result of Diagnostics Structure........................................................................................................114 Diagnostics with the MS...................................................................................................................115 Navigation in the MS........................................................................................................................116 Module diagnostics..........................................................................................................................117 Module Faceplate.............................................................................................................................118 Maintenance Request .............................................................................................................119 Logging of the operations.................................................................................................................121
- ConfigurationsThis diagram illustrates the flexible configuration options of WinCC. -Comprehensive visualization functions for multiple operators are compiled using multi-station systems.-Process interconnection is handled by an OS server.-All other clients are connected to a server via a PC network.-The client receives all data from the server.-Higher-level computers from the plant control level can also access the WinCC database at any time via the terminal bus.-In a harsh industrial environment, the SIMATIC Industrial Ethernet process bus can also be used as the terminal bus, however this will decrease the performance of the process interconnections to the ASs.
- WinCC Multi-station system Multi-station systems are highly suitable for configuration tasks and for process management via multiple operator stations. All required data such as project pictures and process tags, measured value archives and message archives, as well as tag assignments are implemented via a WinCC server and made available for execution and processing on clients. Viewing via the Internet or an intranet is possible with the Web Navigator. System InstallationThe following operating systems are supported: Windows XP Professional Service Pack 2 with Microsoft Internet Explorer 6.0 SP2 Windows Server 2003 (Standard Edition) Service Pack 1with Microsoft Internet Explorer 6.0 SP1 MS Explorer V7.0 has not been approved! LicensingIn order to use the possible OS configurations, you require special license keys which are delivered on diskette when you order the products. Which license key is delivered with which packet is described in detail in "PCS 7 Process Control System V7.0, PC Configuration and Authorization", Appendix B "Licensing of software packages".
- Single station systemThe computer communicates with the ASs and is therefore a WinCC server and client at once, i.e. it is also used to operate the plant. You can connect a maximum of four monitors (multi-VGA card option) to such a system, operated by one single keyboard and mouse. Referenced single station system Can be referenced as a copy of an OS (saves configuration and synchronization of the project following modifications). Multi-station systemThis system consists of at least one WinCC server that communicates with the ASs via the system bus and with the terminal computers for operators who retrieve data from the WinCC server (terminal bus).
- OS with multiple servers A distributed OS, with up to 12 servers/server pairs and up to 32 terminals for each server/server pair. Each server communicates with the ASs assigned to it (different ASs for each server). CASOne server/pair of servers can also be used as a so-called CAS (central archive server). This is connected to the other servers/server pairs (max. 11) only via the terminal bus, and takes over their archives. ClientA terminal (OS client) can simultaneously request data from max. 12 servers and display these data on a screen, if applicable. Reference clientCan be referenced as a copy of an OS client (saves configuration and synchronization of the client projects following modifications) Special clientAn OS client itself can function as a Web server or Open PCS 7 station, and arrange a controlled access from other clients (typically from other networks) to the OS server data.
- ESThe Engineering Station is used to configure the AS and OS. The AS configuration is downloaded to the respective AS via the system bus and commissioned. The OS configuration is distributed via the terminal bus.
- Operator station (OS)In PCS 7 you distinguish between two types of operator stations:OS server andOS client OS serverAn OS server centrally contains the Data Manager of the operator control and monitoring system with which it handles the PLC communication links required in the system and the associated tag management.It also contains the alarm logging and measured value archives. Usually there is no operator control and monitoring functionality available on an OS server to ensure that capacity is channeled into the main tasks. OS clientThe purpose of the OS client is to enable operator control and monitoring of the processes. The data manager of the OS server provides the tag states of the individual process tags that are linked to the selected process picture. An OS either consists of one computer (single station system) or a computer network (multi-station system) that has both read and write access to the data in the automation systems.To attain operator control and monitoring functionality, the "WinCC" SCADA software package with process control options is used. This package can be supplemented by options according to the task. Special caseAn OS client itself can be used as a server for other clients (Web OS or Open PCS 7). In this case it is not operated by a plant operator. It is only a "switchboard" between specific OS servers and the other PCs.
- OS Project EditorThis editor is for configuring and initializing the screen and picture setting for the current WinCC project. It sets up the message system, defines the dimensions for the area overview picture and establishes the basic data for the OS project, e.g. default screen layout. Picture Tree ManagerThis manager is used to manage a hierarchy of process cells, units and pictures of the Graphics Designer. The Picture Tree Manager also provides the following functions: · Creating and changing a project hierarchy · Support during definition of process cells and units. · Support when assigning pictures to these process cells and establishment of order among thepictures created in the Graphics Designer. · You can navigate in the hierarchy tree to select therequired pictures during runtime. The Picture Tree Manager influences the user administrator, the group display and the text library. Lifebeat MonitorA lifebeat monitor computer performs sign-of-life monitoring centrally. The lifebeat monitor monitors all the server computers, client computers, multi-client computers, and, above all, the automation systems that can be reached over PC networks and industrial networks and that are assigned to the lifebeat monitor (lifebeat objects). Time Synchronization Allows the same time of day to be set for all stations from a central location. This requires the presence of a time master. Audio alarmYou use the "Horn" editor to configure which signals are to be triggered when specific messages occur.
- The PCS 7 basic options represent WinCC options that also are available for the PCS 7 Engineering Toolset options.The software components are contained on the PCS 7 Engineering Toolset CDs.
- OS Options OS optional packages increase the functionality of the operator stations as needed. Storage PlusAddOn. Using Storage Plus you can access data that were swapped out from the archive backup. Storage Plus is installed on an external PC. From there, you can manage and visualize the data that were swapped out. Storage Plus can also be used to manage reports in file format and batch data. Version 5 project data that were swapped out can be converted and then processed further and visualized with Storage Plus. CASCentral archive server. A CAS is particularly useful if larger data amounts are to be archived. The data of the CAS can be displayed using the OS terminals. SFC visualizationYou can use this option to graphically display the sequence configured with SFC on the ES in the same form on the OS. From an overview picture, for example, you can open the step and transition displays and the step comments or display the current dynamically-supplied step enabling conditions and their status information. Signal moduleThis module adds hardware (including drivers) to the PCS 7 message system for acoustic signaling and acknowledging of events. Is configured using the audio alarm editor. Multi-VGAIf you require several operator communication channels on one operator terminal, you can set up a maximum of four process monitors on one operator terminal. Chip card readerThis reader enables access control for operator stations. You can also set up different authorization levels, which the chip card can check. You can also configure an additional password ("electronic signature") for enhanced access protection in particularly sensitive systems. Time-of-day synchronizationAdditional packages are available that can be used as the time master in the system. These packages include the SICLOCK TM real-time transmitter in GPS or DCF 77 versions. Web NavigatorOperator control and monitoring via the Internet. Open PCS 7OPC and OLE/DB server for access of other PCs (clients) to PCS 7.
- ProjectOS (project) name as defined in the SIMATIC Manager.In "Properties" you can select from a single station project, a multi-station project or a client project; you can display a list and change some aspects of the update cycles. ComputersHere you enter all the computers (OS) belonging to the project (clients and servers). Use "Properties" to enter the settings for the type you selected. GeneralThis is where you select the function of the computer (such as server/client). RestartFor SIMATIC PCS 7, all of the components are generally selected for restart. If needed, you can add additional applications. ParametersSome keyboard shortcuts can be disabled (e.g. Alt+TAB) to protect the WinCC runtime system.Do not disable any key combination until after commissioning! Time-of-day settings are provided. Graphics RuntimeIn PCS 7 these settings are entered from the "OS Project Editor". RuntimeSettings with respect to VBS, image cache and mouse pointer. Tag ManagementAll of the tags for the computer are defined/stored here. Structure TypesSummary of the tags in the form of a structure (e.g. CTRL_PID). EditorsConfiguration tools for the various operating and monitoring configuration tasks for the selected project.
- Tag ManagementThis is where all variables (tags) for the computer are defined/stored. A distinction is made between internal (local) tags and process tags. The connection to the S7 ASs is made via the S7 drivers. The channel DLL and the relevant channel unit are selected during the "Compile OS" operation according to the hardware for this connection. Internal TagsFor SIMATIC PCS 7, the internal tags are generated to some extent by the OS Project Editor and to some extent during OS compilation. Process TagsProcess tags refer to the various AS systems. They are usually generated by the "Compile OS" operation. You can add customized tags, as needed. NoteIf a tag is to be linked to an object in the Graphics Designer, the tag can be selected in a dialog window from the ES or WinCC view. The ES view shows all parameters (tags) of the ASs, which may not yet exist as WinCC tags. They become WinCC tags during the Compile OS operation; and also in part when tags of the ES view are inserted this takes place virtually concealed in the background). After compilation (in the background) these tags become visible in the WinCC view. For PCS 7, the ES view is used preferentially (direct access to names of the blocks/tags configured in the ES with plant hierarchy). All of the tags are listed by default. You can apply filters with an asterisk (*) to expand the selections.Example: The PLANT1*TIC* filter causes all names that begin with "PLANT1" and contain the text string "TIC" to be listed. Structure TypesThis is where, for example, operator-controllable block types are shown (after the Compile OS operation). Below the individual structure types (e.g., CTRL_PID), the specific instance names of the relevant type are managed = process tag names.
- Standard Editors:Editors included in the standard WinCC package Graphics DesignerFor creating process pictures, including dynamization with process tags. Alarm LoggingAlarm system for messages with/without acknowledgement. Tag LoggingFunctions for taking data from active processes and preparing the data for displaying and archiving. Report DesignerFunctions for creating and outputting reports (printer outputs). Global ScriptUser-defined C functions or VBS functions and actions. Text LibraryLanguage-dependent texts for alarm logging. User AdministrationAdministration of users in user groups and assignment of individual rights. Options:Typically used for SIMATIC PCS7 Picture Tree ManagerPicture hierarchy with processing of group displays. Lifebeat MonitoringMonitoring the "existence" of all systems in the network during process control. OS Project EditorCreating basic data (such as screen division, key sets, message system, etc.) with Wizards. Time synchronizationTime-of-day synchronization of systems in the network (GPS, DCF77 and OS clock) RedundancyConfiguration of redundant OS servers. User AdministrationExtended by the addition of area-dependent assignment of rights. SFC VisualizationOperator control and monitoring of SFC sequential control systems via OS. Additional OptionsUser archives (for user-specific data management). Faceplate Designer (faceplate creation) Web Navigator (provision of picture data via the Internet)
- Compile OSThis operation must be used to transfer the data that currently exist only in the AS project in a suitable format to the OS database. This requires that the AS charts themselves have been compiled beforehand, the plant folders have also been assigned, and a picture has been inserted in the PH level defined as the OS area. Dialog 1Here you can check or change the OS area assignment if necessary. Dialog 2Here you confirm or select the S7 connection (which you have created in NetPro) that is to be used for the OS to exchange data with the AS. Dialog 3Here you can define the scope of the data to be taken into consideration. For the first compilation, only a full compilation is offered; afterwards, you can choose to compile the changes only. A memory reset only applies to data that were generated by a previous compilation. Dialog 4This message box is only displayed if you have made changes to the associated AS but have not yet compiled the changes. NoteBlock icons are always considered/generated if their generation has been enabled in the CFC or in the process object view.
- Result of the OS CompilationThe OS compilation primarily affects the following WinCC components: DriverThe driver, the so-called channel DLL (S7 PROTOCOL SUITE) is inserted, containing a UNIT (Industrial Ethernet) in which the logical connection (1) is created to the AS (S7-AS01). All OS-relevant tags are created under this connection; they can be updated over the system bus if necessary. Internal variablesThese internal tags (2) are created for internal purposes, and do not have a connection to the AS. Structure TagsThe structured data (3) types from the AS are listed here. For example, under the "CTRL_PID" type, all of the closed-loop instances are listed that are marked as HMI-capable (default setting). Alarm LoggingThe alarms (4) from message-capable blocks are entered here. Text LibraryLanguage-dependent texts for Alarm Logging (5) are entered here; they can be seen in the messages and some are also displayed in the operator interface (for online language changeover). Picture HierarchyThe picture hierarchy derived from the "Plant View" is automatically configured through the Picture Tree Manager (6) (if this option is set). The picture hierarchy assists navigation during runtime via a) Overview area and b) Picture navigation keys (arrow keys) in the standard function key area of the OS.
- FaceplatesStarting in PCS 7 Version 5, when a new OS project is created a file with typicals is created and stored in the GRACS directory: @@PCS7TYPICALS.PDL.The configuring engineer can assign an attribute to his or her pictures in the plant hierarchy, so that the block icons belonging to the standard code blocks are automatically inserted in the pictures during OS compilation and are also automatically connected to the correct process tag. In PCS 7 Version 7 and higher, these attributes are automatically set, but can also be deactivated.Double-clicking on a block icon during runtime results in the display of the faceplate in the standard view. Clicking the button with the black down arrow allows you to switch between views for maintenance, messages, parameters, limits, trends or batch, depending on the respective block icon.If you click the button for the loop display instead, the entire loop display opens with all its views.
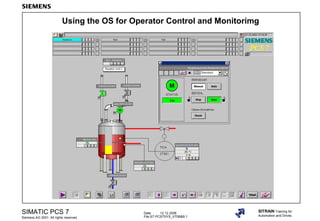
- Overview AreaDepending on the graphics resolution selected, up to 36/48/64 plant areas are displayed here, corresponding to the plant view of the project. The group displays show whether there is a fault in the associated area. If you use the arrow icon next to the area name, you can overlay the part of the Picture Tree for this area and directly select the subarea. The overview area is always visible during runtime. Working AreaPicture window showing process pictures with static and dynamic elements in compact overview or detail view.The operator selects the picture in the overview area.Process pictures are used for operator control and monitoring of process states - Entering setpoints, setting parameters, acknowledging messages, controlling SFC sequencers - Monitoring fill levels, temperatures, output states and messagesWith some objects it is possible to make operator input contingent on operator rights, e.g. controller parameters of the PID controller via the PID faceplate. Key setThe pre-defined key set in PCS 7 allows you to select typical process information (such as alarm logging, process tag information) or system operator inputs (such as logging on or deactivating the OS).
- Preparatory exercise Prepare the project in order to create the picture hierarchy during compilation of the OS and to generate the icons for operable blocks in this picture hierarchy. To do this, carry out the actions described below. ------------------------------------------------------------------------------------------------------- Preparation of PHIn the plant hierarchy PH, the picture names, e.g. Picture(7), are adapted to more meaningful names. Block iconsIn order to automatically insert block icons into the process pictures during compilation, a properties setting is required for all process pictures in which the icons are desired.If the pictures are inserted in the PH, the property is already activated and must therefore be deactivated if not required (with V7.0 and higher). Right-click and select Properties Block icons tab and select/clear the check box to activate/deactivate automatic insertion. The block icons are obtained from the @@PCS7Typicals.PDL picture. It is recommendable to create one or more copies, and to carry out changes or extensions there as required. If these copies are created with the names @PCS7TypicalsXYZ.PDL (XYZ can be any value: 1, 2, abc, version1, etc.) the symbols displayed there for the standard blocks are incorporated in pictures. If you double-click in runtime, the desired process values and statuses are displayed in the form of so-called faceplates. After insertion, these icons are automatically linked to the associated process tags during OS compilation.
- Note 1The PCS 7 faceplates are now inserted as a change function with "Compile OS" or "Create/update block icons". -If a change is made in the CFC, the associated picture is updated. -If one of the template pictures "@@PCS7Typicals.PDL", @PCS7Typicals.PDL or @PCS7TypicalsXYZ.PDL is changed, all plant pictures are updated. When the icons are generated in the pictures (manually or through compilation), the "@@PCS7Typicals.csv" file is also created in the main directory of the OS project. It is noted internally whether changes are relevant for creating/updating the block icons and, if so, which ones. If this option (block icons) is to be set multiple times, the "Process object view" can be called for this purpose (see slide). First select the project or hierarchy in the left window, then select the General tab in the right window. In the "Filter by column" box, select Type and in the Display box, select "picture". All pictures of the described hierarchy branch are listed in a table. In the "Block icon" column, you can now make multiple selections, then right-click and selectSet or Reset to apply the desired setting to all the selected pictures at once. Note 2You can also split the right window. To do so, first look for the small, rectangular button in the bottom left-hand corner of the scrollbar and drag it with the mouse. Now each window pane has its own horizontal scrollbar. When you move the vertical scrollbar, both windows are moved in synchronism.
- SettingsFirst select the OS project (in the PH or process object view). Right-click and selectPlant Hierarchy… Create/update block icons to display the above dialog box. This displays the hierarchy levels containing pictures with the "Derive faceplates from PH" option selected. If "Lower hierarchy levels included" =1, the following is specified in the above example: For picture "UnitAi" in PRO_OS, path "\ReactorsiUnitAi": - The CFC and SFC charts in all AS projects (PRO_AS) in path "\ReactorsiUnitAi" are identified. - The charts that are located one level lower are also identified (e.g., "Drain", "HeatCont", etc.). - A search is also made in the identified charts for blocks that can be monitored by the OS. If some exist, the search will first try to find the template picture of the OS with the name "@PCS7Typicals.PDL" as well as "@PCS7TypicalsXYZ.PDL", and if not (yet) available, the original picture "@@PCS7Typicals.PDL" is taken instead. A suitable block icon is copied from this picture and inserted in the "UnitA" picture. The icon is pre-wired, and only needs to be correctly positioned manually in the Graphics Designer. If "Object name…TAG" = "Block" you specify that only the block name is to be displayed in the picture as an icon heading. The TAG to be displayed may be too long for the other versions. RemarkClick Apply then Cancel to exit the settings dialog. Typically, the block icons are actually created when the OS is compiled.
- Set up OSThe OS configuration consists of the following three steps.In the first step, the OS is opened for the first time and changed to a single station system or multi-station system. The OS Project Editor enables the configuration engineer to define the basic setting with picture structure and message system. Following setup/checking of the AS-OS connection, the OS is compiled, and the block icons matching the utilized blocks are automatically inserted. Process screensThe geometry of the process pictures is adapted to the selected resolution in the next block, and the actual process representations are configured as static and dynamic picture components.The Picture Tree Manager is always called during OS compilation, and the AS's PH is incorporated in the overview area of the OS pictures. If additional icons are to be inserted or deleted manually, it may be necessary to manually call the Picture Tree Manager, make the necessary adjustments, and then compile. Alarm/Tag LoggingIn Tag Logging, measured value archives are set up so that in addition to online variables, a history of the measured values (within certain time boundaries) is displayed in the trend pictures of the faceplates. If runtime is activated, the operator can set up and compile online trends. Lifebeat monitoring This function monitors all automation systems and operator stations in the process control system for functional competence. You set up and activate lifebeat monitoring in the "Lifebeat Monitoring" editor. User Administration User administration is set up to administer and handle different users and their corresponding rights. When this editor is first launched, some rights are set by default and are known for the PCS 7 standard faceplates.You then transfer these rights to individual users when they are set up and organized in user groups.
- Multi-station systemA multi-station system is an OS server project with clients (terminals for operators or other servers that obtain data from the first server) assigned to it. Single station systemThe single station system can be used both as an ES and OS. Because an integrated configured operator station is created as a multi-station system, it is necessary to change the OS project to "Single station system". If you right-click the project header in the left navigation window, the project properties dialog box can be called using the displayed context menu (see 1.) The current project type is displayed in the "General" tab. It can be changed here to "Single station system". PC PropertiesRight-click "Computer" in the navigation window to display the properties of the configured computer.With V6 and higher, the OS projects are distributed such that one or more SIMATIC PCs with multi-station projects are set up for the server OSs in SIMATIC Manager and additional further SIMATIC PCs with client projects are inserted.Check the runtime components in the "Startup" tab, and activate or deactivate them as required. These changes only become effective the next time runtime is started. In PCS 7, these settings are normally made automatically by the project editor and other process control options.
- Key combinationsThese settings are intended for the post-commissioning phase in order to disablethe OS computer from unauthorized access. Any selected key combinations remain disabled in runtime. Runtime languageThis is the language used (when multiple languages are configured) for the runtime displays. Default runtime language If not all texts are available in the first language, the default language is used for the missing texts. Time-of-Day SettingThere are two possible settings for the time type method used in the automation systems: The PLC is set to coordinated universal time (UTC) (preferred setting) (corresponds to GMT ) PLC is set to the local winter time all year (WinCC V5 compatibility mode)Here WinCC is informed which time base the PLC is operating with and how the time stamp is to be interpreted, e.g. in message frames. Settings must be coordinated with the hardware configuration of the AS (CPU and Ethernet CP). Time baseThe time base for the time-of-day display in runtime can be set to one of the following three options: Local time zone (local time of the computer) Time zone of the server (migrated project) and Coordinated universal time (UTC) - corresponds to GMT - for display in WinCC Alarm Control and in WinCC Trend /Table Control.The date and time displayed in the top right corner of the screen is always the local time of the computer.
- OS Project EditorThe basic system settings for the display and message system are set with the OS project editor. The resolution and the number and arrangement of planned monitor(s) of the OS are also set in this editor(Notice: When using several monitors, you need to use a multi-VGA card).The editor also provides settings for area selection, basic data for the system (template pictures) as well as message configuration. LayoutUpon activation of the "Layout" tab, a dialog box opens where you can set the desired screen resolution as well as the number and configuration of the monitors. You can set up to four monitors.If several monitors are used, they must all have the same resolution. Area sizeClick the "Detail" button to open a dialog box where you can define the number of area rows and columns corresponding to the selected resolution. You can check the settings first in the preview.
- Message configurationUpon selection of the "Message Configuration" tab, the configuring engineer can see the settings for the message system that are to be made from the project editor. These settings include creating/adapting message blocks, creating short-term and long-term message archives as well as generating system messages.The configuring engineer can disable any unwanted system messages by clearing the check box in front of the message number on this tab. NoteAfter the first Compile OS operation, the setting "Configurations that support online DeltaLoading only" is automatically selected in the General tab. This disables (grays out) the message configuration so that no unwanted changes can be made. If you would like to change this setting, click the General tab, and select the option "Complete configuration" and then return to the Message Configuration tab. The fields can now be edited again.
- Message displayThe default settings are based on the message design for versions up to PCS 7 V6.0, with the corresponding message windows. Group display hierarchy (as of V6.1) The setting for the group display hierarchy has important implications. The graphic message system is automatically configured when you select this option. However, in doing so, manually configured group displays may be deleted. Therefore, you have to acknowledge a warning box before the option becomes enabled. This is recommended for new projects. Smart alarm hiding (V7.0 and higher) Here you can offer an additional button for operators in the message window that the operator can use to suppress messages on the display. The messages defined by the operator are not blocked at the source (AS) but are still sent to the OS. They are entered there directly into the history without being displayed. The suppression operation can be time-limited so that messages are displayed again once the specified amount of time has expired. Operator messagesThe block comment can be recorded here (optional) if operation is from the OS. This results in better readability of the history of the operations that have been carried out.
- Area AssignmentIn this dialog, you can set the areas to be displayed in the overview area of the OS picture. The area names from the plant hierarchy are used here.The area names that are listed in alphabetical order in the PH can be arranged in any order here. If you don't want specific area names to be visible for area selection, select the area name and click the right arrow button to remove the area.You can also create a wildcard for later upgrading by taking the so-called "Empty button" and positioning it at the required location using the Up and Down buttons. NoteThe area settings and sequence in the OS project editor compete with those in the plant hierarchy. If settings are made in the OS project editor, they always take priority over the plant hierarchy settings! Additional tabsSelect the tab (and the option to be set, if necessary) and press the F1 online help key. Here you will find information about additional setting options.
- AS-OS ConnectionYou must first configure a connection between the OS and each AS in NetPro before compiling the OS.If this connection is missing, the OS cannot be compiled.In order to configure an AS-OS connection, see Chapter "System configuration" under NetPro "Configure connections". NetPro must be opened there for the respective project, and the connection configured (and downloaded). CheckingThe "Cross-project network view" can also be selected in NetPro for checking and possibly downloading (see slide). Here you can view (but not change) the connection data for each station by clicking the CPU or application and, if necessary, download to the target system.
- ESOS-relevant data are stored partially in the (sub)project and partially in the OS database. During configuration on the ES, the process information (tags) required in the OS can be scanned directly from the project database. The PH assists you by giving you a structural overview.If the connection exists but the OS has not yet been compiled, the associated process tag (block parameter) can be linked from the ES view, and the "Delta compilation for the tags of the block is performed in the background. Compile OSBecause the OSs are not ordinarily used in the system as an ES as well, they require their own database at runtime. Therefore, the OS must be compiled before the OS is activated.This expands the OS database to include the process connections to the ASs, the picture hierarchy (derived from the plant view), the messages from message-capable blocks and tags that are retrieved only from the OS database during runtime.
- If the ES and OS are installed on different PCs, the OS can also be simulated locally on the ES in order to make a preliminary check of the OS's operability and outward appearance. The OS configuration is then copied to a temporary directory on the ES and runtime activated there.If the communication data are exactly the same (the connection name from the ES to the AS is identical to the connection name from the OS to the same AS), it is also possible to establish connection to the AS. Otherwise, fields that are directly linked to variables are "grayed out" to show that there is no process connection. The call is started on the ES in the SIMATIC Manager. Select the OS object to be tested, right-click and selectStart OS Simulation to display the same picture as on the future OS. If the test was successful, this OS project can be compiled and uploaded to the physical OS. Provided you have not made any illegal changes, you can load the modified and tested project onto the OS during runtime without interrupting the monitoring.
- Setting up the OS The OS is to be set up as a single station system, with a standard layout and automatic group display hierarchy generation. The OS areas are derived from the plant hierarchy. Block icons are to be inserted into the process pictures, the picture size adapted to the resolution and the OS compiled. The compiled OS project is to be subjected to a runtime test. ---------------------------------------------------------------------------------------------------------- Exercise 1OS projects integrated in S7 projects are automatically created as multi-station systems. Change the setting. -------------------------------------------------------------------------------- Steps1. Open the OS2. Change OS project properties to single station system3. Close OS project4. Open OS project again -------------------------------------------------------------------------------- ActionSelect the OS in the SIMATIC Manager (SM). Then right-click and select Open objectThe OS project is displayed in the WinCC Explorer. Select the project header,e.g. OS01 in the left navigation window right-click and select: Properties "Single station system" type to change the project type. The "Delete startup list?" prompt appears. Respond with NO. Remember the effects of the change. This change becomes effective with the the reorganization that takes place upon exiting.Then open the OS project again.
- Exercise 2Use the OS Project Editor to set the resolution and the monitor configuration, set the message configuration, define areas for the picture tree, specify the number of runtime windows and set the basic data.----------------------------------------------------------------------------------------------------- Steps1. Open the OS Project Editor in the WinCC Explorer2. Layout tab: Set resolution to standard 1280 * 1024, leave the monitor configuration set to 1 monitor.3. Message Configuration tab: Check the settings. 4. In the Message display tab, select the "Generate group displays..." option, and select the button for suppressing messages in Smart Alarm Hiding. 5. Area tab: Select visible areas Visible: 'Reactors', 'Tank' and 'Test'(if already present) 6. Runtime window tab: Define the maximum number of process windows - leave default setting7. Leave Basic Data tab and General tab set to the default settings. Click OK to confirm and apply your settings. ----------------------------------------------------------------------------------------------------- ActionIn the opened OS project in the WinCC Explorer, open the "OS Project Editor".In the Layout tab set the resolution for your OS project to 1280 * 1024. The monitor resolution of your ES must also be set to 1280 * 1024 (check!).Leave the monitor configuration set to one monitor.In the other tabs set the options specified in the exercise. NoteIf you need a higher resolution than is actually set (or can be set) on the ES/OS, then you will see a picture in activated runtime, but you will not see the complete picture!
- Exercise 3Before the OS can be compiled,and the process connections and the tags created, the connections between the OS and the individual ASs must be checked. ---------------------------------------------------------------------------------------------------------- Steps1. In the SIMATIC Manager, open "NetPro" and go to "Cross-Project – Network View". 2. Check connections, each AS must have its own connection to the OS 3. If okay, exit NetPro; otherwise, create missing connection(s), in that case exit the previous view again. . -------------------------------------------------------------------------------------------------- ActionSelect one of the existing subnets in the SIMATIC Manager. Select subnet double-click: NetPro is then opened with all subnets and connections. Activate the menu command: View Cross-Project Network View to display the view suitable for checking (it displays all participating stations from all projects in the multiproject). In the PC station icon, select the WinCC application component and check the connection to your OS in the table that opens below.If the connection exists but is not yet downloaded, you can also carry out the download from this view for all stations. If the connection does not exist, continue in Section "System configuration" under "Creating and Downloading Connections"
- Exercise 5Now compile the OS. All required process connections will be created automatically, the process tags created and the message system set up. The block symbols will also be inserted in the highlighted pictures. ----------------------------------------------------------------------------------------------------- Steps1. In the SIMATIC Manager start "Compile OS"2. Check S7 connections to the OS and adapt if necessary -> Named connections3. Define OS compilation data and scope4. Complete compilation ----------------------------------------------------------------------------------------------------- ProcedureIn the SIMATIC Manager select the OS in the component view, then right-click and select Compile to start the Compile OS wizard. Assign the OS areas to the previously selected OS. Only the data from the assigned areas are compiled! Select each connection to the OS individually and click the Connection' button to check whether an S7 connection of subnet type Named Connection is entered.Click the Continue button in the "Compilation data and scope" dialog to set all data and options active and set the scope to "Entire OS" and "With memory reset" for the first compilationClick the "Finish" button to start compilation.
- Exercise 5After setting up the OS and making the necessary adaptations, you can start the WinCC runtime for the first time. The created connections and basic functionality of the OS are now tested. ---------------------------------------------------------------------------------------------------------- Steps1. Activate OS runtime in the WinCC Explorer2. Switch from the start screen to the WinCC Explorer and select the Options -> Connection Status menu command and check whether the connection(s) to the AS(s) work3. Check the required functionality in the runtime window Does the area selection function? . . . . Were block icons inserted for all standard blocks? . . . . Can you operate the block icons and open the faceplate displays? . . . . Do the block icons and faceplates show updated states? . . . . -------------------------------------------------------------------------------------------------- Action1.) In Explorer, select the Activate Runtime button.2.) When the runtime screen opens (see slide, right) press <Ctrl> + <ESC>, then click Options -> 'Connection statuses' in WinCC Explorer to open the connection status window and to view all configured connections there with success message. "Disconnected" is reported when a connection was not successfully established; "OK" indicates the connection was set up.3.) Check the above functionalities in the runtime screen. Operation of the SFC control largely corresponds to the test mode for the SFC chart editor.
- SFC VisualizationOn the OS, you can operate and monitor the sequencers configured with SFC charts. The interface is almost the same one as in test mode for the SFC chart. As opposed to the test mode, the inputs are dependent on the authorization. At each operator action, an information text is displayed which you need to confirm before the operation will be processed. At the same time the operator action is retained in the operation log! (Alarm Logging) SelectionThere are two ways to start the SFC visualization:1.) In the standard function key bar by activating the "SFC visualization" icon. A selection box is displayed listing all configured SFC sequencers. Double-click on the desired sequencer to modally open a "reminder window", which also shows an overview of the state of the sequencer with color status information. Double-click on this window to display the graphical representation of the sequencer with status information - largely equivalent to the test mode for the SFC chart.2.) The process image of the process tags contains a block symbol of the associated SFC sequencer. Click on this symbol to display the SFC faceplate with which the operator can control and monitor the sequencer within the framework of his/her rights in the user administration.Click the "Section" button to display the sequencer with its status display as in SFC chart test mode.
- SFC Status InformationSFC visualization is for operating (control) and monitoring (status) execution of the sequencer. Step StateA step is opened by clicking on it. The step actions are displayed divided into Initialization - Processing - Termination, but without status display.The General tab sheet displays the settings for setpoint and current actual value of any configured wait time for the step (here with status information). Transition StateYou can display the conditions with their associated states by clicking on a transition. These queries are gated and the color relating to fulfillment is displayed.Green = fulfilledRed/brown = not fulfilled NoteIf the "Update" checkbox is checked, status monitoring will automatically continue in the next step/transition to be executed after a transition is fulfilled for a step.
- SFC CommandsThe command buttons are used to control the sequencer.(See also Chapter SFC "Operating state logic") SFC Step Control ModesThe operator can change the step control mode of the SFC sequencer. Click in the top field to display the drop-down menu where you can select the desired step control mode.
- Exercise 6After the first runtime test of the OS, test the visualization of the sequencers configured in SFC in WinCC. ---------------------------------------------------------------------------------------------------------- Steps1. Activate the OS runtime in the WinCC Explorer2. Select process picture UnitC in the overview area3. Display the SFC faceplate with step visualization of the state4. Start the sequencer in manual mode with "Command Output" activated. -------------------------------------------------------------------------------------------------- ActionIn the Explorer select the Activate Runtime button.In the overview area select the process picture of the process tag UnitC and activate the SFC faceplate for the process tag by double-clicking the SFC block icon.Check that Manual mode and "Command Output" mode are active. Now start automatic execution and control the status display in the step and transition display. Additional exerciseChange the SFC for Reactor1UnitA1 such that the "Drain" step has to be acknowledged following draining of the vessel. Configure appropriate acknowledgment information. Compile and download the AS. Carry out the online test in the SFC. Compile the OS (downloading is omitted if the ES/OS are on one computer). Test the display of this information in WinCC-RT, in step control mode "T/T and B".
- Exercise 7Set the size of the process images if the existing settings are not suitable. ----------------------------------------------------------------------------------------------------- Steps1. Open OS2. Start Graphics Designer and open the process (user) pictures there.3. Open the Object Properties box via right-click -> Picture background and select Object Properties 4. Select the Geometry property group in the Properties tab In the right window, double-click the Picture Height and Picture Width properties.. Set them to 1280 * 1024 pixels.----------------------------------------------------------------------------------------------------- ActionIn the SIMATIC Manager, right-click the OS to open the OS project in the WinCC Explorer.In the Layout tab of the OS Project Editor, set the resolution for your OS project to 1280 * 1024. The monitor resolution of your ES must also be set to 1280 * 1024 (check!).Leave the monitor configuration set to one monitor. NoteIf you need a higher resolution than is actually set (or can be set) on the ES/OS, then you will see the picture in activated runtime, but you will not see the complete picture!The picture height is later adapted to the screen height as shown in the table on page 52. TipIf you have adapted a picture to the desired size, you can copy this (still blank) picture to the plant hierarchy and insert it into other hierarchy folders.
- We shall now look at the fundamental concepts behind creating pictures and how to set dynamic displays. Then you will be able to apply your knowledge in the exercises. Creating PicturesThe "Graphics Designer" editor is used to create the pictures. You open the Graphics Designer by double-clicking on the picture. You can also open the picture in the plant view or in the Picture Tree Manager, if the OS project is opened in the WinCC Explorer. Object PaletteThis window contains predefined graphical WinCC objects that you can drag to the Designer window, and position and expand as required. The picture objects are vectorial, i.e. they can be moved using the mouse at any time.You can also open a library containing additional predefined objects (user objects or controls). It is also possible to add custom designed elements to the library in the "Project library" or globally for the ES in the "Global library". LibraryThe library consists of two parts: "Project library" (empty at project start) and "Global library" (predefined graphics). The Global library contains the so-called HMI library - another useful library with different controls for many different technologies. General Procedure1. Select the object by clicking it in the palette. 2. In the picture, click the required position, keep the left mouse button depressed and draw a frame around the object. 3. Select the required property from the "Properties" dialog screen (light bulb icon) then right-click to display the context menu and select the type of action you wish to apply. If necessary switch to the "Events" tab and create the required action there via the selected event (lightning icon).
- Configuring ObjectsYou can highlight each object on the screen. Right-click and select Properties to open a dialog box where you can modify Properties and/or Events for these objects either statically or dynamically. PropertiesThe properties are arranged appropriately. For example, a rectangle under "Geometry": has the properties "Height", "Width" (in pixels) or "Colors": "Background color", "Foreground color" etc. StaticWith a property has a static setting, you can select it, then right-click and select Editto change the setting. DynamizationHere right-click and select Tag or Dynamic Dialog or C Action or VBS Actionto associate a different dynamic property with the respective property. TagYou select a tag from tag management, if the format of this tag is appropriate for this property. Dynamic DialogThis tool is used if the tag/process information cannot supply the property value directly (e.g. "PV_IN" for bar color). Use the dialog to create a table in which defined property values can be assigned to the various process values of a tag. The associated property value for the current process value is determined during runtime and supplied to the object. C Action/VBS ActionA "C script" or "VBS script" can be used to evaluate any WinCC information during runtime in order to supply a property value not provided by the standard properties. EventsRight-click and select C Action or VBS Action or Direct Connection. Each action configured in this way is triggered once when the selected event takes place (such as an object change in the I/O field).
- ExerciseAt the start of the project, you stored some empty pictures in the plant hierarchy. In these pictures now adapt the window height to the resolution.-------------------------------------------------------------------------------- Steps1. Open Graphics Designer, open picture @screen.pdl, obtain picture height of picture window @win12 and enter it here. Picture height:________________2. Adapt the picture height of all process pictures from the plant hierarchy (to suit the available equipment) 3. Save the modified pictures-------------------------------------------------------------------------------- ActionIn the WinCC Explorer, open the Graphics Designer by double-clicking the picture @screen.pdl. Click the middle picture and then right-click and selectProperties to open the Object properties for the picture window @win12. TipIf you cannot find the picture window, it may be hidden by other window. Click on any object, open its Properties screen and select the object "@win12" from the dropdown list in the top right-hand corner. The Properties screen now refers to the "@win12" object!In the Object Properties dialog box, select the geometry. The box on the right will show the value for Window Height - enter it under "Steps" point 1.Then open the other process pictures and change the "Picture Height" property to a value that is compatible with your monitor resolution.To do this, go to the property Picture Height --> double-click and enter the change value, then press OK to confirm. NoteIf picture adaptation is not carried out, you will be able to select the process picture in runtime, but scroll bars will appear at the right edge of the picture to scroll the process picture in the picture window. Tip:A more efficient procedure (for the complete project) would be to modify the first picture in the PH at the beginning and to duplicate it (as an empty picture) in the PH.
- Making Color Dynamic- Create a polygon as Valve V2. Select the polygon, right-click and select Properties - Color Properties Background Color Light bulb icon right-click and select Dynamic Dialog. - Click the button next to "Expression/Formula" and select the tag for the valve feedback signal of the "FB_V2_OP" reactor in tag management. - Set "Bool" as the data type for this tag - it only has two states! - The "Yes/No" validity range for this tag and the associated background color aredisplayed in the result window. Double-click the color to select it: "Blue" for "Yes" (valve open) and "Gray" for "No" (valve closed). Color values (info)The color values are compiled from a large palette, where the 16 basic colors are set using hexadecimal values.You can find the codes in the online help under the search term "Color table". The symbolic constants are externally predefined by #define and provided by WinCC for C scripts. Because the desired color is not achieved by directly assigning a color property to a variable, you need to use the Dynamic dialog here or work in scripts using the symbolic color names in the above table. RememberIf using colors, use the Dynamic dialog.
- Rotational movements are too difficult and time-consuming to display for objects in motion like a mixer motor. An easier way to display rotations is by making them flash. Activate Flashing -Highlight the mixer symbol (a group consisting of a circle and line). Right-click and select Property -Property Group -> Flashing -> Flashing line active -> Light-bulb icon, then right-click and activate Variable and select the feedback tag "MOTOR_ON_OFF".As there are only two alternative states for activating/deactivating flashing, this property can be directly linked with a binary variable - unlike the background color.
- Activating Dynamics for I/O Fields In addition to the usual"Properties" window, there is an easier method (called "configuration dialog"). - Highlight the I/O field (temperature display). - Right-click and select Configuration Dialog - Select the actual value of the PV_IN temperature controller. - Select the "Output" type (output function, not input) - Set format (as required), here vertical and horizontal centered NoteThe configuration dialog box is automatically opened when a new I/O field, bar or slider are inserted.You will find additional settings in the familiar "Properties" box. These include the (most important) properties "Data Format" and "Output Format" as part of the "Output/Input" group.With output format, the figure "9" is a wildcard for places before/after the decimal point. If leading zeros are to be displayed, enter a "0" in front of the nines. If you need to display a leading sign, the output format must be preceded by a "S" = Sign. Exponential notation is represented by adding an "e" at the end. TipDouble-click on the property "Output format" to open a selection screen for possible formats.
- Call Faceplate with Mouse-Click Due to the size of the faceplate display, you may often want to display a representative icon and display the faceplate only when needed. - Select the graphical element to be used for making the faceplate visible. - In the Dynamic Wizard -> Picture Functions tab, double-click Picture selection via process tag - In the subsequently displayed dialog boxes, select the block you want.This programs a call of the block faceplate for the selected icon. If the icon's design complies with the guidelines for the faceplate designer (e.g. the standard icons from picture "@Template-PDL") the wizard will also connect the process tag (and all required tags) and make the faceplate visible. Note It is advisable to choose Group Display as the display type (corresponds to faceplate) - see wide arrow in the bottom right corner of the picture. You can call up the loop display as needed from the group display (complete screen with all available block parameters).To enable integration of these block icons (typicals) in your pictures, theOS project directory GraCS directory contains the @Template.PDLfileIt contains the standard typicals for the blocks of the technological library; you can copy/paste them into your process picture. Connection to the process tag is via the wizard (see above).Do not use the icons from "@@PCS7Typicals.PDL", they are intended for automatic generation during OS compilation.
- Direct ConnectionThis form of dynamization can only be used for events present on the triggering object. It is possible to define which source information is to be transported to which destination in a dialog box. ExampleIn the above picture, two text boxes and a circle are present. With a mouse click (event) on text box 1 (contents "Visible"), the property "Display" of the circle object will be set (value TRUE). By clicking the second text box, the circle object will be made invisible. 1. Select the triggering object (text box 1 in this case). 2. Open the properties dialog "Events" tab 3. Next to the lightning icon for the "Mouse click" event, right-click and select "Direct connection". In the dialog that appears next, you can select (or enter in the case of constants): - the source and the type of information (constant, property of which object, tag) - destination (properties of the current window, properties of an object in the picture, a variable from the tag management) Data that are to be transferred. In the example, select the constant on the left as the source (enter the Boolean value TRUE). As the destination on the right, select the circle object "Circle 1" and then the property "Display" referring to this object. When you click OK, a blue lightning icon at the source ("Text box 1", event "Mouse click") indicates an outgoing direct connection.In the destination object "Circle 1", the destination property "Display" is shown in italics (Display) as reference to an incoming direct connection. 4. To switch the circle to invisible, repeat the process starting with the second text box (content "Invisible")
- Area OverviewThe group display (1) preconfigured in the area overview combines messages from group displays (2) and (6) from the area picture ("Reac.pdl") From V6.1 they can be automatically generated (setting in OS project editor, Message Display tab). Although their default setting is hidden (invisible), they can be post-edited in the pictures. "Reactors" Area PictureThe group displays in "Reactors.PDL" combine the messages from the group displays (3) and (5) from the pictures "UnitB.PDL" and "UnitA.PDL". The group display (4) combines messages from "UnitB.PDL" (3) and group display (6) from picture "UnitA.PDL" (5). "UnitA" Detail Picture“This contains group displays that are assigned to the measurement point. These are either complete PCS 7 block symbols (with integrated group display) or group displays that have been inserted by the use and are linked to the process tag by the Dynamic Wizard (see also next page). ChainingIf a measurement point triggers an alarm, this event is collected (ORed) via the group displays of the higher-level pictures and displayed in the area overview (even if the signaling process tag is not in the picture currently being displayed). As the area overview picture is always visible at runtime, the plant operator can immediately determine if there is a disturbance in one of the plant areas. Selecting the TriggerWith the configured "Picture selection via group display" you can click on the alarm/warning signal to track the collect path - but only if the message is present. NoteIf you make changes to a picture regarding group displays (inserting, editing or deleting group displays/blocks with group display), you must call up the Picture Tree Manager and save the hierarchical group display with the option "Calculate the group display hierarchy completely new again while saving" activated: via Project -> Save When the OS is compiled, this procedure is automatically carried out.
- InfoThis type of connection was used in previous versions of PCS 7 because ready-to-use block icons were not yet available (see "@@PCS7Typicals.PDL"). This procedure is no longer necessary in the current version when using the ready-to-use icons. Also the appearance, number and message class assignment of the fields in the group display can now be changed. Connecting the Group Display to a Process Tag If you need to recognize the alarm/fault state of a process tag in a picture (provided that this process tag provides this information), you can use a group display and connect it to the special "EventState" tag of the associated block. This tag is only available in the tag management of the WinCC Data Manager after the OS is compiled. The easiest way to establish this connection is using the Dynamic Wizard. - Select group display - In the Dynamic Wizard -> Standard Dynamics tab, double-click Connecting the Group Display to a Tag Structure. - Select the block name and the instance and confirm your selection. NoteIf you make changes to a picture involving group displays (inserting, editing or deleting group displays/blocks with group displays),you must call up the Picture Tree Manager and, with selected option, "Calculate the group display hierarchy completely new again while saving" explicitly save via Project -> Save to complete the operation. When the OS is compiled, this procedure is automatically carried out.
- Exercise 1In order to display alarms immediately in the overview area of the OS, group displays are needed as links between the process pictures and the overview area. These group displays collect and pass on messages from and to the lower-level pictures as defined in the Picture Tree. These group displays are connected to the lower-level pictures. After OS compilation, verify that your OS project editor settings have taken effect. (i is your group number) -------------------------------------------------------------------------------- Steps1.Open the Picture Tree Manager and activate the "Preview" view.2.Check whether you can see a group display in the "Reactors" picture and the block icons in the "Unit A" picture.3.Open the Reactors picture in Graphics Designer and check the group display (Properties and Events) -------------------------------------------------------------------------------- Action1.Open the Picture Tree Manager and switch the view to "Preview". 2.Verify that a group display or block icons can be recognized in the right preview window by selecting the "Reactors" and "UnitAi" pictures. If not, check the settings in the plant hierarchy for the OS compilation and, if necessary, in the "Message display" tab in the OS project editor. The icons should appear there when you repeat the OS compilation.3.The group display must be present in the "Reactorsi" picture and the "Group Value" property and the "Mouse Action" event must be completely configured. The "Display" property is preset to No. You can change this setting. Position the group display (if it is to be displayed) at the required location. NoteEach time you change a picture involving the group displays, it is necessary to re-calculate the group display hierarchy by saving again (explicit SAVE operation in the Picture Tree Manager!), unless you are subsequently going to compile the OS.
- Exercise 2In the following, i is your group number. Open the UnitAi.PDL process picture and use the Graphics Designer to create a reactor visualization similar to the one shown above. -------------------------------------------------------------------------------- Steps1. Open the UnitAi.PDL picture in the Graphics Designer2. Open the picture library and select the reactor3. Insert the bar for fill level control4. Reposition the block icons5. Select the pipes from the picture library and position them as required -------------------------------------------------------------------------------- ActionIn the WinCC Explorer, select the UnitAi.PDL process picture and double-click to open it in the Graphics Designer. Open the picture library and insert a reactor control. Then insert the suitable pipe elements.Insert a bar from the Object Palette Smart Objects and position it on the reactor. In the configuration dialog, connect the bar to the "LEVEL" tag from the reactor simulation.Drag and drop the block icons inserted during OS compilation at their correct location in the reactor unit.Create the control valve as a polygon from the object palette, since the inserted block icons are only used for shut-off valves. Insert a static text from the object palette and select it as labeling field above the reactor: Text "Reactor Ai" PlusIn order to display the level of the manipulated variable, make the fill level of this valve dynamic by using the variable "LMNR_IN" from block "CTRL-PID". TipThe static texts can be prepared for different display languages. Once you have created all texts in the current language, you can switch to this language via View Language. The setting is retained in the Graphics Designer (for other pictures too).
- Exercise 3An overview picture for the reactor area is to be adapted. You need to use the elements suggested in the slide above. Each of the group displays is to display alarms/faults from the "UnitAi" and (later) "UnitDi" pictures and allow the picture to be switched if there is a fault (i is your group number). ---------------------------------------------------------------------------------------------- Static textSelect Object palette Standard objects. Double-click the Text property to enter it. There are additional possibilities under "Properties". ReactorCall library (top right button, or select View Library) HMI Library Tanks (show Tanks only as static display) BarSelect Object Palette Smart Objects Bar and position it on Tanks. Select the "Process Connection" property under "Miscellaneous" and set Minimum value =0; Maximum value=100 as fixed values (Static column). Click the "Fill level" light bulb icon (Dynamic column), right-click and select Tag.... Select and confirm the "LEVEL" tag for the REACTOR block from the window you see now (in the ES view or WinCC view). Group display Move it with the mouse and label it with a static text (heading). Proceed in the same way with "Unit Di". TipFirst complete the section for Unit Ai, then copy it and move it. Now you only need to change the tag connections in the copy.
- ReconnectingYou can change the tag connections. 1.You can change them directly by calling the respective property and linking the (green) light bulb icon again. 2.As a user-friendly alternative you can capture them with the lasso tool, right-click and selectLink Tag Connections to change the links. In the displayed dialog box, select the "Places of Use" tab to first check the actual connected component properties and the tag connected there. In the "Find and Replace" tab you can use the "Search for" field to narrow your search down to one or more selected tag names. You can preview the changes by entering text in the "Replace with" field and clicking Preview. This allows you to preview the results of changes before making the changes. If you do not want to proceed, you can try out other search terms or click the Cancel button to cancel the operation. If after viewing the preview, you decide to proceed, click the Replace button. 3.Cross-project reconnections can also be carried out in the CrossReference editor of WinCC . However, the danger is great that wrong connections could be made, which cannot be reversed - the project should therefore first be archived! NoteCheck the preview carefully. The shorter the search text, the more likely it is that it will be contained in names you do not want to modify. If you change them all at once, you may have created errors. If in doubt, you can also go through the table row by row and search for the new tags using the Tag Browser. As usual, when you click a field, you can display the help function by pressing the F1 function key.
- Runtime TestTo test the OS project you created online, you must first activate the project. In most cases, you first need to close all other WinCC editors and options. - In the WinCC Explorer, select File Activate (or the black triangle symbol) to change the OS to runtime mode. - Open your pictures and check the dynamicsWhen messages appear in the message line, verify that they are also visible in the group display of the overview area.When you double-click the group display, do you jump straight to the associated process picture? Picture Tree ManagerIf you receive an error message indicating that the picture hierarchy in the Picture Tree is not up-to-date, open the Picture Tree Manager again and click the "Save" button; the option "Calculate the group display hierarchy completely new again while saving" must be selected.You do not have to deactivate the runtime again for this purpose . This is implicitly performed for each OS compilation.
- Operate the blocks/faceplates (closed-loop controller example). Can you see concrete values? If you do not see concrete values (entries are grayed out and all values are "0"), there is a link problem (AS in stop mode, block name unknown, block not loaded in the AS). - Select the "Manual" display. Change the operating mode. If the Execute button is not available (grayed out), use check the block enables in CFC. - Click the "Setpoint" field. Enter a value to change the setpoint. - When you change tasks (ALT+TAB) at the Windows level, you open the CFC chart with the block. Go to test mode and check the value.
- ExerciseSet up two users (e.g. "First" and "Second") in the User Administrator. Give these users the authorizations illustrated in the slide above. ------------------------------------------------------------------------------ In the WinCC Explorer, select "User Administrator". Right-click and select Open to activate it. GroupSet up a user group (e.g. Plant operators) Right-click and select Create group Assign all rights to this group that are common to all plant operators (serves as a template). Double-click the white/red fields in the "Authorization" column or in the areas. UserSelect the Plant operators group. Right-click and select Create user and the option: Copy group settings also to create the new users. Provide the new users with a name (Login) >= 4 characters and password >= 6 characters. Assign rights by modifying the rights associated with the group. For our exercise, use passwords like aaaaaa for all users, so that they are easier to remember! Note The user administration authorization makes it possible to call up the "User Administrator" during runtime and set up new users, as well as change or delete existing rights for existing users! This authorization does not include operator control and monitoring. If you want to assign this function to your user, it is necessary to activate additional authorizations, such as 2, 4, 5, etc. However, the user with user administration authorization can call the "User Administrator" during runtime and activate additional authorizations for themselves. After you log on again, the new authorizations are active!
- SIMATIC LogonIf the SIMATIC Logon option is installed on the computer, the users must be set up in the Windows computer management. Further groups are automatically installed there in addition to the existing user groups (e.g. users, administrators, power users) through installation of the PCS 7 components (e.g. SIMATIC HMI through WinCC, Logon_Administrator through SIMATIC Logon). If the WinCC user administration is then to interact with SIMATIC Logon, separate user groups must first be created under Windows (e.g. "Plant operators", "Maintenance" etc.). The Windows users are also created there, and assigned to the respective group. The "SIMATIC Logon" option is selected in the User Administrator tool (see slide) in WinCC. Then you insert the groups, which must have the same name as the Windows groups ("Plant operators", "Maintenance" etc.), and assign the WinCC authorizations to the groups. No users are inserted in WinCC! (You have already set them up in user groups of the same names in the Windows computer administration.) RemarkIn addition to being a member of his own group, the WinCC user must also be a member of the "SIMATIC HMI" user group. RuntimeIf WinCC is used in runtime, a new screen form is offered for logging-in (see slide) in which the Windows login (e.g. "FIRST") is typed. If the login and the password agree, the logged-in user has all authorizations of the user group with the same name from the WinCC user administrator. As a Windows user, you can change your own password yourself (if allowed in Windows). If you call the user administrator during runtime, the active login appears underneath the associated group.
- Online TrendsDuring controller commissioning, it is very helpful to be able to graphically evaluate aspects such as the oscillating behavior of the closed-loop controller. For this purpose, the operator can create a trend group online during runtime. The tags can be supplied directly from the data manager of the WinCC Server or from the Tag Logging archives. AdvantageThe operator can check the time sequence of any analog or binary process signals at any time, regardless of the configuration. Note that when you display the online values directly from the data manager, a new trend display will be started each time you call a picture (as there is no history).
- CreateTo create online trend groups, activate the respective button in the standard function Trend Groupsbar. A dialog box is displayed where you can choose to create either an existing or a new trend group.Enter a meaningful name for this trend group and select 'Online'. A properties dialog box is displayed; use the"+" button to select the required number of trends, change their names to representative names, and click the 'Selection' button to assign the required process tag.After you confirm your selection, the trend window is immediately displayed modally, regardless of which area picture is currently displayed.The operator can change the group composition at any time. RemarkIn the trend group, it is also possible to access tags from the archives. Thus, it is also possible to compare a current trend with an archived trend.
- PCS 7 Message SystemThe message system is represented in the OS by means of alarm controls. This display is accessed by activating the "Message system" key in the first system key set. A specific key set is then displayed (see above), via which you can open the various message windows.There are two different message system types for the OS - Bit message procedure (not in PCS7) and- Chronological reporting in which the messages are generated within the driver blocks and technological blocks of the AS and are sent to the OS as message frames (telegrams) with time stamp. The messages are then entered in the short-term archive. To ensure that these messages are not lost, the archives are saved in a backup as specified in the configuration. The messages and the complete message system were generated from the standard blocks of the technological library during OS compilation in the form of system messages for the AS and OS.A distinction is made between messages requiring acknowledgment and those which do not. Layout of the Message LineA message is composed of different information components, which are created in groups as system message blocks, user text blocks and process value blocks. The system message blocks contain information such as the date and time, as well as message classes, message types, message state and duration.The user text blocks contain information such as the message event, message origin, and area.The process value blocks also provide up to 10 process values for the messages if required and configured.
- The message system can be viewed and adapted via the Alarm Logging Editor in the WinCC Explorer, if this has not yet been done via the OS Project Editor. When the OS Project Editor is run, the settings in the Alarm Logging Editor can be affected. Alarm Logging is divided into three windows (panes), - The navigation window containing the Message blocks, Message classes, Group messages, and Archive configuration- The Edit window showing details or components of the topic selected in the Navigation window, and- The table window containing the individual messages. This window lists the already configured messages, and also allows new message to be added for the bit message procedure. Classes and TypesIn alarm logging, all messages can be assigned to one of the up to 16 message classes. Among other things, the message class determines the acknowledgement procedure for the class and identifies the message status "Came In", "Went Out", "Acknowledged" and "Came In and Went Out".Up to 16 message types can be created for each message and define the coloring of the message states "Came In", "Went Out" and "Acknowledged" for each type. NoteThe PCS 7 standard is the initial template for the message system. The template file "MessageTemplate.cfg" can be found in "Installation_directoryOptionsSSM". If you do not wish to use the PCS 7 standard, you can use this configuration file as an example for your own, individual configuration file. Prior to conversion, save the "MessageTemplate.cfg" file under a different name outside the installation directory (see online help in the Project Editor).
- ArchivingDepending on the message class, changes that occur in message states are written to configurable archives. Archiving takes place in the message archive. For this purpose, various parameters such as the archive size, time range, switchover time, etc., are set. If one of the configured criteria is exceeded, the oldest messages in the archive are overwritten. The backup of the archiving databases can be specified through additional settings. Display of messages saved in a message archive takes place in a long-term archive list or a short-term archive list. Display of messages in the short-term archive list is updated immediately upon receipt of a new incoming message. Details on the archive settings and on the backup are discussed with the topic "Tag Logging", since the procedure is based on the same principle.
- Disable messages through OS operation Area-based1. With the area selected, change to the second system key set and press the disable icon. Any pending messages in group displays will be reset and replaced by a white "X"; current messages will be displayed in the history as disabled. 2. With the area selected, press the enable icon. The area is enabled again. Any individually disabled tags in the area are also enabled! If the causes of messages are still present at this time, the status changes, but the messages are displayed as acknowledged messages with the time stamp crossed out (as occurs with an OS startup). Tag-based1. With the faceplate selected, press the disable icon in the faceplate. The messages of this tag are entered as acknowledged and disabled. The group display is replaced in the faceplate by a white "X". 2. With the faceplate selected, press the enable icon in the faceplate. Only the messages of this tag are enabled. The response in the history is the same as with the area-oriented enable (but only for this tag). Alarm-basedIndividual limit alarms can be suppressed in the faceplate, typically in the limit view. Disable messages through process statuses An input parameter MSG_LOCK exists for the PCS 7 blocks with message capability. If this is set, the process alarms of this block are disabled (upper/lower alarm, upper/lower warning). Process control messages triggered by the CSF parameter (typically channel faults of the driver blocks belonging to the tag) are still signaled. This is relevant when starting-up/shutting-down the plant if the process variables monitored are outside the operating range.
- Alarm HidingThe operator can also hide selected messages. When messages are disabled, a message is not generated at the source despite an event. When messages are hidden, the message is no longer displayed for a preset amount of time, but it is entered in the history/archive. It can also be switched over manually to "Display" later. ActionIn the message window (e.g. new list, see above) 1. Click scroll icon 2. Select message to be suppressed 3. Click high/show message icon. ResultThe Hide operation is logged in the operating list. The message "hidden" in the above process is acknowledged internally and no longer displayed. If it exits and comes back again, it is acknowledged and entered into the history or archive, but it is no longer displayed as an alarm line or in the new list. It remains hidden (in the "normal" message windows) until it is shown again by the same operating sequence in a different alarm window (see below). It is also shown again automatically when the time set in the Project Editor expires (see slide) Information4. List of messages to be hidden. When you click the icon, the list of messages currently hidden is displayed (only by name and without status information, irrespective of whether they are present or not). 5. List of hidden messages. This is the list of messages whose cause is still present but which are no longer displayed in the old list.
- Automatic alarm hiding (principle) 1. In Global declarations Project enumerations, an "Operating State" list is set up containing possible operating states for a plant (e.g. start-up, maintenance, emergency stop etc., max. 32 statuses) and associated INT values. 2. Plant or plant section blocks with message capability (MOTOR, VALVE, etc) are combined into a so-called block group (e.g. in the CFC Object properties of block Block group) by entering same name there. 3. A STATEREP block is configured for each group (with same block group). Using XOR logic, one of the 32 inputs of this block is set, corresponding to the current plant status. The STATEREP passes this information on to the OS via the QSTATE output. The attributes of the STATEREP block mean that this block is handled in a special manner in the OS. 4. In the process object view of the AS project, a status matrix is offered in the "Messages" tab (scroll to right). For blocks with entered block groups, the plant status (column) in which this message is to be hidden can be selected here for each type of message (line). Although the messages are generated by the AS during runtime, they are hidden in the respective status of the plant and handled the same as with manual alarm hiding (see previous pages).
- The project directory of the OS contains a file (master database) for management of the runtime data; the name of this file consists of the project name followed by RT and the file name extension .mdf, here, e.g. OS01RT.mdf. This file contains the references to the runtime databases. The databases are created with MS SQL Server 2005. All archives function as cyclic archives!The runtime data are stored in so-called segments, for which the configuring engineer specifies a max. content or a date/time for changing to the next segment. If the configured content limit is reached or the configured time duration is exceeded, Alarm Logging or Tag Logging starts new segments in the respective database.When the maximum total segment size is reached, the last segment is exited and archiving starts again in the first one, overwriting the "old" runtime data. To avoid loss of data, the configuring engineer can enter a network drive directory and substitute drive directory for the backup function. Tag LoggingTag Logging distinguishes between two types of runtime archives.TagLoggingFast is used for archive data that are stored in archiving cycles <= 1 minute and TagLoggingSlow is used for archive data that are stored with archiving cycles > 1 minute . These represent different archives in different directories on the hard disk. You can change the default setting of one minute via Tag Logging Archive Configuration TagLoggingFast Archive Content tab. Alarm LoggingMessages are also saved here in an archive. There is a "Long-term archive" view where ActiveX displays in the history window only those archived messages that already existed when the message window was called. This is the default history setting in PCS 7. There is also a "Short-term archive" view that is updated when messages arrive. This view can be restored after recovery from a power failure (selectable via Alarm Logging Archive Configuration Message Archive right click and select Reload …)
- CS DatabaseThe OS project directory contains a configuration database for the configuration data (message texts, connections and tag definitions, Alarm Logging and Tag Logging); the name of this database consists of the project name followed by the file extension .mdf, e.g. OS01.mdf. There are two addition files: e.g. OS01Tlg.mdf for configuration data of Tag Logging and e.g. OS01Alg.mdf for Alarm Logging.The files with the same name and the endings .ldf are log files where the SQL server records the accesses/changes to the database. Directories/NamesThe master database, here OS07RT.mdf, is located in the project path of the OS project. The runtime archives - divided into Tag Logging and Alarm Logging - are located in a subdirectory ArchiveManager.The AlarmLogging subdirectory contains the message archives of the long-term archive; the file name consists of: <Computer name>_<OS project name>_ALG_YYYYMMDDhhmm.mdf or <Computer name>_<OS project name>_ALG_StartTimestamp_EndTimestamp.mdfe.g.: LNB04_OS07_ALG_200504260901_200504260949.mdfThese files with two time stamps contain the message data of the corresponding archive segments. The TagLoggingFast directory contains the runtime archives of measured values with an archiving cycle <= 1 minute.All other measured values with archiving cycles > 1 minute are contained in the runtime archives in the TagLoggingSlow directory.The name of the archive files is composed of<Computer name>_<OS project name>_TLG_S_YYYYMMDDhhmm.mdf- the "S" stands for TagLoggingSlow.
- Measured Value ArchiveThe easiest way to create a measured value archive is: When configuring in CFC, select the block parameter you want to archive, right-click and selectObject Properties (see above). to select the archiving method. The "Archiving" and "Long-Term Archiving" options differ only if your project uses a Central Archive Server (CAS). In that case, the archiving options differ according to the OS properties for the CAS that you specified in SIMATIC Manager (see next page). The connections marked as being relevant for archiving are created as archive tags in the OS project during OS compilation and a process value archive is created if it does not yet exist. If a connection that is included in the archive is subsequently deleted or marked "No Archiving", the corresponding archive tag is deleted the next time the OS is compiled.
- CAS Principle of OperationThe respective OS master server transfers completed archive segments (see previous page) as a copy and OS reports into the enabled input path (share) on the CAS. Transfer of SIMATIC Batch reports logs is triggered from the start center. The cyclic archive continues on the OS server. Midterm ArchiveThe StoragePlus software integrated on the CAS continues to run there. It resolves the incoming data, and saves them in a separate database whose structure as a cyclic archive corresponds to that of the OS (WinCC) server. Segments of this cyclic archive are adapted depending on the size of the selected long-term memory medium, and they permit data to be swapped out to a backup after switching to a new segment. Client AccessEvery client can access both the assigned OS server and the central archive server (CAS). The client possesses one package from each assigned OS server and the CAS. Access is transparent for the operator Depending on the time period for displaying data, the client obtains the data from the OS server or, if they are no longer present there, from the CAS. The client can no longer access data which have been swapped out from the CAS to the long-term archive. To achieve this, it is necessary to insert the long-term memory medium and to connect this to the database of the CAS (using the StoragePlus administration console on the CAS).
- If the "Transfer to Central Archive Server" option has been set for the OS (see previous slide), the option "Only long-term data" can be set for the CAS. If this option is set for the CS, only the block parameters with the setting "Long-term archiving" will be saved here. If the "Only long-term data" option is not set, all Tag Logging parameters on the CAS will be saved. The distinction is irrelevant for message archives. The archive on the CAS can be configured in the same manner as for an OS server (see also next pages)
- SettingsTo the extent possible, it is advisable to make the settings for the individual parameters to be archived in the "Archive tags" tab in the "Process Object View". See the next page for additional settings you can make for individual tags.
- Archive TagsOpen Tag Logging, select a tag in the archive, right-click and activate "Properties" to open the Process Tag Properties dialog box.Here you can change additional parameters/settings for the individual archive tags. CyclesUnder Acquisition specify on the basis of the existing or custom cycles in which the data manager is to request the tags from the AS for supplying the archive.Under Archiving/Display specify the cycle in which the tag is to be saved. If you select Current value, the acquisition cycle will usually be equal to the archiving cycle.If, however, you want to acquire compressed values such as mean values or extreme values, then the archiving cycle is significantly greater than the acquisition cycle.It is not permitted to set an archiving cycle that is smaller than an acquisition cycle!
- Archive ConfigurationUpon selection of the Archive configuration icon in Tag Logging, a selection of two archive types is displayed.- TagLoggingFast is for recording archive values that are archived in cycles shorter than 1 minute- TagLoggingSlow is for recording archive values that are archived in cycles longer than 1 minute. NoteYou can change the default setting of one minute via Tag Logging Archive Configuration TagLoggingFast Archive Content tab. Each of these archives is subdivided into segments and are configured by double-clicking on TagLoggingFast or TagLoggingSlow. These segments determine which storage space is to be reserved on the hard disk - e.g. 1 day and 44 MB. If one the two limit values is exceeded, i.e. either the time duration of 1 day is exceeded or the storage space of 44 MB is reached, then Tag Logging automatically records in the next segment.Using the same method as for the segments, the configuring engineer also specifies a total time duration and total storage capacity for all segments. If one of these values is reached, the oldest segment is overwritten. This means that cyclic archiving is used here too. BackupThe configuring engineer also specifies whether and when the archive is to be transferred to a specified network drive as a "Backup".
- Exercise: ArchivesIn this series of exercises you will create/configure a process value archive in Tag Logging and then use this archive to create online trends. and Online TrendsWe shall compare using these process value archives and using trend screens from the controller faceplate. After completion of all activities and tests, the multiproject is to be archived. ---------------------------------------------------------------------------------------------------------- Exercise 1In the process object view of the AS project, set the parameters SP, PV_IN and LMN of Unit A's temperature controller to archivable (long-term archive). Compile the OS and check the resulting Tag Logging archive "SystemArchive". ---------------------------------------------------------------------------------------------------------- ProcedureOpen the CFC with the temperature controller for Unit A. Set long-term archiving for the above mentioned parameters (in the Properties screen of the respective parameter). Open the process object view for the multiproject, select the AS project and open the "Process Value Archive" tab sheet. You can check or modify the option "Long-term archiving" for the two parameters (see also slide 67). Compile the OS. In Tag Logging check the archive called "SystemArchive". Change the acquisition cycle there and then check the process object view.
- Exercise 2In activated runtime, click the button for "Create Online Trend Group" (see previous slide).From the "SystemArchive" archive, create a trend group with the setpoint and actual value of the PID controller. For this exercise adapt the properties of the online trend control during runtime, i.e. value range of the values axis from Automatic (Autoranging) to fixed values "120" units.Test trend display in comparison to the loop display of the controller for Unit C.------------------------------------------------------------------------------------------------------- Action1. In runtime activate the button for creating online trends and create a new trend group with 2 trends. Take the values from the "SystemArchive" archive. 2. Create an online trend group containing the active setpoint SP and the controlled variable PV_IN of the PID controller from Unit A. 3. Left-click on the parameter assignment button of the online trend control to open the Properties dialog box. Insert a 2nd trend, select the name Set and Act and choose suitable colors for the trend. Open the "Value Axis" tab and change the area selection from "Automatic" to fix 0 - 120.
- ArchivingArchiving a project means creating a compressed file from many files and directories - usually as a ZIP file. The SIMATIC Manager provides an integrated interface for ZIP archives.You can also use "PKZIP for Windows", an additional compression tool which is included on the installation DVD, for archiving and dearchiving. PreparationExit all SIMATIC Tools such as HW Config, CFC Chart, SFC Chart or WinCC - as well as CS and RT.The SIMATIC Manager is the only program open - and it is advisable to close the multiproject there too.In addition, all other ESs that have open subprojects belonging to our multiproject must close them too.If you forget to do this, archiving fails and terminates with an error message.In the SIMATIC Manager, selectFile Archive In the first dialog box, select the required multiproject Color.Acknowledge your selection and then specify the target location and archive name in the next dialog box; the name should not exceed 8 characters and is followed by the file extension . ZIP
- Notes
- Sign-of-life monitoring Lifebeat monitoring is used for cyclic sign-of-life monitoring of ASs and OSs (in multi-station systems). Symbolic representation of the station by means of a red "X" signifies the station is currently not reachable. Parameter assignmentOpen the Lifebeat Monitoring editor in WinCC Explorer.Double-click on a field under the column heading "Device Name" and enter a name for the monitored device. The name can be up to 21 characters in length.Double-click on a field below "Device Type" to select an AS or OS device to be monitored.Double-click under "Connection" to select the suitable connection to the device.Repeat this procedure for all devices to be monitored. Then click the "Update" button to activate the configuration.This activation can also be performed during activated runtime, but will result in an operator message in the message archive. --------------------------------------------------------------------------------------------------------- Exercise Lifebeat monitoring for the AS is to be set up and activated for monitoring the AS in runtime. Test!(See slide) ----------------------------------------------------------------------------------------------------------
- Time synchronization Process data can be evaluated if all components of the process control system work with an identical time of day. This guarantees that messages can be assigned in the correct chronological order irrespective of the time zone in which they occur. Active time master So that all operator stations and automation systems on the plant bus and on the terminal bus have an identical time of day, one OS server, for example, assumes the function of the time master from which all other systems receive their time. The acceptance or failure of the "Time mastership" is indicated by process control messages. Passive time master The other OSs can also be configured as time masters, but they are initially synchronized like a slave (as a passive time master). If the active time master fails, a passive time master takes over the task, and becomes the active time master. Time slaveAn OS client obtains its time-of-day message frames from one of its OS servers (via the terminal bus). An AS obtains the time of day from the active time master (via the plant bus)
- OS time of dayWinCC Explorer contains the LT option "Time synchronization". OS serverAfter selecting this option, you typically select synchronization via the plant bus for the OS server. In so doing, you select the access point (link to the interface parameter assignment) via which the ISO protocol is routed to the plant bus. You also set the role there (typically "Master"). The master then becomes active or passive during runtime, depending on the case. The slave setting is useful if the time signal receiver determines the time of day (e.g. SICLOCK). OS clientIn this type of project, only synchronization via the terminal bus is offered. The time of day is typically received from a connected server, which has been assigned to the client (i.e. the client has downloaded the server package). Computer startup listWhen time-of-day synchronization is activated, the "CCTMTimeSync.EXE" program is included in the startup list and is launched each time runtime is activated. If the WinCC project is not in "Runtime", the computer is not synchronized.
- HW Config setting CPUThe CPU is set in HW Config "Diagnostics / Clock" tab Synchronization mode in the AS: "As Slave". CP443-1In the Properties for CP 443-1 (Industrial Ethernet - CP), select the "Time-of-Day Synchronization" tab and select "Activate SIMATIC time-of-day synchronization" check box. Now the CP will pass the time-of-day synchronization message frames to the AS. CoordinationThe above settings in the AS must also be taken into account in the computer properties of the OS. OS ComputerIn the WinCC Explorer, make the following settings in the Computer properties dialog box (default setting) in the "Parameters" tab:PLC clock setting: --> "The PLC is set to coordinated world time (UTC) (preferred setting) This informs the OS that the CPU is operating in GMT in the message frames and it can convert the time stamps in the OS accordingly.Time base for time-of-day display in runtime: --> "Local time zone" This setting ensures that the online trend control, online table control and alarm control time displays show the converted time of day (including daylight savings). The settings in the computer properties of the OS must correspond to the AS settings (see slide).
- Exercise The time of day is to be continuously updated in the OS and AS and synchronized with one another using the OS as the time master and the AS as the time slave. From the OS, force the date/time display on all components in ISO 8601 format. --------------------------------------------------------------------------------------------- Steps1. In the WinCC Explorer, set the computer properties to PLC clock setting "The PLC is set to coordinated world time (UTC) (preferred setting) and Time display "Local time zone" and central date and time formatting to ISO 8601.2. In the WinCC Explorer right-click Time Synchronization . Synchronization via System Bus with "Access point 1: ISO Ind. Ethernet" as Master (select the CP on the system bus!)2. In the project in the HW Config, change the CPU to time slave in the AS3. In the HW Config, change the properties of CP443-1 to "Activate time-of-day synchronization".4. Download HW Config data to the AS5. Test synchronization via the SIMATIC Manager Right-click on CPU PLC Set time-of-dayand change the CPU time to test the synchronization. After a maximum of1 minute, the time of day of the CPU should be set automatically. Notice! CPU time is not the same as the display time of the PC (see slide). The PC display time is dependent on daylight savings time, but UTC (GMT) is not! RemarkIn the course room, the components are networked on the plant bus. The OS which is activated first becomes the active time master!
- Additional ExerciseIn the "Time Synchronization" editor of your OS project, change the specification of access points to "Symbolic names". --------------------------------------------------------------------------------------------------------- RemarkThe symbolic names of the access points can then be chosen if the ES and OS communicate on the plant bus through different hardware. During OS configuration on the ES, the only interface parameters you can assign in the "Time Synchronization" editor are those that are present on the ES computer. ProcedureIf you change over to symbolic names (see slide), select a name for the access point. Use the access "<Softnet (1)>" if you are using BCE communication, or use <CP1613 (1)> if the SIMATIC CP 1613 is used. You determine the underlying hardware and interface parameter assignment on the OS target computer (the same computer in your case). From the Windows task bar, select START SIMATIC NET Set PC station. If the desired access point is not present there, select the item "Access points" (see slide) and right-click and select New New access point to create it. Enter the name in the screen form (observing the exact spelling in WinCC!), and select the CP on the plant bus, with the correct interface parameter assignment. After downloading the OS project from the ES to the OS, the access point present there is used!
- Exercise(if a sound card and loudspeaker are installed in your training stations) When alarm messages and warning messages are received, they are to trigger different audio warnings. -------------------------------------------------------------------------------------------------------- Procedure1.Create the binary tags "Alarm" and "Warning" in Tag Management | Internal Tags | Horn. 2.Open the "Horn" configuration editor. 3.Make the settings as shown in the above slide. Double-click on the individual fields (if available, a selection box or button will display). NoteAs of PCS 7 V7.0, a group is generated for coordinated horn acknowledgment. A common group name (e.g. HORNGROUP1, see slide) is entered in the "Signal assignment" tab for all OS computers whose horns are to be acknowledged together. If a message requiring acknowledgment arrives, the horns are triggered on the relevant OSs. If the horn is acknowledged from one of the systems, all horns of the group are canceled. For a detailed description of the individual options, please refer to the "PCS 7 Configuration Manual OS" on your ES via START SIMATIC Documentation (Language) PCS 7 - Configuration Manual Operator Station under the keyword "Horn".
- Functions of theThe report system offers the possibility to create so-called feedback Report Systemdocumentation of the OS project in the CS configuration mode.A range of online value reports and archive value reports are available in runtime mode.Of course, only those messages that meet the configured criteria are printed out. Layout EditorsThe report system provides two powerful layout editors under Layout1. Page layout editor for report printouts on page printers (e.g. laser printers or graphic inkjet printers) that print whole pages at a time and2. Line layout editor for report printouts on line printers (matrix printers), which are mainly used for the message sequence report. Incoming and outgoing messages are printed in the message sequence report, together with their status and respective time stamp. A default layout is supplied and can be customized @CCAlgRtSequence.RP1The line printer works with continuous paper and prints one line at a time, when triggered by a message. The prepared print job @Report Alarm Logging RT Message sequence is available for this. If you display print jobs in the right-hand window of WinCC Explorer, this print job is indicated by a yellow symbol.In contrast, page printers "collect" messages until a complete page can be printed. Then the print operation is triggered. Any job can be created for the page printer.
- ReportingThree message reporting types are available in Alarm Logging. ·With the message sequence report, all status messages (came in, went out, acknowledged) of currently queued messages are output to a printer. ·The online report is used to print out chronologically sorted messages from the Alarm Control via the "Print" button on an opened process message window. ·With the archive report, the status changes of messages stored in an archive can be output to a printer.
- CreateThe layout for the message sequence report is basically predefined, but can be adapted by the configuring engineer. The report is stored in Report Designer --> Layout under the name @alrtmef.rpl.The page layout editor for the message sequence report is opened via right-click on @alrtmef.rpl --> context menu Open page layout. Static PartHere you determine the page layout among other things.Right-click and select --> Properties to set them in Portrait or Landscape format. In the header instead of the WinCC bitmap, you can incorporate e.g. the company logo of the end customer. In addition the margins are defined, and you determine whether to add a front cover sheet and/or a back cover sheet. Dynamic PartIn the Connect tab activate Selection and click the Edit button to set which message blocks you want to select from alarm logging and in which sequence they are to appear on the report printout.As the editor also has the Graphics Designer look, you will generally already be familiar with the tools and operation. PC StartFor the next runtime start, you need to activate two components in the Computer properties window of the OS server:- Report Runtime and- Message Sequence Report
- Printing out reports for project documentation (back documentation) via the configuration software is generally performed by the operator.You initiate printouts of reports for the runtime documentation via "print jobs". A print job determines:- Whether and at what time a report is to be printed- Which layout is to be used for printing- On which printer or to which file is to be printedReports can be output in the following ways:- Time-controlled – e.g. every hour, daily or at change of shift- Event-controlled – e.g. when certain limit values are exceeded- Upon change – e.g. after a key is pressed by the operator Activate the Report Designer --> Print Jobs menu to select the existing print job@Report Alarm Logging RT Message sequence Right-click and select Properties from the context menu to open it.In the print job you can specify which print layout and which report type is to be processed. The default setting is Line layout. Uncheck the checkbox and select layout @alrtmef.rpl for the message sequence report. Printer SelectionIn the "Printer Setup" you set whether you want to use the "Standard Printer" only or you can use up to 3 alternative, hierarchically configured printers that you can use for the report printout - depending on their availabilityfirst 1.) then 2.) and then 3.).In addition, or as an alternative you can also print to an EMF file, which is then archived or printed later.
- Exercise All incoming messages are to be printed on the standard printer of the OS server as a message sequence report.--------------------------------------------------------------------------------------------- Steps1. In the WinCC Explorer activate the runtime components "Report Runtime" and "Message sequence report" in the start list for the server/computer. (Attention: invisible!)2. In the Report Designer, go to Layouts and open the predefined layout for the message sequence report "@algrtmef.rpl" and adapt is as shown in the diagram.<ut DisplayText="sr"><sr/></ut>3. In the Report Designer, now go to Print jobs and select the job "@Report Alarm Logging RT Message sequence" and change the settings from "Line Layout" to "Page Layout". In the print layout created under 2.) select the message sequence report.4. Connect the printer, start the WinCC Runtime, cause a few messages and check the result. NoteWith page print layout, the server waits until enough data has been collected to print an entire page.It runtime is deactivated and the message sequence report buffer still contains data that has not yet been printed, an "incomplete" sheet is printed before actual deactivation. TipThe properties for the "Dynamic table" contains the property "Columns" under "Geometry". Their number is displayed, but by double-clicking on them you can also display a configuration screen for the column width.
- Exercise After completing a batch on Reactor A (Unit A) print a log containing the alarm and warning messages issued by the temperature controller, as well as a graphic temperature trend for this duration. ------------------------------------------------------------------------------------------------------- Steps1. Create a new layout "Batch_A". In its dynamic section, insert an "alarm log" and a "tag trend" (from the object palette Runtime Documentation). 2. In the alarm log (Properties --> Connect tab) select the property "Selection". Continue on the next page
- Message BlocksDetermine which columns in the messages are to be displayed by selecting blocks in the box on the left and clicking the arrow button to move them to the box on the right. (Suggestion: see above.) SelectionSelect message classes "Alarm" and "Warning" and the text "UnitA" for Source. Filtering of the messages is now completed. Select the time range for the displayed messages when you create the print job!
- TrendSet the properties for the trend as shown in the slide above. You can define the time settings for the display in the time range. This has priority over settings in the print job!
- Print Job3. Create a new print job. 4. Rename it (in its Properties, "General" tab) to "Print_Batch_A". Assign the print job to the layout "Batch_A". 5. Set the time range in the "Selection" tab. 6. In the "Printer Setup" tab set Print output to... File for now. If required, you can view this file with the tool you can call via START SIMATIC WinCC Tools "WinCC Documentation Viewer".
- Test Preview-Activate WinCC. -Select your print job in the WinCC Explorer, right-click and select Print Preview to see what the printout would look like. You can print the current status by clicking the "Print..." button in the preview screen (in our case print to file). Print ViewYou can view "printed" files from the current OS project via the WinCC Documentation Viewer. NoteOnce the test has been successful you can activate the setting for the print job to be sent to the printer too. ResultThe print job can also be started automatically when the batch is completed. To do this a flag needs to be triggered from the SFC control, which in turn triggers a C script in WinCC and therefore initiates the print job. You can try doing this once we have dealt with the C scripts (following pages).
- Additional exercise (as alternative to exercise in the C Scripts section) Task descriptionThe previous batch report is to be automatically printed when the batch is finished. ---------------------------------------------------------------------------------------------------------- Procedure1. Revise DB1 to include the parameter CHAi_Ready (BOOL), where "i" is your group number. Make this visible (S7_m_c), as well as the DB (special object properties). 2. Using SFC_ReacAi, set this parameter to "FALSE" when starting the batch, and to "TRUE" when finishing it. 3. Compile the AS and OS. A tag is then available in WinCC, which indicates that the batch is finished by changing from "FALSE" to "TRUE".
- 4. In WinCC, open the "Global Script" C-Editor, and under "Actions Actions: <ComputerName> add a new action. 5. Place the cursor in front of the "return" line, and type in the "if" command. 6. Select the internal function tag get GetTagBit and right-click and select Parameter assignment to insert Tag_0 as the replacement for the tag name in the subsequent form. Revise the "if" command as shown in the slide (do not forget the parentheses). The identifier "Tag_0" refers to the ready tag (in the "define" line which you have to insert). 7. Select the report function "RPTJobPrint", and right-click and select Parameter assignment to enter the name of the print job in the form; then click OK to transfer it to the script. 8. Compile the script (using the icon in the toolbar), correct the contents if necessary, and recompile. 9. Use the trigger icon to select the "Ready parameter" as the trigger tag. 10. Complete with File -> Save. ResultThe action is started with each change in the Ready tag, but printing is only triggered when the batch has been finished (Ready = TRUE).
- PrototypingA customized object is a group of graphic elements where only the desired properties are taken and made available for additional parameter assignment (Create customized object). In Prototyping these properties are connected with what are called "structure member variables". This presupposes the existence of a structure and at least one structure variable. InstantiationThe reproduction is followed by a permanent instantiation of these "copies" using a wizard; the wizard links all sub-tags of the selected structure tags "in one stroke". Ability to Make ChangesThe prototype only needs to be created once, but can be used an unlimited number of times. If any later changes are to be made that affect all "copies" of this customized object, then they must all be changed individually.It is therefore only worthwhile to use a customized object when you require it for multiple use.
- ExerciseCreate a customized object for a controller (in short CO, see slide). It is to represent the active setpoint, the actual value and the unit for the setpoint. The only properties required for the object are connections to the above mentioned parameters. Save the object in the WinCC project library. In a second step, the object is to be created as a prototype for a CTRL_PID block (prelinked to connections). Save this object too in the WinCC project library. In a third step, use it as an example for the controller from Unit A. ---------------------------------------------------------------------------------------------------------- Steps1. Open a new picture (as workspace) and create the above structure from two I/O fields and one static text. Drag a "lasso" around the objects, right-click and selectCustomized Object Create to open a configuration dialog. The middle section of the dialog displays the parts of the CO. Select a part (e.g. IOField1). Its properties are listed in the window on the right. Use the mouse to drag a property (e.g. "Output value") to the left window and drop it on the UserDefined2 item. The created "Output Value" of the CO is displayed there with the components assigned to it. Point to this property, right-click and select Properties… Another dialog box opens where you can rename the property with regard to its use/meaning (e.g. "OuputValue" "Setpoint"). Repeat the procedure for the second IO field ("ActualValue") and the text field ("Unit"). Call the CO "REG_SYMB" (field "Object Type").
- PrototypeThe typical use of the created CO is to be for controller blocks. As "prototype" each property to be made dynamic needs to be "prelinked" with the parameter names (of a CTRL_PID block) which are later to influence the respective property. Simplest Procedure-Open the "Properties" of the CO -In the "Dynamic" column, double-click next to the light bulb icon for the property -Enter the parameter name preceded by a period (e.g. .SP) -Select its respective update time (Update (or "Current") column) Save in WinCC Library -Create a new directory in the project library (e.g. "Prototypes") and drag the prototype CO to this directory. NoteThe WinCC project library is only available within the respective WinCC project. It is located as file "library.pxl" in the subdirectory "library" of the OS project. The WinCC global library has the same name, but is in the "Aplib" subdirectory of the WinCC installation path. It can be reached from every OS project.
- Connecting PrototypeFor real use, the prelinked properties must be completed by adding the instance name of the structure (block). Use the Dynamic Wizard so you don't have to type all the names. NoteIf the Dynamic Wizard is hidden, it can be activated again in the Graphics Designer via View Toolbars Dynamic Wizard Procedure-Select CO -Dynamic Wizard Standard Dynamics tab Link a prototype to a structure double-click -Use the "Tags" screen to locate the block name, select it in the right window and click OK to confirm. ResultThe properties are all linked, the CO is now functional.
- WinCC offers the possibility of creating properties that far exceed the standard ones, and, in particular, creation of actions by means of C scripts. These scripts are interpreted and processed during runtime.As an example, we have included hiding and showing a static text.The static text has the static property "Visible - no". The C Editor is started via the Properties dialog box --> Events tab, right-click --> "C Action...". First the status of the "Visible" property must be queried.. If the static text is visible, it must be made invisible.If however, the static text is invisible, clicking the button is to make the text visible.
- C EditorAs soon as a C action is created, the C Editor is opened. It consists of two windows,- The function window in which completed standard or internal functions are made offered, and the project functions you configured yourself.- The Edit window in which you can see and edit the function definition incl. function body. The complete function definition is provided by the WinCC development environment.A comment part is provided in the function body where the process tags required by the script are initially called "#define" instructions. This allows the cross reference to later recognize where all variables are used, even in the C scripts. The "#define" lines are embedded in the comments //WINCC_TAGNAME_SECTION_START and//WINCC_TAGNAME_SECTION_END.Picture names used in scripts such can also be named "#define" lines in order to allow them to be recognized by the cross reference function too. Parameter transferParameters are passed at function call."lpszPictureName" is a pointer to the current picture name"lpszObjectName" is a pointer to the name of the selected object
- GetVisibleIn order to query the "visible" status of the static text in C script, WinCC provides the function Get Visible in the Graphics Designer in the function window in "Internal Functions" --> "Graphics" --> "Get" --> "Miscs". The Assigning parameters dialog box is displayed bydouble-clicking --> "GetVisible". With double-click --> "lpszObjectName" the desired graphic object is selected - here the static text, assigned to the picture Test.PDL.The result is binary, therefore "yes" or "no". SetVisibleIn order to make a graphic object visible or invisible, WinCC provides the internal function "SetVisible".This function can be found under "Internal Functions" --> "Graphics" --> "set" --> "Miscs" --> "SetVisible".Under "lpszObjectName" select the static text assigned to the picture "Test.PDL"."bVisible" is the future state, i.e. to be set by the function "SetVisible" "1" or "True" for visible"0" or "False" for invisible.
- ExerciseIn picture Test.PDL create a static text as operator information. This static text is to be switched visible and invisible when a button is activated (right mouse click RMC).As an option, at operation of the static text, the C script can be displayed as a screenshot. ---------------------------------------------------------------------------------------------------------- Steps1. In the Graphics Designer open the picture Test.PDL and insert a static text and name it "Operator_C_Text". This text is to be statically changed to invisible with the property "visible - no". 2. insert a button in this picture. In the "Properties" dialog box in the "Events" tab, create a C action which it to alternate between making the static text visible/invisible.3. Save this picture and change in runtime in the process picture "Test", to test the function.Optional4. In the C Editor in the Graphics Designer create a screenshot of your C script and insert it in the picture "Test.PDL" as "OLE object". In the Properties dialog box, set the property "visible" --> no.5. Create a mouse action on the static text to make the C script visible. With the mouse action of the button, this script is also to become invisible if the static text is switched to invisible.
- WinCC offers the possibility of creating properties in addition to the standard ones, and, in particular, supports creation of actions by means of VB scripts. Like C scripts, the VB scripts are interpreted and processed during runtime.As an example, we have also used here hiding and showing a static text.The static text has the static property "Visible - no". The VB Editor can be started via a button Properties dialog --> Events tab, right-click --> "VBS Action...". In order for the object state of e.g. our static text to be queried, a pointer must be placed on this object. This pointer is assigned to an internal variable - created using a DIM statement. First the status of the "Visible" property must be queried.. If the static text is visible, it must be made invisible.If however, the static text is invisible, clicking the button is to make the text visible.
- VB EditorAs soon as a VBS action is created, the VB Editor is opened. It consists of two windows,- The module window where project modules created by the configuring engineer are displayed in addition to standard modules and- The Edit window, in which the function definition incl. function body can be seen/edited. The complete function definition is provided by the WinCC development environment.
- In order to create the property of a graphic object in VBS, you need to place a pointer to this object via a "SET" statement and assign this pointer to an internal VB variable.The VBS action is started by selecting the button thenright-click --> "VBS Action...". The DIM statement is created as an internal variable of type "Variant", which can transfer the pointer to the object using the "SET" statement. The keyword "ScreenItems" is then used and the object name enclosed in "quotation marks".The required object property can then be accessed by addressing the internal pointer variable followed by a period and the property namee.g. "TextObjekt.Visible".
- ExerciseIn picture Test.PDL create a new static text as operator information. This static text is to be switched visible and invisible when a button is activated (left mouse click LMC).As an option, at operation of the static text, the VB script can be displayed as a screenshot. ---------------------------------------------------------------------------------------------------------- Steps1. In the Graphics Designer open the picture Test.PDL and insert a static text and name it "Operator_VBS_Text". This text is to be statically changed to invisible with the property "visible - no". 2. Select the button in the picture. In the "Properties" dialog box in the "Events" tab, create a VBS action which is to alternate between making the static text visible/invisible.3. Save this picture and change in runtime in the process picture "Test", to test the function.Optional4. In the VB Editor in the Graphics Designer create a screenshot of your VB script and insert it in the picture "Test.PDL" as "OLE object". In the Properties dialog box, set the property "visible" --> no.5. Create a mouse action on the static text to make the VB script visible. With the mouse action of the button, this script is also to become invisible if the static text is switched to invisible.
- Maintenance StationAn OS (an OS area) can also be configured and used as a Maintenance Station (MS). Using the MS it is possible to call information on the status of all PCS 7 components in hierarchically structured diagnostics displays. An MS can also be configured in a client/server architecture. The MS server is an OS server, whereas the MS client runs on an ES. For diagnostics purposes, the MS accesses data resulting from the use of driver blocks (driver concept) as well as further information produced by SIMATIC PDM, OPC and other software components. Operating principleDiagnostic event is displayed, and triggers a message or horn. Operator requests maintenance, with automatic documentation (with device and diagnostics data). Maintenance department obtains information, sets processing status to "In progress" (to avoid a double job) and carries out the maintenance. The end of the maintenance work is set as a status, and documented. Through successive setting of the maintenance status, the current status/maintenance needs are displayed. Optional printing of statuses and requirements allows simple recording of jobs for the maintenance team.
- Additional Exercise:Your project is completed. Now extend it by adding the functionality of the Maintenance Station. --------------------------------------------------------------------------------------------------------- Steps1.In the plant view, select the multiproject, right-click and select Plant Hierarchy Settings and supplement this by the option "Derive diagnostics displays from PH". Select the OS which is to be used as an MS (in your case, only the ES/OS is present). Following acknowledgment of messages, the PH is expanded in your projects of the multiproject. However, this is only a preparation. RemarkIf you use the SIMATIC PDM package and always wish your pictures to display up-to-date information/diagnostics from it, you must additionally select the "Detailed diagnostics" option in the object properties of the OS (on the ES/OS in the case of a single-user system, on the MS client in the case of a multi-user system). 2. In the plant view, select the multiproject again, right-click and select Plant Hierarchy Create/Update Diagnostics Screens and wait for the diagnostics information to be generated (see next slide).
- The previously initiated procedure results in expansion of the PH to include additional levels in the structure (usually down to the I/O module). Further displays with corresponding block icons are created for these levels in the OS project. You can then call the log of this procedure following selection of the multiproject right-click and select Plant Hierarchy Display Diagnostics Screens Log 3.Compile the OS.
- 4.Navigate through the new "Diagnostics" OS area. 5.Simulate a wire break on the analog input module and monitor the display. NavigationYou can either proceed as usual via the Picture Tree Navigator, or by clicking the flashing components.
- Monitor the information. Refer to the slide for orientation.
- Locating the faultIn this level (of the ET 200M or of the slave 1_153_2_Redundant), one can recognize faults: in the AI module, at slot 6, channel 0 and in the AO module, at slot 7, channel 0.
- Steps for maintenance 1.Click fault symbol on module. 2.Define urgency of elimination (e.g. alarm), enter a comment (for the decision) in the display window, and possibly the work instruction number (if present). 3.The status (in the symbolic display) is changed. 4.The request for maintenance work is printed (documented). Someone should then carry out the work. The status does not change provided that nothing is recorded in the same form.
- 5.Maintenance engineer sets the status "In progress", and documents this. 6.Fault is eliminated in the plant The status symbol changes to "Good", but the maintenance status symbol "In progress" is still present. 7.Following a successful repair, the maintenance engineer sets the status "Finished", and documents this. The maintenance status symbol changes to "Good". RemarkThe red fault identifier requires acknowledgment, and depends on the set maintenance status.
- LoggingSetting of the maintenance status is also logged as an operation. The comment block also contains the comment at the time at which the maintenance status was set. User Diagnostics Structure (Condition Monitoring) Below the diagnostics area in the PH, the user can create his own diagnostics structure with its own pictures. It is also possible to generate maintenance information for devices that do not supply their own diagnostics information. The ASSETMON block is available for this in the PCS 7 library V7.0. The block is used to monitor three analog process variables for violation of three separate limit values. It signals the maintenance status of the process variables: ·on violation of a limit or ·by means of the device-based Quality Code or ·by means of signal inputs. NoteThe block does not contain any process-related or device-related processing components and is therefore not considered by the driver generator. In order for this monitoring to achieve a similar behavior as the self-diagnostics of "intelligent" devices, this block is configured using SIMATIC PDM. This enables the same maintenance sequence to be performed when a diagnostic event occurs.