SlideShare a Scribd company logo
1 of 18
Tutorial on Activity Life Cycle and Activities
1. Create a newprojectinandroidand name it“ActivityLifeCycleAndActivities”andplease
remembername yourxml file as“activitylifecycleandactivities.xml”.ItisyourfirstActivity.
2. Please addthe followingcode in“activitylifecycleandactivities.xml”.
<?xml version="1.0" encoding="utf-8"?>
<LinearLayout
xmlns:android="http://schemas.android.com/apk/res/android"
android:id="@+id/container"
android:layout_width="match_parent"
android:layout_height="match_parent"
android:baselineAligned="false"
android:orientation="vertical">
<TextView
android:layout_width="wrap_content"
android:layout_height="10dp"
android:text="Hello World, MainActivity!">
</TextView>
<Button
android:layout_gravity="left"
android:layout_width="wrap_content"
android:layout_height="wrap_content"
android:text="Go to Activity Two"
android:id="@+id/btnActTwo">
</Button>
<Button
android:layout_gravity="left"
android:layout_width="wrap_content"
android:layout_height="wrap_content"
android:text="Contact View"
android:id="@+id/buttonContact" />
<Button
android:layout_gravity="left"
android:layout_width="wrap_content"
android:layout_height="wrap_content"
android:text="ChangeColor"
android:id="@+id/buttonColor" />
</LinearLayout>
3. Addthe followingcode in onCreate functionof yourActivity“ActivityLifeCycleAndActivities”
// intilization
btnActTwo = (Button) findViewById(R.id.btnActTwo);
btnContact= (Button) findViewById(R.id.buttonContact);
btnColor= (Button) findViewById(R.id.buttonColor);
container= (LinearLayout) findViewById(R.id.container);
// link UI elements to action the code
btnContact.setOnClickListener(new View.OnClickListener() {
@Override
public void onClick(View v) {
}
});
btnColor.setOnClickListener(new View.OnClickListener() {
@Override
public void onClick(View v) {
}
});
btnActTwo.setOnClickListener(new View.OnClickListener() {
@Override
public void onClick(View v) {
}
});
4. Run and Install the app and you should see the similar output as shown below.
5. Type the following line in the onCreatefunction of your current Activity.
6. Write the following code after the function of “OnCreate () as follows
And then press the key “ctrl+o” ( Note, this only works in Android Sudio) and choose the method OnRestart
as shown in the snapshots below.
After step 6, your code will look like this.
7. After that add all functions of Activity Life cycle using the step 6. As shown below
@Override
protected void onRestart() {
super.onRestart();
}
@Override
protected void onStart() {
super.onStart();
Log.d(TAG, "MainActivity: onStart()");
}
@Override
protected void onResume() {
super.onResume();
Log.d(TAG, "MainActivity: onResume()");
}
@Override
protected void onPause() {
super.onPause();
Log.d(TAG, "MainActivity: onPause()");
}
@Override
protected void onStop() {
super.onStop();
Log.d(TAG, "MainActivity: onStop()");
}
@Override
protected void onDestroy() {
super.onDestroy();
Log.d(TAG, "MainActivity: onDestroy()");
}
8. Add the following line in the global space of your activity (it is the space write after your activity)
9. Now at least run the emulator and device first and click the “logcat” and choose “edit filter configuration”.
10. Add the following in the filter “states”.
11. You shouldsee the followinglinesinthe logcat afterrunningyourapplication
Part 2. Creating Second Activity
1. Right click on your package folder as shown below and add a new Activity and name it
as “ActivityTwo”.
2. Also add the xml file for “ActivityTwo” and name it “activitytwo” by choosing the
following actions.
3. Add the following code in the “activitytwo.xml”.
4. <?xml version="1.0" encoding="utf-8"?>
<LinearLayout
xmlns:android="http://schemas.android.com/apk/res/android"
android:orientation="vertical"
android:layout_width="match_parent"
android:layout_height="match_parent">
<TextView
android:id="@+id/textView1"
android:layout_width="wrap_content"
android:layout_height="wrap_content"
android:text="This is Activity Two">
</TextView>
</LinearLayout>
5. Go to the source folder of your Activity and add the following code.
public class ActivityTwo extends Activity {
final String TAG = "States";
@Override
public void onCreate(Bundle savedInstanceState) {
super.onCreate(savedInstanceState);
setContentView(R.layout.activity_two);
Log.d(TAG, "ActivityTwo: onCreate()");
}
@Override
protected void onRestart() {
super.onRestart();
Log.d(TAG, "ActivityTwo: onRestart()");
}
@Override
protected void onStart() {
super.onStart();
Log.d(TAG, "ActivityTwo: onStart()");
}
@Override
protected void onResume() {
super.onResume();
Log.d(TAG, "ActivityTwo: onResume()");
}
@Override
protected void onPause() {
super.onPause();
Log.d(TAG, "ActivityTwo: onPause()");
}
@Override
protected void onStop() {
super.onStop();
Log.d(TAG, "ActivityTwo: onStop()");
}
protected void onDestroy() {
super.onDestroy();
Log.d(TAG, "ActivityTwo: onDestroy()");
}
}
6. Remove the errors if any
7. Now Go to the activity “ActivityLifeCycleAndActivities”andaddthe followingcode inthe
listener.
8. //Button Listener for Activity Two
btnActTwo.setOnClickListener(new View.OnClickListener() {
@Override
public void onClick(View v) {
Intent intent = new Intent(MainActivity.this,
ActivityTwo.class);
startActivity(intent);
}
});
9. Now Run the Application and press the button “Go To Activity Two”. And you should
see the following. ( If not, remove the logical errors by debugging)
In the log cat.
Part 3. Using onActivityFor Result
1. Add new activity as “ActivityThree” ( see step 1 on Part 2)
2. Add xml file in the layout folder of your project as “activitythree” and add the following
code.
<?xml version="1.0" encoding="utf-8"?>
<LinearLayout xmlns:android="http://schemas.android.com/apk/res/android"
android:layout_width="match_parent" android:layout_height="match_parent">
<ListView
android:layout_width="wrap_content"
android:layout_height="wrap_content"
android:id="@+id/listView"
android:layout_gravity="center_vertical"
android:layout_weight="1" />
</LinearLayout>
3. Add the following code in the “ActivityThree”.
4. public class ActivityThree extends AppCompatActivity {
ListView listV;
ArrayList <String> list;
@Override
protected void onCreate(Bundle savedInstanceState) {
super.onCreate(savedInstanceState);
setContentView(R.layout.activitythree);
listV= (ListView) findViewById(R.id.listView);
ArrayAdapter adapter = new ArrayAdapter(this,
android.R.layout.simple_list_item_1, list);
listV.setAdapter(adapter);
listV.setOnItemClickListener(new AdapterView.OnItemClickListener() {
@Override
public void onItemClick(AdapterView<?> parent, View view, int
position, long id) {
}
});
}
}
5. Create an ArrayList and add it after the ListView As shown in the ActivityThree
6. Add the following code in the listener.
7. Now go to the Activity “ActivityLifeCycleAndActivities” andaddthe followingcode inthe
listener.
btnColor.setOnClickListener(new View.OnClickListener() {
@Override
public void onClick(View v) {
Intent intent = new Intent(MainActivity.this, ActivityThree.class);
startActivityForResult(intent, PICK_COLOR );
}
});
8. Add the “PICK_COLOR” variable in the global space of this Activity.
9. Add the following function after the On Destroy function. Of this activity.
public void changeBackground(String color) {
// depending the extra value String, choose a background color
if (color.equals("red")) {
container.setBackgroundColor(Color.RED);
} else if (color.equals("green")) {
container.setBackgroundColor(Color.GREEN);
} else if (color.equals("blue")) {
container.setBackgroundColor(Color.BLUE);
}
}
10. Add the following line of code in the same Activity. ( Just write few onActi)
11. Remove the Error if any.Run your application and pressthe button“CHANGECOLOR”andselect
Redfrom the ActivityThree andyoushouldsee yourbackgroundredinthe firstactivity.
Part 4 showing the Contacts of your
smartphones
1. Add the following code in the listener of your activity “ActivityLifeCycleAndActivities”
2. add the pickContact as shown.
3. copy and paste the following code in the “onActivityResult” Method.
if ( requestCode==PICK_COLOR)
{
String clr=data.getStringExtra("COLOR");
changeBackground(clr);
}
// Check which request it is that we're responding to
else if (requestCode == PICK_CONTACT_REQUEST) {
// Make sure the request was successful
if (resultCode == RESULT_OK) {
// Get the URI that points to the selected contact
Uri contactUri = data.getData();
// We only need the NUMBER column, because there will be only one row in
the result
String[] projection = {ContactsContract.CommonDataKinds.Phone.NUMBER};
// Perform the query on the contact to get the NUMBER column
// We don't need a selection or sort order (there's only one result for the
given URI)
// CAUTION: The query() method should be called from a separate thread to
avoid blocking
// your app's UI thread. (For simplicity of the sample, this code doesn't
do that.)
// Consider using CursorLoader to perform the query.
Cursor cursor = getContentResolver()
.query(contactUri, projection, null, null, null);
cursor.moveToFirst();
// Retrieve the phone number from the NUMBER column
int column =
cursor.getColumnIndex(ContactsContract.CommonDataKinds.Phone.NUMBER);
String number = cursor.getString(column);
// Do something with the phone number...
}
}
4. Run the application , you should see the output like this. After pressing the
“contactView” Button.

More Related Content

What's hot

Android appwidget
Android appwidgetAndroid appwidget
Android appwidget
Krazy Koder
 
OpenSocial Intro
OpenSocial IntroOpenSocial Intro
OpenSocial Intro
Pamela Fox
 

What's hot (20)

IMPACT/myGrid Hackathon - Introduction to Taverna
IMPACT/myGrid Hackathon - Introduction to TavernaIMPACT/myGrid Hackathon - Introduction to Taverna
IMPACT/myGrid Hackathon - Introduction to Taverna
 
Android Intent.pptx
Android Intent.pptxAndroid Intent.pptx
Android Intent.pptx
 
Android appwidget
Android appwidgetAndroid appwidget
Android appwidget
 
Google analytics for iOS
Google analytics for iOSGoogle analytics for iOS
Google analytics for iOS
 
AI: Integrate Search Function into Your App Using Bing Search API.
AI: Integrate Search Function into Your App Using Bing Search API.AI: Integrate Search Function into Your App Using Bing Search API.
AI: Integrate Search Function into Your App Using Bing Search API.
 
Ios actions and outlets
Ios actions and outletsIos actions and outlets
Ios actions and outlets
 
Flex Building User Interface Components
Flex Building User Interface ComponentsFlex Building User Interface Components
Flex Building User Interface Components
 
OpenSocial Intro
OpenSocial IntroOpenSocial Intro
OpenSocial Intro
 
Lightning Components Workshop v2
Lightning Components Workshop v2Lightning Components Workshop v2
Lightning Components Workshop v2
 
Grails Advanced
Grails Advanced Grails Advanced
Grails Advanced
 
Android tutorial (2)
Android tutorial (2)Android tutorial (2)
Android tutorial (2)
 
React native app with type script tutorial
React native app with type script tutorialReact native app with type script tutorial
React native app with type script tutorial
 
Creating web api and consuming- part 1
Creating web api and consuming- part 1Creating web api and consuming- part 1
Creating web api and consuming- part 1
 
CloudBrew: Windows Azure Mobile Services - Next stage
CloudBrew: Windows Azure Mobile Services - Next stageCloudBrew: Windows Azure Mobile Services - Next stage
CloudBrew: Windows Azure Mobile Services - Next stage
 
Gaad01 job scheduler
Gaad01 job schedulerGaad01 job scheduler
Gaad01 job scheduler
 
Cómo tener analíticas en tu app y no volverte loco
Cómo tener analíticas en tu app y no volverte locoCómo tener analíticas en tu app y no volverte loco
Cómo tener analíticas en tu app y no volverte loco
 
iOS_Presentation
iOS_PresentationiOS_Presentation
iOS_Presentation
 
Salesforce Lightning Components Workshop
Salesforce Lightning Components WorkshopSalesforce Lightning Components Workshop
Salesforce Lightning Components Workshop
 
How to build integrated, professional enterprise-grade cross-platform mobile ...
How to build integrated, professional enterprise-grade cross-platform mobile ...How to build integrated, professional enterprise-grade cross-platform mobile ...
How to build integrated, professional enterprise-grade cross-platform mobile ...
 
Test Case Creation in Katalon Studio
Test Case Creation in Katalon StudioTest Case Creation in Katalon Studio
Test Case Creation in Katalon Studio
 

Similar to Lecture exercise on activities

Similar to Lecture exercise on activities (20)

Beginning Native Android Apps
Beginning Native Android AppsBeginning Native Android Apps
Beginning Native Android Apps
 
Android apps development
Android apps developmentAndroid apps development
Android apps development
 
Creation of simple application using - step by step
Creation of simple application using - step by stepCreation of simple application using - step by step
Creation of simple application using - step by step
 
AndroidLab_IT.pptx
AndroidLab_IT.pptxAndroidLab_IT.pptx
AndroidLab_IT.pptx
 
04 activities - Android
04   activities - Android04   activities - Android
04 activities - Android
 
Android Tutorials : Basic widgets
Android Tutorials : Basic widgetsAndroid Tutorials : Basic widgets
Android Tutorials : Basic widgets
 
Android Workshop
Android WorkshopAndroid Workshop
Android Workshop
 
Exercises
ExercisesExercises
Exercises
 
2. file internal memory
2. file internal memory2. file internal memory
2. file internal memory
 
Android tutorial
Android tutorialAndroid tutorial
Android tutorial
 
android level 3
android level 3android level 3
android level 3
 
4.preference management
4.preference management 4.preference management
4.preference management
 
Android Bootcamp Tanzania:understanding ui in_android
Android Bootcamp Tanzania:understanding ui in_androidAndroid Bootcamp Tanzania:understanding ui in_android
Android Bootcamp Tanzania:understanding ui in_android
 
Activity
ActivityActivity
Activity
 
Activity
ActivityActivity
Activity
 
Activity
ActivityActivity
Activity
 
Activity
ActivityActivity
Activity
 
Basics and different xml files used in android
Basics and different xml files used in androidBasics and different xml files used in android
Basics and different xml files used in android
 
21 android2 updated
21 android2 updated21 android2 updated
21 android2 updated
 
Handling action bar in Android
Handling action bar in AndroidHandling action bar in Android
Handling action bar in Android
 

More from maamir farooq (20)

Ooad lab1
Ooad lab1Ooad lab1
Ooad lab1
 
Lesson 03
Lesson 03Lesson 03
Lesson 03
 
Lesson 02
Lesson 02Lesson 02
Lesson 02
 
Php client libray
Php client librayPhp client libray
Php client libray
 
Swiftmailer
SwiftmailerSwiftmailer
Swiftmailer
 
Lect15
Lect15Lect15
Lect15
 
Lec 7
Lec 7Lec 7
Lec 7
 
Lec 6
Lec 6Lec 6
Lec 6
 
Lec 5
Lec 5Lec 5
Lec 5
 
J query 1.7 cheat sheet
J query 1.7 cheat sheetJ query 1.7 cheat sheet
J query 1.7 cheat sheet
 
Assignment
AssignmentAssignment
Assignment
 
Java script summary
Java script summaryJava script summary
Java script summary
 
Lec 3
Lec 3Lec 3
Lec 3
 
Lec 2
Lec 2Lec 2
Lec 2
 
Lec 1
Lec 1Lec 1
Lec 1
 
Css summary
Css summaryCss summary
Css summary
 
Manual of image processing lab
Manual of image processing labManual of image processing lab
Manual of image processing lab
 
Session management
Session managementSession management
Session management
 
Data management
Data managementData management
Data management
 
Content provider
Content providerContent provider
Content provider
 

Recently uploaded

Seal of Good Local Governance (SGLG) 2024Final.pptx
Seal of Good Local Governance (SGLG) 2024Final.pptxSeal of Good Local Governance (SGLG) 2024Final.pptx
Seal of Good Local Governance (SGLG) 2024Final.pptx
negromaestrong
 
Beyond the EU: DORA and NIS 2 Directive's Global Impact
Beyond the EU: DORA and NIS 2 Directive's Global ImpactBeyond the EU: DORA and NIS 2 Directive's Global Impact
Beyond the EU: DORA and NIS 2 Directive's Global Impact
PECB
 
Russian Escort Service in Delhi 11k Hotel Foreigner Russian Call Girls in Delhi
Russian Escort Service in Delhi 11k Hotel Foreigner Russian Call Girls in DelhiRussian Escort Service in Delhi 11k Hotel Foreigner Russian Call Girls in Delhi
Russian Escort Service in Delhi 11k Hotel Foreigner Russian Call Girls in Delhi
kauryashika82
 
Activity 01 - Artificial Culture (1).pdf
Activity 01 - Artificial Culture (1).pdfActivity 01 - Artificial Culture (1).pdf
Activity 01 - Artificial Culture (1).pdf
ciinovamais
 
An Overview of Mutual Funds Bcom Project.pdf
An Overview of Mutual Funds Bcom Project.pdfAn Overview of Mutual Funds Bcom Project.pdf
An Overview of Mutual Funds Bcom Project.pdf
SanaAli374401
 

Recently uploaded (20)

SOCIAL AND HISTORICAL CONTEXT - LFTVD.pptx
SOCIAL AND HISTORICAL CONTEXT - LFTVD.pptxSOCIAL AND HISTORICAL CONTEXT - LFTVD.pptx
SOCIAL AND HISTORICAL CONTEXT - LFTVD.pptx
 
Seal of Good Local Governance (SGLG) 2024Final.pptx
Seal of Good Local Governance (SGLG) 2024Final.pptxSeal of Good Local Governance (SGLG) 2024Final.pptx
Seal of Good Local Governance (SGLG) 2024Final.pptx
 
Introduction to Nonprofit Accounting: The Basics
Introduction to Nonprofit Accounting: The BasicsIntroduction to Nonprofit Accounting: The Basics
Introduction to Nonprofit Accounting: The Basics
 
Beyond the EU: DORA and NIS 2 Directive's Global Impact
Beyond the EU: DORA and NIS 2 Directive's Global ImpactBeyond the EU: DORA and NIS 2 Directive's Global Impact
Beyond the EU: DORA and NIS 2 Directive's Global Impact
 
Russian Escort Service in Delhi 11k Hotel Foreigner Russian Call Girls in Delhi
Russian Escort Service in Delhi 11k Hotel Foreigner Russian Call Girls in DelhiRussian Escort Service in Delhi 11k Hotel Foreigner Russian Call Girls in Delhi
Russian Escort Service in Delhi 11k Hotel Foreigner Russian Call Girls in Delhi
 
Application orientated numerical on hev.ppt
Application orientated numerical on hev.pptApplication orientated numerical on hev.ppt
Application orientated numerical on hev.ppt
 
Unit-V; Pricing (Pharma Marketing Management).pptx
Unit-V; Pricing (Pharma Marketing Management).pptxUnit-V; Pricing (Pharma Marketing Management).pptx
Unit-V; Pricing (Pharma Marketing Management).pptx
 
Activity 01 - Artificial Culture (1).pdf
Activity 01 - Artificial Culture (1).pdfActivity 01 - Artificial Culture (1).pdf
Activity 01 - Artificial Culture (1).pdf
 
Accessible design: Minimum effort, maximum impact
Accessible design: Minimum effort, maximum impactAccessible design: Minimum effort, maximum impact
Accessible design: Minimum effort, maximum impact
 
PROCESS RECORDING FORMAT.docx
PROCESS      RECORDING        FORMAT.docxPROCESS      RECORDING        FORMAT.docx
PROCESS RECORDING FORMAT.docx
 
How to Give a Domain for a Field in Odoo 17
How to Give a Domain for a Field in Odoo 17How to Give a Domain for a Field in Odoo 17
How to Give a Domain for a Field in Odoo 17
 
Código Creativo y Arte de Software | Unidad 1
Código Creativo y Arte de Software | Unidad 1Código Creativo y Arte de Software | Unidad 1
Código Creativo y Arte de Software | Unidad 1
 
An Overview of Mutual Funds Bcom Project.pdf
An Overview of Mutual Funds Bcom Project.pdfAn Overview of Mutual Funds Bcom Project.pdf
An Overview of Mutual Funds Bcom Project.pdf
 
APM Welcome, APM North West Network Conference, Synergies Across Sectors
APM Welcome, APM North West Network Conference, Synergies Across SectorsAPM Welcome, APM North West Network Conference, Synergies Across Sectors
APM Welcome, APM North West Network Conference, Synergies Across Sectors
 
Basic Civil Engineering first year Notes- Chapter 4 Building.pptx
Basic Civil Engineering first year Notes- Chapter 4 Building.pptxBasic Civil Engineering first year Notes- Chapter 4 Building.pptx
Basic Civil Engineering first year Notes- Chapter 4 Building.pptx
 
Explore beautiful and ugly buildings. Mathematics helps us create beautiful d...
Explore beautiful and ugly buildings. Mathematics helps us create beautiful d...Explore beautiful and ugly buildings. Mathematics helps us create beautiful d...
Explore beautiful and ugly buildings. Mathematics helps us create beautiful d...
 
INDIA QUIZ 2024 RLAC DELHI UNIVERSITY.pptx
INDIA QUIZ 2024 RLAC DELHI UNIVERSITY.pptxINDIA QUIZ 2024 RLAC DELHI UNIVERSITY.pptx
INDIA QUIZ 2024 RLAC DELHI UNIVERSITY.pptx
 
Unit-IV- Pharma. Marketing Channels.pptx
Unit-IV- Pharma. Marketing Channels.pptxUnit-IV- Pharma. Marketing Channels.pptx
Unit-IV- Pharma. Marketing Channels.pptx
 
fourth grading exam for kindergarten in writing
fourth grading exam for kindergarten in writingfourth grading exam for kindergarten in writing
fourth grading exam for kindergarten in writing
 
Advanced Views - Calendar View in Odoo 17
Advanced Views - Calendar View in Odoo 17Advanced Views - Calendar View in Odoo 17
Advanced Views - Calendar View in Odoo 17
 

Lecture exercise on activities

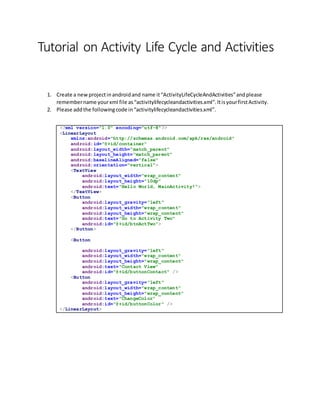
  • 1. Tutorial on Activity Life Cycle and Activities 1. Create a newprojectinandroidand name it“ActivityLifeCycleAndActivities”andplease remembername yourxml file as“activitylifecycleandactivities.xml”.ItisyourfirstActivity. 2. Please addthe followingcode in“activitylifecycleandactivities.xml”. <?xml version="1.0" encoding="utf-8"?> <LinearLayout xmlns:android="http://schemas.android.com/apk/res/android" android:id="@+id/container" android:layout_width="match_parent" android:layout_height="match_parent" android:baselineAligned="false" android:orientation="vertical"> <TextView android:layout_width="wrap_content" android:layout_height="10dp" android:text="Hello World, MainActivity!"> </TextView> <Button android:layout_gravity="left" android:layout_width="wrap_content" android:layout_height="wrap_content" android:text="Go to Activity Two" android:id="@+id/btnActTwo"> </Button> <Button android:layout_gravity="left" android:layout_width="wrap_content" android:layout_height="wrap_content" android:text="Contact View" android:id="@+id/buttonContact" /> <Button android:layout_gravity="left" android:layout_width="wrap_content" android:layout_height="wrap_content" android:text="ChangeColor" android:id="@+id/buttonColor" /> </LinearLayout>
  • 2. 3. Addthe followingcode in onCreate functionof yourActivity“ActivityLifeCycleAndActivities” // intilization btnActTwo = (Button) findViewById(R.id.btnActTwo); btnContact= (Button) findViewById(R.id.buttonContact); btnColor= (Button) findViewById(R.id.buttonColor); container= (LinearLayout) findViewById(R.id.container); // link UI elements to action the code btnContact.setOnClickListener(new View.OnClickListener() { @Override public void onClick(View v) { } }); btnColor.setOnClickListener(new View.OnClickListener() { @Override public void onClick(View v) { } }); btnActTwo.setOnClickListener(new View.OnClickListener() { @Override public void onClick(View v) { } }); 4. Run and Install the app and you should see the similar output as shown below.
  • 3. 5. Type the following line in the onCreatefunction of your current Activity. 6. Write the following code after the function of “OnCreate () as follows And then press the key “ctrl+o” ( Note, this only works in Android Sudio) and choose the method OnRestart as shown in the snapshots below.
  • 4.
  • 5. After step 6, your code will look like this. 7. After that add all functions of Activity Life cycle using the step 6. As shown below @Override protected void onRestart() { super.onRestart(); } @Override protected void onStart() { super.onStart(); Log.d(TAG, "MainActivity: onStart()"); } @Override protected void onResume() { super.onResume(); Log.d(TAG, "MainActivity: onResume()");
  • 6. } @Override protected void onPause() { super.onPause(); Log.d(TAG, "MainActivity: onPause()"); } @Override protected void onStop() { super.onStop(); Log.d(TAG, "MainActivity: onStop()"); } @Override protected void onDestroy() { super.onDestroy(); Log.d(TAG, "MainActivity: onDestroy()"); } 8. Add the following line in the global space of your activity (it is the space write after your activity) 9. Now at least run the emulator and device first and click the “logcat” and choose “edit filter configuration”. 10. Add the following in the filter “states”.
  • 7. 11. You shouldsee the followinglinesinthe logcat afterrunningyourapplication Part 2. Creating Second Activity 1. Right click on your package folder as shown below and add a new Activity and name it as “ActivityTwo”.
  • 8. 2. Also add the xml file for “ActivityTwo” and name it “activitytwo” by choosing the following actions.
  • 9. 3. Add the following code in the “activitytwo.xml”. 4. <?xml version="1.0" encoding="utf-8"?> <LinearLayout xmlns:android="http://schemas.android.com/apk/res/android" android:orientation="vertical" android:layout_width="match_parent" android:layout_height="match_parent"> <TextView android:id="@+id/textView1" android:layout_width="wrap_content" android:layout_height="wrap_content" android:text="This is Activity Two"> </TextView> </LinearLayout> 5. Go to the source folder of your Activity and add the following code. public class ActivityTwo extends Activity { final String TAG = "States"; @Override public void onCreate(Bundle savedInstanceState) {
  • 10. super.onCreate(savedInstanceState); setContentView(R.layout.activity_two); Log.d(TAG, "ActivityTwo: onCreate()"); } @Override protected void onRestart() { super.onRestart(); Log.d(TAG, "ActivityTwo: onRestart()"); } @Override protected void onStart() { super.onStart(); Log.d(TAG, "ActivityTwo: onStart()"); } @Override protected void onResume() { super.onResume(); Log.d(TAG, "ActivityTwo: onResume()"); } @Override protected void onPause() { super.onPause(); Log.d(TAG, "ActivityTwo: onPause()"); } @Override protected void onStop() { super.onStop(); Log.d(TAG, "ActivityTwo: onStop()"); } protected void onDestroy() { super.onDestroy(); Log.d(TAG, "ActivityTwo: onDestroy()"); } } 6. Remove the errors if any 7. Now Go to the activity “ActivityLifeCycleAndActivities”andaddthe followingcode inthe listener. 8. //Button Listener for Activity Two btnActTwo.setOnClickListener(new View.OnClickListener() { @Override public void onClick(View v) { Intent intent = new Intent(MainActivity.this, ActivityTwo.class); startActivity(intent); } });
  • 11. 9. Now Run the Application and press the button “Go To Activity Two”. And you should see the following. ( If not, remove the logical errors by debugging) In the log cat. Part 3. Using onActivityFor Result 1. Add new activity as “ActivityThree” ( see step 1 on Part 2) 2. Add xml file in the layout folder of your project as “activitythree” and add the following code. <?xml version="1.0" encoding="utf-8"?> <LinearLayout xmlns:android="http://schemas.android.com/apk/res/android"
  • 12. android:layout_width="match_parent" android:layout_height="match_parent"> <ListView android:layout_width="wrap_content" android:layout_height="wrap_content" android:id="@+id/listView" android:layout_gravity="center_vertical" android:layout_weight="1" /> </LinearLayout> 3. Add the following code in the “ActivityThree”. 4. public class ActivityThree extends AppCompatActivity { ListView listV; ArrayList <String> list; @Override protected void onCreate(Bundle savedInstanceState) { super.onCreate(savedInstanceState); setContentView(R.layout.activitythree); listV= (ListView) findViewById(R.id.listView); ArrayAdapter adapter = new ArrayAdapter(this, android.R.layout.simple_list_item_1, list); listV.setAdapter(adapter); listV.setOnItemClickListener(new AdapterView.OnItemClickListener() { @Override public void onItemClick(AdapterView<?> parent, View view, int position, long id) { } }); } } 5. Create an ArrayList and add it after the ListView As shown in the ActivityThree 6. Add the following code in the listener.
  • 13. 7. Now go to the Activity “ActivityLifeCycleAndActivities” andaddthe followingcode inthe listener. btnColor.setOnClickListener(new View.OnClickListener() { @Override public void onClick(View v) { Intent intent = new Intent(MainActivity.this, ActivityThree.class); startActivityForResult(intent, PICK_COLOR ); } }); 8. Add the “PICK_COLOR” variable in the global space of this Activity. 9. Add the following function after the On Destroy function. Of this activity.
  • 14. public void changeBackground(String color) { // depending the extra value String, choose a background color if (color.equals("red")) { container.setBackgroundColor(Color.RED); } else if (color.equals("green")) { container.setBackgroundColor(Color.GREEN); } else if (color.equals("blue")) { container.setBackgroundColor(Color.BLUE); } } 10. Add the following line of code in the same Activity. ( Just write few onActi)
  • 15. 11. Remove the Error if any.Run your application and pressthe button“CHANGECOLOR”andselect Redfrom the ActivityThree andyoushouldsee yourbackgroundredinthe firstactivity.
  • 16.
  • 17. Part 4 showing the Contacts of your smartphones 1. Add the following code in the listener of your activity “ActivityLifeCycleAndActivities” 2. add the pickContact as shown. 3. copy and paste the following code in the “onActivityResult” Method. if ( requestCode==PICK_COLOR) { String clr=data.getStringExtra("COLOR"); changeBackground(clr); } // Check which request it is that we're responding to else if (requestCode == PICK_CONTACT_REQUEST) { // Make sure the request was successful if (resultCode == RESULT_OK) { // Get the URI that points to the selected contact Uri contactUri = data.getData(); // We only need the NUMBER column, because there will be only one row in the result String[] projection = {ContactsContract.CommonDataKinds.Phone.NUMBER}; // Perform the query on the contact to get the NUMBER column // We don't need a selection or sort order (there's only one result for the given URI)
  • 18. // CAUTION: The query() method should be called from a separate thread to avoid blocking // your app's UI thread. (For simplicity of the sample, this code doesn't do that.) // Consider using CursorLoader to perform the query. Cursor cursor = getContentResolver() .query(contactUri, projection, null, null, null); cursor.moveToFirst(); // Retrieve the phone number from the NUMBER column int column = cursor.getColumnIndex(ContactsContract.CommonDataKinds.Phone.NUMBER); String number = cursor.getString(column); // Do something with the phone number... } } 4. Run the application , you should see the output like this. After pressing the “contactView” Button.