1. online beginner
exclusive metal
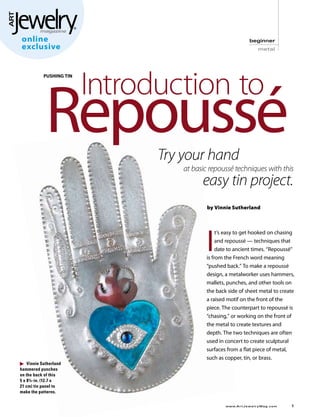
Introduction to
Repoussé
PUSHING TIN
Try your hand
at basic repoussé techniques with this
easy tin project.
by Vinnie Sutherland
I
t’s easy to get hooked on chasing
and repoussé — techniques that
date to ancient times. “Repoussé”
is from the French word meaning
“pushed back.” To make a repoussé
design, a metalworker uses hammers,
mallets, punches, and other tools on
the back side of sheet metal to create
a raised motif on the front of the
piece. The counterpart to repoussé is
“chasing,” or working on the front of
the metal to create textures and
depth. The two techniques are often
used in concert to create sculptural
surfaces from a flat piece of metal,
such as copper, tin, or brass.
Vinnie Sutherland
hammered punches
on the back of this
5 x 8¼-in. (12.7 x
21 cm) tin panel to
make the patterns.
www.A r t J e w e l r y M a g . c o m
2. Five years ago, I loaded my truck
and drove from Michigan to New
Mexico — I was on a mission to
learn basic repoussé techniques
at a weeklong tinsmithing work-
shop held in Taos. I wasn’t new to
working with metal, but I wanted
to expand my skill set to include
tinwork. I’d always admired tinwork
created in the Mexican folk art 1 2
tradition. That workshop left a
lasting impression. I now do
tinwork full time and travel to art
fairs throughout the Midwest and
South to sell my work.
In this project, you’ll cut tin
sheet metal and use a variety
3
of punches to make a low-relief
design. You’ll experiment with 4
different patterns and get a feel
for how to use punches to make
Gather your tools. The tools you’ll use Cut a shape out of tin sheet. Select a
impressions without making holes in this project are fairly easy to come by. design and use a permanent marker to
in the metal. If you work with You’ll need a heavy rubber mat, a wood- draw its outline on a sheet of 28-gauge
copper, consider giving it a patina worker’s rubber mallet, French shears, (0.32 mm) tin. (I use 30-gauge [0.26 mm]
some wooden dowels, and a variety of tin roofing sheet that I buy from a
by heating the metal with a torch. punches [1]. commercial supplier. See “Where To Get
I make many of my punches from nails, Sheet Metal,” left.) Use curved or straight
using a bench grinder to blunt the tips into French shears to cut out the shape [2]. All
various shapes. You could also use a flex cuts should be made with the sheet metal
shaft and diamond burs to grind and deep in the throat of the blades. (Using the
where to get shape the nails. This method will take tips of the blades will leave sharp burs at
sheet
more time than using a bench grinder, the edge of the metal.)
and you’ll need to keep the burs
cool and lubricated by frequently Draw a pattern on the back of the sheet.
metal
dipping them in water. Use a permanent marker to draw a design
on the back of the sheet [3]. Remember,
TIP: I use spray you’ll be using your punches on the back
paint to color-code of the sheet to create a raised pattern on
Hobby stores are good sources for the heads of my the front of your piece. You can use steel
28-gauge (0.32 mm) tin and small
sheets of copper. nail punches to wool or denatured alcohol to erase any
help me keep unwanted marks.
Check your hardware store for flashing track of the
tin — it’s a bit thinner than 28-gauge
(0.32 mm), but it’ll work for repoussé if various marks Outline the sheet. Tinsmiths commonly
you use a light hand with your punches. that I make. pound the edge of their cut metal shape to
When I make outline the design and to minimize sharp
Roofing companies also have scrap tin and
copper that they may sell or give to you. intricate designs, edges. Place your sheet with its back side
I keep a log of up on a rubber mat that’s supported by a
There’s always the option of recycling the punches I use sturdy table or bench. Choose a punch to
your tin cans. Carefully cut them along
the seam and roll them flat. Olive oil cans, to make specific outline your metal shape and use a rubber
which don’t usually have ridges, work patterns. mallet to hammer the punch, following the
well for tinwork. edge of your design [4]. When you’ve
www.A r t J e w e l r y M a g . c o m
3. Process photos by Vinnie Sutherland.
5 6 7 8
9 10 11 12
finished outlining the piece, turn it over to use your rubber mallet to gently pound from the panel. Use the steel wool to
check your work [5]. the sheet flat [8]. remove some of the patina from the
metal’s surface. Leave some patina on the
Add details. Working on the back of the Add extra dimension with a wooden raised areas — the deep color accentuates
sheet (the side with your drawing), use dowel. To further push out a larger area the textures made by the punches. I like to
punches to detail your design [6]. See of metal, use the rounded and sanded end use an electric engraving tool to add even
“What a Relief,” below, for tips on using of a wooden dowel. Tap the dowel with more texture and a few highlights to the
punches. Expect the tin to warp while you the rubber mallet [9]. patinated surface [12].
work on it. As this happens, turn the sheet
over so that the front is facing up [7], and Work from the front of the piece. To Add a hanger. To make the piece into a
accentuate the areas pushed out by the wall hanging, I used 60/40 lead solder (the
dowel, turn the piece front-side up and kind you’d use for plumbing or stained
use your punches to define these raised glass) to attach a loop of tin strip to the
areas [10]. I dimpled a line of dots back of the panel [13].
what a around the puffed-out heart in
relief
Like nails, you can use the ends of screw-
my design [11].
Add a patina. Use 0000
steel wool to clean and
Layer components for contrast. Com-
bining copper elements with tin is a nice
way to introduce more color into a piece
[14]. For this project, I cut a flame shape
smooth the front of the from 28-gauge (0.32 mm) copper sheet
drivers as punches for repoussé. You can
even try using punches made for leather. piece. Put on latex or to partly conceal the small heart. After
nitrile gloves. Mix one shaping the flame with a small wooden
To create a stippled effect on the surface part Novacan black dowel punch, I heated the copper with a
of the metal, use a fine-tip punch and make
the impressions very close to each other. patina to two parts torch until the metal turned a deep red.
I used this technique to make a shaded water. Use a natural The blue heart is a piece of copper that I
flame beneath the large heart in the sponge to apply the patinated with a ready-made solution.
featured project.
patina to the front
If you make a mark that you want to of the panel. While TIP: Check local hobby
remove, turn the metal over, place it on the patina is still wet, stores for prepared patinas
a hard surface (like a brass block) and
use a small hammer to tap out the use a paper towel to that you can use to color
unwanted dimple. wipe the solution your metal.
www.A r t J e w e l r y M a g . c o m
4. materials
■ Tin sheet: 28-gauge (0.32 mm), 10 x 6 in. (25.4 x
15.2 cm)
■ Copper sheet: 28-gauge (0.32 mm), dead-soft, 2 x
3 in. (51 x 76 mm)
■ Lead solder: 60/40
■ Paua shell (optional)
tools supplies
■ Rubber mat: heavy
13 14 ■
■
Rubber mallet: MA-18 oz. (510.3 g) (woodworker’s
tool)
French shears: straight or curved
■ Wooden dowels
The eye layered on top of the blue ■ Punches: nails, screwdrivers, decorative punches
Bench grinder; or flex shaft with diamond burs
heart is a piece of tin with a blue paua ■
■ Spray paint (optional)
shell in its center. I used glue to adhere
■ Permanent marker
these components to the repousséd hand,
■ Steel wool: 0000
but you could just as easily assemble the Denatured alcohol (optional)
You can turn ■
pieces using rivets, tabs, or wire. Brass block
this piece into a ■
wall hanging by ■ Hammer: small (optional)
adding a loop of ■ Sandpaper: 150 grit
tin to the back. ■ Latex or nitrile gloves
■ Novacan black patina for solder
■ Natural sponge
■ Electric engraving tool (optional)
■ Torch (optional)
■ Glue: plumbing
See Safety Basics by clicking on “How To” at
www.artjewelrymag.com.
suppliers
■ Tin sheet (Arnie’s Arts ‘N’ Crafts, 989.366.8794,
www.arnies.com)
■ Rubber mat, Protecto board (Tandy Leather,
800.632.9620, www.tandyleatherfactory.com)
■ French shears, diamond burs (Rio Grande,
800.545.6566, www.riogrande.com)
■ Rubber mallet, MA-18 oz. (510.3 g)
(Wood is Good, 888.330.5444)
■ Bench grinder (Harbor Freight Tools,
800.423.2567, www.harborfreight.com)
Vinnie Sutherland lives and works in the
woods of western Michigan. She is a full-time
artist and owner of Taproot Tinworks. Her work
is represented in several galleries throughout
the United States. You can reach her via
e-mail at halfwild@riverview.net.
www.A r t J e w e l r y M a g . c o m
5. Make jewelry
that makes a
statement . . .
your statement
Looking for projects that use different
materials such as metalwork, wirework,
stone, glass, polymer, and enamel? Then
Art Jewelry is the magazine for you!
Discover the secrets you need to create
breathtaking pieces that express your own
distinctive style like never before! Whether
you want to learn a new technique, try a
Subscribe
different material, or get ideas for your
own jewelry projects, there’s something for
Today!
you in Art Jewelry!
Order online at
www.artjewelrymag.com/promo
Enter code: I4XZ1
or call 800-533-6644
Monday-Friday, 8:30 a.m. - 5:00 p.m. Central Time.
Outside the U.S. and Canada, call 262-796-8776, ext. 661.
05X1017
I4XZ1

![Five years ago, I loaded my truck
and drove from Michigan to New
Mexico — I was on a mission to
learn basic repoussé techniques
at a weeklong tinsmithing work-
shop held in Taos. I wasn’t new to
working with metal, but I wanted
to expand my skill set to include
tinwork. I’d always admired tinwork
created in the Mexican folk art 1 2
tradition. That workshop left a
lasting impression. I now do
tinwork full time and travel to art
fairs throughout the Midwest and
South to sell my work.
In this project, you’ll cut tin
sheet metal and use a variety
3
of punches to make a low-relief
design. You’ll experiment with 4
different patterns and get a feel
for how to use punches to make
Gather your tools. The tools you’ll use Cut a shape out of tin sheet. Select a
impressions without making holes in this project are fairly easy to come by. design and use a permanent marker to
in the metal. If you work with You’ll need a heavy rubber mat, a wood- draw its outline on a sheet of 28-gauge
copper, consider giving it a patina worker’s rubber mallet, French shears, (0.32 mm) tin. (I use 30-gauge [0.26 mm]
some wooden dowels, and a variety of tin roofing sheet that I buy from a
by heating the metal with a torch. punches [1]. commercial supplier. See “Where To Get
I make many of my punches from nails, Sheet Metal,” left.) Use curved or straight
using a bench grinder to blunt the tips into French shears to cut out the shape [2]. All
various shapes. You could also use a flex cuts should be made with the sheet metal
shaft and diamond burs to grind and deep in the throat of the blades. (Using the
where to get shape the nails. This method will take tips of the blades will leave sharp burs at
sheet
more time than using a bench grinder, the edge of the metal.)
and you’ll need to keep the burs
cool and lubricated by frequently Draw a pattern on the back of the sheet.
metal
dipping them in water. Use a permanent marker to draw a design
on the back of the sheet [3]. Remember,
TIP: I use spray you’ll be using your punches on the back
paint to color-code of the sheet to create a raised pattern on
Hobby stores are good sources for the heads of my the front of your piece. You can use steel
28-gauge (0.32 mm) tin and small
sheets of copper. nail punches to wool or denatured alcohol to erase any
help me keep unwanted marks.
Check your hardware store for flashing track of the
tin — it’s a bit thinner than 28-gauge
(0.32 mm), but it’ll work for repoussé if various marks Outline the sheet. Tinsmiths commonly
you use a light hand with your punches. that I make. pound the edge of their cut metal shape to
When I make outline the design and to minimize sharp
Roofing companies also have scrap tin and
copper that they may sell or give to you. intricate designs, edges. Place your sheet with its back side
I keep a log of up on a rubber mat that’s supported by a
There’s always the option of recycling the punches I use sturdy table or bench. Choose a punch to
your tin cans. Carefully cut them along
the seam and roll them flat. Olive oil cans, to make specific outline your metal shape and use a rubber
which don’t usually have ridges, work patterns. mallet to hammer the punch, following the
well for tinwork. edge of your design [4]. When you’ve
www.A r t J e w e l r y M a g . c o m](data:image/gif;base64,R0lGODlhAQABAIAAAAAAAP///yH5BAEAAAAALAAAAAABAAEAAAIBRAA7)