Administering and Reporting with Oracle BI Publisher
1. Oracle BI Publisher is a reporting solution to efficiently author, manage, and deliver reports and documents.
This guide describes the most common tasks when administering BI Publisher, creating data models and
reports, and viewing and scheduling reports.
For more information about these and other Oracle BI Publisher tasks, see Oracle BI Publisher documentation
on Oracle Technology Network.
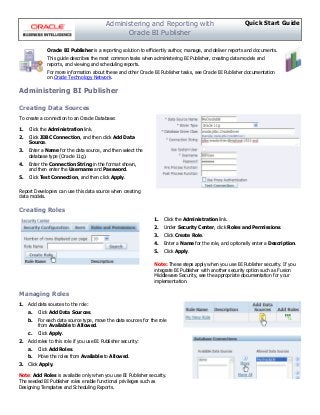
To create a connection to an Oracle Database:
1. Click the Administration link.
2. Click JDBC Connection, and then click Add Data
Source.
3. Enter a Name for the data source, and then select the
database type (Oracle 11g).
4. Enter the Connection String in the format shown,
and then enter the Username and Password.
5. Click Test Connection, and then click Apply.
Report Developers can use this data source when creating
data models.
Quick Start GuideAdministering and Reporting with
Oracle BI Publisher
Administering BI Publisher
Creating Data Sources
Creating Roles
1. Click the Administration link.
2. Under Security Center, click Roles and Permissions.
3. Click Create Role.
4. Enter a Name for the role, and optionally enter a Description.
5. Click Apply.
Note: These steps apply when you use BI Publisher security. If you
integrate BI Publisher with another security option such as Fusion
Middleware Security, see the appropriate documentation for your
implementation.
Managing Roles
1. Add data sources to the role:
a. Click Add Data Sources.
b. For each data source type, move the data sources for the role
from Available to Allowed.
c. Click Apply.
2. Add roles to this role if you use BI Publisher security:
a. Click Add Roles.
b. Move the roles from Available to Allowed.
3. Click Apply.
Note: Add Roles is available only when you use BI Publisher security.
The seeded BI Publisher roles enable functional privileges such as
Designing Templates and Scheduling Reports.
2. Creating Users
1. Click the Administration link.
2. Under Security Center, click Users.
a. Click Create User.
b. Enter a Username and Password.
c. Click Apply.
3. Click Assign Roles.
4. To grant user privileges, move Available Roles to Assigned Roles.
Note: If you integrate BI Publisher with another security option such as
Fusion Middleware Security, see the appropriate documentation for your
implementation.
Granting Catalog Permissions to a Role
A role must be granted access to folders and objects in the catalog to
perform actions on those objects.
1. Select the folder or object in the catalog.
2. In the Tasks pane, click Permissions.
3. Click Add to add role permissions to the object.
4. In the Add Roles dialog, enter the role name or partial role
name, and then click Search.
5. Move the role to the Selected Roles list, and then click OK.
6. Select the permissions to grant the role on this object, such as
Read, Write, and Delete.
7. (Optional) For folders, select Apply permissions to items
within this folder.
Creating Delivery Destinations
To add an email server as a delivery destination:
1. Click the Administration link.
2. Under Delivery, click Email.
3. Click Add Server.
4. Enter the email server details:
a. Enter a unique Server Name.
b. Enter the email server Host (for example,
mail.example.com) and Port.
c. (Optional) Select the Secure Connection type.
d. (Optional) Enter the server Username and
Password.
5. Click Apply.
Report Viewers can now use this Destination Type for BI
Publisher scheduled jobs.
3. To create a data model based on a SQL data set:
1. From the New menu, select Data Model.
2. Click New Data Set.
3. From the New Data Set menu, select SQL Query.
4. Enter the Name of the data set.
5. Select the Default Data Source.
6. Click Query Builder.
Creating Data Models and Reports
Creating Data Models
Creating Reports and Layouts
1. From the New menu, select Report.
2. Choose a data model, spreadsheet, or subject area, and then click
Next.
3. Select the page options and layout, and then click Next.
4. Add Data Source elements to the report components (for example,
charts, data tables, pivot tables) to create the layout, and then click
Next.
5. Select one of the following options:
• Select View Report to view and run the report.
• Select Customize Report Layout to customize the report in
the Layout Editor.
7. Select the tables and columns to include, optionally create joins, and add
conditions.
8. Click Save.
9. (Optional) Add Parameters, and associate each parameter with a List of
Values.
10. Click the Structure tab to edit the Display Names of data elements.
11. Click the Data tab, and then click View to generate sample data.
12. Select Save As Sample Data, and then click OK.
13. Save the data model.
6. Click Finish.
7. Select the report folder, enter the report name, and
then click Save.
8. If you selected to customize the report in the Report
Layout Editor, use the ribbon toolbar or the
Properties pane to control the look and feel of the
layout components.
9. (Optional) Preview in different formats as you build the
layout.
10. Save the layout.
11. Click Return.
12. (Optional) Customize Parameters, Properties, and
Layout Properties.