BHGREGG Real Satisfied Tutorial
•
0 likes•509 views

The document provides instructions for BHGRE agents on using the RealSatisfied agent dashboard. It explains how to log in using credentials from CREST, edit profile settings, display satisfaction ratings, syndicate reviews to Realtor.com, invite clients to complete surveys, and approve and promote testimonials. The dashboard centralizes these account management tasks in one location.

Recommended
More Related Content
What's hot
What's hot (17)
Similar to BHGREGG Real Satisfied Tutorial
Similar to BHGREGG Real Satisfied Tutorial (20)
More from Ken Brand
More from Ken Brand (20)
Recently uploaded
Recently uploaded (20)
BHGREGG Real Satisfied Tutorial
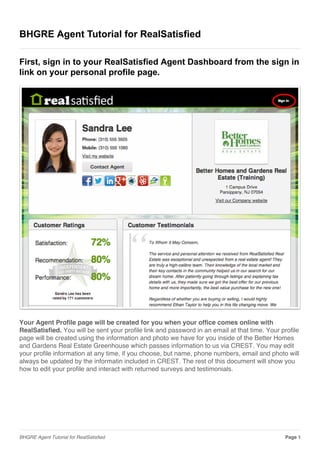
- 1. BHGRE Agent Tutorial for RealSatisfied First, sign in to your RealSatisfied Agent Dashboard from the sign in link on your personal profile page. Your Agent Profile page will be created for you when your office comes online with RealSatisfied. You will be sent your profile link and password in an email at that time. Your profile page will be created using the information and photo we have for you inside of the Better Homes and Gardens Real Estate Greenhouse which passes information to us via CREST. You may edit your profile information at any time, if you choose, but name, phone numbers, email and photo will always be updated by the informatin included in CREST. The rest of this document will show you how to edit your profile and interact with returned surveys and testimonials. BHGRE Agent Tutorial for RealSatisfied Page 1
- 2. Enter the temporary password you will be sent from RealSatisfied You will be able to change the password after you log in using the "change password" button next to your profile photo. If you have misplaced the launch email, you can click on "reset password" at the login screen and a reset link will be emailed to you at the email address listed as your business email address in CREST. BHGRE Agent Tutorial for RealSatisfied Page 2
- 3. Profile Settings When you are in your agent dashboard, you will see that your entire account is managed from this single location. The majority of your pofile page settings are taken care of for you via our CREST feed. However, you can edit your social media and profiles by clicking on "Profile Page Settings" and this will trigger a window that pops up over the dashboard to allow you easy access to edits. All changes are instantly reflected in the dashboard view and on your public profile. These settings are NOT updated by the CREST feed. BHGRE Agent Tutorial for RealSatisfied Page 3
- 4. Displaying Your Ratings In your profile settings, you may choose to display your Satisfaction, Recommendation and Performance as % scores, or as stars. This choice is entirely yours. Displaying Your Ratings You may change the display settings at any time. BHGRE Agent Tutorial for RealSatisfied Page 4
- 5. Syndication, Publishing Services, Feeds & Widgets 1. Syndication: RealSatisfied is currently the only service that can syndicate recommendations to Realtor.com®. To sync your RealSatisfied account with your Social Bios account at Realtor.com, click the toggle next to the Realtor.com® and you will be taken to login to your Social Bios account. If you do not have a Social Bios account, you can create one and link your accounts at this time. 2. Publishing Services: When you receive a recommendation via RealSatisfied, you may share these to Facebook and Twitter. Give permission to send to those channels on your behalf by clicking the toggle next to each. Once you've done this, you should not have to do it again. You must approve each recommendation you share out to these social networks. 3. Feeds & Widgets: If your website is built on WordPress, RealSatisfied provides a plugin that will enable you to share your customer satisfaction percentages and client testimonials automatically. Click on the "get it here" link to download the WordPress plugin or send the link to your website provider to install for you. The instructions for how to use the Wordpress plugin can be found here: LINK There is also a link to the RSS feed that contains all of the data in your agent profile. You may be able to provide this link to your web developer if you are not hosted on the WordPress platform. BHGRE Agent Tutorial for RealSatisfied Page 5
- 6. Invitations To Complete Surveys 1. When an invitation to complete a survey is sent to your client, it is logged in your account and it's status will show up in the "invitations" window of your dashboard. Any item that requires your immediate attention will show up with an alert at the top of the box. As you can see in this example, there are two invitations missing client emails, two testimonials that need approval, four invitations that were undeliverable and three that are in quarantine, indicating that it has triggered our audit & verification filter. Clicking on any of these will allow you to quickly and easily take action to correct or approve. 2. The default view is "all invitations," and when you click on the filter a dropdown menu appears that gives you access to any invitation type you'd like to see. It also includes an indication of which items require action on your part. 3. You can access any survey directly by clicking on the row that shows the invitation identification. Each survey type will show you different details about that invitation. Clicking on a completed survey, for example will allow you to see the full survey responses in PDF form and promote the results. 4. Clicking on a survey that has been sent, but not responded to, will allow you to resend a notification to your client. The pop up windows for these actions should be self-explanatory in context. BHGRE Agent Tutorial for RealSatisfied Page 6
- 7. Approving & Promoting Testimonials 1. Every testimonial must be approved by you before it will appear on your profile page. We only ask for testimonials from clients who were highly satisfied with your performance, but there may be many reasons why you might not want a testimonial to be public. 2. Once you have made a testimonial public, you can choose to publish it to social media channels like Twitter and Facebook, and... 3. Syndicate the testimonial to Realtor.com®. BHGRE Agent Tutorial for RealSatisfied Page 7