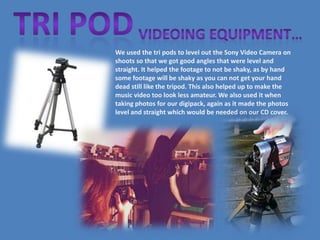
1. We used the tri pods to level out the Sony Video Camera on
shoots so that we got good angles that were level and
straight. It helped the footage to not be shaky, as by hand
some footage will be shaky as you can not get your hand
dead still like the tripod. This also helped up to make the
music video too look less amateur. We also used it when
taking photos for our digipack, again as it made the photos
level and straight which would be needed on our CD cover.
2. Link To Site http://photobucket.com/
We used photobucket to present slideshows of
our images we took on set and also to show the
different digipack effects. Instead of a boring
page of photos having to scroll through, we
thought it looked more professional and
interesting having a slideshow which changes
automatically for you.
It also takes up a lot less space on our
blogs, which I think look more effective. As you
can see the different changes in photos and how
we progressed through out shoots, from the
beginning to the end also like a diary in pictures.
We used photo bucket to Display our
preliminary shoots for our CD cover, also to
show the behind the scenes before and after of
our dark room scene. I think this was a good
software to use as it is presented like a
presentation so you can click back fourth
through the slides. It moves
automatically, unlike the boring page full of
images this is a much neater and effective way
of presenting our images.
3. http://prezi.com/vp2tdv27ppyr/digi-pack-ideas/
We used Prezi to present our ideas on and research
developments as we thought that PowerPoint was
a bit boring. With all the new sites we could now
use, it looked more interesting then PowerPoint
from going from slide to slide. We was able to
change the way the presentation was presented
making the text stand out more, and was more
interactive. For example YouTube clips played
instantly when clicked upon which was not
available on PowerPoint.
I also think it is a better way of presenting as you
are also able to zoom out of the presentation and
look at it almost in a spider diagram view. Which
would look more appealing to the eye then
handouts from PowerPoint. Overall I think we used
the piece of software effectively. However
sometimes it let us down and did not save work
correctly or froze occasionally. So took longer to
create then a PowerPoint presentation, but overall
I think it is a more effective way of presenting out
findings.
4. We used YouTube firstly to advertise our new artist Aaron
Brookes. I was able to change the background and also the
colours and style’s and create a little bio about the artist.
Which Is commonly done with really artists, after this was
created we able to upload our work to the channel, which
could then be viewed by his fans around the world. YouTube
was great as it also allowed us to create comments so we
could really make people believe the artist was real. For
example YouTube could allow you to rate the artist and write
comments on their walls.
For A closer Look click this link:
I was also able to do some editing as well through YouTube. http://www.youtube.com/user/AaronBrookesOffical/feed
As now it has special finishing touches that can be used to
make your videos even better. For example change the video
to Vintage, cross process, rotating the video, trimming the
video and stretching the video’s we uploaded.
We were also able to uploaded the videos we had uploaded
to YouTube on social networking sites such as
Twitter, MySpace and Facebook using embeds and the music
videos URLs. So that we could get more views and also make
the artist look real. The only let down I would say about
using YouTube is that our music video song may be taken of
as the real artist has copyright restrictions to his song on
YouTube. I think we used this to the best of our abilities, but
if we did it again I think we could also use sites such as
Vimeo as they are not as strict on copyrighting restricts.