TrustArc Webinar - Stay Ahead of US State Data Privacy Law Developments
I psec tunnel vs transport mode
1. IPsec Tunnel vs Transport Mode
IP Security(IPsec) is a framework of open standards developed by the Internet
Engineering Task Force (IETF). IPsec provides security for transmission of sensitive
information over unprotected networks such as the Internet. IPsec acts at the
network layer, protecting and authenticating IP packets between participating IPsec
devices also known as IPsec peers. IPsec has two modes of operation:
Tunnel mode: The entire original IP packet is protected (encrypted, authenticated, or
both) in tunnel mode. The packet is then encapsulated by the IPsec headers and
trailers. Finally a new IP header is prefixed to the packet, specifying the IPsec
endpoints as the source and destination. Tunnel mode is the more common IPsec
mode that can be used with any IP traffic. If IPsec is required to protect traffic from
hosts behind the IPsec peers, tunnel mode must be used. Virtual private networks
(VPNs) make use of tunnel mode where hosts on one protected network send
packets to hosts on a different protected network via a pair of IPsec peers such as
Cisco routers. In this scenario, the IPsec peers tunnel the protected traffic between
the peers while the hosts on the protected networks are the actual session
endpoints. Tunnel Mode is configured under a “Transform Set” as we will see below.
Transport mode: Only the payload or data of the original IP packet is protected
(encrypted, authenticated, or both) in transport mode. The protected payload is
then encapsulated by the IPsec headers and trailers while the original IP header
remains intact and is not protected by IPsec. Transport mode is used only when the
IP traffic to be protected has IPsec peers as both the source and destination. For
example, you could use the transport mode to protect router management traffic.
Transport Mode is configured under a “Transform Set” as we will see below.
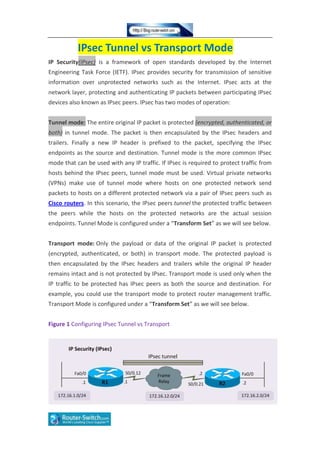
Figure 1 Configuring IPsec Tunnel vs Transport
2. Please refer to the topology where two Cisco routers R1 and R2 are configured to
send protected traffic across an IPsec tunnel. The two routers are connected over a
Frame Relay connection the configuration of which is not included in this tutorial.
Each router also has a FastEthernet interface where end systems reside. The traffic
sent and received by those end systems will be encrypted when flowing across the
IPsec tunnel. This essentially is IPsec in tunnel mode as we defined earlier in the
tutorial.
We start our IPsec configuration with Internet Security Association and Key
Management Protocol (ISAKMP), which is a framework for authentication and key
exchange. Cisco uses a derivative of ISAKMP known as Internet Key Exchange (IKE).
IKE is used to establish a shared security policy and authenticated keys for IPsec to
use.
Let’s create policy 1 first, specifying that we’ll use MD5 to hash the IKE exchange,
DES to encrypt IKE, and pre-shared key for authentication.
R1>enable
R1#configure terminal
Enter configuration commands, one per line. End with CNTL/Z.
R1(config)#crypto isakmp policy 1
R1(config-isakmp)#hash md5
R1(config-isakmp)#authentication pre-share
R1(config-isakmp)#crypto isakmp key MyKey address 172.16.12.2
Next, we create an IPsec “Transform Set” that we call MySet. We specify
Authentication Header (AH) as the authentication protocol and Encapsulating
Security Payload (ESP) as the encryption protocol for IPsec. We can also use the
mode command in crypto transform configuration mode to set the mode for the
VPN to be either tunnel (default) or transport(“transport” setting is used only when
the traffic to be protected has the same IP addresses as the IPsec peers).
R1(config)#crypto ipsec transform-set MySet ah-sha-hmacesp-aes 256
R1(cfg-crypto-trans)#mode tunnel
R1(cfg-crypto-trans)
In our example above, we configure the VPN to work in “tunnel” mode. If we wanted
to have “transport mode”, the command would be:
3. R1(cfg-crypto-trans)#mode transport
We now proceed to create a crypto map called MyMap with sequence number 1. A
crypto map can have multiple entries with different sequence numbers but we’ll use
just one entry. Theipsec-isakmp argument instructs the router that this map is an
IPsec map. We also tell the router about its peer 172.16.12.2 once again and also set
the security-association lifetime. We also refer to the access list 101 which will be
used to match interesting traffic that has to be protected by IPsec.
R1(cfg-crypto-trans)#crypto map MyMap 1 ipsec-isakmp
R1(config-crypto-map)#set peer 172.16.12.2
R1(config-crypto-map)#set security-association lifetime seconds 190
R1(config-crypto-map)#set transform-set MySet
R1(config-crypto-map)#match address 101
Now we apply our crypto map to the interface that will be sending the encrypted
traffic. The interface is a Frame Relay sub-interface that connects to our IPsec peer
at the other end. Our address is 172.16.12.1 while our peer is 172.16.12.2.
R1(config-crypto-map)#interface Serial0/0.12 point-to-point
R1(config-if)#crypto map MyMap
R1(config-if)#exit
R1(config)#
And finally we define access list 101 that specifies which traffic will be protected by
IPsec.
R1(config)#access-list 101 permit ip 172.16.0.0 0.0.255.255 172.16.0.0 0.0.255.255
This concludes our IPsec configuration on R1. Let’s now move to R2 and apply IPsec
configuration to it just the way we applied to R1.
R2>enable
R2#configure terminal
Enter configuration commands, one per line. End with CNTL/Z.
R2(config)#crypto isakmp policy 1
R2(config-isakmp)#hash md5
R2(config-isakmp)#authentication pre-share
4. R2(config-isakmp)#crypto isakmp key MyKey address 172.16.12.1
R2(config)#crypto ipsec transform-set MySet ah-sha-hmacesp-aes 256
R2(cfg-crypto-trans)#mode tunnel
R2(cfg-crypto-trans)#crypto map MyMap 1 ipsec-isakmp
R2(config-crypto-map)#set peer 172.16.12.1
R2(config-crypto-map)#set security-association lifetime seconds 190
R2(config-crypto-map)#set transform-set MySet
R2(config-crypto-map)#match address 101
R2(config-crypto-map)#interface Serial0/0.21 point-to-point
R2(config-fr-dlci)#crypto map MyMap
R2(config-subif)#router ospf 100
R2(config-router)#network 172.16.0.0 0.0.255.255 area 0
R2(config-router)#access-list 101 permit ip 172.16.0.0 0.0.255.255 172.16.0.0
0.0.255.255
This finalizes our basic IPsec configuration in tunnel mode for both R1 and R2.
Let’s now verify if the configuration works as expected. A variety of Cisco
IOS show commands are available to confirm that security associations (SAs) are live
and interesting traffic is indeed being encrypted.
The show crypto session command verifies that the IKE session is active and R1 is
indeed talking to its peer 172.16.12.2 via UDP port 500, the port for IKE.
R1#show crypto session
Crypto session current status
Interface: Serial0/0.12
Session status: UP-ACTIVE
Peer: 172.16.12.2 port 500
IKE SA: local 172.16.12.1/500 remote 172.16.12.2/500 Active
IPSEC FLOW: permit ip 172.16.0.0/255.255.0.0 172.16.0.0/255.255.0.0
Active SAs: 4, origin: crypto map
5. The show crypto map command verifies our IPsec status.
R1#show crypto map
Crypto Map “MyMap” 1 ipsec-isakmp
Peer = 172.16.12.2
Extended IP access list 101
access-list 101 permit ip 172.16.0.0 0.0.255.255 172.16.0.0 0.0.255.255
Current peer: 172.16.12.2
Security association lifetime: 4608000 kilobytes/190 seconds
PFS (Y/N): N
Transform sets={
MySet,
}
Interfaces using crypto map MyMap:
Serial0/0.12
The show crypto ipsec transform-set command verifies our IPsec status and shows
that we are indeed using tunnel mode as opposed to transport mode.
R1#show crypto ipsec transform-set
Transform set MySet: { ah-sha-hmac }
will negotiate = { Tunnel, },
{ esp-256-aes }
will negotiate = { Tunnel, },
The same show commands can be used on R2 to obtain similar results.
More Related Networking Tips:
How to Set Up IPSec Direct Encapsulation on Cisco Devices?
How to Configure GRE over an IPSec Tunnel on Routers?
How to Configure IPSEC Encryption with the Cisco IOS?