SlideShare ist ein Scribd-Unternehmen logo
1 von 7
Adobe® Photoshop®
                                           Selections

                                 Michael E. Stern
                       PHOTOGRAPHY EDUCATION CONSULTING


1) Open up file: Ducky.tif. This file is in the sub-folder Samples in the Adobe Photoshop
folder. Go to the eyedropper (I) tool and set the Sample Size to


3x3.

Select the Magic Wand tool in the tool palette or by pressing W on the keyboard. Great for
selecting objects with a strong contrast between subject (duck) and background. Make sure the
wand is selected and not the Quick Selection tool.

Look at the Magic Wand option bar and set it to the default:


Tolerance of 32 and Contiguous checked on are the important settings here. Tolerance and
Sample Size tells the tool to average out the 9 pixels it sampled and select all pixels by looking
at 32 gradations outward of the selected, averaged value. Contiguous is a fancy word for
uninterrupted. When clicking on the white part of the image only the white that is continuous
will be selected. Uncheck contiguous and you will see the whites of the eyes chosen too.

Command + D to deselect. Click on the yellow part of the duck. Not all are selected. Deselect.
Increase tolerance to 64. Select again. Still no luck? Hold down the Shift key and build up the
selection by shift-clicking on areas of the duck not already selected. Click on the bill, eyes, etc.
What a bother. Sometimes it is easier to select the opposite of what we need and then Inverse
the selection.

Deselect. Reset tolerance to 32. Click on white. Go to Select – Inverse and now the duck is
selected and the background is not. This is what to look for when selecting objects, a nice clean
edge. However Photoshop always leaves a ring around the selection, in this case an edge of
white pixels from the white background. Selection edges must always be modified for
professional looking results. I used to leave a ring around the bathtub but then I discovered
soap. Moving on. To fix selection edges push the Refine Edge button at the top of the monitor:
Modify the edge with these settings:


                                      Click OK. While looking at the Layers Palette, select
Command + J and “jump” the selected object (duck) to it’s own separate and new layer. The
duck is now on its’ own layer (Layer 1), surrounded by transparency and the original
Background is still intact. Neat.

To see how clean the edges are, make a new blank layer and fill it with a contrasting color. Hold
down the Command key and click on the new layer icon at the bottom of the layers palette:


 Layer 1 created after being jumped.    New blank layer underneath Layer 1.
Go to Edit – Fill and make sure black is selected. Click OK.


Layers Palette should look like this:


                                     Click on Layer 1 to view the edges of the duck. Double
click on Layer 1 or Layer 2. After the text box becomes highlighted, rename the layer.
Photoshop supports 8,000 layers, so renaming layers is an important part of the workflow.
Open Dune.tif. It is in the same folder Ducky.tif was in. Use the Magic Wand and click on a
part of the sky or sand. Shift-click on the sky or sand and build up the selection.


                                                                           It works great but
wait, there’s more. Deselect and grab the Quick Selection tool beneath the Magic Wand.

The Quick Selection tool is the Magic Wand grown up and about enter puberty, powerful but
needs constant vigilance.

Before using the Quick Selection tool, set up the History Palette first so changes can be
tracked and reversed if necessary.

The History Palette is a great way to track the work being done. Go to Window – History to
bring up the palette. Click on the     icon at the upper right of the History Palette to bring up
the History Options.
Choose as indicated below:


                                If you don’t like what Quick Selection has done, step back in
time and begin again. Simple.
Back to the Dune.tif image. With the Quick Selection tool active, click on an area and move
the cursor across the area. The selected area should be of similar values/colors. Shift + hold will
add (remember?) while option/alt + hold will subtract if an area was selected by accident. It
takes practice to work with this tool effectively, just like teenagers.

Upon completion, go to Refine Edge and (just like before) modify the edges. Try different
settings. Follow the duck procedure (sounds painful) and if the edges are unacceptable, step
back in the History Palette to begin anew.


Click on the number in the Brush box and get the dialog box pictured. Notice where the cursor
is set. This is the starting point. Drag across the sand or sky.

Open up Selections.jpg. In the Tools palette pick the Lasso (L) tool. Feather set to 0 px. Make
a loose selection around the flower. Select the Magic Wand and option-click inside the
marching ants marquee. The loose selection has snapped to the edges of the flower. Way cool.


                                                                                 Zero Feather.
When option-clicking, the cursor becomes a cross with a minus sign attached.

Select the Polygonal Lasso (L) tool beneath the freehand Lasso (L) tool. One after the other,
click on each corner of the book. When the selection is about to be completed, Photoshop adds a
small circle to the tool icon informing you a complete selection is about to occur. This tool is
great for working on geometric shapes. Deselect.

Select the Rectangular Marquee Tool. (M) Start at a corner and drag out to the opposite edge
of the book. Although it is not appropriate for this object, holding down the Shift key when
using the marquee tools constrains the proportions to either a square or circle. While keeping
the mouse or tablet stylus clicked, hold down the space bar and the selection can be dragged
around. After releasing the mouse button, the selection can be moved around as long as the
marquee tool is still highlighted in the Tools Palette. Click inside the selection to move
otherwise, poof goes the selection. Can you say start over? Or use the History Palette and there
it is again. Clever little buggers at Adobe, eh?

Select the black oval located on the right side of the document. This will take back and forth
movements to resize and reshape the selection borders. Hold down the space bar and move the
entire selection. Just for kicks, hold down the Shift key and see the oval snap to a perfect circle.
Release the Shift key and all is forgiven.

If you have what you like but one or more edges is still a bit off, transform the selection. Go to
Select - Transform Selection and the bounding box with corner and side handles appears on
screen:


                                                   Pull out any handle and the marching ants
will be resized. Hold down the option key or the command key or both and notice how the
bounding box is altered. The marching ants follow the bounding box. Hit return or escape to
apply the transformation or cancel the adjustment.

Adobe® Photoshop® used with permission of Adobe Systems Incorporated. This is a registered trademark in the
US and/or other countries.

Weitere ähnliche Inhalte

Was ist angesagt?

Working with selections
Working with selectionsWorking with selections
Working with selectionsmiksta96
 
Creating a poster in adobe photoshop
Creating a poster in adobe photoshopCreating a poster in adobe photoshop
Creating a poster in adobe photoshopHarshal Gunwant
 
Navigation keys in tree controls
Navigation keys in tree controlsNavigation keys in tree controls
Navigation keys in tree controlsHemakumar.S
 
88 brilliant little tips for Photoshop
88 brilliant little tips for Photoshop88 brilliant little tips for Photoshop
88 brilliant little tips for PhotoshopEmad Mido
 
Menggunakan Radial blur
Menggunakan Radial blurMenggunakan Radial blur
Menggunakan Radial blurasyarifaisal
 
How to make a photoshop advert a4 poster
How to make a photoshop advert a4 posterHow to make a photoshop advert a4 poster
How to make a photoshop advert a4 postersparkly
 
Digital work station intro
Digital work station introDigital work station intro
Digital work station introWhitney Brooks
 
adobephotoshop_frerking
adobephotoshop_frerking adobephotoshop_frerking
adobephotoshop_frerking Agung Yuwono
 
Crazy Photos: An Introduction to GIMP
Crazy Photos: An Introduction to GIMPCrazy Photos: An Introduction to GIMP
Crazy Photos: An Introduction to GIMPRino Landa
 
Create a canvas banner in photoshop
Create a canvas banner in photoshopCreate a canvas banner in photoshop
Create a canvas banner in photoshopNaomiPB
 
Balloons tutorial by rokas petskevicius visualpelican
Balloons tutorial by rokas petskevicius visualpelicanBalloons tutorial by rokas petskevicius visualpelican
Balloons tutorial by rokas petskevicius visualpelicanRokas Petškevičius
 
Making a Circular Cropping in Photoshop
Making a Circular Cropping in PhotoshopMaking a Circular Cropping in Photoshop
Making a Circular Cropping in Photoshopds2kGTS
 

Was ist angesagt? (18)

Working with selections
Working with selectionsWorking with selections
Working with selections
 
Applying masks in photoshop
Applying masks in photoshopApplying masks in photoshop
Applying masks in photoshop
 
Image manipulation - Photoshop
Image manipulation - PhotoshopImage manipulation - Photoshop
Image manipulation - Photoshop
 
Creating a poster in adobe photoshop
Creating a poster in adobe photoshopCreating a poster in adobe photoshop
Creating a poster in adobe photoshop
 
Navigation keys in tree controls
Navigation keys in tree controlsNavigation keys in tree controls
Navigation keys in tree controls
 
Assignment 26
Assignment 26Assignment 26
Assignment 26
 
88 brilliant little tips for Photoshop
88 brilliant little tips for Photoshop88 brilliant little tips for Photoshop
88 brilliant little tips for Photoshop
 
Menggunakan Radial blur
Menggunakan Radial blurMenggunakan Radial blur
Menggunakan Radial blur
 
How to make a photoshop advert a4 poster
How to make a photoshop advert a4 posterHow to make a photoshop advert a4 poster
How to make a photoshop advert a4 poster
 
Owl Clock
Owl ClockOwl Clock
Owl Clock
 
Digital work station intro
Digital work station introDigital work station intro
Digital work station intro
 
adobephotoshop_frerking
adobephotoshop_frerking adobephotoshop_frerking
adobephotoshop_frerking
 
Colour Magic Graphics
Colour Magic GraphicsColour Magic Graphics
Colour Magic Graphics
 
Crazy Photos: An Introduction to GIMP
Crazy Photos: An Introduction to GIMPCrazy Photos: An Introduction to GIMP
Crazy Photos: An Introduction to GIMP
 
Create a canvas banner in photoshop
Create a canvas banner in photoshopCreate a canvas banner in photoshop
Create a canvas banner in photoshop
 
Balloons tutorial by rokas petskevicius visualpelican
Balloons tutorial by rokas petskevicius visualpelicanBalloons tutorial by rokas petskevicius visualpelican
Balloons tutorial by rokas petskevicius visualpelican
 
Making a Circular Cropping in Photoshop
Making a Circular Cropping in PhotoshopMaking a Circular Cropping in Photoshop
Making a Circular Cropping in Photoshop
 
Writing ED material
Writing ED materialWriting ED material
Writing ED material
 

Ähnlich wie Photoshop Selections

Edit images using selection in Adobe Photoshop.pptx
Edit images using selection in Adobe Photoshop.pptxEdit images using selection in Adobe Photoshop.pptx
Edit images using selection in Adobe Photoshop.pptxMarvin Santiago
 
3Dimention_lessonA_introMayaModeling.pptx
3Dimention_lessonA_introMayaModeling.pptx3Dimention_lessonA_introMayaModeling.pptx
3Dimention_lessonA_introMayaModeling.pptxFaris Abuhashish
 
How To Cut Out An Image In Photoshop 2024
How To Cut Out An Image In Photoshop 2024How To Cut Out An Image In Photoshop 2024
How To Cut Out An Image In Photoshop 2024Zenith Clipping
 
Illustrator's basic shapes part 1
Illustrator's basic shapes part 1Illustrator's basic shapes part 1
Illustrator's basic shapes part 1Jerry Arnold
 
Session 2.2 photoshop interface
Session 2.2   photoshop interfaceSession 2.2   photoshop interface
Session 2.2 photoshop interfaceJohn Josef Jimenez
 
Introduction- The Basics of Photoshop CS6
Introduction- The Basics of Photoshop CS6Introduction- The Basics of Photoshop CS6
Introduction- The Basics of Photoshop CS6Crest TechnoSoft
 
SGIS Training Introduction
SGIS Training IntroductionSGIS Training Introduction
SGIS Training IntroductionWill Kirkwood
 
Pepsi vector tutorial
Pepsi vector tutorialPepsi vector tutorial
Pepsi vector tutorialbalermm
 
how to use design by software.pptx
how to use design by software.pptxhow to use design by software.pptx
how to use design by software.pptxNitinKumar12570
 
Intro to Adobe Illustrator
Intro to Adobe IllustratorIntro to Adobe Illustrator
Intro to Adobe IllustratorDUSPviz
 
Working with selections
Working with selectionsWorking with selections
Working with selectionsJake Bennett
 
Microsoft Office PowerPoint 2007 - Lesson 2
Microsoft Office PowerPoint 2007 - Lesson 2Microsoft Office PowerPoint 2007 - Lesson 2
Microsoft Office PowerPoint 2007 - Lesson 2Samantha TerBeest
 
Lesson 9 (Tools Palette 1)
Lesson 9 (Tools Palette 1)Lesson 9 (Tools Palette 1)
Lesson 9 (Tools Palette 1)Denden Amarante
 
217 quick guide to photoshop cs6
217 quick guide to photoshop cs6217 quick guide to photoshop cs6
217 quick guide to photoshop cs6Rodel Morales
 

Ähnlich wie Photoshop Selections (20)

Edit images using selection in Adobe Photoshop.pptx
Edit images using selection in Adobe Photoshop.pptxEdit images using selection in Adobe Photoshop.pptx
Edit images using selection in Adobe Photoshop.pptx
 
3Dimention_lessonA_introMayaModeling.pptx
3Dimention_lessonA_introMayaModeling.pptx3Dimention_lessonA_introMayaModeling.pptx
3Dimention_lessonA_introMayaModeling.pptx
 
How To Cut Out An Image In Photoshop 2024
How To Cut Out An Image In Photoshop 2024How To Cut Out An Image In Photoshop 2024
How To Cut Out An Image In Photoshop 2024
 
Illustrator's basic shapes part 1
Illustrator's basic shapes part 1Illustrator's basic shapes part 1
Illustrator's basic shapes part 1
 
Photoshop tools
Photoshop toolsPhotoshop tools
Photoshop tools
 
Session 2.2 photoshop interface
Session 2.2   photoshop interfaceSession 2.2   photoshop interface
Session 2.2 photoshop interface
 
Introduction- The Basics of Photoshop CS6
Introduction- The Basics of Photoshop CS6Introduction- The Basics of Photoshop CS6
Introduction- The Basics of Photoshop CS6
 
SGIS Training Introduction
SGIS Training IntroductionSGIS Training Introduction
SGIS Training Introduction
 
Pepsi vector tutorial
Pepsi vector tutorialPepsi vector tutorial
Pepsi vector tutorial
 
how to use design by software.pptx
how to use design by software.pptxhow to use design by software.pptx
how to use design by software.pptx
 
Intro to Adobe Illustrator
Intro to Adobe IllustratorIntro to Adobe Illustrator
Intro to Adobe Illustrator
 
Computer Science.pptx
Computer Science.pptxComputer Science.pptx
Computer Science.pptx
 
Ai tool box 1
Ai tool box 1Ai tool box 1
Ai tool box 1
 
Working with selections
Working with selectionsWorking with selections
Working with selections
 
Microsoft Office PowerPoint 2007 - Lesson 2
Microsoft Office PowerPoint 2007 - Lesson 2Microsoft Office PowerPoint 2007 - Lesson 2
Microsoft Office PowerPoint 2007 - Lesson 2
 
Tutorial
TutorialTutorial
Tutorial
 
Lesson 9 (Tools Palette 1)
Lesson 9 (Tools Palette 1)Lesson 9 (Tools Palette 1)
Lesson 9 (Tools Palette 1)
 
teacherinset.pptx
teacherinset.pptxteacherinset.pptx
teacherinset.pptx
 
Edgy Colors
Edgy ColorsEdgy Colors
Edgy Colors
 
217 quick guide to photoshop cs6
217 quick guide to photoshop cs6217 quick guide to photoshop cs6
217 quick guide to photoshop cs6
 

Kürzlich hochgeladen

Q-Factor General Quiz-7th April 2024, Quiz Club NITW
Q-Factor General Quiz-7th April 2024, Quiz Club NITWQ-Factor General Quiz-7th April 2024, Quiz Club NITW
Q-Factor General Quiz-7th April 2024, Quiz Club NITWQuiz Club NITW
 
Sulphonamides, mechanisms and their uses
Sulphonamides, mechanisms and their usesSulphonamides, mechanisms and their uses
Sulphonamides, mechanisms and their usesVijayaLaxmi84
 
Using Grammatical Signals Suitable to Patterns of Idea Development
Using Grammatical Signals Suitable to Patterns of Idea DevelopmentUsing Grammatical Signals Suitable to Patterns of Idea Development
Using Grammatical Signals Suitable to Patterns of Idea Developmentchesterberbo7
 
Q-Factor HISPOL Quiz-6th April 2024, Quiz Club NITW
Q-Factor HISPOL Quiz-6th April 2024, Quiz Club NITWQ-Factor HISPOL Quiz-6th April 2024, Quiz Club NITW
Q-Factor HISPOL Quiz-6th April 2024, Quiz Club NITWQuiz Club NITW
 
ARTERIAL BLOOD GAS ANALYSIS........pptx
ARTERIAL BLOOD  GAS ANALYSIS........pptxARTERIAL BLOOD  GAS ANALYSIS........pptx
ARTERIAL BLOOD GAS ANALYSIS........pptxAneriPatwari
 
Congestive Cardiac Failure..presentation
Congestive Cardiac Failure..presentationCongestive Cardiac Failure..presentation
Congestive Cardiac Failure..presentationdeepaannamalai16
 
Beauty Amidst the Bytes_ Unearthing Unexpected Advantages of the Digital Wast...
Beauty Amidst the Bytes_ Unearthing Unexpected Advantages of the Digital Wast...Beauty Amidst the Bytes_ Unearthing Unexpected Advantages of the Digital Wast...
Beauty Amidst the Bytes_ Unearthing Unexpected Advantages of the Digital Wast...DhatriParmar
 
Reading and Writing Skills 11 quarter 4 melc 1
Reading and Writing Skills 11 quarter 4 melc 1Reading and Writing Skills 11 quarter 4 melc 1
Reading and Writing Skills 11 quarter 4 melc 1GloryAnnCastre1
 
Concurrency Control in Database Management system
Concurrency Control in Database Management systemConcurrency Control in Database Management system
Concurrency Control in Database Management systemChristalin Nelson
 
Narcotic and Non Narcotic Analgesic..pdf
Narcotic and Non Narcotic Analgesic..pdfNarcotic and Non Narcotic Analgesic..pdf
Narcotic and Non Narcotic Analgesic..pdfPrerana Jadhav
 
How to Make a Duplicate of Your Odoo 17 Database
How to Make a Duplicate of Your Odoo 17 DatabaseHow to Make a Duplicate of Your Odoo 17 Database
How to Make a Duplicate of Your Odoo 17 DatabaseCeline George
 
BIOCHEMISTRY-CARBOHYDRATE METABOLISM CHAPTER 2.pptx
BIOCHEMISTRY-CARBOHYDRATE METABOLISM CHAPTER 2.pptxBIOCHEMISTRY-CARBOHYDRATE METABOLISM CHAPTER 2.pptx
BIOCHEMISTRY-CARBOHYDRATE METABOLISM CHAPTER 2.pptxSayali Powar
 
Grade Three -ELLNA-REVIEWER-ENGLISH.pptx
Grade Three -ELLNA-REVIEWER-ENGLISH.pptxGrade Three -ELLNA-REVIEWER-ENGLISH.pptx
Grade Three -ELLNA-REVIEWER-ENGLISH.pptxkarenfajardo43
 
Oppenheimer Film Discussion for Philosophy and Film
Oppenheimer Film Discussion for Philosophy and FilmOppenheimer Film Discussion for Philosophy and Film
Oppenheimer Film Discussion for Philosophy and FilmStan Meyer
 
Active Learning Strategies (in short ALS).pdf
Active Learning Strategies (in short ALS).pdfActive Learning Strategies (in short ALS).pdf
Active Learning Strategies (in short ALS).pdfPatidar M
 
Grade 9 Quarter 4 Dll Grade 9 Quarter 4 DLL.pdf
Grade 9 Quarter 4 Dll Grade 9 Quarter 4 DLL.pdfGrade 9 Quarter 4 Dll Grade 9 Quarter 4 DLL.pdf
Grade 9 Quarter 4 Dll Grade 9 Quarter 4 DLL.pdfJemuel Francisco
 
Tree View Decoration Attribute in the Odoo 17
Tree View Decoration Attribute in the Odoo 17Tree View Decoration Attribute in the Odoo 17
Tree View Decoration Attribute in the Odoo 17Celine George
 
MS4 level being good citizen -imperative- (1) (1).pdf
MS4 level   being good citizen -imperative- (1) (1).pdfMS4 level   being good citizen -imperative- (1) (1).pdf
MS4 level being good citizen -imperative- (1) (1).pdfMr Bounab Samir
 

Kürzlich hochgeladen (20)

Q-Factor General Quiz-7th April 2024, Quiz Club NITW
Q-Factor General Quiz-7th April 2024, Quiz Club NITWQ-Factor General Quiz-7th April 2024, Quiz Club NITW
Q-Factor General Quiz-7th April 2024, Quiz Club NITW
 
Sulphonamides, mechanisms and their uses
Sulphonamides, mechanisms and their usesSulphonamides, mechanisms and their uses
Sulphonamides, mechanisms and their uses
 
Using Grammatical Signals Suitable to Patterns of Idea Development
Using Grammatical Signals Suitable to Patterns of Idea DevelopmentUsing Grammatical Signals Suitable to Patterns of Idea Development
Using Grammatical Signals Suitable to Patterns of Idea Development
 
INCLUSIVE EDUCATION PRACTICES FOR TEACHERS AND TRAINERS.pptx
INCLUSIVE EDUCATION PRACTICES FOR TEACHERS AND TRAINERS.pptxINCLUSIVE EDUCATION PRACTICES FOR TEACHERS AND TRAINERS.pptx
INCLUSIVE EDUCATION PRACTICES FOR TEACHERS AND TRAINERS.pptx
 
Q-Factor HISPOL Quiz-6th April 2024, Quiz Club NITW
Q-Factor HISPOL Quiz-6th April 2024, Quiz Club NITWQ-Factor HISPOL Quiz-6th April 2024, Quiz Club NITW
Q-Factor HISPOL Quiz-6th April 2024, Quiz Club NITW
 
ARTERIAL BLOOD GAS ANALYSIS........pptx
ARTERIAL BLOOD  GAS ANALYSIS........pptxARTERIAL BLOOD  GAS ANALYSIS........pptx
ARTERIAL BLOOD GAS ANALYSIS........pptx
 
Congestive Cardiac Failure..presentation
Congestive Cardiac Failure..presentationCongestive Cardiac Failure..presentation
Congestive Cardiac Failure..presentation
 
Beauty Amidst the Bytes_ Unearthing Unexpected Advantages of the Digital Wast...
Beauty Amidst the Bytes_ Unearthing Unexpected Advantages of the Digital Wast...Beauty Amidst the Bytes_ Unearthing Unexpected Advantages of the Digital Wast...
Beauty Amidst the Bytes_ Unearthing Unexpected Advantages of the Digital Wast...
 
Mattingly "AI & Prompt Design: Large Language Models"
Mattingly "AI & Prompt Design: Large Language Models"Mattingly "AI & Prompt Design: Large Language Models"
Mattingly "AI & Prompt Design: Large Language Models"
 
Reading and Writing Skills 11 quarter 4 melc 1
Reading and Writing Skills 11 quarter 4 melc 1Reading and Writing Skills 11 quarter 4 melc 1
Reading and Writing Skills 11 quarter 4 melc 1
 
Concurrency Control in Database Management system
Concurrency Control in Database Management systemConcurrency Control in Database Management system
Concurrency Control in Database Management system
 
Narcotic and Non Narcotic Analgesic..pdf
Narcotic and Non Narcotic Analgesic..pdfNarcotic and Non Narcotic Analgesic..pdf
Narcotic and Non Narcotic Analgesic..pdf
 
How to Make a Duplicate of Your Odoo 17 Database
How to Make a Duplicate of Your Odoo 17 DatabaseHow to Make a Duplicate of Your Odoo 17 Database
How to Make a Duplicate of Your Odoo 17 Database
 
BIOCHEMISTRY-CARBOHYDRATE METABOLISM CHAPTER 2.pptx
BIOCHEMISTRY-CARBOHYDRATE METABOLISM CHAPTER 2.pptxBIOCHEMISTRY-CARBOHYDRATE METABOLISM CHAPTER 2.pptx
BIOCHEMISTRY-CARBOHYDRATE METABOLISM CHAPTER 2.pptx
 
Grade Three -ELLNA-REVIEWER-ENGLISH.pptx
Grade Three -ELLNA-REVIEWER-ENGLISH.pptxGrade Three -ELLNA-REVIEWER-ENGLISH.pptx
Grade Three -ELLNA-REVIEWER-ENGLISH.pptx
 
Oppenheimer Film Discussion for Philosophy and Film
Oppenheimer Film Discussion for Philosophy and FilmOppenheimer Film Discussion for Philosophy and Film
Oppenheimer Film Discussion for Philosophy and Film
 
Active Learning Strategies (in short ALS).pdf
Active Learning Strategies (in short ALS).pdfActive Learning Strategies (in short ALS).pdf
Active Learning Strategies (in short ALS).pdf
 
Grade 9 Quarter 4 Dll Grade 9 Quarter 4 DLL.pdf
Grade 9 Quarter 4 Dll Grade 9 Quarter 4 DLL.pdfGrade 9 Quarter 4 Dll Grade 9 Quarter 4 DLL.pdf
Grade 9 Quarter 4 Dll Grade 9 Quarter 4 DLL.pdf
 
Tree View Decoration Attribute in the Odoo 17
Tree View Decoration Attribute in the Odoo 17Tree View Decoration Attribute in the Odoo 17
Tree View Decoration Attribute in the Odoo 17
 
MS4 level being good citizen -imperative- (1) (1).pdf
MS4 level   being good citizen -imperative- (1) (1).pdfMS4 level   being good citizen -imperative- (1) (1).pdf
MS4 level being good citizen -imperative- (1) (1).pdf
 

Photoshop Selections

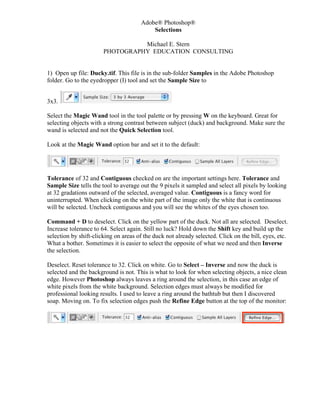
  • 1. Adobe® Photoshop® Selections Michael E. Stern PHOTOGRAPHY EDUCATION CONSULTING 1) Open up file: Ducky.tif. This file is in the sub-folder Samples in the Adobe Photoshop folder. Go to the eyedropper (I) tool and set the Sample Size to 3x3. Select the Magic Wand tool in the tool palette or by pressing W on the keyboard. Great for selecting objects with a strong contrast between subject (duck) and background. Make sure the wand is selected and not the Quick Selection tool. Look at the Magic Wand option bar and set it to the default: Tolerance of 32 and Contiguous checked on are the important settings here. Tolerance and Sample Size tells the tool to average out the 9 pixels it sampled and select all pixels by looking at 32 gradations outward of the selected, averaged value. Contiguous is a fancy word for uninterrupted. When clicking on the white part of the image only the white that is continuous will be selected. Uncheck contiguous and you will see the whites of the eyes chosen too. Command + D to deselect. Click on the yellow part of the duck. Not all are selected. Deselect. Increase tolerance to 64. Select again. Still no luck? Hold down the Shift key and build up the selection by shift-clicking on areas of the duck not already selected. Click on the bill, eyes, etc. What a bother. Sometimes it is easier to select the opposite of what we need and then Inverse the selection. Deselect. Reset tolerance to 32. Click on white. Go to Select – Inverse and now the duck is selected and the background is not. This is what to look for when selecting objects, a nice clean edge. However Photoshop always leaves a ring around the selection, in this case an edge of white pixels from the white background. Selection edges must always be modified for professional looking results. I used to leave a ring around the bathtub but then I discovered soap. Moving on. To fix selection edges push the Refine Edge button at the top of the monitor:
  • 2. Modify the edge with these settings: Click OK. While looking at the Layers Palette, select Command + J and “jump” the selected object (duck) to it’s own separate and new layer. The duck is now on its’ own layer (Layer 1), surrounded by transparency and the original Background is still intact. Neat. To see how clean the edges are, make a new blank layer and fill it with a contrasting color. Hold down the Command key and click on the new layer icon at the bottom of the layers palette: Layer 1 created after being jumped. New blank layer underneath Layer 1.
  • 3. Go to Edit – Fill and make sure black is selected. Click OK. Layers Palette should look like this: Click on Layer 1 to view the edges of the duck. Double click on Layer 1 or Layer 2. After the text box becomes highlighted, rename the layer. Photoshop supports 8,000 layers, so renaming layers is an important part of the workflow.
  • 4. Open Dune.tif. It is in the same folder Ducky.tif was in. Use the Magic Wand and click on a part of the sky or sand. Shift-click on the sky or sand and build up the selection. It works great but wait, there’s more. Deselect and grab the Quick Selection tool beneath the Magic Wand. The Quick Selection tool is the Magic Wand grown up and about enter puberty, powerful but needs constant vigilance. Before using the Quick Selection tool, set up the History Palette first so changes can be tracked and reversed if necessary. The History Palette is a great way to track the work being done. Go to Window – History to bring up the palette. Click on the icon at the upper right of the History Palette to bring up the History Options.
  • 5. Choose as indicated below: If you don’t like what Quick Selection has done, step back in time and begin again. Simple.
  • 6. Back to the Dune.tif image. With the Quick Selection tool active, click on an area and move the cursor across the area. The selected area should be of similar values/colors. Shift + hold will add (remember?) while option/alt + hold will subtract if an area was selected by accident. It takes practice to work with this tool effectively, just like teenagers. Upon completion, go to Refine Edge and (just like before) modify the edges. Try different settings. Follow the duck procedure (sounds painful) and if the edges are unacceptable, step back in the History Palette to begin anew. Click on the number in the Brush box and get the dialog box pictured. Notice where the cursor is set. This is the starting point. Drag across the sand or sky. Open up Selections.jpg. In the Tools palette pick the Lasso (L) tool. Feather set to 0 px. Make a loose selection around the flower. Select the Magic Wand and option-click inside the marching ants marquee. The loose selection has snapped to the edges of the flower. Way cool. Zero Feather.
  • 7. When option-clicking, the cursor becomes a cross with a minus sign attached. Select the Polygonal Lasso (L) tool beneath the freehand Lasso (L) tool. One after the other, click on each corner of the book. When the selection is about to be completed, Photoshop adds a small circle to the tool icon informing you a complete selection is about to occur. This tool is great for working on geometric shapes. Deselect. Select the Rectangular Marquee Tool. (M) Start at a corner and drag out to the opposite edge of the book. Although it is not appropriate for this object, holding down the Shift key when using the marquee tools constrains the proportions to either a square or circle. While keeping the mouse or tablet stylus clicked, hold down the space bar and the selection can be dragged around. After releasing the mouse button, the selection can be moved around as long as the marquee tool is still highlighted in the Tools Palette. Click inside the selection to move otherwise, poof goes the selection. Can you say start over? Or use the History Palette and there it is again. Clever little buggers at Adobe, eh? Select the black oval located on the right side of the document. This will take back and forth movements to resize and reshape the selection borders. Hold down the space bar and move the entire selection. Just for kicks, hold down the Shift key and see the oval snap to a perfect circle. Release the Shift key and all is forgiven. If you have what you like but one or more edges is still a bit off, transform the selection. Go to Select - Transform Selection and the bounding box with corner and side handles appears on screen: Pull out any handle and the marching ants will be resized. Hold down the option key or the command key or both and notice how the bounding box is altered. The marching ants follow the bounding box. Hit return or escape to apply the transformation or cancel the adjustment. Adobe® Photoshop® used with permission of Adobe Systems Incorporated. This is a registered trademark in the US and/or other countries.