![USAGE AND SAFETY PRECAUTIONS
USAGE AND SAFETY PRECAUTIONS
• Pay close attention to the labelling of the battery to
SAFETY PRECAUTIONS make sure you choose the correct type.
• When not using the unit for an extended period,
remove the batteries from the unit.
In this manual, symbols are used to highlight warnings and
• If battery leakage has occurred, wipe the battery
cautions for you to read so that accidents can be prevented.
compartment and the battery terminals carefully to
The meanings of these symbols are as follows:
remove all remnants of battery fluid.
• While using the unit, the battery compartment
This symbol indicates explanations about
cover should be closed.
extremely dangerous matters. If users
Warning ignore this symbol and handle the device
• Environment
the wrong way, serious injury or death could To prevent the risk of fire, electric shock or
result. Warning malfunction, avoid using your MRS-8 in
environments where it will be exposed to:
This symbol indicates explanations about
dangerous matters. If users ignore this • Extreme temperatures
Caution symbol and handle the device the wrong
• Heat sources such as radiators or stoves
way, bodily injury and damage to the • High humidity or moisture
equipment could result. • Excessive dust or sand
• Excessive vibration or shock
Please observe the following safety tips and precautions to
ensure hazard-free use of the MRS-8. • Handling
• Never place objects filled with liquids, such as
vases, on the MRS-8 since this can cause electric
• Power requirements Warning
Since power consumption of this unit is fairly high, shock.
Warning we recommend the use of an AC adapter whenever • Do not place naked flame sources, such as lighted
possible. When powering the unit from batteries, use candles, on the MRS-8 since this can cause fire.
only alkaline types.
The MRS-8 is a precision instrument. Do not exert
[AC adapter operation] undue pressure on the keys and other controls. Also
Caution
• Be sure to use only an AC adapter which supplies take care not to drop the unit, and do not subject it to
9 V DC, 300 mA and is equipped with a quot;center shock or excessive pressure.
minusquot; plug (Zoom AD-0006). The use of an
adapter other than the specified type may damage • Connecting cables and input and output jacks
You should always turn off the power to the MRS-8
the unit and pose a safety hazard.
Caution and all other equipment before connecting or
• Connect the AC adapter only to an AC outlet that
disconnecting any cables. Also make sure to
supplies the rated voltage required by the adapter.
disconnect all connection cables and the power cord
• When disconnecting the AC adapter from the AC
before moving the MRS-8.
outlet, always grasp the adapter itself and do not
pull at the cable.
• Alterations
• During lightning or when not using the unit for an
Never open the case of the MRS-8 or attempt to
extended period, disconnect the AC adapter from
Warning modify the product in any way since this can result in
the AC outlet.
damage to the unit.
[Battery operation]
• Volume
• Use four conventional IEC R6 (size AA) batteries
Do not use the MRS-8 at a loud volume for a long
(alkaline).
Caution time since this can cause hearing impairment.
• The MRS-8 cannot be used for recharging.
2 ZOOM MRS-8](data:image/gif;base64,R0lGODlhAQABAIAAAAAAAP///yH5BAEAAAAALAAAAAABAAEAAAIBRAA7)
Empfohlen
Weitere ähnliche Inhalte
Was ist angesagt?
Was ist angesagt? (14)
Ähnlich wie zoom mrs8
Ähnlich wie zoom mrs8 (20)
Kürzlich hochgeladen
Kürzlich hochgeladen (20)
zoom mrs8
- 1. Operation Manual © ZOOM Corporation Reproduction of this manual, in whole or in part, by any means, is prohibited.
- 2. USAGE AND SAFETY PRECAUTIONS USAGE AND SAFETY PRECAUTIONS • Pay close attention to the labelling of the battery to SAFETY PRECAUTIONS make sure you choose the correct type. • When not using the unit for an extended period, remove the batteries from the unit. In this manual, symbols are used to highlight warnings and • If battery leakage has occurred, wipe the battery cautions for you to read so that accidents can be prevented. compartment and the battery terminals carefully to The meanings of these symbols are as follows: remove all remnants of battery fluid. • While using the unit, the battery compartment This symbol indicates explanations about cover should be closed. extremely dangerous matters. If users Warning ignore this symbol and handle the device • Environment the wrong way, serious injury or death could To prevent the risk of fire, electric shock or result. Warning malfunction, avoid using your MRS-8 in environments where it will be exposed to: This symbol indicates explanations about dangerous matters. If users ignore this • Extreme temperatures Caution symbol and handle the device the wrong • Heat sources such as radiators or stoves way, bodily injury and damage to the • High humidity or moisture equipment could result. • Excessive dust or sand • Excessive vibration or shock Please observe the following safety tips and precautions to ensure hazard-free use of the MRS-8. • Handling • Never place objects filled with liquids, such as vases, on the MRS-8 since this can cause electric • Power requirements Warning Since power consumption of this unit is fairly high, shock. Warning we recommend the use of an AC adapter whenever • Do not place naked flame sources, such as lighted possible. When powering the unit from batteries, use candles, on the MRS-8 since this can cause fire. only alkaline types. The MRS-8 is a precision instrument. Do not exert [AC adapter operation] undue pressure on the keys and other controls. Also Caution • Be sure to use only an AC adapter which supplies take care not to drop the unit, and do not subject it to 9 V DC, 300 mA and is equipped with a quot;center shock or excessive pressure. minusquot; plug (Zoom AD-0006). The use of an adapter other than the specified type may damage • Connecting cables and input and output jacks You should always turn off the power to the MRS-8 the unit and pose a safety hazard. Caution and all other equipment before connecting or • Connect the AC adapter only to an AC outlet that disconnecting any cables. Also make sure to supplies the rated voltage required by the adapter. disconnect all connection cables and the power cord • When disconnecting the AC adapter from the AC before moving the MRS-8. outlet, always grasp the adapter itself and do not pull at the cable. • Alterations • During lightning or when not using the unit for an Never open the case of the MRS-8 or attempt to extended period, disconnect the AC adapter from Warning modify the product in any way since this can result in the AC outlet. damage to the unit. [Battery operation] • Volume • Use four conventional IEC R6 (size AA) batteries Do not use the MRS-8 at a loud volume for a long (alkaline). Caution time since this can cause hearing impairment. • The MRS-8 cannot be used for recharging. 2 ZOOM MRS-8
- 3. USAGE AND SAFETY PRECAUTIONS * MIDI is a registered trademark of Association of Usage Precautions Musical Electronics Industry(AMEI). * SD Logo is a trademark. • Electrical interference For safety considerations, the MRS-8 has been designed to * All trademarks and registered trademarks mentioned provide maximum protection against the emission of in this manual are for identification purposes only and electromagnetic radiation from inside the device, and are not intended to infringe on the copyrighted protection from external interference. However, equipment properties of their respective owners. that is very susceptible to interference or that emits powerful electromagnetic waves should not be placed near the MRS- 8, as the possibility of interference cannot be ruled out entirely. With any type of digital control device, the MRS-8 included, electromagnetic interference can cause malfunctioning and can corrupt or destroy data. Care should be taken to minimize the risk of damage. • Cleaning Use a soft, dry cloth to clean the MRS-8. If necessary, slightly moisten the cloth. Do not use abrasive cleanser, wax, or solvents (such as paint thinner or cleaning alcohol), since these may dull the finish or damage the surface. • Backup The data of MRS-8 can be lost because of malfunction or incorrect operation. Backup your data. • Copyrights Except for personal use, unauthorized recording from copyrighted sources(CDs, records, tapes, video clips, broadcast material and so on) is prohibited. ZOOM Corporation does not bear any liability for injunctions regarding the copyright law infringement. Please keep this manual in a convenient place for future reference. 3 ZOOM MRS-8
- 4. Contents USAGE AND SAFETY Step 4: Mixing . . . . . . . . . . . . . . . . . . . . . . . . 26 PRECAUTIONS . . . . . . . . . . . . . . . . . . . . . 2 4.1 Adjusting volume, panning, and EQ. . . . . . 26 4.2 Applying the send/return effect . . . . . . . . . 27 4.3 Applying the insert effect to a track. . . . . . 28 Introduction . . . . . . . . . . . . . . . . . . . . . . . . 7 Step 5: Mixdown . . . . . . . . . . . . . . . . . . . . . . 29 Introducing the MRS-8 . . . . . . . . . . . . . . 8 5.1 Using the mastering effect . . . . . . . . . . . . . 29 Recorder . . . . . . . . . . . . . . . . . . . . . . . . . . . . . . 8 5.2 Mixdown onto the master track . . . . . . . . . 30 Rhythm section. . . . . . . . . . . . . . . . . . . . . . . . . 9 Reference [Recorder] . . . . . . . . . . . . . . . 32 Mixer . . . . . . . . . . . . . . . . . . . . . . . . . . . . . . . . . .9 Effects . . . . . . . . . . . . . . . . . . . . . . . . . . . . . . . . 9 V-takes . . . . . . . . . . . . . . . . . . . . . . . . . . . . . . 32 Switching V-takes . . . . . . . . . . . . . . . . . . . . . . . . . 32 Names of Parts . . . . . . . . . . . . . . . . . . . . 10 Changing the V-take name . . . . . . . . . . . . . . . . . . 32 Moving to a desired point in the song Front panel . . . . . . . . . . . . . . . . . . . . . . . . . . . .10 (locate function) . . . . . . . . . . . . . . . . . . . . . 35 Rear panel. . . . . . . . . . . . . . . . . . . . . . . . . . . . 11 Setting marks in a song (marker function) . . . . . . . . . . . . . . . . . . . . . . . . . . . . . . . . . . . 35 Connections . . . . . . . . . . . . . . . . . . . . . . 12 Setting a mark . . . . . . . . . . . . . . . . . . . . . . . . . . . . 35 Locating a mark. . . . . . . . . . . . . . . . . . . . . . . . . . . 36 Inserting SD Card and Batteries. . . . . . 13 Deleting a mark . . . . . . . . . . . . . . . . . . . . . . . . . . . 36 Inserting an SD card. . . . . . . . . . . . . . . . . . . . 13 Playing back the same passage repeatedly (A-B repeat function). . . . . . . . . . . . . . . . . . 36 Inserting the batteries . . . . . . . . . . . . . . . . . . 13 Re-recording only a specified region (punch-in/out function) . . . . . . . . . . . . . . . . 37 Power On/Off. . . . . . . . . . . . . . . . . . . . . . 14 Manual punch-in/out . . . . . . . . . . . . . . . . . . . . . . . 37 Power-on. . . . . . . . . . . . . . . . . . . . . . . . . . . . . 14 Auto punch-in/out . . . . . . . . . . . . . . . . . . . . . . . . . 37 Power-off . . . . . . . . . . . . . . . . . . . . . . . . . . . . 14 Recording several tracks on a master track (mixdown function) . . . . . . . . . . . . . . . . . . . 38 Let’s Record . . . . . . . . . . . . . . . . . . . . . . 15 About the master track . . . . . . . . . . . . . . . . . . . . . 38 Master track mixdown steps . . . . . . . . . . . . . . . . . 39 Quick Tour . . . . . . . . . . . . . . . . . . . . . . . . 17 Playing the master track . . . . . . . . . . . . . . . . . . . . 39 Combining multiple tracks on one or two Step 1: Preparations. . . . . . . . . . . . . . . . . . . . 17 tracks (bounce function) . . . . . . . . . . . . . . . 40 1.1 Creating a new project . . . . . . . . . . . . . . . 17 Making bounce settings . . . . . . . . . . . . . . . . . . . . 40 1.2 Selecting the rhythm pattern to use. . . . . 18 Executing bounce recording . . . . . . . . . . . . . . . . . 41 Recording drum/bass sound on audio tracks Step 2: Recording the first track . . . . . . . . . . 20 (rhythm recording) . . . . . . . . . . . . . . . . . . . . 42 2.1 Adjusting input sensitivity. . . . . . . . . . . . . 20 Selecting the recording source . . . . . . . . . . . . . . . 42 2.2 Applying the insert effect . . . . . . . . . . . . . 21 Rhythm recording procedure . . . . . . . . . . . . . . . . 42 2.3 Selecting a track and recording . . . . . . . . 23 Making settings for pre-count operation . . . 43 Step 3: Overdubbing . . . . . . . . . . . . . . . . . . . 25 3.1 Making settings for input sensitivity and insert effect . . . . . . . . . . . . . . . . . . . . . . . . 25 3.2 Selecting a track and recording . . . . . . . . 25 4 ZOOM MRS-8
- 5. Contents Reference [Track Editing] . . . . . . . . . . . 44 Editing rhythm patterns . . . . . . . . . . . . . . . . . 75 Copying a rhythm pattern . . . . . . . . . . . . . . . . . . . 75 Editing a range of data . . . . . . . . . . . . . . . . . . 44 Erasing a rhythm pattern . . . . . . . . . . . . . . . . . . . . 76 Basic steps for range editing. . . . . . . . . . . . . . . . 44 Creating a rhythm song . . . . . . . . . . . . . . . . . 76 Copying a specified range of data. . . . . . . . . . . . 45 Selecting a rhythm song . . . . . . . . . . . . . . . . . . . . 76 Moving a specified range of data . . . . . . . . . . . . 46 Entering pattern information using step input. . . . 77 Erasing a specified range of data . . . . . . . . . . . . 47 Using FAST for pattern information input . . . . . . . 79 Trimming a specified range of data. . . . . . . . . . . 47 Entering chord information . . . . . . . . . . . . . . . . . . 81 Fade-in/fade-out of specified data range . . . . . . 48 Entering other information. . . . . . . . . . . . . . . . . . . 83 Reversing a specified range of audio data . . . . . 49 Playing a rhythm song . . . . . . . . . . . . . . . . . . 84 Editing using V-takes . . . . . . . . . . . . . . . . . . . 50 Editing a rhythm song . . . . . . . . . . . . . . . . . . 85 Basic steps for V-take editing . . . . . . . . . . . . . . . 50 Erasing a V-take . . . . . . . . . . . . . . . . . . . . . . . . . 51 Copying a specified range of measures . . . . . . . 85 Copying a V-take . . . . . . . . . . . . . . . . . . . . . . . . . 51 Transposing the entire rhythm song . . . . . . . . . . 85 Moving a V-take. . . . . . . . . . . . . . . . . . . . . . . . . . 51 Copying a rhythm song . . . . . . . . . . . . . . . . . . . . 86 Exchanging V-takes. . . . . . . . . . . . . . . . . . . . . . . 52 Erasing the rhythm song . . . . . . . . . . . . . . . . . . . 87 Importing a V-take from another project . . . . . . . 52 Assigning a name to a rhythm song . . . . . . . . . . 87 Track capture and swap. . . . . . . . . . . . . . . . . 53 Importing rhythm patterns and rhythm songs from another project . . . . . . . . . . . . . . . . . 88 Capturing a track . . . . . . . . . . . . . . . . . . . . . . . . . 53 Swapping track data . . . . . . . . . . . . . . . . . . . . . . 54 Editing various settings of the rhythm section . . . . . . . . . . . . . . . . . . . . . . . . . . . . . 89 Reference [Mixer] . . . . . . . . . . . . . . . . . . 55 Basic procedure . . . . . . . . . . . . . . . . . . . . . . . . . 89 Changing the length of the pre-count . . . . . . . . . 89 About the mixer . . . . . . . . . . . . . . . . . . . . . . . 55 Changing the metronome volume. . . . . . . . . . . . 90 Assigning input signals to recording Adjusting the sensitivity of the pads . . . . . . . . . . 90 tracks . . . . . . . . . . . . . . . . . . . . . . . . . . . . . . 56 Checking the remaining amount of memory . . . . 90 Adjusting the signal for each track Swapping the left/right pan position . . . . . . . . . . 90 (track parameters) . . . . . . . . . . . . . . . . . . . 59 Linking two tracks (stereo link) . . . . . . . . . . . 60 Reference [Effects] . . . . . . . . . . . . . . . . 91 About the effects . . . . . . . . . . . . . . . . . . . . . . 91 Reference [Rhythm] . . . . . . . . . . . . . . . . 61 Using the insert effect . . . . . . . . . . . . . . . . . . 92 About the rhythm section. . . . . . . . . . . . . . . . 61 About insert effect patches . . . . . . . . . . . . . . . . . 92 Drum kits and bass programs . . . . . . . . . . . . . . . 61 Changing the insert location of the insert Rhythm patterns . . . . . . . . . . . . . . . . . . . . . . . . . 62 effect . . . . . . . . . . . . . . . . . . . . . . . . . . . . . . . . . 93 Rhythm song . . . . . . . . . . . . . . . . . . . . . . . . . . . . 62 Selecting the patch for the insert effect . . . . . . . 93 Rhythm pattern mode and rhythm song Editing an insert effect patch . . . . . . . . . . . . . . . 95 mode . . . . . . . . . . . . . . . . . . . . . . . . . . . . . . . . . 62 Storing or swapping insert effect patches . . . . . 98 Assigning a name to an insert effect patch. . . . . 98 Playing rhythm patterns . . . . . . . . . . . . . . . . . 63 Applying the insert effect only to the monitor Selecting a rhythm pattern . . . . . . . . . . . . . . . . . 63 signal. . . . . . . . . . . . . . . . . . . . . . . . . . . . . . . . . 99 Changing the tempo . . . . . . . . . . . . . . . . . . . . . . 63 Using the send/return effect . . . . . . . . . . . . 100 Changing the drum kit / bass program . . . . . . . . 64 Using the pads to play drum/bass sounds . . . . . 64 About the send/return effect patches . . . . . . . . . 100 Selecting a send/return effect patch . . . . . . . . . . 100 Creating a rhythm pattern . . . . . . . . . . . . . . . 66 Editing a send/return effect patch. . . . . . . . . . . . 100 Preparations . . . . . . . . . . . . . . . . . . . . . . . . . . . . 66 Storing or swapping send/return effect Drum sequence real-time input . . . . . . . . . . . . . . 67 patches . . . . . . . . . . . . . . . . . . . . . . . . . . . . . . . 101 Bass sequence real-time input . . . . . . . . . . . . . . 69 Assigning a name to a send/return effect Drum sequence step input . . . . . . . . . . . . . . . . . 70 patch . . . . . . . . . . . . . . . . . . . . . . . . . . . . . . . . . 102 Bass sequence step input . . . . . . . . . . . . . . . . . . 71 Importing patches from another project . . . . 102 Entering rhythm pattern chord information . . . . . 73 Changing the drum/bass sequence volume level . . . . . . . . . . . . . . . . . . . . . . . . . . . . . . . . . 74 Assigning a name to a rhythm pattern. . . . . . . . . 75 5 ZOOM MRS-8
- 6. Contents Reference [Projects]. . . . . . . . . . . . . . . 104 Troubleshooting. . . . . . . . . . . . . . . . . . . 120 About projects . . . . . . . . . . . . . . . . . . . . . . . 104 Problems during playback. . . . . . . . . . . . . . 120 Working with projects. . . . . . . . . . . . . . . . . . 104 Problems during recording . . . . . . . . . . . . . 120 Basic procedure . . . . . . . . . . . . . . . . . . . . . . . . 104 Problems with effects . . . . . . . . . . . . . . . . . 121 Loading a project . . . . . . . . . . . . . . . . . . . . . . . 105 Problems with the rhythm section . . . . . . . 121 Creating a new project . . . . . . . . . . . . . . . . . . . 105 Problems with MIDI . . . . . . . . . . . . . . . . . . . 121 Copying a project . . . . . . . . . . . . . . . . . . . . . . . 106 Other problems . . . . . . . . . . . . . . . . . . . . . . 122 Erasing a project . . . . . . . . . . . . . . . . . . . . . . . . 106 Changing the project name . . . . . . . . . . . . . . . . 107 Protecting a project . . . . . . . . . . . . . . . . . . . . . . 107 Appendix . . . . . . . . . . . . . . . . . . . . . . . . 123 Specifications. . . . . . . . . . . . . . . . . . . . . . . . 123 Reference [MIDI] . . . . . . . . . . . . . . . . . . 108 Effect Parameters . . . . . . . . . . . . . . . . . . . . 125 About MIDI . . . . . . . . . . . . . . . . . . . . . . . . . . 108 Insert Effect . . . . . . . . . . . . . . . . . . . . . . . . . . . . 125 What you can do using MIDI . . . . . . . . . . . . 108 Send/return Effect . . . . . . . . . . . . . . . . . . . . . . . 133 Making MIDI-related settings . . . . . . . . . . . 108 Effect Patch . . . . . . . . . . . . . . . . . . . . . . . . . 134 Basic procedure . . . . . . . . . . . . . . . . . . . . . . . . 108 Insert Effect . . . . . . . . . . . . . . . . . . . . . . . . . . . . 134 Setting the drum kit/bass program MIDI Send/return Effect . . . . . . . . . . . . . . . . . . . . . . . 139 channel . . . . . . . . . . . . . . . . . . . . . . . . . . . . . . 109 Rhythm Pattern . . . . . . . . . . . . . . . . . . . . . . 140 Turning Timing Clock messages on or off. . . . . 109 Drum Kits/Bass Programs . . . . . . . . . . . . . . 142 Turning Song Position Pointer messages on or Instrument/MIDI note number chart . . . . . . 142 off . . . . . . . . . . . . . . . . . . . . . . . . . . . . . . . . . . 110 Files on SD card . . . . . . . . . . . . . . . . . . . . . 142 Turning Start/Stop/Continue messages on or off . . . . . . . . . . . . . . . . . . . . . . . . . . . . . . . . . . 110 MIDI implementation . . . . . . . . . . . . . . . . . . 143 Turning MIDI Time Code (MTC) messages on or MIDI implementation chart . . . . . . . . . . . . . 144 off . . . . . . . . . . . . . . . . . . . . . . . . . . . . . . . . . . 110 INDEX . . . . . . . . . . . . . . . . . . . . . . . . . . 145 Reference [Other Functions] . . . . . . . 111 Playing several projects continuously (sequence play) . . . . . . . . . . . . . . . . . . . . . 111 Creating a playlist . . . . . . . . . . . . . . . . . . . . . . . 111 Playing a playlist . . . . . . . . . . . . . . . . . . . . . . . . 112 Using the tuner function . . . . . . . . . . . . . . . 114 Using the chromatic tuner . . . . . . . . . . . . . . . . . 114 Using other tuning types . . . . . . . . . . . . . . . . . . 115 Switching the level meter display type . . . . 116 Adjusting the display contrast and backlight . . . . . . . . . . . . . . . . . . . . . . . . . . 116 Changing the SD card . . . . . . . . . . . . . . . . . 117 Formatting an SD card . . . . . . . . . . . . . . . . . 118 Checking the available SD card capacity/ project size . . . . . . . . . . . . . . . . . . . . . . . . . 118 6 ZOOM MRS-8
- 7. Introduction Thank you for selecting the ZOOM MRS-8 MultiTrak Recording Studio (simply called the “MRS-8” in this manual). The MRS-8 is a fascinating product with the following features. • Four major functions in a compact unit The MRS-8 combines an 8-track SD card recorder, effect device, digital mixer, and drum/bass machine in a single unit of amazingly compact dimensions. Everything you need to create music is right there. Use it to pre-produce a song at home or take it into the studio for some serious recording work. The MRS-8 is a great tool that will go anywhere. • Versatile input configuration handles a wide variety of sources In addition to the standard phone type jack, the MRS-8 features a combo type connector that can handle XLR plug leads (balanced) as well as phone plug leads (balanced and unbalanced). Guitar, bass, synthesizer and various other sources as well as microphones and direct boxes can be connected easily. A high-performance microphone is also built in, which is great for recording acoustic guitar or vocals. • Recorder with 8 tracks x 10 virtual takes The recorder section provides four mono tracks and two stereo tracks, resulting in a total of eight tracks. Each track has ten virtual tracks (V-takes). A bounce function lets you play all tracks and record the result on an empty V-take. • Dedicated master track for mixdown The master track is separate from the regular recording tracks and is optimized for mixdown with a minimum of fuss. A sequence play function lets you play the master tracks of multiple songs in succession, which is convenient for moving mixed-down songs onto an external recorder in one go. • Full-function mixer The built-in digital mixer handles the audio tracks and drum/bass sounds and allows adjusting parameters such as level, panning, EQ, and effect intensity. The result is a full-fledged stereo mix to which the input signal can also be added. • Two versatile effects The MRS-8 provides an insert effect for processing the input signal and/or any track, and a send/return effect that is used via the mixer send/return loop. The insert effect can be used as mastering effect for the stereo mix, for adjusting the sound pressure and tonal quality during mixdown. • Rhythm section can be used to provide guide rhythm or accompaniment Realistic PCM sources produce drum and bass sounds that can be played in more than 500 rhythm patterns. By programming a combination of patterns and setting a chord progression, you can build the rhythm accompaniment to an entire song. • Compatible with system-wide synchronization The MIDI OUT connector can supply synchronization messages such as MIDI time code information and MIDI clock information. In combination with a computer, MIDI sequencer or similar device, this lets you create a system with professional-level synchronization. • Built-in tuner with support for various tuning methods Besides the standard chromatic type, the tuner function of the MRS-8 also caters for 7-string guitar, 5-string bass, and other special tuning needs. In order to take full advantage of the MRS-8’s versatile functions and to ensure trouble-free enjoyment, please read this manual carefully. Keep this manual in a safe place together with the warranty card. 7 ZOOM MRS-8
- 8. Introducing the MRS-8 The MRS-8 is internally divided into the following four sections. ● Recorder Recorder Records and plays back audio signals. ● Rhythm section The recorder section of the MRS-8 has eight audio tracks. Uses the internal drum/bass sound source to play (A “track” is a separate section for recording audio data.) rhythms. There are four mono tracks (track 1 – 4) and two stereo tracks (tracks 5/6 and 7/8). Up to 2 tracks can be recorded ● Mixer simultaneously and up to 8 tracks can be played back Mixes the signals from the recorder and the drum/bass simultaneously. sound source into a stereo signal, for output via the output jacks and for mixdown on dedicated master tracks. Each of the tracks has ten switchable virtual tracks (called “V-takes”). For each track, one V-take can be selected for ● Effects recording/playback. Process input signals, recorder playback signals, or drum/ bass sound source signals in various ways, to achieve various sound characteristics. The following diagram shows the relationship and signal flow between each section. Recorder INPUT 1 Track 1 MASTER OUTPUT or Track 2 Built-in Track 3 Insert mic Track 4 effect Tracks 5/6 INPUT 2 Tracks 7/8 To immediately From immediately before Master Track after [MASTER] fader [MASTER] fader To Rhythm section master track Drum sound source Bass sound source DRUM BASS 1 2 3 4 5/6 7/8 MASTER Send/return effect Mixer From master track 8 ZOOM MRS-8
- 9. Introducing the MRS-8 Mixer Currently selected V-take on tracks 1 – 8 and master track The playback signals from the audio tracks and the drum/ V-take bass sounds are sent to the built-in digital mixer to create 1 2 a stereo mix. For each track/sound, parameters such as 3 volume, panning, and 2-band EQ (Hi and Lo) can be 4 5 controlled independently. 6 7 The resulting stereo mix is sent to the output jacks and 8 can be sent to an empty V-take of the master track or any 9 10 other tracks, for mixdown and bounce operation. 1 2 3 4 5/6 7/8 Master track Tracks Effects The recorder section also provides a set of stereo tracks which are separate from the normal audio tracks. This is called the master track. The master track is reserved for use in mixdown. The MRS-8 provides two types of effects: insert effect and send/return effect. These effects have the characteristics described below. Rhythm section ■ Insert effect This effect can be inserted at one of the following three The MRS-8 contains a rhythm section that operates in points in the signal path. sync with the recorder. It offers 511 accompaniment patterns (called “rhythm patterns”) that use the internal (1) Immediately after the input d r u m / b a s s s o u n d g e n e r a t o r. Yo u c a n u s e t h e (2) In the output of any audio track or drum preprogrammed patterns, modify them in part, or create track/bass sound entirely new patterns from scratch. (3) Immediately before the [MASTER] fader Recorder In the default condition, position (1) (immediately after Track 1 input) is selected. When the setting is changed to (2), only Track 2 Track 3 a selected track or drum/bass sound is processed by the effect. When the setting is changed to (3), the final stereo mix can be processed. Rhythm section To mixer Drum sound ■ Send/return effect Rhythm Rhythm Rhythm pattern pattern pattern Bass sound To mixer This effect is internally connected to the send/return loop of the mixer section. The effect includes reverb, chorus and other processing types. HINT The level of the signal supplied to the send/return effect (send level) for each track/sound adjusts the depth of the The drum/bass sound sources can be also played with the pads on the top panel. effect. Raising the send level will produce a deeper effect for that track or sound. You can arrange rhythm patterns in the desired order of playback, and program chords and tempo to create the rhythm accompaniment for an entire song. (This is called a “rhythm song”.) Up to 10 rhythm songs can be created, among which one is selected for editing/playback. 9 ZOOM MRS-8
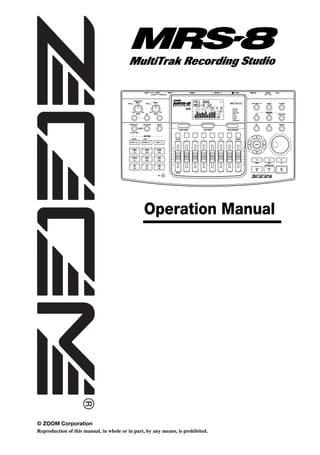
- 10. Names of Parts Front panel Display section Control section Input section Effect section Rhythm section Built-in mic Fader section Transport section Input section Rhythm section [INPUT] controls 1/2 [SONG/PATTERN] key [DRUM/BASS] key [PEAK] indicators [TEMPO] key [MIC] key Pads 1 – 9 INPUT [ON/OFF] keys 1/2 Effect section [INSERT EFFECT] key [INPUT SRC] key [SEND/RETURN] key 10 ZOOM MRS-8
- 11. Names of Parts Display section Control section [SD CARD ACCESS] indicator MARKER [U] / [I] keys Display [AUTO PUNCH I/O] key [BOUNCE] key [A-B REPEAT] key [MARK/CLEAR] key [FUNCTION] key [TRACK PARAMETER] key [SYSTEM/UTILITY] key [EXIT] key [EDIT] key [NEW PROJECT] key Dial Fader section Status keys Cursor keys ([RHYTHM], 1 – 4, 5/6, 7/8, [MASTER]) [ENTER] key Transport section REW [T] key ZERO [U] key FF [Y] key STOP [P] key REC [O] key Faders ([RHYTHM], 1 – 4, 5/6, 7/8, [MASTER]) PLAY [R] key Rear panel INPUT 1/2 MASTER connectors OUTPUT jacks MIDI OUT connector DC 9V jack PHONES jack [POWER ON/OFF] Card slot [PHONES] [INPUT 1 SELECT] switch volume control switch 11 ZOOM MRS-8
- 12. Connections The INPUT 1 connector accepts a standard phone plug cable (unbalanced). The INPUT 2 connector accepts an XLR plug cable (balanced) or a phone plug cable (balanced or unbalanced). MIDI sequencer (computer etc.) Guitar When a passive electric guitar/bass or other instrument with high output impedance is connected to INPUT 1, set the [INPUT 1 SELECT] switch to GUITAR/BASS. When an active electric guitar/bass, a dynamic microphone, synthesizer or other device with low MIDI interface output impedance is connected to INPUT 1, set Bass the [INPUT 1 SELECT] switch to MIC/LINE. MIDI IN Dynamic or condenser microphone Rear panel To power the MRS-8 from an AC outlet, be sure to use only the ZOOM AD-0006 (available separately). Using L another AC adapter can R lead to malfunction and AC adapter damage. Loop the cable of the AC adapter around the hook as shown in the diagram before Synthesizer or sampler etc. connecting it to the [DC 12V] jack. This will prevent the plug from being pulled out When connecting stereo output devices if the AC adaptor cable is accidentally such as a synthesizer or CD player, connect pulled. the L output of the external device to INPUT 1 and the R output to INPUT 2. To monitor the sound with headphones, connect a pair of headphones to the PHONES jack. The listening volume can Headphones be adjusted with the PHONES control. To prevent damage to the speakers of your monitor system, turn off the power of the system connected to the output jacks (or turn the volume all the way down) before you make connections. Monitor system (audio components or amplified speakers etc.) 12 ZOOM MRS-8
- 13. Inserting SD Card and Batteries Inserting an SD card Inserting the batteries For operating the MRS-8, an SD card or a miniSD card The MRS-8 can be powered from batteries. Purchase the with adapter (capacity 16 MB or more) must be inserted correct batteries and insert them as described below. as storage media. Before inserting a card, verify that the 1. Turn the unit over and open the battery write protect feature is turned off. Make sure that power compartment cover. to the MRS-8 is turned off, and then insert the card as shown below. IEC R6 (size AA) battery x 4 MRS-8 bottom view Battery compartment 2. Insert four IEC R6 (size AA) batteries into the compartment. (Use alkaline batteries.) 3. Close the battery compartment cover. NOTE SD card If you are operating the unit on battery power and the indication [ ] appears in the bottom right of the When inserting the card, push it all the way into the slot. display, the batteries are almost exhausted. Replace all four To remove the card, turn power off and then pull the card batteries with fresh ones as soon as possible. out. To remove or insert a card with the power turned on, be sure to follow the procedure described on page 117. Otherwise data may be permanently destroyed. NOTE • If the card is inserted with wrong orientation, it will not go all the way in. Never try to force the card, as this may damage it. 13 ZOOM MRS-8
- 14. Power On/Off To turn the MRS-8 on and off, follow the steps described below. complete, the main screen appears. Power-on HINT 1. • You can also format an SD card after the MRS-8 has started Make sure that the MRS-8 and peripheral up, as described on page 118. equipment is turned off. • Changing the SD card while the MRS-8 is operating is Turn down the volume controls of connected equipment, possible by following the procedure described on page 117. the MRS-8, and the monitor system. 4. Turn on the connected instrument and the 2. Insert an SD card into the card slot. monitor system in that order. 3. Set the [POWER ON/OFF] switch of the MRS-8 to ON. Power-off 1. Turn down the volume at the monitor system. 2. Turn off the monitor system and the connected instrument in that order. 3. Data loading for the inserted SD card starts. During this Set the [POWER ON/OFF] switch of the interval, the [SD CARD ACCESS] indicator lights up. MRS-8 to OFF. The indication “GoodBye See You!” appears on the display and the unit is turned off. Any settings and other information are stored automatically on the SD card. After a while, the following screen appears. PRJ 000 MRS-8 SD • Never turn power on or off by connecting or 0 0 0 1- 1- 0 disconnecting the AC adapter. Otherwise data may be destroyed. • In particular, if you disconnect the AC adapter This is called the main screen. From this screen, you can while the [SD CARD ACCESS] indicator is lit, access various recording and playback functions. all data may be permanently destroyed. HINT To return to the main screen from other screens, press the [EXIT] key repeatedly. If an SD card that is not ready for use in the MRS-8 is inserted, the indication “FORMAT?” appears when you turn the MRS-8 on. If you press the [ENTER] key at this point, the SD card will be formatted. When formatting is 14 ZOOM MRS-8
- 15. Let’s Record This section demonstrates the basics of recording and playback with the MRS-8. As an example, we explain how to record an electric guitar connected to the INPUT 1 connector. 1. Connect the guitar to the INPUT 1 connector and set the [INPUT 1 SELECT] Flickers occasionally switch to GUITAR/BASS (for a passive guitar) or MIC/LINE (for an active guitar). 2. Press the [NEW PROJECT] key in the display section. Verify that the indication “PRJNOxxx (where xxx is the project number) is shown on the first line of the 5. display. Then press the [ENTER] key. Press the [TRACK PARAMETER] key in the display section, and use the cursor left/ right keys to bring up the indication “INPUT” on the first line of the display. A new project is created, and the unit goes into recording standby mode. If necessary, you can edit the project name in this condition (→ p. 105). NOTE 3. Verify that the [MIC] key is flashing or out. If “INPUT” is not shown on the first line of the display, check Then press the INPUT [ON/OFF] key 1 so whether the INPUT [ON/OFF] key is lit. that the key is lit. 6. In this condition, the INPUT 1 connector is active. Use the cursor up/down keys to bring up the following indication on the display. From this screen, you can adjust the input signal recording level (the signal level sent to the track). INPUT 100 REC LVL Recording level setting HINT 7. Turn the dial to adjust the recording level. If the [MIC] key is lit, the built-in microphone is active instead of the INPUT 1 connector. In such a case, press the [MIC] key once to switch the key to flashing status. 4. While playing your guitar, use the [INPUT] control 1 to adjust the input sensitivity. Make the adjustment so that the [PEAK] indicator flickers slightly when you play your instrument at its The current signal level can be checked using the meter loudest volume. 15 ZOOM MRS-8
- 16. Let’s Record in the lower part of the display. Adjust the recording level your instrument along with the rhythm pattern. so that the 0 (dB) segment for IN 1 flashes slightly when the guitar is at maximum volume. 0 (dB) segment Lit in green Lit in red HINT Input 1 recording level • If you do not want a rhythm pattern, select an empty rhythm pattern (→ p. 18) or mute the drum/bass sound (→ p. 19). 8. Press the [EXIT] key repeatedly to return to • In the default condition of a project, the insert effect processes the input signal. You can bypass the effect the main screen. (→ p. 22) or select another effect patch (→ p. 21). 12. When recording is complete, press the STOP [P] key. 9. Press status key 1 repeatedly until the key is lit in red. When a status key is lit in red, the respective audio track (track 1 in this example) is selected as recording The REC [O] key and PLAY [R] key go out, and destination. recording stops. Lit in red 13. To check the recorded contents, press the ZERO [U] key and then press the PLAY [R] key. 10. Operate fader 1 and the [MASTER] fader to adjust the input signal monitor level. Faders 1 – 4, 5/6, and 7/8 adjust the volume for the respective track. When the input signal is sent to a track, By operating the [MASTER] fader you can adjust the the monitor level can be adjusted. The [MASTER] fader volume of the entire song (stereo mix signal level). can be used to adjust the final output level. 14. To cancel the recording condition, press the status key 1 so that the key is lit in green. Lit in green 11. To start recording, press the PLAY [R] key while holding down the REC [O] key. A four-beat pre-count is heard, and recording starts. In the default condition of a project, an 8-beat rhythm pattern is played during recording and playback. Play 16 ZOOM MRS-8
- 17. Quick Tour Now let’s use your MRS-8 to do some actual recording. This Quick Tour describes the five steps that cover the entire process from preparation until the completion of a song. • Step 1: Preparations Step 1: Preparations Shows how to create a new project, select a guide rhythm, and perform other steps necessary for recording. • Step 2: Recording the first track Shows how to record the first track while using the insert 1.1 Creating a new project effect on the input signal. On the MRS-8, song data are managed in units called • Step 3: Overdubbing “projects”. A project comprises recorded audio data as Shows how to record further tracks while listening to a well as various rhythm and effect settings. By loading a track already recorded (overdubbing). project, the same condition as when the song was last saved can be recreated. • Step 4: Mixing Shows how to adjust the level, panning, and EQ of each To start recording with the MRS-8, you must first create track, apply the send/return effect, and mix the recorded a project. material to a pair of stereo tracks. 1. Connect the instrument to record and the • Step 5: Mixdown monitor system to the MRS-8 (→ p. 12). Finally the completed stereo mix is recorded on the master track to create the finished song. 2. Insert the SD card to use for recording (→ p. 13). 3. Turn power on in the order MRS-8 → monitor system. When the MRS-8 starts up, the last handled project is automatically loaded. 4. Press the [NEW PROJECT] key in the display section. When you press the [NEW PROJECT] key from the main screen, the display changes as follows. PRJNo001 Cursor keys that be used PRJ001 In this condition, a new project can be created. The top right of the display shows the cursor keys that can be used on this screen. 17 ZOOM MRS-8
- 18. Quick Tour HINT Rhythm pattern number • When creating a new project, the lowest free project number is automatically selected. 001#117 • It is also possible to create a new project from the project 1 MTNs1Vb menu (→ p. 105). Rhythm pattern name 5. Press the [ENTER] key. A new project is created, and the main screen for audio HINT track recording/playback appears. To return to the main screen from other screens, press the [EXIT] key repeatedly. The [EXIT] key always serves to return to the previous screen. PRJ 001 PRJ001 2. Turn the dial to select a pattern to use as guide rhythm. HINT • When selecting a different project or creating a new project, the project you were working on up to that point is automatically saved. • When performing the power-off procedure for the MRS-8 (→ p. 14), the last project is automatically saved. Up to 511 types of rhythm pattern can be used in a • When creating a new project, you can edit the project name project. (More than 450 of these are preprogrammed.) (→ p. 105). You select a pattern by turning the dial. NOTE When you turn the dial to select another rhythm pattern While the MRS-8 is operating, do not remove the SD card. while a pattern is playing, the new pattern will start after Otherwise data may be destroyed and malfunction may the current pattern has finished. When you select a new occur. If you want to remove the SD card while the MRS-8 is pattern with the cursor up/down keys, the new pattern on, be sure to follow the correct procedure (→ p. 117). begins playing immediately. 1.2 Selecting the rhythm In this example, we will select a simple rhythm pattern as pattern to use guide rhythm for use during recording. If you select for example the rhythm pattern number 510, a 4/4-beat metronome sound is heard. The MRS-8 has a built-in rhythm function that operates in sync with the recorder. This lets you use drum sounds 3. Set the [MASTER] fader to 0 (dB) and press (drum kits) and bass sounds (bass programs) to create the PLAY [R] key in the transport section. repeated rhythm patterns of several measures. By combining various patterns, you can create the rhythm accompaniment for an entire song (rhythm song). This section explains how to select a rhythm pattern for use as guide rhythm during recording. 1. 0dB From the main screen, press the [SONG/ PATTERN] key repeatedly, until the key goes out. The rhythm pattern selection screen appears. The selected rhythm pattern is played in sync with the recorder operation. The [TEMPO] key flashes according to the current tempo setting. 18 ZOOM MRS-8
- 19. Quick Tour • When drum track is selected In the default condition of a project, the sound the bass program (bass track) is muted. Therefore only the drum kit (drum track) is heard when the rhythm pattern plays. HINT During rhythm pattern play, the pads corresponding to the Lit currently produced sound of the drum kit (or pitch of the bass program) are flashing. You can also tap the pads to play the drum sounds/bass notes. • When bass track is selected 4. To change the tempo, press the [TEMPO] key in the rhythm section and then turn the dial to change the tempo value shown on the display. Out TEMPO 1200 BPM= Tempo value The signal level of the respective channel can be checked with the level meter in the lower part of the display. The tempo value can be set in 0.1 BPM steps. When the setting is complete, press the [EXIT] key to return to the Bass track signal level previous screen. Drum track signal level HINT In the same way, the [DRUM/BASS] key can be used to You can also set the tempo by hitting the [TEMPO] key select the sound (drum or bass), and then the [RHYTHM] repeatedly. status key can be used to control muting on/off for the drum track/bass track. 5. To adjust the volume of the drum/bass track, use the [DRUM/BASS] key in the 6. To stop playback, press the STOP [P]key in rhythm section to select the sound (drum or the transport section. bass), and then operate the [RHYTHM] fader. The [RHYTHM] fader serves for controlling either the drum track or the bass track. When the key is lit, the drum track is selected. When the key is out, the bass track is selected. The [RHYTHM] fader then controls the 7. respective level. To return to the main screen, press the [EXIT] key. 19 ZOOM MRS-8
- 20. Quick Tour is selected as input source. Step 2: Recording the first To use two input sources simultaneously, hold down one INPUT [ON/OFF] key while pressing the other one. track In this step, we explain how to select an audio track for recording, how to record while listening to the guide rhythm of the rhythm section, and how to use the insert effect on the input signal. 2.1 Adjusting input sensitivity The INPUT [ON/OFF] keys 1/2 and [MIC] key lighting 1. status with various input selections is shown below. Connect an instrument to the INPUT 1/2 connector. • Input source = INPUT 1 connector The MRS-8 can handle up to two input sources at a time, from INPUT 1, INPUT 2, and the built-in mic. INPUT 1 and the built-in mic are mutually exclusive. A switch selects one of these for use as input source. Lit Flashing Out 2. or out To use the built-in mic, press the [MIC] key in the input section so that the key is lit. • Input source = INPUT 2 connector Out Flashing Lit or out • Input source = Built-in mic When the unit is in a mode where the built-in mic can be used, the [MIC] key in the input section flashes. If you press the key so that it is lit, the built-in mic will be active Lit Lit Out instead of INPUT 1. Depending on the insert effect settings, the built-in mic • Input source = INPUT 1 connector + INPUT 2 may not be available. In this case, the [MIC] key is out. connector [MIC] key [MIC] key [MIC] key [MIC] key [MIC] key [MIC] key lit flashing out lit flashing out Lit Flashing Lit or out Built-in mic is Built-in mic is Built-in mic is Built-in mic is Built-in mic is Built-in mic is active available not available active available not available (INPUT 1 is (INPUT 1 is (INPUT 1 is (INPUT 1 is (INPUT 1 is (INPUT 1 is • Input source = Built-in mic + INPUT 2 inactive) active) active) inactive) active) active) connector 3. Use the INPUT [ON/OFF] keys 1/2 to select the input source. Lit Lit Lit The INPUT [ON/OFF] keys 1/2 control the INPUT 1 connector (or built-in mic) and INPUT 2 connector respectively. When a key is lit, the signal from that input 20 ZOOM MRS-8
- 21. Quick Tour 4. While playing your instrument, adjust the another setting is currently displayed, turn the dial to [INPUT] control for the input(s) selected in select “IN”. step 2, to adjust the input sensitivity. The sensitivity of INPUT 1 and the built-in mic is IN SRC adjusted with the [INPUT] 1 control. The sensitivity of IN INPUT 2 is adjusted with the [INPUT] 2 control. Make adjustments so that the [PEAK] indicator in the 2. Press the [INSERT EFFECT] key in the input section flickers slightly when you play your effect section. instrument at its loudest volume. Flickers occasionally The display changes as follows. From this screen, you can select the insert effect algorithm (combination of effect modules used simultaneously) and patch (effect program). 0 (dB) segment Algorithm name CLEAN Input 1 recording level 0 Standard Patch name Patch number The input signal level can be checked with the level meter IN 1/IN 2 bars in the display. The MRS-8 has eight algorithms with multiple patch selections for each algorithm. To use the insert effect, 2.2 Applying the insert effect select the algorithm first and then call up one of the patches in that algorithm. The insert effect can be applied to a point immediately after the input, to the output of any track, or immediately 3. Use the cursor up/down keys to select the before the [MASTER] fader. The insert effect actually is algorithm. a multi-effect unit that contains a number of single effects (effect modules) such as compressor, distortion, and delay, connected in series. When you apply the insert effect to the input signal, you can record the processed signal on a track. The following steps show how to apply an insert effect suitable for The following algorithms are available. guitar/bass. 1. • CLEAN Press the [INPUT SRC] key in the effect section. • DIST • ACO/BASS SIM (shown on the display as “Ac/ BsSIM”) • BASS These algorithms are suitable for recording guitar/bass. • MIC The indication “IN” (input) appears on the second line of An algorithm suitable for vocals and other microphone the display. In this condition, you can select the insert recordings. effect position. In the default condition of a patch, “IN” is selected. If 21 ZOOM MRS-8
- 22. Quick Tour • LINE HINT An algorithm suitable mainly for recording line-level When “EMPTY” is shown as the patch name, the patch is output instruments such as synthesizer or electric piano. empty. Selecting such a patch will have no effect. • Dual MIC An algorithm for two entirely separate mono input and NOTE mono output channels, for use with two microphones. Depending on the selected algorithm, the input/output signal • MASTERING (shown on the display as routing will change (→ p. 94). “MASTRING”) 5. An algorithm suitable for processing the final stereo To adjust the signal level recorded on a mixdown signal. track, press the [TRACK PARAMETER] key in the control section and then press the INPUT [ON/OFF] key. HINT In the default condition of a project, the CLEAN algorithm is selected for the insert effect. NOTE When a patch of the CLEAN, DIST, ACO/BASS SIM, or BASS algorithms is selected, the built-in mic cannot be used. But when the insert effect is temporarily bypassed, when “CABINET” is selected on the PRE AMP/DRIVE module, or when the module is turned off, you can use the built-in mic. 4. Set the [MASTER] fader to 0 (dB). While playing your instrument to check the The insert effect output level may change according to the sound, use the dial to select the patch. selected patch. When recording with the insert effect applied, you will have to adjust the recording level according to the selected patch. 6. Press the cursor down key repeatedly to bring up the indication “REC LVL” on the 0 dB second line of the display. The display changes as follows. The REC LVL parameter shown on this screen indicates the signal level after passing the insert effect, which will be recorded on the 300 patches can be used with the insert effect. The effect track. type and intensity for a patch can be adjusted as needed. The patches available with the different algorithms are INPUT listed below. 100 REC LVL Algorithm Patch number 0 – 29 CLEAN 7. Turn the dial to adjust the recording level. 0 – 49 DIST 0 – 19 ACO/BASS SIM 8. To return to the main screen, press the 0 – 19 BASS [EXIT] key. 0 – 49 MIC 0 – 49 LINE 0 – 49 DUAL MIC HINT 0 – 29 MASTERING • To record without using the insert effect, press the [INSERT EFFECT] key in the effect section repeatedly until the key goes out. While the key is out, the insert effect is bypassed. 22 ZOOM MRS-8
- 23. Quick Tour • When the insert effect is bypassed for recording, setting the When a status key is red, the track is in the recording REC LVL parameter to 100 (default) results in unity gain (the standby condition and the input signal is assigned to that recording level same as the input level). track. If a mono track (1 – 4) has been selected as recording track, the signal routing will be as follows. 2.3 Selecting a track and Mono track selected recording MASTER 1 One Input source Track 1 Now we will select a track and record the input sound Track 2 (with the insert effect applied) on that track. 1. MASTER 1 From the main screen, repeatedly press the Two Input sources status key of the recording track until the Track 1 key is lit in red. Track 2 Lit in red If a stereo track has been selected as recording track, the signal routing will change as shown below. Except for the V-take selection, the parameters for left/right stereo tracks are set to the same values. This is useful for recording from a stereo source such as a synthesizer or CD player. The audio track status keys are used to select the Stereo track selected recording track and to switch muting for each track on MASTER 7/8 and off. Each time you press a status key, the key will Two Input sources cycle through the following states. Track 7/8 Status key Lit in green Out Lit in red HINT • You can select up to two tracks for recording, either one Mute off Mute on Selected as recording track stereo track or two mono tracks. To select two mono tracks, press the first status key of an odd/even-numbered pair so that it is lit in red, and then hold down that key and press the When all status keys are green, the input signal will not other key so that it also is lit in red. be sent to the tracks and will go directly to the • If the input signal is mono, selecting a pair of stereo tracks as [MASTER] fader. (Panning and send/return effect depth target will ensure that the left/right spread added by certain can be adjusted in this case.) insert effect settings is preserved in recording. 2. Set the fader for the recording track and the Recording track not selected MASTER [MASTER] fader to 0 (dB). Then adjust the One Input source volume of the monitor system while playing Track 1 Track 2 your instrument. 3. To begin recording, press the ZERO [U] MASTER key to return to the beginning of the song. Two Input sources Track 1 Then hold down the REC [O] key and press Track 2 the PLAY [R] key. 23 ZOOM MRS-8
- 24. Quick Tour The track will be played back together with the selected Both keys light up, and a pre-count of 4 beats is heard. guide rhythm from the rhythm section. Then recording will begin. Record the first instrument track while listening to the guide rhythm from the rhythm HINT section. • You can specify a position in minutes/seconds/milliseconds or measures/beats/ticks and move directly to that point (→ p. HINT 35). • The number and the sound of the pre-count clicks can be • By setting marks at the desired points, you can quickly jump changed (→ p. 43). to these points (→ p. 35). • If the input signal is distorted, refer to steps 2.1 and 2.2 to 6. readjust the input sensitivity and recording level. To stop playback, press the STOP [P] key. To redo the recording, repeat steps 3 – 5. 4. When you have finished recording, press 7. the STOP [P] key. When you are satisfied with the recorded The REC [O] key and PLAY [R] key go out, and content, press the status key of the recording will stop. The indication “wait...” is briefly recording track until it is lit in green. shown on the display, and then the main screen reappears. The recording standby condition of the track is canceled. HINT HINT The duration of the “wait...” period may differ. Never turn • A recorded track can be copied, deleted, or edited (→ p. 44). power to the unit off while “wait...” is being shown on the • By switching the V-take for the track on which you have display. Otherwise recorded data may be lost and damage to recorded, you can record again on the track without erasing the unit may occur. the current recording. 5. To listen to the recorded content, press the ZERO [U] key to return to the beginning of the song (counter zero position), and then press the PLAY [R] key. Basic operation of transport keys REW [T] key Moves the current position back in 1-second steps. Movement speed can be increased by holding down the REW [T] key and pressing the FF [Y] key. ZERO [U] key FF [Y] key Returns the recorder to the Moves the current position forward in 1-second steps. start position (counter zero Movement speed can be increased by holding down position). the FF [Y] key and pressing the REW [T] key. STOP [P] key REC [O] key Stops the recorder. If you press the PLAY [R] key while holding down this key, recording starts. Pressing the key during PLAY [R] key playback causes punch-in and pressing the key Starts recorder playback during recording causes punch-out (→p. 37). from the current position. 24 ZOOM MRS-8