Making business from recycled materials
•Download as PPTX, PDF•
2 likes•4,559 views

Training Manual for making curtain beads, paper flowers, junk food pillows, de latang parol ni juan, spoony lampshade and stylistic lantern.

Recommended
More Related Content
What's hot
What's hot (20)
Viewers also liked
Viewers also liked (19)
Similar to Making business from recycled materials
Similar to Making business from recycled materials (20)
Making business from recycled materials
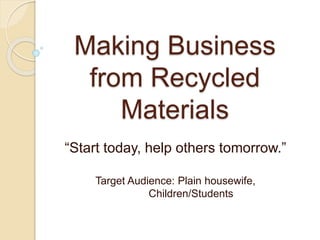
- 1. Making Business from Recycled Materials “Start today, help others tomorrow.” Target Audience: Plain housewife, Children/Students
- 2. OUTLINE: Session 1: Making stylistic beads using paper How to make flowers from magazine/brochure? Session 2: How to make pillow using junk food plastics? How to make “de latang parol”? Session 3: Making lampshade by using plastic spoons How to make lanterns using brochure/magazine?
- 3. General Objectives: To educate, persuade and convince people to build their own small business through using recycled materials o SESSION OBJECTIVES: To influence and help the people to be productive in recycling materials that will benefit them To make the audience to be innovative and artistic by appreciating simple things that comes from trash To provide training in making useful things by using raw materials and creative imagination
- 4. Benefits: Plain Housewife Earn extra income Bring the family closer together Create good values Students/Children Earn extra income Express their creativity Boasting inner self (self-esteem) Socialization Environment Conservation for Nature Reduce, Reuse, Recycle
- 5. INTRODUCTION Have you ever dreamed to have your own business? Don’t you know that you could have it by just using recyclable materials? Starting a business is an easy one, especially when you use your creativity. You can be an effective as well as an efficient businessman/businesswoman through using scarce materials. Beside, you can help the environment through what we called 3R (Reduce, Reuse & Recycle). One more thing is that while putting up this business, you could already make it as a hobby. In that way, you don’t just earn money but you also enjoy yourself. Despite the fact, who would say that putting up a business is an expensive one if you could use available resources around you? You learn to build new things when you imagine making something and believe that everything is possible. Who knows you might succeed in the near future. And by that time, you can now also help others to achieve their own dreamed business.
- 6. MAKING FLOWERS USING THE BROCHURE / MAGAZINES MATERIALS: ◦ 1 PIECE OF STICK ◦ BROCHURE / MAGAZINES ◦ SCISSOR ◦ GLUE
- 7. PROCEDURES: First get a piece magazines / brochure and fold it . Second put the glue at end of the brochure and cut it.
- 8. Third make nine pieces of folded brochure so that you can make a flower.
- 10. MAKING CURTAIN BEADS USING BROCHURE / MAGAZINES MATERIALS: ◦ GLUE ◦ SCISSOR ◦ NEEDLE ◦ THREAD ◦ RULER ◦ PENCIL ◦ 1 PIECE OF BROOM STICK ◦ 1 PIECE OF COTTON
- 11. PROCEDURES: First get the ruler, pencil and the magazine / brochure and raw a triangle and cut it. Second get the broom stick and the piece of brochure and put it in the edge of the brochure and roll it, at the end put the glue at the bottom of it.
- 12. Third, after that if you have made enough beads then you may now make a curtain beads. Fourth get the needle and the thread insert the beads one by one inside the thread using the needle be careful when you inserting the beads inside the thread so that you avoid hurting your self.
- 13. After sewing the beads onto the cotton, you now have a curtain beads.
- 14. PILLOWS JUNK FOOD PLASTICS Materials: Junk foods wrappers Unused clothes Thread and needle Scissor
- 15. Procedures: Wash and dry the junk food wrappers into hot water. Cut the wrapper of the junk foods into small pieces. Draw a two circle and four oblong shape for the head part of the cat figure and then cut out. Weave the two circle that you already cut and also for the two pairs for the ears of the cat. Leave an opened space. Put the small pieces of wrapper inside through the open space until it is already full. Then waive to closed the opened part of your pillow. Draw an eyes and mouth for your pillow to complete the funny image of your pillow.
- 16. DE LATANG PAROL NI JUAN Materials: cleaned, empty tin cans (you can use any size) a hammer an assortment of nails (for larger or smaller holes) paper, pencil, masking tape, scissors (if you plan to use a pattern) votive candles
- 17. Procedures: Wash and dry the empty can. Draw an image you want to be your pattern. Use hammer and nails to make a hole in your can. Follow the pattern you have already drawn. After making a hole , it is now your time to paint ( any colors you want). Make sure the paint is already dry before put in the candle.
- 18. Making lampshade by using plastic spoons Materials: one (1) plastic bottle plastic spoons (at least 50-75 pcs. / much better if with different colors) paint brush paint (different colors) / watercolor glue gun/candle glue stick scissor cutter nylon lighter
- 19. Procedures: 1. First, get a plastic bottle and remove its pointed part through using cutter and scissor. Be sure to cut it straightly and thoroughly to avoid unnecessary problems. 2. Next, make a hole on the bottom side of the bottle depending on how the light bulb you want to put will fit perfectly.
- 20. 3. Third, using the glue gun and the stick glue, begin to attach plastic spoons across the body of the plastic bottle. But before that, you should remove or break the half of its handle. 4. Wait until it is already dry so that the spoons would not be easily removed. (If the spoon is already colored, nothing to do more but polish the edges and you can now put nylon as a handle in its upper part.)
- 21. 5. Fifth, paint/color the plastic spoons using the paint brush. You can draw if you want to, just be sure it will look good. 6. Wait until the paint was already dry. Afterwards, put nylon at the upper part of your bottle so that it would be easy for you to hang it when it was already attach to the light bulb. Tip: It is much better if you will use different colors of spoon for it to be much easier and more attractive.
- 22. HOW TO MAKE “PAROL/LANTERN” THROUGH MAGAZINE/BROCHURE? Materials: magazine/brochure needle thread glue scissor cutter pencil
- 23. Procedures: 1. Get a page of magazine/brochure. Fold it vertically into 4-6 parts depending on how big is the page. 2. Cut it into pieces using cutter to make paper strips. Fold each paper strips vertically into 3 parts. Then, paste the edge of both sides using glue.
- 24. 3. Next, get ten (10) pcs. of strips and make or form stars shape one. Afterwards, using the thread and the needle, start sewing the strips for it to be fix or to be attach to each other. 4. Get five (5) small cutted strips (at least 1/3 of the strips in height). Then, put those pieces inside the flat star you have created through sewing for it to look thicker. Then, set aside.
- 25. 5. Next, get another strips and cut it into half. Put 8-10 pcs. of it into one by sewing and rolling the thread to the body of those papers trips in order to create a flower like decoration. (Create ten (10) pcs. of flower-like decoration for the sides of the stars). Then, use the scissor in cutting the edge of each strip to make it pointed. 6. Afterwards, use the pencil towards creating the flower-like shape by forming first a cylindrical shape inside. Gently hold the middle of each paper strip and press it to its sides following its pointed side. Later on, you may start sewing those flower-like decorations to each pointed side of the star.
- 26. 7. Next, make another two (2) flower-like shapes bigger than what you put to the sides of your star. Put it on the center part of your star to make it more creative.
- 27. 8. Now, for the tail of your lantern, make another six (6) flower-like decoration with different sizes. Since it is a tail, it is much better if the sizes are consecutive to each other. Put those three (3) consecutive sizes flower-like decoration by sewing their end to each other. 9. Finally, attach it to the two (2) pointed side of your star. Put a thread in the upper side of your star to serve as the supporter when you hang it. And just by that, you have already created your own star-shape lantern using magazine/brochure. TIP: It is better if you use drinking straw in making this kind of lantern because straw easily follow a particular form especially when you sew and put it together. It is also much easier since you don’t need to cut and make strips anymore.
- 28. THE END