SlideShare ist ein Scribd-Unternehmen logo
1 von 14
Downloaden Sie, um offline zu lesen
This tutorial will show you the steps to create this simple Flyer using Inkscape.
          Steps
          01: Document Setup
          02: The Oval Tool
          03: Draw Oval
          04: Adjust The Oval
          05: Oval Fill and Stroke
          06: Set No Stroke
          07: Gradient Filled Oval
          08: Add An Image
          09: Add Text
          10: Text Properties
          11: Add More Text
          12: The Bezier Tool
          13: The Path Tool
          14: Text on Path
          15: Downward Curved Text
          16: Format Text
          17: Upward Curved Text
          18: Set No Stroke
          19: The Gradient Tool
          20: Change Gradient Colors
          21: Filter Effects
          22: Rename Filter
          23: Add Effects
          24: Gaussian Blur Connection
          25: Offset Connection
          26: Merge Connection
          27: Gaussian Blur - S D
          28: Offset - Delta X and Y
          29: Apply Drop Shadow
          30: Save File
                                          For a larger image click the link below
                                          Bridal Flyer (400px by 566px)


                         If there is anything that is unclear to you, or you spot any mistakes,
                 please send email to feedback@flyertutor.com Suggestions are always welcome.


                                                     Page 1 of 14
Inkscape Tutorial – Bridal Pageant Boutique Flyer                                               www.flyertutor.com
Step 01: Document Setup
                                                                   Upon
           opening Inkscape, locate the Menu Bar. Select File > New >
           Letter. This will determine the Page Size. Letter is 8.5 by 11
           inches.


           Step 02: The Oval Tool
           Next we will create a
           Gradient Filled Oval.
           Select the Oval Tool       on the Tool Bar.

           Before drawing your Oval, go down to the Color Palette and hold the mouse over the color
                                                                            "Black". Right click and
                                                                            select Set Stroke.

           This will set the Stroke of the Oval to "Black" so that the shape remains
           visible on the page.
           If you wanted to change the Stroke to "Red", you would just do the same steps
           over that color instead.


                                                    Page 2 of 14
Inkscape Tutorial – Bridal Pageant Boutique Flyer                                          www.flyertutor.com
Step 03: Draw Oval
                                     Now hold down the left mouse button and drag your cursor over the
                                     page to create a Large Oval.
                                     You will notice there are "2 Small Squares" and "1 Small Circle"
                                     on the Stroke of the Oval.

                                     The "Square" on the top will adjust the "Height" of the Oval.
                                     The "Square" on the left will adjust the "Width" of the Oval.
                                     The "Small Circle" will adjust the position of the End Point on
                                     the Oval.

                                     Use the "2 Squares" to adjust the Size of the Oval until it almost
           fills the page. Move the mouse over each "Square", hold down the left mouse button and
           drag.

           Step 04: Adjust The Oval
               Next, using the Select Tool, click on the Oval.
           8 Black Arrows will appear around the Oval. Moving any of these arrows will also allow
           you to resize the shape.

           You can move the Oval when you move the mouse over it while it is selected and the cursor
           turns into a 4 Sided Arrow.

           Step 05: Oval Fill and Stroke
           Next go down to the right side of the Color Palette and click on the
           Arrow.

           This will bring up the menu that changes the way colors are displayed.
           In this case, select Gold.


           Now on your new Color Palette pick one of the "Dark Gold" colors,
           right click over it and select Set Fill. This will give you a Gold Oval.

                                You can then move the mouse over the White
                                color on the Color Palette, right click and select
                                Set Stroke.

                                This will change the Stroke to White or you can
                                do the following instead.


                                                     Page 3 of 14
Inkscape Tutorial – Bridal Pageant Boutique Flyer                                             www.flyertutor.com
Step 06: Set No Stroke
                                                              Double click
                                                              on the Fill
                                                              and Stroke
                                                              area at the bottom left of the screen.

                                                              This will bring up the Fill and Stroke
                                                              Window.

                                                              On the Stroke Paint Tab, click on the
                                                                   button. This means No Stroke.


           Step 07: Gradient Filled Oval
           Use the Select Tool      from the Tool Box to select the Oval.

           Then click on the Gradient Tool       to give the Oval a Gradient Fill.

           Move the Gradient Tool to the base of the Oval. Hold down the left mouse button and drag
           the tool up the middle of the Oval up to about 3/4 of the way. Release the mouse.

           Your Gradient Filled Oval should look like this.


                                                    Page 4 of 14
Inkscape Tutorial – Bridal Pageant Boutique Flyer                                               www.flyertutor.com
Step 08: Add An Image
                      Here I downloaded the Image of a Bride from the Microsoft Clipart Gallery
                      Online.

                        You can find Royalty Free Images at www.Clker.com, www.Public-Domain-
                        Image.com, and OpenClipArt.org.


                        To add the Images go to File > Import.

           You can then select where you have the file and click
           Open.
                                       Once you have picked
                                       your desired Image,
                                       place it ontop of the
                                       Oval.


           Step 09: Add Text
           Select the Text Tool     on the Tool Box.

           Then click anywhere on the canvas to start typing. Type the desired block of Text, in this case
           "3425 Marry Way, Bliss, NC 23415 Tel. 567-487-4748 Fax 567-832-4643".

           When typed without any modifications it should look like this:


                                                    Page 5 of 14
Inkscape Tutorial – Bridal Pageant Boutique Flyer                                             www.flyertutor.com
Step 10: Text Properties
           On the Command Bar, select the Text Properties Icon         . This will open the Text and
           Font Window.

           Here you can change the Font Family, Style, Size, Layout and Line Spacing. You will also
           be able to see a Preview of your modifications.


           In this case the Font Family is "AC" which is a free Font that was downloaded at
           www.FontFreak.com.

           Style is Normal. Size is "22". Layout is Center. Click Apply. Click Close.


           The modified text appears as follows:


           Step 11: Add More Text
                                               You can then go on to create all other blocks of Text
                                               and place them on the document in their preferred
                                               places.

                                               The result should be:


                                                    Page 6 of 14
Inkscape Tutorial – Bridal Pageant Boutique Flyer                                             www.flyertutor.com
Step 12: The Bezier Tool
           Now we will put some Curved Text at the bottom of the Oval. This requires creating Text and
           a Curve.

           The Text is "Create the Perfect Day!" Set Font Family to "Gabriola". Set Style to Normal.
           Set Size to "36". Set Layout to Left. Set the Fill to "White" and the Stroke to "Black".

           Go to the Tool Box and click on the Bezier Tool.        Hold the left mouse button down and
           then drag the mouse from Left to Right.

           Stop at about 2 inches then double click at the end of your line. You should have a straight
           line with "2 End Points".

           Step 13: The Path Tool
                                        Select the Path Tool.     Go to the middle of your line, hold
                                        down the left mouse button and drag downward until you get the
                                        desired curve.

           Use the Select Tool to drag this curve to the bottom of the Oval so that you can see how they
           line up. Move the "2 Arrows" in the upper left and right corners toward the Oval to make
           adjustments.


           Step 14: Text on Path
                                             Select both the Text and the Curve with the Select Tool
                                             while holding down the "Shift" Key.

                                             Then go to the Menu Bar and select Text > Put on Path.

                                             Resulting in the following:


                                                    Page 7 of 14
Inkscape Tutorial – Bridal Pageant Boutique Flyer                                              www.flyertutor.com
Step 15: Downward Curved Text
           Next using the Text Tool, click on the beginning of the Text and press
           the Spacebar until Text is Centered.

           Go down to the bottom left of the screen and right-click on the Stroke
           Window and select Remove Stroke.

           This will remove the Stroke from the Path and give you Curved Text
                                         on an invisible Path.


                                           Now the Flyer should look like this.

                                           Only the Title is missing.


           Step 16: Format Text
           To do this we will attempt Gradient Filled Shadowed Text on a Curved Path. First select
           the Text Tool, click anywhere on the canvas and start typing the title of the flyer, in this case
           "Bridal Pageant Boutique".

           Then click on the Text Properties Icon and
           change the Font to Advert, which you can get
           from FontFreak.com, set Size to "48" and Center.

           The Text will look like this:


           Step 17: Upward Curved Text
           Next redo the steps to create Text on a Path, only this time when you are using the Path Tool,
           drag the mouse upward so that you get an
           Upward Facing Curve.

           Remember to move the curve above the Oval to
           make sure it lines up well. It should look this:


                                                     Page 8 of 14
Inkscape Tutorial – Bridal Pageant Boutique Flyer                                                www.flyertutor.com
Step 18: Set No Stroke
                                            Select the Path and go to the Menu Bar.

                                            Click on Object > Fill and Stroke.

                                            This will bring up the Fill and Stroke Window.

                                            Click on the Stroke Paint Tab and then select the

                                            for No Stroke.


           Step 19: The Gradient Tool
           Click on any White area on the canvas, then using the Select Tool, click on the newly curved
           Text again.

            Then select the Gradient Tool, hold the left mouse button down while over the Text and
           drag up through the Center of the Text. It should look like
           this:

           You will notice a "Square" and "Circle" handle on either
           end of the Gradient Line. The line between them is the direction of the Gradient. The
           Handles also allow you to change the Colors of the Gradient.

           Step 20: Change Gradient Colors
           Go down to the Color Palette, click on the Arrow to the right and select Inkscape Default
           from the pop up menu.

           Then click on the "Square Handle" and select one of the Orange Colors on the Color
           Palette. Then select the "Circular Handle" and select
           Yellow.

           The result is:


                                                    Page 9 of 14
Inkscape Tutorial – Bridal Pageant Boutique Flyer                                            www.flyertutor.com
Step 21: Filter Effects
                                              Next we will add a Drop Shadow.

                                              To do this, go to the Objects Menu > Filter Effects.

                                              This will open the Filter Effects Window.


           Step 22: Rename Filter
           To create the Fill Effect, click
           on New. In the Filter
           Column, you will see Filter1.

           To change this Text, right
           click on Filter1 and select
           Rename.

           Type in "Drop Shadow".


                                                    Page 10 of 14
Inkscape Tutorial – Bridal Pageant Boutique Flyer                                          www.flyertutor.com
Step 23: Add Effects
                                                                             Then move over to the
                                                                             Add Effect button, select
                                                                             the down arrow and select
                                                                             3 Effects, Gaussian Blur,
                                                                             Offset and Merge,
                                                                             clicking Add Effect after
                                                                             each one.


           Step 24: Gaussian Blur Connection
           Click on the Little Gray Triangle on the
           right side of Gaussian Blur, while
           holding the left mouse button down, drag a
           line to Source Alpha.


           Step 25 : Offset Connection
                                                             Click on the Offset Triangle and drag to
                                                             Gaussian Blur if this one is not already
                                                             done for you.


           Step 26: Merge Connection
           Connect the First Merge Triangle to Offset
           and the Second Triangle to Source Graphic.


                                                    Page 11 of 14
Inkscape Tutorial – Bridal Pageant Boutique Flyer                                            www.flyertutor.com
Step 27: Gaussian Blur - Standard Deviation
                                                                    Then select the Gaussian
                                                                    Blur Effect and set the
                                                                    Standard Deviation to
                                                                    "10.5" in the Effect
                                                                    Parameters Tab.


           Step 28: Offset - Delta X and Y
           Then select the Offset
           Effect and set Delta X to
           "6.0" and Delta Y to
           "6.0".


                                                    Page 12 of 14
Inkscape Tutorial – Bridal Pageant Boutique Flyer                                  www.flyertutor.com
Step 29: Apply Drop Shadow
                            Click on the Select Tool, click on the Image you want to add the Shadow
                            to, then go back to the Filter Effects Window and select the Check Box
                            for Drop Shadow in the Filter Column.


                                The Shadowed Text will look like this:


           Step 30: Save File
                                                            Use the Text Tool to position the Text above
                                                            the Oval.

                                                            Now you have a completed flyer.

                                                            Go to File > Save.

                                                            It will be saved as a Scalable Vector
                                                            Graphic (svg) file by default.


                                                    Page 13 of 14
Inkscape Tutorial – Bridal Pageant Boutique Flyer                                             www.flyertutor.com
Page 14 of 14
Inkscape Tutorial – Bridal Pageant Boutique Flyer                   www.flyertutor.com

Weitere ähnliche Inhalte

Was ist angesagt?

Inkscape Tutorials: Easter Egg Hunt Flyer
Inkscape Tutorials: Easter Egg Hunt FlyerInkscape Tutorials: Easter Egg Hunt Flyer
Inkscape Tutorials: Easter Egg Hunt FlyerFlyer Tutor
 
How to create tessellations
How to create tessellationsHow to create tessellations
How to create tessellationsJacqui Sharp
 
Adobe After Effects
Adobe After EffectsAdobe After Effects
Adobe After EffectsKat350
 
Getting started
Getting startedGetting started
Getting startedAlex Bong
 
Adobe Photoshop I Primer
Adobe Photoshop I PrimerAdobe Photoshop I Primer
Adobe Photoshop I PrimerNYCCTfab
 
OpenOffice Draw Tutorials: Easter Egg Hunt Flyer
OpenOffice Draw Tutorials: Easter Egg Hunt FlyerOpenOffice Draw Tutorials: Easter Egg Hunt Flyer
OpenOffice Draw Tutorials: Easter Egg Hunt FlyerFlyer Tutor
 
DUSPviz Intro to Photoshop - 2013
DUSPviz Intro to Photoshop - 2013DUSPviz Intro to Photoshop - 2013
DUSPviz Intro to Photoshop - 2013DUSPviz
 
Adobe Illustrator CS6 Primer
Adobe Illustrator CS6 PrimerAdobe Illustrator CS6 Primer
Adobe Illustrator CS6 PrimerNYCCTfab
 
Power Point for the Novice
Power Point for the NovicePower Point for the Novice
Power Point for the Novicelib2012
 
Digital Drawing Assignment Directions & Tutorial
Digital Drawing Assignment Directions & TutorialDigital Drawing Assignment Directions & Tutorial
Digital Drawing Assignment Directions & TutorialMrsM2014
 
Adobe Illustrator CS5 Part 1 : Introduction to Illustrator
Adobe Illustrator CS5 Part 1 : Introduction to IllustratorAdobe Illustrator CS5 Part 1 : Introduction to Illustrator
Adobe Illustrator CS5 Part 1 : Introduction to Illustratorcsula its training
 
Intro to Adobe Photoshop
Intro to Adobe PhotoshopIntro to Adobe Photoshop
Intro to Adobe PhotoshopDUSPviz
 
Drawing In Word Packet
Drawing In Word PacketDrawing In Word Packet
Drawing In Word Packettechmunoz
 

Was ist angesagt? (18)

Inkscape Tutorials: Easter Egg Hunt Flyer
Inkscape Tutorials: Easter Egg Hunt FlyerInkscape Tutorials: Easter Egg Hunt Flyer
Inkscape Tutorials: Easter Egg Hunt Flyer
 
How to create tessellations
How to create tessellationsHow to create tessellations
How to create tessellations
 
08 graphics
08 graphics08 graphics
08 graphics
 
Adobe After Effects
Adobe After EffectsAdobe After Effects
Adobe After Effects
 
Getting started
Getting startedGetting started
Getting started
 
Adobe Photoshop I Primer
Adobe Photoshop I PrimerAdobe Photoshop I Primer
Adobe Photoshop I Primer
 
OpenOffice Draw Tutorials: Easter Egg Hunt Flyer
OpenOffice Draw Tutorials: Easter Egg Hunt FlyerOpenOffice Draw Tutorials: Easter Egg Hunt Flyer
OpenOffice Draw Tutorials: Easter Egg Hunt Flyer
 
Adobe illustrator basics
Adobe illustrator basicsAdobe illustrator basics
Adobe illustrator basics
 
Keynote
KeynoteKeynote
Keynote
 
Text and Extrude
Text and ExtrudeText and Extrude
Text and Extrude
 
DUSPviz Intro to Photoshop - 2013
DUSPviz Intro to Photoshop - 2013DUSPviz Intro to Photoshop - 2013
DUSPviz Intro to Photoshop - 2013
 
Adobe Illustrator CS6 Primer
Adobe Illustrator CS6 PrimerAdobe Illustrator CS6 Primer
Adobe Illustrator CS6 Primer
 
Power Point for the Novice
Power Point for the NovicePower Point for the Novice
Power Point for the Novice
 
Digital Drawing Assignment Directions & Tutorial
Digital Drawing Assignment Directions & TutorialDigital Drawing Assignment Directions & Tutorial
Digital Drawing Assignment Directions & Tutorial
 
Adobe Illustrator CS5 Part 1 : Introduction to Illustrator
Adobe Illustrator CS5 Part 1 : Introduction to IllustratorAdobe Illustrator CS5 Part 1 : Introduction to Illustrator
Adobe Illustrator CS5 Part 1 : Introduction to Illustrator
 
Intro to Adobe Photoshop
Intro to Adobe PhotoshopIntro to Adobe Photoshop
Intro to Adobe Photoshop
 
Drawing In Word Packet
Drawing In Word PacketDrawing In Word Packet
Drawing In Word Packet
 
Picmonkey
PicmonkeyPicmonkey
Picmonkey
 

Ähnlich wie Create a Simple Flyer in Inkscape Using Gradient Fills, Images and Curved Text

OpenOffice Draw Tutorials: Florist Flyer
OpenOffice Draw Tutorials: Florist FlyerOpenOffice Draw Tutorials: Florist Flyer
OpenOffice Draw Tutorials: Florist FlyerFlyer Tutor
 
Inkscape Fall Fest Flyer Tutorial
Inkscape Fall Fest Flyer TutorialInkscape Fall Fest Flyer Tutorial
Inkscape Fall Fest Flyer TutorialFlyer Tutor
 
Corel Draw Tutorial: Florist Flyer
Corel Draw Tutorial: Florist FlyerCorel Draw Tutorial: Florist Flyer
Corel Draw Tutorial: Florist FlyerFlyer Tutor
 
Microsoft Word Tutorial: Bridal Pageant Boutique Flyer
Microsoft Word Tutorial: Bridal Pageant Boutique FlyerMicrosoft Word Tutorial: Bridal Pageant Boutique Flyer
Microsoft Word Tutorial: Bridal Pageant Boutique FlyerFlyer Tutor
 
Adobe Illustrator Tutorials: Digital Photography Flyer
Adobe Illustrator Tutorials: Digital Photography FlyerAdobe Illustrator Tutorials: Digital Photography Flyer
Adobe Illustrator Tutorials: Digital Photography FlyerFlyer Tutor
 
Corel Draw Tutorials: Easter Egg Hunt Flyer
Corel Draw Tutorials: Easter Egg Hunt FlyerCorel Draw Tutorials: Easter Egg Hunt Flyer
Corel Draw Tutorials: Easter Egg Hunt FlyerFlyer Tutor
 
Adobe Illustrator Tutorials: Easter Egg Hunt Flyer
Adobe Illustrator Tutorials: Easter Egg Hunt FlyerAdobe Illustrator Tutorials: Easter Egg Hunt Flyer
Adobe Illustrator Tutorials: Easter Egg Hunt FlyerFlyer Tutor
 
How to Make a Web 2.0 Play Button in Adobe Illustrator CS6
How to Make a Web 2.0 Play Button in Adobe Illustrator CS6How to Make a Web 2.0 Play Button in Adobe Illustrator CS6
How to Make a Web 2.0 Play Button in Adobe Illustrator CS6ZillionDesigns
 
How to add a drop shadow to your product images in Adobe Photoshop
How to add a drop shadow to your product images in Adobe PhotoshopHow to add a drop shadow to your product images in Adobe Photoshop
How to add a drop shadow to your product images in Adobe PhotoshopPixc
 
Microsoft Word 2007 Tutorial: Digital Photography Flyer
Microsoft Word 2007 Tutorial: Digital Photography FlyerMicrosoft Word 2007 Tutorial: Digital Photography Flyer
Microsoft Word 2007 Tutorial: Digital Photography FlyerFlyer Tutor
 
Microsoft Word 2007 Tutorials: Florist Flyer
Microsoft Word 2007 Tutorials: Florist FlyerMicrosoft Word 2007 Tutorials: Florist Flyer
Microsoft Word 2007 Tutorials: Florist FlyerFlyer Tutor
 
how to use design by software.pptx
how to use design by software.pptxhow to use design by software.pptx
how to use design by software.pptxNitinKumar12570
 
Unit 5 Task 4 Tutorial
Unit 5 Task 4 TutorialUnit 5 Task 4 Tutorial
Unit 5 Task 4 Tutorialilyaboj
 
Unit 5 Task 4 Create an Ad
Unit 5 Task 4 Create an AdUnit 5 Task 4 Create an Ad
Unit 5 Task 4 Create an Adilyaboj
 
Educ 215 final- how to guide
Educ 215 final- how to guideEduc 215 final- how to guide
Educ 215 final- how to guidesmemontech
 
AiM Spinner Design Tutorial in Solidworks
AiM Spinner Design Tutorial in SolidworksAiM Spinner Design Tutorial in Solidworks
AiM Spinner Design Tutorial in Solidworksdsp39
 
Microsoft Publisher 2007 Tutorial: Easter Egg Hunt Flyer
Microsoft Publisher 2007 Tutorial: Easter Egg Hunt FlyerMicrosoft Publisher 2007 Tutorial: Easter Egg Hunt Flyer
Microsoft Publisher 2007 Tutorial: Easter Egg Hunt FlyerFlyer Tutor
 
InDesign Part 2
InDesign Part 2InDesign Part 2
InDesign Part 2Sam Georgi
 
MEMBUAT LOGO THE COFFEE SHOP
MEMBUAT LOGO THE COFFEE SHOPMEMBUAT LOGO THE COFFEE SHOP
MEMBUAT LOGO THE COFFEE SHOPDIANTO IRAWAN
 

Ähnlich wie Create a Simple Flyer in Inkscape Using Gradient Fills, Images and Curved Text (20)

OpenOffice Draw Tutorials: Florist Flyer
OpenOffice Draw Tutorials: Florist FlyerOpenOffice Draw Tutorials: Florist Flyer
OpenOffice Draw Tutorials: Florist Flyer
 
Inkscape Fall Fest Flyer Tutorial
Inkscape Fall Fest Flyer TutorialInkscape Fall Fest Flyer Tutorial
Inkscape Fall Fest Flyer Tutorial
 
Corel Draw Tutorial: Florist Flyer
Corel Draw Tutorial: Florist FlyerCorel Draw Tutorial: Florist Flyer
Corel Draw Tutorial: Florist Flyer
 
Microsoft Word Tutorial: Bridal Pageant Boutique Flyer
Microsoft Word Tutorial: Bridal Pageant Boutique FlyerMicrosoft Word Tutorial: Bridal Pageant Boutique Flyer
Microsoft Word Tutorial: Bridal Pageant Boutique Flyer
 
Adobe Illustrator Tutorials: Digital Photography Flyer
Adobe Illustrator Tutorials: Digital Photography FlyerAdobe Illustrator Tutorials: Digital Photography Flyer
Adobe Illustrator Tutorials: Digital Photography Flyer
 
Ed online guide_book_web
Ed online guide_book_webEd online guide_book_web
Ed online guide_book_web
 
Corel Draw Tutorials: Easter Egg Hunt Flyer
Corel Draw Tutorials: Easter Egg Hunt FlyerCorel Draw Tutorials: Easter Egg Hunt Flyer
Corel Draw Tutorials: Easter Egg Hunt Flyer
 
Adobe Illustrator Tutorials: Easter Egg Hunt Flyer
Adobe Illustrator Tutorials: Easter Egg Hunt FlyerAdobe Illustrator Tutorials: Easter Egg Hunt Flyer
Adobe Illustrator Tutorials: Easter Egg Hunt Flyer
 
How to Make a Web 2.0 Play Button in Adobe Illustrator CS6
How to Make a Web 2.0 Play Button in Adobe Illustrator CS6How to Make a Web 2.0 Play Button in Adobe Illustrator CS6
How to Make a Web 2.0 Play Button in Adobe Illustrator CS6
 
How to add a drop shadow to your product images in Adobe Photoshop
How to add a drop shadow to your product images in Adobe PhotoshopHow to add a drop shadow to your product images in Adobe Photoshop
How to add a drop shadow to your product images in Adobe Photoshop
 
Microsoft Word 2007 Tutorial: Digital Photography Flyer
Microsoft Word 2007 Tutorial: Digital Photography FlyerMicrosoft Word 2007 Tutorial: Digital Photography Flyer
Microsoft Word 2007 Tutorial: Digital Photography Flyer
 
Microsoft Word 2007 Tutorials: Florist Flyer
Microsoft Word 2007 Tutorials: Florist FlyerMicrosoft Word 2007 Tutorials: Florist Flyer
Microsoft Word 2007 Tutorials: Florist Flyer
 
how to use design by software.pptx
how to use design by software.pptxhow to use design by software.pptx
how to use design by software.pptx
 
Unit 5 Task 4 Tutorial
Unit 5 Task 4 TutorialUnit 5 Task 4 Tutorial
Unit 5 Task 4 Tutorial
 
Unit 5 Task 4 Create an Ad
Unit 5 Task 4 Create an AdUnit 5 Task 4 Create an Ad
Unit 5 Task 4 Create an Ad
 
Educ 215 final- how to guide
Educ 215 final- how to guideEduc 215 final- how to guide
Educ 215 final- how to guide
 
AiM Spinner Design Tutorial in Solidworks
AiM Spinner Design Tutorial in SolidworksAiM Spinner Design Tutorial in Solidworks
AiM Spinner Design Tutorial in Solidworks
 
Microsoft Publisher 2007 Tutorial: Easter Egg Hunt Flyer
Microsoft Publisher 2007 Tutorial: Easter Egg Hunt FlyerMicrosoft Publisher 2007 Tutorial: Easter Egg Hunt Flyer
Microsoft Publisher 2007 Tutorial: Easter Egg Hunt Flyer
 
InDesign Part 2
InDesign Part 2InDesign Part 2
InDesign Part 2
 
MEMBUAT LOGO THE COFFEE SHOP
MEMBUAT LOGO THE COFFEE SHOPMEMBUAT LOGO THE COFFEE SHOP
MEMBUAT LOGO THE COFFEE SHOP
 

Kürzlich hochgeladen

Benefits of Co working & Shared office space in India
Benefits of Co working & Shared office space in IndiaBenefits of Co working & Shared office space in India
Benefits of Co working & Shared office space in IndiaBrantfordIndia
 
Spiritual Life Quote from Shiva Negi
Spiritual Life Quote from Shiva Negi Spiritual Life Quote from Shiva Negi
Spiritual Life Quote from Shiva Negi OneDay18
 
integrity in personal relationship (1).pdf
integrity in personal relationship (1).pdfintegrity in personal relationship (1).pdf
integrity in personal relationship (1).pdfAmitRout25
 
Virtue ethics & Effective Altruism: What can EA learn from virtue ethics?
Virtue ethics & Effective Altruism: What can EA learn from virtue ethics?Virtue ethics & Effective Altruism: What can EA learn from virtue ethics?
Virtue ethics & Effective Altruism: What can EA learn from virtue ethics?Mikko Kangassalo
 
English basic for beginners Future tenses .pdf
English basic for beginners Future tenses .pdfEnglish basic for beginners Future tenses .pdf
English basic for beginners Future tenses .pdfbromerom1
 
Module-2-Lesson-2-COMMUNICATION-AIDS-AND-STRATEGIES-USING-TOOLS-OF-TECHNOLOGY...
Module-2-Lesson-2-COMMUNICATION-AIDS-AND-STRATEGIES-USING-TOOLS-OF-TECHNOLOGY...Module-2-Lesson-2-COMMUNICATION-AIDS-AND-STRATEGIES-USING-TOOLS-OF-TECHNOLOGY...
Module-2-Lesson-2-COMMUNICATION-AIDS-AND-STRATEGIES-USING-TOOLS-OF-TECHNOLOGY...JeylaisaManabat1
 
ingrediendts needed in preparing dessert and sweet sauces
ingrediendts needed in preparing dessert and sweet saucesingrediendts needed in preparing dessert and sweet sauces
ingrediendts needed in preparing dessert and sweet saucesJessicaEscao
 
The 5 sec rule - Mel Robins (Hindi Summary)
The 5 sec rule - Mel Robins (Hindi Summary)The 5 sec rule - Mel Robins (Hindi Summary)
The 5 sec rule - Mel Robins (Hindi Summary)Shakti Savarn
 
Call Girls Dubai O525547819 Favor Dubai Call Girls Agency
Call Girls Dubai O525547819 Favor Dubai Call Girls AgencyCall Girls Dubai O525547819 Favor Dubai Call Girls Agency
Call Girls Dubai O525547819 Favor Dubai Call Girls Agencykojalkojal131
 

Kürzlich hochgeladen (9)

Benefits of Co working & Shared office space in India
Benefits of Co working & Shared office space in IndiaBenefits of Co working & Shared office space in India
Benefits of Co working & Shared office space in India
 
Spiritual Life Quote from Shiva Negi
Spiritual Life Quote from Shiva Negi Spiritual Life Quote from Shiva Negi
Spiritual Life Quote from Shiva Negi
 
integrity in personal relationship (1).pdf
integrity in personal relationship (1).pdfintegrity in personal relationship (1).pdf
integrity in personal relationship (1).pdf
 
Virtue ethics & Effective Altruism: What can EA learn from virtue ethics?
Virtue ethics & Effective Altruism: What can EA learn from virtue ethics?Virtue ethics & Effective Altruism: What can EA learn from virtue ethics?
Virtue ethics & Effective Altruism: What can EA learn from virtue ethics?
 
English basic for beginners Future tenses .pdf
English basic for beginners Future tenses .pdfEnglish basic for beginners Future tenses .pdf
English basic for beginners Future tenses .pdf
 
Module-2-Lesson-2-COMMUNICATION-AIDS-AND-STRATEGIES-USING-TOOLS-OF-TECHNOLOGY...
Module-2-Lesson-2-COMMUNICATION-AIDS-AND-STRATEGIES-USING-TOOLS-OF-TECHNOLOGY...Module-2-Lesson-2-COMMUNICATION-AIDS-AND-STRATEGIES-USING-TOOLS-OF-TECHNOLOGY...
Module-2-Lesson-2-COMMUNICATION-AIDS-AND-STRATEGIES-USING-TOOLS-OF-TECHNOLOGY...
 
ingrediendts needed in preparing dessert and sweet sauces
ingrediendts needed in preparing dessert and sweet saucesingrediendts needed in preparing dessert and sweet sauces
ingrediendts needed in preparing dessert and sweet sauces
 
The 5 sec rule - Mel Robins (Hindi Summary)
The 5 sec rule - Mel Robins (Hindi Summary)The 5 sec rule - Mel Robins (Hindi Summary)
The 5 sec rule - Mel Robins (Hindi Summary)
 
Call Girls Dubai O525547819 Favor Dubai Call Girls Agency
Call Girls Dubai O525547819 Favor Dubai Call Girls AgencyCall Girls Dubai O525547819 Favor Dubai Call Girls Agency
Call Girls Dubai O525547819 Favor Dubai Call Girls Agency
 

Create a Simple Flyer in Inkscape Using Gradient Fills, Images and Curved Text

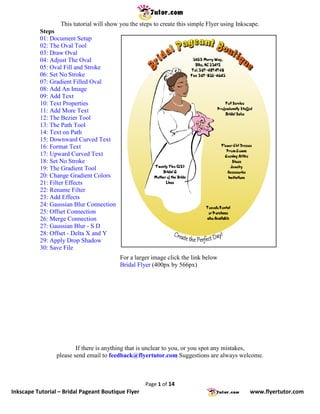
  • 1. This tutorial will show you the steps to create this simple Flyer using Inkscape. Steps 01: Document Setup 02: The Oval Tool 03: Draw Oval 04: Adjust The Oval 05: Oval Fill and Stroke 06: Set No Stroke 07: Gradient Filled Oval 08: Add An Image 09: Add Text 10: Text Properties 11: Add More Text 12: The Bezier Tool 13: The Path Tool 14: Text on Path 15: Downward Curved Text 16: Format Text 17: Upward Curved Text 18: Set No Stroke 19: The Gradient Tool 20: Change Gradient Colors 21: Filter Effects 22: Rename Filter 23: Add Effects 24: Gaussian Blur Connection 25: Offset Connection 26: Merge Connection 27: Gaussian Blur - S D 28: Offset - Delta X and Y 29: Apply Drop Shadow 30: Save File For a larger image click the link below Bridal Flyer (400px by 566px) If there is anything that is unclear to you, or you spot any mistakes, please send email to feedback@flyertutor.com Suggestions are always welcome. Page 1 of 14 Inkscape Tutorial – Bridal Pageant Boutique Flyer www.flyertutor.com
  • 2. Step 01: Document Setup Upon opening Inkscape, locate the Menu Bar. Select File > New > Letter. This will determine the Page Size. Letter is 8.5 by 11 inches. Step 02: The Oval Tool Next we will create a Gradient Filled Oval. Select the Oval Tool on the Tool Bar. Before drawing your Oval, go down to the Color Palette and hold the mouse over the color "Black". Right click and select Set Stroke. This will set the Stroke of the Oval to "Black" so that the shape remains visible on the page. If you wanted to change the Stroke to "Red", you would just do the same steps over that color instead. Page 2 of 14 Inkscape Tutorial – Bridal Pageant Boutique Flyer www.flyertutor.com
  • 3. Step 03: Draw Oval Now hold down the left mouse button and drag your cursor over the page to create a Large Oval. You will notice there are "2 Small Squares" and "1 Small Circle" on the Stroke of the Oval. The "Square" on the top will adjust the "Height" of the Oval. The "Square" on the left will adjust the "Width" of the Oval. The "Small Circle" will adjust the position of the End Point on the Oval. Use the "2 Squares" to adjust the Size of the Oval until it almost fills the page. Move the mouse over each "Square", hold down the left mouse button and drag. Step 04: Adjust The Oval Next, using the Select Tool, click on the Oval. 8 Black Arrows will appear around the Oval. Moving any of these arrows will also allow you to resize the shape. You can move the Oval when you move the mouse over it while it is selected and the cursor turns into a 4 Sided Arrow. Step 05: Oval Fill and Stroke Next go down to the right side of the Color Palette and click on the Arrow. This will bring up the menu that changes the way colors are displayed. In this case, select Gold. Now on your new Color Palette pick one of the "Dark Gold" colors, right click over it and select Set Fill. This will give you a Gold Oval. You can then move the mouse over the White color on the Color Palette, right click and select Set Stroke. This will change the Stroke to White or you can do the following instead. Page 3 of 14 Inkscape Tutorial – Bridal Pageant Boutique Flyer www.flyertutor.com
  • 4. Step 06: Set No Stroke Double click on the Fill and Stroke area at the bottom left of the screen. This will bring up the Fill and Stroke Window. On the Stroke Paint Tab, click on the button. This means No Stroke. Step 07: Gradient Filled Oval Use the Select Tool from the Tool Box to select the Oval. Then click on the Gradient Tool to give the Oval a Gradient Fill. Move the Gradient Tool to the base of the Oval. Hold down the left mouse button and drag the tool up the middle of the Oval up to about 3/4 of the way. Release the mouse. Your Gradient Filled Oval should look like this. Page 4 of 14 Inkscape Tutorial – Bridal Pageant Boutique Flyer www.flyertutor.com
  • 5. Step 08: Add An Image Here I downloaded the Image of a Bride from the Microsoft Clipart Gallery Online. You can find Royalty Free Images at www.Clker.com, www.Public-Domain- Image.com, and OpenClipArt.org. To add the Images go to File > Import. You can then select where you have the file and click Open. Once you have picked your desired Image, place it ontop of the Oval. Step 09: Add Text Select the Text Tool on the Tool Box. Then click anywhere on the canvas to start typing. Type the desired block of Text, in this case "3425 Marry Way, Bliss, NC 23415 Tel. 567-487-4748 Fax 567-832-4643". When typed without any modifications it should look like this: Page 5 of 14 Inkscape Tutorial – Bridal Pageant Boutique Flyer www.flyertutor.com
  • 6. Step 10: Text Properties On the Command Bar, select the Text Properties Icon . This will open the Text and Font Window. Here you can change the Font Family, Style, Size, Layout and Line Spacing. You will also be able to see a Preview of your modifications. In this case the Font Family is "AC" which is a free Font that was downloaded at www.FontFreak.com. Style is Normal. Size is "22". Layout is Center. Click Apply. Click Close. The modified text appears as follows: Step 11: Add More Text You can then go on to create all other blocks of Text and place them on the document in their preferred places. The result should be: Page 6 of 14 Inkscape Tutorial – Bridal Pageant Boutique Flyer www.flyertutor.com
  • 7. Step 12: The Bezier Tool Now we will put some Curved Text at the bottom of the Oval. This requires creating Text and a Curve. The Text is "Create the Perfect Day!" Set Font Family to "Gabriola". Set Style to Normal. Set Size to "36". Set Layout to Left. Set the Fill to "White" and the Stroke to "Black". Go to the Tool Box and click on the Bezier Tool. Hold the left mouse button down and then drag the mouse from Left to Right. Stop at about 2 inches then double click at the end of your line. You should have a straight line with "2 End Points". Step 13: The Path Tool Select the Path Tool. Go to the middle of your line, hold down the left mouse button and drag downward until you get the desired curve. Use the Select Tool to drag this curve to the bottom of the Oval so that you can see how they line up. Move the "2 Arrows" in the upper left and right corners toward the Oval to make adjustments. Step 14: Text on Path Select both the Text and the Curve with the Select Tool while holding down the "Shift" Key. Then go to the Menu Bar and select Text > Put on Path. Resulting in the following: Page 7 of 14 Inkscape Tutorial – Bridal Pageant Boutique Flyer www.flyertutor.com
  • 8. Step 15: Downward Curved Text Next using the Text Tool, click on the beginning of the Text and press the Spacebar until Text is Centered. Go down to the bottom left of the screen and right-click on the Stroke Window and select Remove Stroke. This will remove the Stroke from the Path and give you Curved Text on an invisible Path. Now the Flyer should look like this. Only the Title is missing. Step 16: Format Text To do this we will attempt Gradient Filled Shadowed Text on a Curved Path. First select the Text Tool, click anywhere on the canvas and start typing the title of the flyer, in this case "Bridal Pageant Boutique". Then click on the Text Properties Icon and change the Font to Advert, which you can get from FontFreak.com, set Size to "48" and Center. The Text will look like this: Step 17: Upward Curved Text Next redo the steps to create Text on a Path, only this time when you are using the Path Tool, drag the mouse upward so that you get an Upward Facing Curve. Remember to move the curve above the Oval to make sure it lines up well. It should look this: Page 8 of 14 Inkscape Tutorial – Bridal Pageant Boutique Flyer www.flyertutor.com
  • 9. Step 18: Set No Stroke Select the Path and go to the Menu Bar. Click on Object > Fill and Stroke. This will bring up the Fill and Stroke Window. Click on the Stroke Paint Tab and then select the for No Stroke. Step 19: The Gradient Tool Click on any White area on the canvas, then using the Select Tool, click on the newly curved Text again. Then select the Gradient Tool, hold the left mouse button down while over the Text and drag up through the Center of the Text. It should look like this: You will notice a "Square" and "Circle" handle on either end of the Gradient Line. The line between them is the direction of the Gradient. The Handles also allow you to change the Colors of the Gradient. Step 20: Change Gradient Colors Go down to the Color Palette, click on the Arrow to the right and select Inkscape Default from the pop up menu. Then click on the "Square Handle" and select one of the Orange Colors on the Color Palette. Then select the "Circular Handle" and select Yellow. The result is: Page 9 of 14 Inkscape Tutorial – Bridal Pageant Boutique Flyer www.flyertutor.com
  • 10. Step 21: Filter Effects Next we will add a Drop Shadow. To do this, go to the Objects Menu > Filter Effects. This will open the Filter Effects Window. Step 22: Rename Filter To create the Fill Effect, click on New. In the Filter Column, you will see Filter1. To change this Text, right click on Filter1 and select Rename. Type in "Drop Shadow". Page 10 of 14 Inkscape Tutorial – Bridal Pageant Boutique Flyer www.flyertutor.com
  • 11. Step 23: Add Effects Then move over to the Add Effect button, select the down arrow and select 3 Effects, Gaussian Blur, Offset and Merge, clicking Add Effect after each one. Step 24: Gaussian Blur Connection Click on the Little Gray Triangle on the right side of Gaussian Blur, while holding the left mouse button down, drag a line to Source Alpha. Step 25 : Offset Connection Click on the Offset Triangle and drag to Gaussian Blur if this one is not already done for you. Step 26: Merge Connection Connect the First Merge Triangle to Offset and the Second Triangle to Source Graphic. Page 11 of 14 Inkscape Tutorial – Bridal Pageant Boutique Flyer www.flyertutor.com
  • 12. Step 27: Gaussian Blur - Standard Deviation Then select the Gaussian Blur Effect and set the Standard Deviation to "10.5" in the Effect Parameters Tab. Step 28: Offset - Delta X and Y Then select the Offset Effect and set Delta X to "6.0" and Delta Y to "6.0". Page 12 of 14 Inkscape Tutorial – Bridal Pageant Boutique Flyer www.flyertutor.com
  • 13. Step 29: Apply Drop Shadow Click on the Select Tool, click on the Image you want to add the Shadow to, then go back to the Filter Effects Window and select the Check Box for Drop Shadow in the Filter Column. The Shadowed Text will look like this: Step 30: Save File Use the Text Tool to position the Text above the Oval. Now you have a completed flyer. Go to File > Save. It will be saved as a Scalable Vector Graphic (svg) file by default. Page 13 of 14 Inkscape Tutorial – Bridal Pageant Boutique Flyer www.flyertutor.com
  • 14. Page 14 of 14 Inkscape Tutorial – Bridal Pageant Boutique Flyer www.flyertutor.com