SlideShare a Scribd company logo
How to Create a Google Earth Timeline


  1. Open Google Earth
  2. Click on “add”

        a. Add a “folder” and a box will pop up

        b. Put the name of the person you are creating a timeline for in the
           NAME box. Ex. Marco Polo
        c. Click Done
               i. This will now be a category in the Places box.
  3. In the fly box type in your first location.
  4. When location is shown click the place marker icon (thumb tack)
        a. In the title box type the date for this location or the main idea
           (one word)
        b. In the description box type your facts about the location.
               i. TO ADD A PICTURE on a Dell
                     1. find a picture on the internet. (Google Life has great
                        pictures) http://images.google.com/hosted/life
                     2. click on picture so that it is the full size.
                     3. right click and select “copy image location”
                     4. in the description box type <img src=”
                     5. Paste the image location –no space after “
                     6. at end of link put “>
                           a. EXAMPLE
                     <img src="http://tbn0.google.com/hosted/images/c?
                     q=71b0_landing">
                     7. Click ok
              ii. TO ADD A PICTURE on a Mac
1. find a picture on the internet. (Google Life has great
                      pictures) http://images.google.com/hosted/life
                   2. click on picture so that it is the full size.
                   3. hold ctrl and click. select “copy image location”
                   4. in the description box type <img src=”
                   5. Paste the image location –no space after “ by
                      holding the apple key and v at the same time
                   6. at end of link put “>
                           a. EXAMPLE
                   <img src="http://tbn0.google.com/hosted/images/c?
                   q=71b0_landing">
                   7. Click ok
  5. Repeat steps 3 & 4 for each of your points on your timeline.


HOW TO EDIT AN EXISTING PLACEMARK
                   1. click on placemark
                   2. go to edit
                   3. get info
                   4. edit
                   5. ok

More Related Content

Similar to How To Create A Google Earth Timeline (6)

More than a map
More than a mapMore than a map
More than a map
 
GIS - google earth -placemark - image overlay - screen overlay
GIS - google earth -placemark - image overlay - screen overlay GIS - google earth -placemark - image overlay - screen overlay
GIS - google earth -placemark - image overlay - screen overlay
 
WordPress Child Theme Workshop
WordPress Child Theme WorkshopWordPress Child Theme Workshop
WordPress Child Theme Workshop
 
Multimedia Geography through Google Earth
Multimedia Geography through Google EarthMultimedia Geography through Google Earth
Multimedia Geography through Google Earth
 
Petec Google Earth
Petec Google EarthPetec Google Earth
Petec Google Earth
 
Joomla v-15-squeezebox-in-your-joomla-website
Joomla v-15-squeezebox-in-your-joomla-websiteJoomla v-15-squeezebox-in-your-joomla-website
Joomla v-15-squeezebox-in-your-joomla-website
 

More from Erin Sees

Poster Search Tips Final
Poster Search Tips FinalPoster Search Tips Final
Poster Search Tips Final
Erin Sees
 
Revising in Google Docs
Revising in Google DocsRevising in Google Docs
Revising in Google Docs
Erin Sees
 
Search Strings
Search StringsSearch Strings
Search Strings
Erin Sees
 
Scholar Search
Scholar SearchScholar Search
Scholar Search
Erin Sees
 
Custom Search
Custom SearchCustom Search
Custom Search
Erin Sees
 
Library Book Search
Library Book SearchLibrary Book Search
Library Book Search
Erin Sees
 
Tips Tricks Search
Tips Tricks SearchTips Tricks Search
Tips Tricks Search
Erin Sees
 
Google Earth and Maps
Google Earth and MapsGoogle Earth and Maps
Google Earth and Maps
Erin Sees
 
Searching in Google
Searching in GoogleSearching in Google
Searching in Google
Erin Sees
 

More from Erin Sees (15)

Blogger
BloggerBlogger
Blogger
 
Picasa
PicasaPicasa
Picasa
 
Google Docs
Google DocsGoogle Docs
Google Docs
 
Poster Search Tips Final
Poster Search Tips FinalPoster Search Tips Final
Poster Search Tips Final
 
Revising in Google Docs
Revising in Google DocsRevising in Google Docs
Revising in Google Docs
 
Search Strings
Search StringsSearch Strings
Search Strings
 
Scholar Search
Scholar SearchScholar Search
Scholar Search
 
Custom Search
Custom SearchCustom Search
Custom Search
 
Library Book Search
Library Book SearchLibrary Book Search
Library Book Search
 
Google News
Google NewsGoogle News
Google News
 
Tips Tricks Search
Tips Tricks SearchTips Tricks Search
Tips Tricks Search
 
Web Search
Web SearchWeb Search
Web Search
 
Searching
SearchingSearching
Searching
 
Google Earth and Maps
Google Earth and MapsGoogle Earth and Maps
Google Earth and Maps
 
Searching in Google
Searching in GoogleSearching in Google
Searching in Google
 

Recently uploaded

Recently uploaded (20)

Agentic RAG What it is its types applications and implementation.pdf
Agentic RAG What it is its types applications and implementation.pdfAgentic RAG What it is its types applications and implementation.pdf
Agentic RAG What it is its types applications and implementation.pdf
 
Speed Wins: From Kafka to APIs in Minutes
Speed Wins: From Kafka to APIs in MinutesSpeed Wins: From Kafka to APIs in Minutes
Speed Wins: From Kafka to APIs in Minutes
 
Extensible Python: Robustness through Addition - PyCon 2024
Extensible Python: Robustness through Addition - PyCon 2024Extensible Python: Robustness through Addition - PyCon 2024
Extensible Python: Robustness through Addition - PyCon 2024
 
The Value of Certifying Products for FDO _ Paul at FIDO Alliance.pdf
The Value of Certifying Products for FDO _ Paul at FIDO Alliance.pdfThe Value of Certifying Products for FDO _ Paul at FIDO Alliance.pdf
The Value of Certifying Products for FDO _ Paul at FIDO Alliance.pdf
 
Buy Epson EcoTank L3210 Colour Printer Online.pptx
Buy Epson EcoTank L3210 Colour Printer Online.pptxBuy Epson EcoTank L3210 Colour Printer Online.pptx
Buy Epson EcoTank L3210 Colour Printer Online.pptx
 
How Red Hat Uses FDO in Device Lifecycle _ Costin and Vitaliy at Red Hat.pdf
How Red Hat Uses FDO in Device Lifecycle _ Costin and Vitaliy at Red Hat.pdfHow Red Hat Uses FDO in Device Lifecycle _ Costin and Vitaliy at Red Hat.pdf
How Red Hat Uses FDO in Device Lifecycle _ Costin and Vitaliy at Red Hat.pdf
 
Introduction to FDO and How It works Applications _ Richard at FIDO Alliance.pdf
Introduction to FDO and How It works Applications _ Richard at FIDO Alliance.pdfIntroduction to FDO and How It works Applications _ Richard at FIDO Alliance.pdf
Introduction to FDO and How It works Applications _ Richard at FIDO Alliance.pdf
 
Designing for Hardware Accessibility at Comcast
Designing for Hardware Accessibility at ComcastDesigning for Hardware Accessibility at Comcast
Designing for Hardware Accessibility at Comcast
 
The Metaverse: Are We There Yet?
The  Metaverse:    Are   We  There  Yet?The  Metaverse:    Are   We  There  Yet?
The Metaverse: Are We There Yet?
 
UiPath Test Automation using UiPath Test Suite series, part 2
UiPath Test Automation using UiPath Test Suite series, part 2UiPath Test Automation using UiPath Test Suite series, part 2
UiPath Test Automation using UiPath Test Suite series, part 2
 
Syngulon - Selection technology May 2024.pdf
Syngulon - Selection technology May 2024.pdfSyngulon - Selection technology May 2024.pdf
Syngulon - Selection technology May 2024.pdf
 
Where to Learn More About FDO _ Richard at FIDO Alliance.pdf
Where to Learn More About FDO _ Richard at FIDO Alliance.pdfWhere to Learn More About FDO _ Richard at FIDO Alliance.pdf
Where to Learn More About FDO _ Richard at FIDO Alliance.pdf
 
Free and Effective: Making Flows Publicly Accessible, Yumi Ibrahimzade
Free and Effective: Making Flows Publicly Accessible, Yumi IbrahimzadeFree and Effective: Making Flows Publicly Accessible, Yumi Ibrahimzade
Free and Effective: Making Flows Publicly Accessible, Yumi Ibrahimzade
 
Custom Approval Process: A New Perspective, Pavel Hrbacek & Anindya Halder
Custom Approval Process: A New Perspective, Pavel Hrbacek & Anindya HalderCustom Approval Process: A New Perspective, Pavel Hrbacek & Anindya Halder
Custom Approval Process: A New Perspective, Pavel Hrbacek & Anindya Halder
 
IoT Analytics Company Presentation May 2024
IoT Analytics Company Presentation May 2024IoT Analytics Company Presentation May 2024
IoT Analytics Company Presentation May 2024
 
Optimizing NoSQL Performance Through Observability
Optimizing NoSQL Performance Through ObservabilityOptimizing NoSQL Performance Through Observability
Optimizing NoSQL Performance Through Observability
 
AI revolution and Salesforce, Jiří Karpíšek
AI revolution and Salesforce, Jiří KarpíšekAI revolution and Salesforce, Jiří Karpíšek
AI revolution and Salesforce, Jiří Karpíšek
 
WSO2CONMay2024OpenSourceConferenceDebrief.pptx
WSO2CONMay2024OpenSourceConferenceDebrief.pptxWSO2CONMay2024OpenSourceConferenceDebrief.pptx
WSO2CONMay2024OpenSourceConferenceDebrief.pptx
 
Enterprise Knowledge Graphs - Data Summit 2024
Enterprise Knowledge Graphs - Data Summit 2024Enterprise Knowledge Graphs - Data Summit 2024
Enterprise Knowledge Graphs - Data Summit 2024
 
What's New in Teams Calling, Meetings and Devices April 2024
What's New in Teams Calling, Meetings and Devices April 2024What's New in Teams Calling, Meetings and Devices April 2024
What's New in Teams Calling, Meetings and Devices April 2024
 

How To Create A Google Earth Timeline

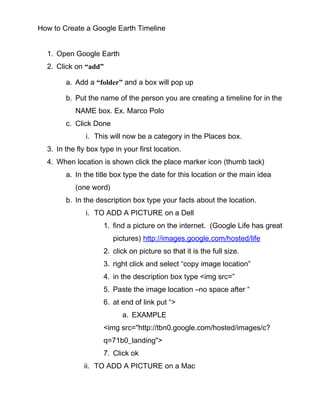
  • 1. How to Create a Google Earth Timeline 1. Open Google Earth 2. Click on “add” a. Add a “folder” and a box will pop up b. Put the name of the person you are creating a timeline for in the NAME box. Ex. Marco Polo c. Click Done i. This will now be a category in the Places box. 3. In the fly box type in your first location. 4. When location is shown click the place marker icon (thumb tack) a. In the title box type the date for this location or the main idea (one word) b. In the description box type your facts about the location. i. TO ADD A PICTURE on a Dell 1. find a picture on the internet. (Google Life has great pictures) http://images.google.com/hosted/life 2. click on picture so that it is the full size. 3. right click and select “copy image location” 4. in the description box type <img src=” 5. Paste the image location –no space after “ 6. at end of link put “> a. EXAMPLE <img src="http://tbn0.google.com/hosted/images/c? q=71b0_landing"> 7. Click ok ii. TO ADD A PICTURE on a Mac
  • 2. 1. find a picture on the internet. (Google Life has great pictures) http://images.google.com/hosted/life 2. click on picture so that it is the full size. 3. hold ctrl and click. select “copy image location” 4. in the description box type <img src=” 5. Paste the image location –no space after “ by holding the apple key and v at the same time 6. at end of link put “> a. EXAMPLE <img src="http://tbn0.google.com/hosted/images/c? q=71b0_landing"> 7. Click ok 5. Repeat steps 3 & 4 for each of your points on your timeline. HOW TO EDIT AN EXISTING PLACEMARK 1. click on placemark 2. go to edit 3. get info 4. edit 5. ok