
Empfohlen
Weitere ähnliche Inhalte
Was ist angesagt?
Was ist angesagt? (20)
Andere mochten auch
Andere mochten auch (20)
Ähnlich wie Checks and splays
Ähnlich wie Checks and splays (20)
Mehr von doogstone
Mehr von doogstone (19)
Checks and splays
- 1. Stonemasonry Department 2012 Checks and Splays Introduction for Stonemasons
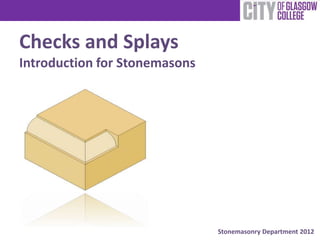
- 2. Cutting a Check Mark check lines on joint of stone and scribe lines across the face and top bed to join the check. Set in both joints using a half inch chisel. Ensure that the check is square before progressing to the next step. Using a teeth tool, cut a V about 5mm- 10mm from the cutting line. Try to get the V as deep as possible without going below the cutting line. On larger checks you may have to do this in stages. Pitch along the face side of the check. The pitch should join to the bottom of the V you cut in the last step. Set in marginal drafts to form the arrises of the check. . Cut the rest of the check using the mel-point, teeth tool and chisel. Ensure that the check is running straight across the joints and square from the top bed and face. .
- 3. Cutting a Splay Mark splay lines on the joints and scribe lines across the face and top bed to join the splays. Make the lines safe using a half inch chisel. Always work away from the line and toward the centre of the splay. Pitch the joints to the working lines. You may wish to support your stone at an angle so that your splay is sitting level. Using marginal drafts, set in the joints, top and bottom of the splay. Rough out the centre section using mel- point and teeth tool. Chisel centre section to flat. Check for flat across the length, width and diagonals of the splay. If splay is to be seen, polish to fine finish.