Using Wordpress with Reclaim Hosting
•
0 likes•789 views

This document provides instructions for setting up a self-hosted WordPress site using Reclaim Hosting. It explains how to create a subdomain, install WordPress, customize settings and content, install themes and plugins, and create a child theme to modify an existing theme without losing changes on updates. The goal is to have a functional WordPress site that can be further customized.

Recommended
More Related Content
What's hot
What's hot (19)
Similar to Using Wordpress with Reclaim Hosting
Similar to Using Wordpress with Reclaim Hosting (20)
More from Cindy Royal
More from Cindy Royal (20)
Recently uploaded
Recently uploaded (20)
Using Wordpress with Reclaim Hosting
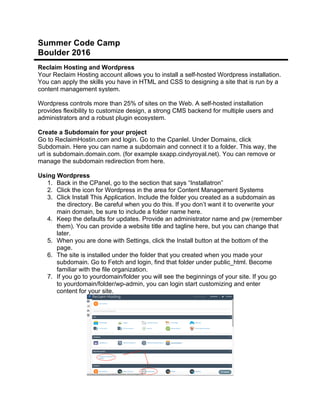
- 1. Summer Code Camp Boulder 2016 Reclaim Hosting and Wordpress Your Reclaim Hosting account allows you to install a self-hosted Wordpress installation. You can apply the skills you have in HTML and CSS to designing a site that is run by a content management system. Wordpress controls more than 25% of sites on the Web. A self-hosted installation provides flexibility to customize design, a strong CMS backend for multiple users and administrators and a robust plugin ecosystem. Create a Subdomain for your project Go to ReclaimHostin.com and login. Go to the Cpanlel. Under Domains, click Subdomain. Here you can name a subdomain and connect it to a folder. This way, the url is subdomain.domain.com. (for example sxapp.cindyroyal.net). You can remove or manage the subdomain redirection from here. Using Wordpress 1. Back in the CPanel, go to the section that says “Installatron” 2. Click the icon for Wordpress in the area for Content Management Systems 3. Click Install This Application. Include the folder you created as a subdomain as the directory. Be careful when you do this. If you don’t want it to overwrite your main domain, be sure to include a folder name here. 4. Keep the defaults for updates. Provide an administrator name and pw (remember them). You can provide a website title and tagline here, but you can change that later. 5. When you are done with Settings, click the Install button at the bottom of the page. 6. The site is installed under the folder that you created when you made your subdomain. Go to Fetch and login, find that folder under public_html. Become familiar with the file organization. 7. If you go to yourdomain/folder you will see the beginnings of your site. If you go to yourdomain/folder/wp-admin, you can login start customizing and enter content for your site.
- 2. Working with Your Custom Wordpress Site Now that you have your Wordpress installation complete, it's time to start using it. If you go to your subdomain (subdomain.yourdomain.com), you can see that the blog is ready to go and what it looks like right now. When you are ready to start customizing it, go to subdomain.yourdomain.com /wp-admin (use your domain name) and login. You will be in the Dashboard of your site. Here you have access to all the admin options of your Wordpress site. In the admin panel, go to Users, Your Profile. Make appropriate changes to the way your name displays, any contact info. You can also change your password here. You should change your Display Name Publicly to your full name.
- 3. Under Settings, General you can change the Site Title, add a tagline and make other changes. At this point, you should also include the name of your site with the domain under Wordpress Address and Site Address. Under Permalinks, I like the choose the “post name”option for the way that links are displayed. Under Writing, Reading , Discussion and Miscellaneous sections, you can change other settings to customize the blog. The Reading section allows you to determine how your blog posts page functions. You can choose to have one or not, and choose whether it is the home page or another page is your home page. If you have installed any plugins that have Settings, you might find those options in this area that allow you to customize your site. Under Posts, you can see the list of posts. The first thing you can do is remove the Hello World post and start adding new posts.
- 4. You can go under Pages and Add and Edit any pages you want on the site. Use the form to add content to the pages. Users – you may add additional users to your blog. Use Add New User Admin Panel. Provide info, password and give them a Role. They can login and change the password later. • Administrator can do everything • Editor – can do anything related to posts, including delete • Author – can only affect their own posts • Contributor – can make posts, but they need to be moderated • Subscriber – has limited access to the site Widgets – you may include a variety of widgets on your site that can add content and/or functionality to your sidebars. Some plugins will introduce new widgets. Simply select a widget, drag it into the area you want it to be located and set the options. Menus – you can use the Menu feature to rearrange your menu items. When you create a new page, it goes in the nav bar. But you might want that page to be part of a dropdown or to be arranged in a different order. You can also add links or categories as items in your nav here, but carefully consider how this will be used.
- 5. You can change the theme under Appearance. Find a very simple theme that can be modified to the desired design. We will be looking at various themes. Find a Bootstrap- based theme that you can modify. Use the search feature under Add Themes and search for Bootstrap. If your theme has other options, they may be available under Appearance (theme options, menus, header background, etc) You cannot use an Editor or the Plugins on a Wordpress.com site. There is much flexibility in having a self-hosted Wordpress blog. Themes Themes use HTML, CSS and PHP to determine the look of the site. Since you are just modifying code, you don't need to be a coding expert, just someone who understands how to troubleshoot. You can set new themes or download new themes from the thousands that are available on the Web. You can get more themes by installing them from the Wordpress Themes directory. You can peruse the site, see the look and features and select and install one. Choose Install Themes to automatically install a theme. Make sure you find well designed, updated themes to install on your blog. Take a look at your blog to see how it looks with the new theme.
- 6. Customizing a theme codex.wordpress.org provides all information about Wordpress templates. The Using Themes page does a good job of describing the template files and how they work together (http://codex.wordpress.org/Using_Themes) . The Template Tags page describes all the PHP tags used in a Wordpress theme (http://codex.wordpress.org/Template_Tags). Modifying CSS We already know CSS. So you can go into the CSS to change the style of the blog. Under Appearance, choose Editor. You can see all the template files. And you will use the Inspect Element feature of your browser to determine which styles to change. There may be multiple css pages, but start with style.css. Look for the sections you want to change. Feel free to experiment. Change things and see what it effects, colors, fonts, sizes, etc. You can change the header in the header area, if your template has that. Or you can change it in CSS by modifying the background property of the header div. Child Themes WordPress recommends creating a child theme any time you make modifications to a theme. By creating a child theme, you avoid losing all youremail-group modifications when the original designer updates the theme. The original designer might be updating a theme for security reasons, or to be compliant with new standards, so being able to retain your changes and work when that happens is important.
- 7. Let’s say your theme is called xyz. Be careful to change everything specifically to the name of your theme, particularly the template. Include your own url as the Author URI. 1. On your server, go to wp-content/themes. You should see a listing of the WordPress themes you have installed, including xyz. 2. Create a folder in that folder called xyz-child. 3. Create a stylesheet in that folder called style.css. 4. Add the following code to style.css, replacing your own themes name: /* Theme Name: XYZ Child Theme URI: http://example.com/xyz-child/ Description: XYZ Child Theme Author: Jane Doe Author URI: http://example.com Template: xyz Version: 1.0.0 */ @import url("../xyz/style.css"); /* =Theme customization starts here ----------------------------------------- --------------------- */ 5. Log in to your site’s dashboard, and go to Appearance > Themes. You will see your Child Theme listed there. Test it first with the Live Preview. 6. Click Activate. Now when you go to the editor, you will see your new stylesheet. Styles you modify here will take precedenct the styles in the theme’s stylesheet. If you want to modify other files in the theme, you can add the modified files to your XYZ Child Theme. These can be related PHP files or other stylesheets. Plugins – Plugins allow you to add a range of functionality to your site, things like different types of social media widgets, social sharing features and slideshows and content sliders. Every plugin functions differently, so you must read the instructions to apply it. There are thousands of plugins. We will cover a few popular ones, but you will be expected to seek out and apply your own. More to come. Wordpress.org/showcase – gallery of sites hosted by Wordpress as a CMS. There are also plugins that will create Child Themes for you.