Getting started with_dlm[1]
•
2 likes•589 views

Use your Downline Manager Reports to provide the best possible service to your team members. Learn how these reports can help you grow your Avon Leadership business.

Recommended
More Related Content
Recently uploaded
Recently uploaded (20)
Featured
Featured (20)
Getting started with_dlm[1]
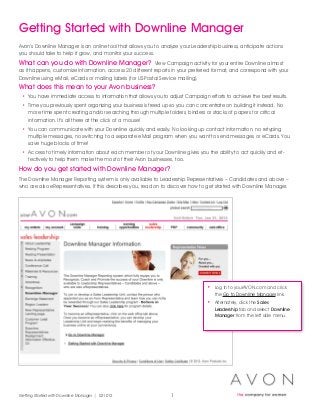
- 1. Getting Started with Downline Manager Avon’s Downline Manager is an online tool that allows you to analyze your Leadership business, anticipate actions you should take to help it grow, and monitor your success. What can you do with Downline Manager? View Campaign activity for your entire Downline almost as it happens, customize information, access 20 different reports in your preferred format, and correspond with your Downline using eMail, eCards or mailing labels (for US Postal Service mailing). What does this mean to your Avon business? • You have immediate access to information that allows you to adjust Campaign efforts to achieve the best results. • Time you previously spent organizing your business is freed up so you can concentrate on building it instead. No more time spent creating and/or searching through multiple folders, binders or stacks of papers for critical information. It’s all there at the click of a mouse! • You can communicate with your Downline quickly and easily. No looking up contact information, no retyping multiple messages, no switching to a separate eMail program when you want to send messages or eCards. You save huge blocks of time! • Access to timely information about each member of your Downline gives you the ability to act quickly and ef-fectively to help them make the most of their Avon businesses, too. How do you get started with Downline Manager? The Downline Manager Reporting system is only available to Leadership Representatives – Candidates and above – who are also eRepresentatives. If this describes you, read on to discover how to get started with Downline Manager. • Log in to yourAVON.com and click the Go to Downline Manager link. • Alternately, click the Sales Leadership tab and select Downline Manager from the left side menu. Getting Started with Downline Manager | 021012 1
- 2. Getting Started with Downline Manager – Home Page When you log into the Downline Manager, the Home page displays. Through the graphs, statistics, action items and links on the Home page, you have real-time access to information about the Downlines in your Leadership Unit – 24/7. The Home page is organized by: Summary Graphs The Total Representatives and Total Unit Sales graphs show your Leadership Unit’s achievements for the previous 6 Campaigns. The Total Unit Sales graph also compares the totals with the same Campaigns from the previous year. HINT: You can save or email a summary graph by using your mouse right-click options. Statistics Panels Panels summarize activity for the Current and Next Campaigns - a Campaign breakdown of your achievements and your first, second, and third generation. This information is updated daily so you can quickly gauge your Leadership Units’ health through-out the current Campaign and into the next Campaign. The Closed Campaign Comparison panel allows you to select any two Campaigns that have closed in the prior year and compare results. Action Items Updated on a daily basis, Action Items are based on the activity in your Leadership Unit for the current and previous Campaign. The action items are direct links to Reports that you can use to contact your Representatives or use as a starting point for more analysis. Click on any item in the list to display the related report. Reports and Saved Reports Each Downline Manager report contains information for the Representatives in your first, second, and/or third generation who match specific criteria. Default Reports contain pre-defined information, but you also can customize the criteria so you can better analyze your Leadership Unit. To view a Report, click a link in the Reports list on the Home page, or select from the Leadership Reports drop menu at the top of the page*. Top Menu The top menu gives you direct access to information and tools available to you through Downline Manager. When you are finished working with Downline Manager. Click Log Out to end your session. Getting Started with Downline Manager | 021012 2
- 3. Getting Started with Downline Manager – Reports When you work with a report in Avon’s Downline Manager, you’ll usually follow 5 steps: STEP 1: Select the Report* You can access reports in 3 ways through Downline Manager: A. Mouse over the Customize a Report tab in the top menu and Click a report from the drop menu. • This displays a criteria screen that allows you to define the report parameters. • Select the display and customize the format of the report so the information is sorted to your preference. • Use the information in the report to plan longer-term action plans. B. Mouse over the Avon Generated Reports tab in the top menu and Click a report from the drop menu. C. Click an Action Item report link from the list in the Action Items panel on the Home page. • Action Item links display reports of Representatives who match specific action item criteria. • The report displays as a web page that you can use to take immediate action. D. Click on a new or saved report link from the panels on the Home page. • This displays the same criteria screen accessed through (A). NOTE: See page 6 for details about the types of available reports. A B C D Getting Started with Downline Manager | 021012 3
- 4. Getting Started with Downline Manager – Reports STEP 2: Customize the report criteria The selection screen allows you to customize criteria to make the report broader or more focused. Each report selection screen has criteria that are relevant to that report. • Click the drop-down arrow on the side of the criteria to display a list of choices, and then click the choice you want. Nesting Opt-in: An indicator of whether an Upline has opted in to the Nesting Program. Nesting Opt-in indicator can be found in different reports. For detailed instructions on using this report, click Report Help here. STEP 3: Choose the desired data format You can view a report in a variety of data formats: • Web Page • Adobe PDF • Excel • Mailing Labels (Avery 5160 or those w/o eMail) NOTE: See page 6 for details about the report data formats. For detailed instructions on using this feature, click Report Help here. Getting Started with Downline Manager | 021012 4
- 5. Getting Started with Downline Manager – Reports STEP 4: Change the format of the report (OPTIONAL) In addition to defining the criteria for a report (STEP 2), you can specify how the information should appear on the report. Click the Format button at the bottom of the report criteria screen. • Check the fields you want included in the report. • Define up to 3 levels of sorting with the “Sort By” drop menus. • Specify whether the results are displayed in ascending or descending order. • Click the Reset button at the bottom of the page to return to the default report selections. When you are finished customizing the format options, click the Return to Next Step button to return to the report criteria page. STEP 5: Show the Report After defining the parameters and data format for the report, click the Show Report button at the bottom of the report criteria page. • Click Report Help to review information about the report you’re viewing. • Click Edit Report to change the search criteria and create a new report. • Click Home to stop viewing the report and return to the home page. • Select another format from the drop menu and Click Run Report to view the report in a different format. • Click Send Bulk EMail to send a message to Representatives who have an eMail address. • Click Send Ecard to send an eCard to Representatives who have an eMail address. • Click the column heading of a web based report and it will be sorted according to that column. NOTE: Report format, size of your Downline and modem speed will affect how quickly the report results are displayed. Getting Started with Downline Manager | 021012 5 For detailed instructions on using this feature, click Help here.
- 6. Types of Reports With Downline Manager you have access to 20 different reports. Each of these contains specific information and/ or data about the Representatives in your Downline and is either updated daily or at the close of each Campaign: • Avon Anniversaries lists your Downlines based on the number of years they have been with Avon. Updated daily. • Avon Generated Report allows Avon to upload Upline specific reporting. These are various reports that Avon generates for you so you can see your own and your Downline members’ performance results that are currently offered via Customize a Report. eg. BIYS bonus payouts & clocks, incentive goals, marketing promos, etc. • Birthdays lists your Downlines based on their birthday. Updated daily. • Follow-Up lists Representatives in your first, second, and/or third generation who have not yet submitted an order up to 3 days prior to their RPS update. Updated daily. • Geographic Search enables you to search for Representatives in your first, second, and/or third generation who are within a geographic radius of a specific zip code. Updated daily. • Hold Orders lists Representatives in your first, second, and/ or third generation who have a hold on their account because of a past due amount. Updated daily. • Leadership Performance lists Leadership Representatives, their achievements, and those of their Downline during a specific Campaign range. • Nested Downline allows you to identify the members of your Downline who have been Nested. • New Appointments lists newly appointed Representatives in your first, second, and/or third generation. Updated daily. • New Uplines lists Representatives new to Leadership. Updated daily. • No Orders lists Representatives in your first, second and/or third generation who have not submitted an on-time order up to, and including, the current RPS. Updated daily. • Orders lists Representatives in your first, second and/or third generation who have submitted an on-time order up to, and including, the current RPS. Updated daily. • Past Due lists Representatives in your first, second and third generation, both active and removed Representatives, who have past due balances ranging from Past Due 1 Campaign through Past Due 11 Campaigns. Updated daily. • President’s Club lists Representatives in your first, second, and/or third generation who have achieved a President’s Recognition Program level; President’s Club, Honor Society, Rose Circle, David H. McConnell Club, President’s Council, or President’s Inner Circle. • Removals lists Representatives in your first, second and third generation whose Avon Account has been removed. Updated daily. • Representative Search enables you to search your Downline to identify a specific Representative, or Representatives, who share specific characteristics. • Sales lists Representatives in your first, second and/or third generation based on their award sales. Updated daily. • Title Advancement lists Representatives in your first, second, and/or third generation who have advanced their Leadership title (from untitled to Unit Leader, Advanced Unit Leader, Executive Unit Leader, or Senior Executive Unit Leader). Updated based on last closed Campaign. • Title Demotion lists Representatives in your first, second, and/or third generation whose Leadership title was demoted because they did not meet the qualifications to maintain their Leadership title. Updated based on last closed Campaign. • Titles at Risk lists Representatives in your in your first, second, and/or third generation whose Leadership title is at risk of being demoted because they do not meet the qualifications to maintain their Leadership title. Updated based on the last completed Campaign. • Genealogy Tree View enables you to display a snapshot of your Downline and to view details about each Representative in your Downline. You can display a snapshot of your entire Downline or select a Representative to use as the top of the tree. It allows you to identify your Nested Downline by color. If the Representative’s box is shaded pink, it has been Nested. You will also be able to see pre-Nested Campaign performance for Nested Downline. Report Formats You can view a report in a variety of data formats • Web Page: This default format shows the results in a convenient online report. This report format gives you the most flexibility for accessing and/or editing report data. • Acrobat (PDF) File: When you select this format, a new window will display with the report in a “document” format. You can print or save a copy of the PDF file using the icons at the top of the window. • Mailing Labels (Avery 5160): Select the version (Laser or Inkjet) compatible with your printer. A PDF window will appear with the name and address of each Representative in a label format you can print (using Avery 5160 label paper) and use to address postcards or other correspondence you want to mail. • Mailing Labels (Those w/o Emails): Select this option to create mailing labels for Representatives who don’t have an eMail address. Choose the option (Laser or Inkjet) compatible with your printer. • Excel: Selecting this option displays the report in a Microsoft Excel spreadsheet format. Depending on your experience with spreadsheets, you can save the report to “tweak” the information to answer “what if” questions. Getting Started with Downline Manager – Reports Getting Started with Downline Manager | 021012 6
- 7. Getting Started with Downline Manager – Communication Tools Communicate with your Downline Representatives easily and efficiently – and all from within Downline Manager! eCards Send electronic postcards to Representatives in your Downline or to anyone with an eMail address. A B C Create an eCard • Select Create New eCard from the drop menu under the eCard tab in the top menu. You can also send an eCard directly from a within a web page format report. • Select a Language from the drop menu at the top of the page. Cards are available in English and Spanish. • Select an eCard to send from multiple categories by clicking on the card image. (A) • Enter your eCard content by typing in the provided fields. Most of the eCards have suggested message text that you can customize as well as space for your name and eMail address. Click Next. (B) • Preview how your eCard will look. You can also print it out. Click Next. (C) What can you do with eCards? • eCards are a great way to “talk” to your Downline to acknowledge, congratulate, encourage, remind, invite, or mentor them. • eCards give you an easy and quick way to “talk” to prospects. Develop a list of prospects and send everyone on the list an eCard. –– To send a personalized eCard, see page 8 of this guide for instructions. –– To send an eCard to a specific group, run a report and click on send eCard to select the recipients. • eCards even let you verify which recipients viewed their eCard and how often they viewed it – then you can take the next step! For detailed instructions on using this feature, click Help here. Getting Started with Downline Manager | 021012 7
- 8. Getting Started with Downline Manager – Communication Tools Send an eCard(s) • Select recipients for your eCard by: • Manually entering individual eMail addresses • Uploading a list of addresses • You can send an eCard to one Representative or to several recipients (this is referred to as bulk eMail). • Click EMail Address Check (optional) to make sure your eCard arrives as intended. • Click Send Now! and your eCard is on its way! Manage eCards eCard Manager keeps a record of your current and past eCards. To access: • Click eCard Manager from the eCard tab in the top menu, or, if you are already in the eCard page, just click the eCard Manager tab. eCard manager lets you: • Review the Details about an eCard you sent: Click the Details icon at the beginning of a listing to review the details. On the eCard Details screen, note the number of recipients who were sent an eCard as well as the number of times they have viewed it. When you finish, click Back. • Add recipients to an eCard before you send it: Click add recipients next to an eCard that hasn’t yet been sent, and then enter or select names to add to the list. When you finish, click Send Now! • Identify the eCards you want to delete. Click the check box after each eCard you want to delete, and then click Delete. eCard Settings Standard entries on eCards can be defined through the eCard Settings page. You can define automatic entries for fields such as: the number of recipients that will be displayed, your name, a location, address, phone number, your eMail address, and any constant message you want to include on all eCards. To access eCard Settings: • Click eCard Manager from the eCard tab in the top menu, or, if you are already in the eCard page, just click the eCard Settings tab. • Fill in the desired fields. • Click Save when you are finished. Getting Started with Downline Manager | 021012 8
- 9. Getting Started with Downline Manager – Communication Tools eMail You can send eMail messages directly from within Downline Manager - without having to open your eMail program! Create and send eMail • To send an eMail to recipients identified by a report, you can initiate a message directly from a report page (A): • While a report is displayed, click the eMail address of the Representative you want to eMail. • To send an eMail to multiple recipients identified in the report, click Send Bulk eMail. When the recipients list displays, click the selection box to deselect Representatives you don’t want to send an eMail to, then click Click here to compose an e-mail. • You may also compose and send an eMail by clicking the eMail tab in the menu. • When then the Compose Email - NEW screen appears (B), the To field will either be blank or show the name of the recipient(s) you selected. You may enter new recipients by selecting eMail addresses from a list, your address book, or hand typing the address. • NOTE: If you selected a group of names from a report, the recipients’ names are shown in the BCC field. A Blind Carbon Copy means each recipient will receive the eMail with only her name in the To field. • Click in the Subject field to enter the text for the Subject. • Click in the text area and enter your message. • Click Send. Your eMail message is on its way! NOTE: You may send, but not receive, eMail from Downline Manager. When you send eMail from Down-line Manager, the system uses your eMail address as the sender (the From address). If a recipient replies to the eMail, it will be to your eMail address, so you should regularly check your eMail using your standard eMail program. For detailed instructions on using this feature, click Help here. A B Getting Started with Downline Manager | 021012 9
- 10. Getting Started with Downline Manager – Communication Tools Mailing Labels Although sending eMail or an eCard is a time and cost efficient way to stay in touch, there are occasions when you will want to send communications by standard US Postal Service mail. Downline Manager simplifies postal mailings by giving you the tools to print mailing labels to individuals or groups quickly and easily! Getting Started with Downline Manager | 021012 10 Print Mailing Labels from a Report • From the Report criteria page select the Mailing Labels format compatible with your printer from the data format drop menu. Click Show Report and a PDF window of the mailing labels displays. • Click the Print icon in the PDF window to print the labels. Click the Save icon if you prefer to print the labels later. • NOTE: Be sure you are using Avery 5160 (or comparable) label paper compatible with your printer and that the paper is properly inserted in the printer. • Click the “X” at the upper right of the window to close the PDF window when you are finished. For detailed instructions on using this and other features and reports, click Help here.