How to Make Pearl Snap FastenerJewelry
•
1 like•955 views

This is a free basic metalsmith tutorial by Judy Larson. For more free tutorials and inspirations, see www.beadinggem.com

Recommended
More Related Content
What's hot
What's hot (20)
Similar to How to Make Pearl Snap FastenerJewelry
Similar to How to Make Pearl Snap FastenerJewelry (20)
Recently uploaded
Recently uploaded (20)
How to Make Pearl Snap FastenerJewelry
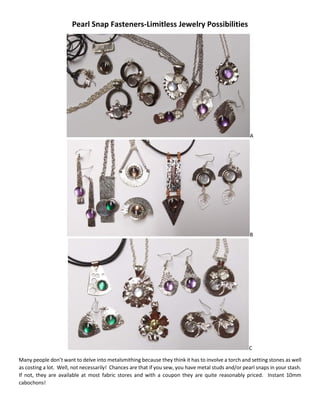
- 1. Pearl Snap Fasteners-Limitless Jewelry Possibilities A B C Many people don’t want to delve into metalsmithing because they think it has to involve a torch and setting stones as well as costing a lot. Well, not necessarily! Chances are that if you sew, you have metal studs and/or pearl snaps in your stash. If not, they are available at most fabric stores and with a coupon they are quite reasonably priced. Instant 10mm cabochons!
- 2. If I don’t have a notebook or a doodle pad with me, I will forget all those “brilliant” (lol) ideas that may cross my mind at any given time so I usually carry a 6”x8” notebook with me for grocery lists and to do lists as well as ideas for new pieces of jewelry. It works well for me for making templates that will fit on a 6”x6” piece of metal. Conserving precious metal is a must when prices are high. Not everyone can melt down their scrap to make into new wire or sheet metal, or do water, broom, salt or clay casting. Making the most of a sheet of metal just seems logical, even if it is not a precious metal. These designs look nice in silver, copper or brass. However, they really shine when combinations of metals are used and a patina finish is added. For some reason, I did not have my notebook with me on a trip years ago so when the lightbulb went off in my head about using pearl snaps as cabochons, I grabbed a hotel notepad and started doodling while watching the grandkids playing. After drawing out the templates on a 6”x6” square divided into three sections, each design template was lettered and numbered to make the pieces easier to find during assembly. All the sketches were lettered and numbered for the same reason. Nothing can be more frustrating than trying to figure out which piece goes where. Materials: Not much is needed to make all the pieces of jewelry seen here: 6”x6” piece of 24 gauge sheet metal, pearl snaps, e-6000 glue, a few embellishments, jump rings, findings and chain or cord Hint: Snap Fastener Kits are available in a variety of colors and styles. Some even resemble faceted gemstones. Tools: Basic set of pliers and wire cutters 1.5mm hole punch All the pieces shown in this tutorial were cut with metal shears. Metal shears bend the edge of the metal slightly, so a plastic, rubber or rawhide mallet may be needed to flatten the edges. A jewelers saw should be used if the metal is any heavier than 24 gauge. The various textures were achieved using metal stamps and various Mini Tru Strike Hammers, but a chasing hammer with a ball head would be all that is necessary to start.
- 3. Files and sanding pads were used to smooth the backs of the snaps and clean up the cut edges of the metal designs. Useful but not necessary: Power Hole Punch Kit, 6-step barrel pliers, dimpling pliers in various sizes, metal stamps and dedicated hammer, Sharpie marker or Liver of Sulfur and polishing pads BASIC DIRECTIONS: These are not directions for making each piece, but basic “getting started” information on using the 6”x6” template. The jewelry templates on the 6”x6” square makes use of most of the metal. Use shears and hole punches on the remaining metal pieces to create small embellishment pieces to create jewelry that is unique to you. When creatively stumped, sometimes all that is needed is a jumping off point. Scale the template in different sizes. Pick a pleasing shape from the templates. Stack different sizes of the same shape using different metals or the same metal with different textures. Use a lighter gauge metal and do a bit of fold-forming. Rivets and eyelets always add flair to an otherwise plain piece. Since heat won’t be used to secure metals together, pretty patinated metal sheets won’t change color and are great for layering, too! A: Prepare the Snaps The pearl portion of a snap has “teeth” that must be removed or this decorative element will not sit flush on a backing. Grasp one of the “teeth” with a flat nose pliers. Position the plier tips as close to the snap as possible. Wiggle the plier back and forth until the “tooth” breaks off. Grasp the pearl, right side up, with fingers and run it across a file until the back is smooth. Since the piece is very thin, it may be difficult to hold. Stick a piece of beeswax from a sewing kit or a piece of wax intended for people with braces to the pearl top to have something to hold on to. Gwen Youngblood has a Sanding Buddy tool on her RollingMillResources page on etsy that is very useful for this, too.
- 4. B: Prepare the 6”x6” 24 Gauge Sheet Metal and Use the Templates: Scale the plain or lettered and numbered template so the outside lines make the full template 6” square. The three sections in the template are each 2”x6”. If using only a few of the design templates, lettered and numbered templates are not important-the first 6”x6” template. You may find it easier to work with the templates if they are numbered, especially if making many designs at once-the second 6”x6” template. Hint: The template letters refer to the jewelry pieces seen in each photo at the beginning of the tutorial. To the lower right of each 6”x6” template is a detached bail pattern that can be used to make any design into a pendant.
- 6. It will be easier to cut out the designs if the sheet metal is cut into 2”x6” sections or smaller, more manageable pieces. Of course, not all the templates need to be used so cut the designs apart and use only those desired. Before adhering templates to sheet metal, make sure the metal is clean and dry. Very fine sandpaper can remove tarnish. Soap and water or an alcohol soaked pad can clean oils from the surface of the metal. Lightly coat the back of a printed template and the clean metal with rubber cement. Let both dry for a bit and then adhere the template to the metal. This is a close to a permanent bond. Soak the piece after cutting it out to remove the paper. After the metal dries, any glue residue should be easy to rub off. Easy, peasy: Running the printed templates through a repositionable sticker machine makes the templates easy to adhere without water cleanup. Printing the 6”x6” template on printable sticker paper is a quick and easy option, too. All the pieces shown in this tutorial were cut with metal shears. Metal shears bend the edge of the metal slightly, so a plastic, rubber or rawhide mallet may be needed to flatten the edges. If available, use a disc cutter to cut out the circular pieces first. Remember to cut the inner circles before the outer circles. If a disc cutter is not available, any piece can be cut first. C: Basic Construction Tips: Swap The Pearl Snaps Out For Brass Studs: D: If A Bail Is Desired, Sometimes It Must Be Made Separately: Use the bail template on the side of the 6”x6” template square to make a separate bail. Attach the bail with an eyelet or a rivet.
- 7. E: Different Hammers, Different Textures Use a base metal sheet for the designs so you can play with different hammers and find out what the textures they produce look like without breaking the bank. Without access to different types of hammers, the ball side of a chasing hammer produces a beautiful texture. If stacking pieces, heavily texture one piece and lightly texture the other with the chasing hammer, or any hammer, for that matter. F: Template Section A: A balled neck chain can be cut and glued around a snap “cabochon” for an elegant design detail. Dimpling pliers can add dimension around the edge of a piece. If dimpling pliers are not available, consider using the narrower side of the Mini True Strike Sharp Designer Hammer to texture just the edge of the metal piece. The edge will become slightly wavy with heavy texturing. Using rivets and eyelets in punched holes add a nice finishing touch. If a disc cutter is not available, cut the larger disks out with shears. Consider adding a different colored smaller metal disk on top of the larger disk to simulate the hole in the original design.
- 8. G: Template Section B: Nickel silver sheet was used for all the pieces made here. Since it does not take patina well, use a Sharpie marker to create dimension. Cover the whole piece with the marker and remove the excess with a polishing pad, leaving marker in the textured impressions. If no polishing pad is available, lightly sand the piece with a very fine piece of sandpaper to remove marker from the high areas. Turning a piece in a different direction changes the whole look, and may inspire taking it in a new direction-seen one way as a pendant and another way as a brooch/pin (or together, statement earrings!). And again, adding a bit of ball chain ups the design a notch. H: Template Section C: Adding a disk to the back of a pearl snap “cabochon” can give it more presence. Sometimes, though, just the texture on the backplate is enough. A bail already connected to a shape makes it easy to make into a pendant. A bail like this can be added to almost any design. The Power Hole Punch makes quick work of making holes in the swiss cheese pendant. I: Putting It All Together: Note: All pieces should be clean and free of hand oils before construction. Embellishments are not always needed. Sometimes, simple is the way to go. Other times, something extra may be desired.
- 9. When making layered pieces, make sure each layer is secured and dry enough to not move before adding additional layers. Slight finger pressure on the top piece should be enough to secure it to the bottom. Make sure to use enough glue to fill any cavity in the snap but not so much that excess glue squishes out the sides. The same holds true for all layered pieces. If the glue does happen to seep out under the edges of a piece, leave it alone until the glue is set and dry. When set and dry, e-6000 is almost like a rubber band and excess can carefully be pulled up and away from the area with tweezers or a chain nose pliers. Above all, have fun and make the designs your own!