

Empfohlen
Weitere ähnliche Inhalte
Ähnlich wie File system restore netbackup
Ähnlich wie File system restore netbackup (20)
Mehr von M Shariff
Kürzlich hochgeladen
Kürzlich hochgeladen (20)
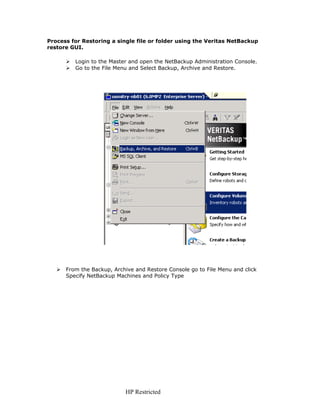
File system restore netbackup
- 1. Process for Restoring a single file or folder using the Veritas NetBackup restore GUI. Login to the Master and open the NetBackup Administration Console. Go to the File Menu and Select Backup, Archive and Restore. From the Backup, Archive and Restore Console go to File Menu and click Specify NetBackup Machines and Policy Type HP Restricted
- 2. You will get a window as below. HP Restricted
- 3. Mention the NetBackup Master name in the “Server to use for backup and restores” drop down box. By default the entry will be there, and NEVER change the server entry! Doing so will cause all subsequent backups and restores to fail on that master. Mention the client name, the one for which you are running the restore in the “Source client for restores” drop down box. If it is not present add the Client name from the Edit Client list tab. Mention the client name, the one to which you want to restore in the “Destination client for restores” drop down box and click “O.K” once you made the selection. By default this will be the same as source client. If you want to restore to a different client use the Edit Client list tab and do the modifications. From the Backup, Archive and Restore Console go to File Menu and click ‘Select Files and Folders to Restore…’ and click ‘from Normal Backup…’ If you see the following information popup, please follow directions below. HP Restricted
- 4. · Remember: If it is a UNIX restore, choose "Standard" on the "Policy type for restores” in the “Specify NetBackup Machines and Policy Type, or you will not be able to see the backups. Lists of Backups that have run are shown in the "NetBackup History" window. Full Backups are represented by a green circle, incrementals are represented with blue. From the "History" window, select the date of the backup for which restore is needed. If you want to select a range of backups. Click on the top left "incremental backups" restore while holding down the "shift" key. Click on the bottom right "full backups". By doing this you have selected the full from the 26th through the incremental to the 1st. You will be able to view the most updated files during this range by performing your selection this way. Expand each directory to find the file from the “All Folders” pane on the left side of the console and place a check mark on that. HP Restricted
- 5. Go to ‘Actions’ Select ‘Start Restore of Marked Files …’ HP Restricted
- 6. Click ‘Start Restore’ From the ‘Activity Monitor’ ensure that Restore is running fine. HP Restricted
- 7. Click ‘Start Restore’ From the ‘Activity Monitor’ ensure that Restore is running fine. HP Restricted