More Related Content
More from Alarm Grid (20)
Programming guide for vizia + dimmers and quiet fan speed control
- 1. TECHNICAL APPLICATION NOTE
Programming Guide for Vizia + Dimmers
and Quiet Fan Speed Control
Vizia+™ProgrammingGuide
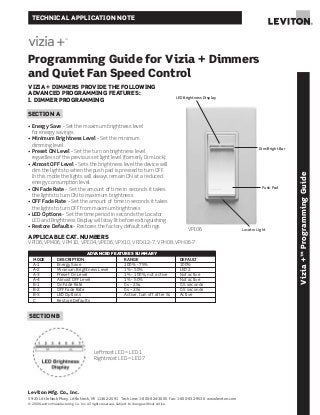
Dim/Bright Bar
VIZIA + DIMMERS PROVIDE THE FOLLOWING
ADVANCED PROGRAMMING FEATURES:
I. DIMMER PROGRAMMING
SECTION A
• Energy Save - Set the maximum brightness level
for energy savings
• Minimum Brightness Level – Set the minimum
dimming level
• Preset ON Level – Set the turn on brightness level
regardless of the previous set light level (formerly Dim Lock)
• Almost OFF Level – Sets the brightness level the device will
dim the lights to when the push pad is pressed to turn OFF.
In this mode the lights will always remain ON at a reduced
energy consumption level.
• ON Fade Rate – Set the amount of time in seconds it takes
the lights to turn ON to maximum brightness
• OFF Fade Rate – Set the amount of time in seconds it takes
the lights to turn OFF from maximum brightness
• LED Options – Set the time period in seconds the Locator
LED and Brightness Display will stay lit before extinguishing
• Restore Defaults – Restores the factory default settings
MODE DESCRIPTION RANGE DEFAULT
A-1 Energy Save 100% - 75% 100%
A-2 Minimum Brightness Level 1% - 50% LED 2
A-3 Preset On Level 1% - 100%, not active Not active
A-4 Almost OFF Level 1% - 50% Not active
B-1 On Fade Rate 0s – 25s 0.5 seconds
B-2 OFF Fade Rate 0s – 25s 0.5 seconds
B-3 LED Options Active, turn off after 5s Active
C Restore Defaults
ADVANCED FEATURES SUMMARY
Leviton Mfg. Co., Inc.
59-25 Little Neck Pkwy, Little Neck, NY 11362-2591 Tech Line: 1-800-824-3005 Fax: 1-800-832-9538 www.leviton.com
© 2008 Leviton Manufacturing Co., Inc. All rights reserved. Subject to change without notice.
Locator Light
Push Pad
LED Brightness Display
SECTION B
Leftmost LED = LED 1
Rightmost LED = LED 7
APPLICABLE CAT. NUMBERS
VPI06, VPM06, VPM10, VPE04, VPE06, VPX10, VPZX12-7, VPH08, VPH06-7
VPI06
- 2. Vizia+™ProgrammingGuide
Leviton Mfg. Co., Inc.
59-25 Little Neck Pkwy, Little Neck, NY 11362-2591 Tech Line: 1-800-824-3005 Fax: 1-800-832-9538 www.leviton.com
© 2008 Leviton Manufacturing Co., Inc. All rights reserved. Subject to change without notice.
Section C
Dimmer Programming
VPI06, VPM06, VPM10, VPE04, VPE06, VPX10, VPX12,
VPH08, VZH06
NOTES:
• Have a flashlight handy if this dimmer controls
the only light source in the room
• The device will exit programming mode after
3 minutes of inactivity
• Pressing the Push Pad at any time during
programming will advance the device to the
next programming mode.
Program Mode A
To enter Program Mode A:
Push and hold the Push Pad and then the right half of
the DIM/BRIGHT Bar (^) for 5 seconds until the Locator
LED and leftmost LED (LED 1) begin to blink.
A-1) Upon releasing the Push Pad and the right
half of the DIM/BRIGHT Bar (^) , the Locator
LED will continue to blink once per second and
the rightmost LED will illuminate to display the
device is in Program Mode A-1, Energy Save.
To change the Energy Save Level, use the
DIM/BRIGHT Bar to move the corresponding LED
to the desired discrete preset level according to
Chart A. By tapping the Push Pad this setting
will automatically be saved and the device will
advance to the next programming mode, A-2.
A-2) The Locator LED will blink 2 times per second to
indicate the device is in Program Mode A-2,
Minimum Brightness Level. To change the
Minimum Brightness Level from 1-50%, use the
DIM/BRIGHT Bar. The light output will reflect the
minimum brightness level selected. By tapping
the Push Pad this setting will automatically be
saved and the device will advance to the next
programming mode, A-3.
A-3) The Locator LED will blink 3 times per second to
indicate Program Mode A-3, Preset ON Level. To
change the current Preset ON Level from 1-100%,
use the DIM/BRIGHT Bar. If this feature is not
desired, press and hold the left half of the
DIM/BRIGHT Bar ( ) until no LED is lit (default
setting). By tapping the Push Pad this setting will
automatically be saved and the device will
advance to the next programming mode, A-4.
A-4) The Locator LED will blink 4 times per second to
indicate Program Mode A-4, Almost OFF Level.
To change the current Almost OFF Level, use the
DIM/BRIGHT Bar to adjust the preset light level.
If this feature is not desired, press and hold the
right half of the DIM/BRIGHT Bar (^) until no
LED is lit (default setting). Almost OFF can be
overridden by pressing and holding the left half of
the DIM/BRIGHT Bar ( ) until the lights turn off.
By tapping the Push Pad this setting will
automatically be saved and the device will
exit Programming Mode A.
Note: When Almost OFF Level is set the LED Locator
will be illuminated when the dimmer is in the Almost
OFF state, even though the light remains on at a
reduced energy consumption level.
Program Mode B
To enter Program Mode B:
Push and hold the Push Pad and then the left half of the
DIM/BRIGHT Bar ( ) for 5 seconds until the Locator LED
and rightmost LED (LED 7) begin to blink.
B-1) Upon releasing the Push Pad, the Locator LED will
continue to blink once per second indicating the
dimmer is in Program Mode B-1, ON Fade Rate. To
change the ON Fade Rate, use the DIM/BRIGHT Bar
to move the LED to the desired preset level according
to Chart B. By tapping the Push Pad this setting will
automatically be saved and the device will advance
to the next programming mode, B-2.
B-2) The Locator LED will blink 2 times per second to
indicate Program Mode B-2, OFF Fade Rate. To
change the OFF Fade Rate, use the DIM/BRIGHT Bar
to move the LED to the desired preset level according
to the Chart B. By tapping the Push Pad this setting
will automatically be saved and the device will
advance to the next programming mode, B-3.
^
^
^
LED MAXIMUM BRIGHTNESS ENERGY SAVINGS
LED 1 75% 34% savings
LED 2 80% 29% savings
LED 3 85% 24% savings
LED 4 90% 16% savings
LED 5 95% 8% savings
LED 6 97% 5% savings
LED 7 100% (full bright) 0 % Savings
(Default)
ADVANCED FEATURES SUMMARY
CHART A
LED 1 0 seconds (instant) 0 seconds (instant)
LED 2 (Default) 0.5 seconds 0.5 seconds
LED 3 1.5 seconds 1.5 seconds
LED 4 3 seconds 3 seconds
LED 5 6 seconds 6 seconds
LED 6 10 seconds 10 seconds
LED 7 25 seconds 25 seconds
LED FADE ON FADE OFF
CHART B
- 3. B-3) The Locator LED will blink 3 times per second
to indicate Program Mode B-3, LED Options.
To change the LED Options settings, use the
DIM/BRIGHT Bar to move the LED to the desired
preset setting according to the chart below.
By tapping the Push Pad this setting will
automatically be saved and the device will
exit Programming Mode B
Program Mode C
To enter Program Mode C:
Engage the air-gap switch by gently pressing the top of
the Push Pad until the bottom lifts
completely out of the frame and a click is heard.
All LEDs will extinguish.
C) Press Push Pad back into the frame and hold for
7 seconds until and the LED Brightness Display
starts bi-directional strobing to indicate Program
Mode C, Restore Default. To Restore Default
settings, release the Push Pad. This will save
defaults settings and exit Programming Mode C.
Leviton Mfg. Co., Inc.
59-25 Little Neck Pkwy, Little Neck, NY 11362-2591 Tech Line: 1-800-824-3005 Fax: 1-800-832-9538 www.leviton.com
© 2008 Leviton Manufacturing Co., Inc. All rights reserved. Subject to change without notice.
Vizia+™ProgrammingGuide
LED 1 Active Active
LED 2 Active Turns off 5 seconds after use
LED 3 Turns off 5 seconds after use Active
LED 4 Turns off 5 seconds after use Turns off 5 seconds after use
LED 5 N/A N/A
LED 6 N/A N/A
LED 7 N/A N/A
LED LOCATOR LED TIMEOUT LED BRIGHTNESS
DISPLAY OPTIONS
LED OPTIONS CHART
Default Active
First toggle Turns off 5 seconds after use
LOCATOR LED LOCATOR LED OPTION SETTING
SWITCH PROGRAMMING
• LED Option - Sets the Locator LED timeout to
5 seconds after use.
NOTE: The switch will exit program mode after
3 minutes of inactivity
Program Mode
To enter Program Mode:
Push and hold the Push Pad for 10 seconds until the
Locator LED begins to blink. Upon releasing the Push
Pad, the LED Option will automatically be changed.
Locator Light
Push Pad
VPS15
- 4. Leviton S. de R.L. de C.V.
Lago Tana 43, Mexico DF, Mexico CP 11290 • Tel. (+52) 55-5082-1040 • FAX: (+52) 5386-1797 • www.leviton.com.mx
G-7904/J7-tp
Leviton Manufacturing of Canada, Ltd.
165 Hymus Boulevard, Pointe Claire, Quebec H9R 1E9 • Telephone: 1-800-469-7890 • FAX: 1-800-563-1853
Leviton Manufacturing Co., Inc.
59-25 Little Neck Parkway, Little Neck, NY 11362-2591
Telephone: 1-800-323-8920 • FAX: 1-800-832-9538 • Tech Line (8:30AM-7:30PM E.S.T. Monday-Friday): 1-800-824-3005
Visit our Website at: www.leviton.com
© 2008 Leviton Manufacturing Co., Inc. All rights reserved. Subject to change without notice.
Vizia+™ProgrammingGuide
LED 1 (Default) Active Active
LED 3 Active Turns off 5 seconds
after use
LED 7 Turns off 5 seconds Turns off 5 seconds
after use after use
LED LED LOCATOR LED BRIGHTNESS
TIMEOUT DISPLAY TIMEOUT
FAN SPEED CONTROL PROGRAMMING
VPF01
• Preset ON Level – Set the turn on fan speed
regardless of the previous set level
• LED Options – Set the time period in seconds
the Locator LED and Fan Speed will stay lit
before extinguishing
• Restore Defaults – Restores the factory default
settings (including device load ON at maximum level)
NOTES:
• The device will exit program mode after 3 minutes
of inactivity
• Pressing the Push Pad at any time during
programming will advance the device to
the next programming mode.
Program Mode A
To enter Program Mode A:
Push and hold the Push Pad and then the right half of
the FAN SPEED Bar (^) for 5 seconds until the Locator LED
and leftmost LED (LED 1) begin to blink. The Locator LED
will blink once per second to indicate Program Mode A,
Preset ON Level. To change the current Preset ON
Level from HIGH (LED 7), MEDIUM (LED 4) or LOW (LED 1),
use the FAN SPEED Bar. If this feature is not desired,
press and hold the left half of the FAN SPEED Bar ( )
until no LED is lit (default setting). By tapping the Push
Pad this setting will automatically be saved and the
device will exit Programming Mode A.
Program Mode B
To enter Program Mode B:
Push and hold the Push Pad and then the left half of
the FAN SPEED Bar ( ) until the rightmost LED (LED 7)
begins to blink. The Locator LED will blink 2 times per
second to indicate Program Mode B, LED Options
Mode. To change the LED Options settings, use the
FAN SPEED Bar to move the LED to the desired preset
setting according to the chart below. By tapping the
Push Pad this setting will automatically be saved and
the device will exit Programming Mode B.
Program Mode C
To enter Program Mode C:
Engage the air-gap switch by gently pressing the top of
the Push Pad until the bottom lifts completely out of the
frame and a click is heard. All LEDs will extinguish.
Press Push Pad back into the frame and hold Push Pad
for 7 seconds until the LED Brightness Display starts
bi-directional strobing to indicate Program Mode C,
Restore Default. Releasing the Push Pad will Restore
Default settings and exit programming mode.
^
^
Fan Speed Bar
Locator Light
Push Pad
LED Brightness Display
MODE DESCRIPTION RANGE DEFAULT
A Preset On Level 1% - 100%, not active Not active
B LED Options Active, turn off after 5s Active
C Restore Defaults
ADVANCED FEATURES SUMMARY
Vizia +™ is a trademark of Leviton Manufacturing Co., Inc.
Covered by one or more U.S. and Foreign Patents and patents pending.