
Empfohlen
Weitere ähnliche Inhalte
Was ist angesagt?
Was ist angesagt? (18)
Andere mochten auch
Ähnlich wie Seo wordpress
Ähnlich wie Seo wordpress (20)
Mehr von mohamed ashraf
Kürzlich hochgeladen
Kürzlich hochgeladen (20)
Seo wordpress
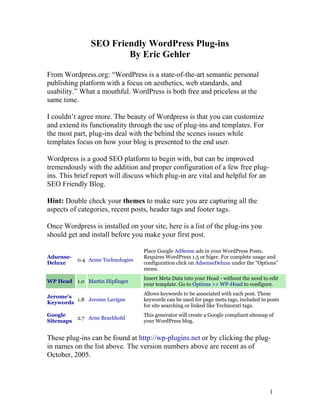
- 1. SEO Friendly WordPress Plug-ins By Eric Gehler From Wordpress.org: “WordPress is a state-of-the-art semantic personal publishing platform with a focus on aesthetics, web standards, and usability.” What a mouthful. WordPress is both free and priceless at the same time. I couldn’t agree more. The beauty of Wordpress is that you can customize and extend its functionality through the use of plug-ins and templates. For the most part, plug-ins deal with the behind the scenes issues while templates focus on how your blog is presented to the end user. Wordpress is a good SEO platform to begin with, but can be improved tremendously with the addition and proper configuration of a few free plug- ins. This brief report will discuss which plug-in are vital and helpful for an SEO Friendly Blog. Hint: Double check your themes to make sure you are capturing all the aspects of categories, recent posts, header tags and footer tags. Once Wordpress is installed on your site, here is a list of the plug-ins you should get and install before you make your first post. Place Google AdSense ads in your WordPress Posts. Adsense- Requires WordPress 1.5 or higer. For complete usage and 0.4 Acme Technologies Deluxe configuration click on AdsenseDeluxe under the “Options” menu. Insert Meta Data into your Head - without the need to edit WP Head 1.0 Martin Hipfinger your template. Go to Options >> WP-Head to configure. Allows keywords to be associated with each post. These Jerome's 1.8 Jerome Lavigne keywords can be used for page meta tags, included in posts Keywords for site searching or linked like Technorati tags. Google This generator will create a Google compliant sitemap of 2.7 Arne Brachhold Sitemaps your WordPress blog. These plug-ins can be found at http://wp-plugins.net or by clicking the plug- in names on the list above. The version numbers above are recent as of October, 2005. 1
- 2. Installation of your Plug-Ins Once you download these plug-ins to your computer, you need to transfer them to your site. If any of the plug-ins were packaged in a zip file, unzip them first and upload only the .php files in the wp-content/plugins directory of your website. Once the files are uploaded, you need to activate (and optionally configure) the plug-ins. To do this, go to your WordPress administrator panel and click on the tab marked Plugins. You will see the following displayed: Plugin Management Plugins are files you usually download separately from WordPress that add functionality. To install a plugin you generally just need to put the plugin file into your wp-content/plugins directory. Once a plugin is installed, you may activate it or deactivate it here. If something goes wrong with a plugin and you can’t use WordPress, delete that plugin from the wp- content/plugins directory and it will be automatically deactivated. Plugin Version Author Description Action Place Google AdSense ads in your WordPress Adsense- Acme Posts. Requires WordPress 1.5 or higer. For 0.4 Activate Deluxe Technologies complete usage and configuration click on AdsenseDeluxe under the “Options” menu. In the example above, only one plug-in (Adsense-Deluxe) is installed. As a protective measure, all freshly installed plug-ins are deactivated by default. To activate it, simply press the Activate link – the plug-in will be highlighted green, indicating that the plug-in is active and ready to be configured. Install and activate all the plug-ins (Adsense-Deluxe, WP-Head, Jerome’s Keywords and Google Sitemaps). We are ready to delve deeper into each plug-in and configure them to make your site a spiders dream! 2
- 3. Overview of Plug-ins and Functionality Now that all your plug-ins have been installed and activated in WordPress, we will now review each plug-in to understand its purpose and configuration options. Adsense-Deluxe Place Google AdSense ads in your WordPress Posts. Requires Adsense- Acme 0.4 WordPress 1.5 or higer. For complete usage and configuration Deluxe Technologies click on AdsenseDeluxe under the “Options” menu. The Adsense-Deluxe plug-in allows you to place Adsense adds directly into your posts. You can customize the colors and sizes of the adsense blocks in each post by placing a special comment tag inside of your article. Of course, you need to have a Google Adsense account to use this plug-in. Let’s get started. Click on Options from the Dashboard. You will see the following: Options for AdSense-Deluxe Plugin v0.4 (Add New) AdSense-Deluxe provides shortcuts for automatically inserting Google AdSense code into your posts. • Instructions are located at the bottom of this page. . . . . or visit AdSense-Deluxe home page • The AdSense Preview Tool will help you see which ads will appear on your pages. • Login to AdSense . . . . . . read Google's TOS AdSense Blocks Name Description Actions On <!--adsense--> Block delete | default | edit The options below this line control where Ads will be shown. Enable Ads on Individual Posts 3
- 4. Enable Ads on Home page Enable Ads on "pages" Enable Ads on any Archive page Globally enable/disable all ads Update Enabled Options » New AdSense Block Name AdSense Code Description (optional) Make Default Discard Changes Add AdSense Block » AdSense SandBox (Preview Tool) View AdSense for: http://recovery-health.info Preview AdSense This form allows you to preview the ads which would appear on a web page. Just enter any URL in the text box and the ads will display in a new window. Since they're shown in test mode, none of the impressions are recorded and clicking them does not cost nor benefit anyone. Reward Plugin Author Reward AdSense-Deluxe Author with 5% of your AdSense Update Author Rew ards Impressions When this option is checked, approximately 5% of the ad impressions on your blog will use my [the guy who wrote and maintains this plug-in] AdSense client-ID. Doing this is not crazy, no... it's a good way to help contribute to let the author know you appreciate how useful the tool is to you and motivate him to add more features. AdSense Deluxe Instructions 4
- 5. This plugin allows you to insert html comments in your posts and have them replaced by the actual Google AdSense code. You can define a single default code block to use, or as many variations as you like. Adsense-Deluxe makes it easy to test different AdSense styles in all your posts without having to edit the WordPress code or templates, or change all the posts manually. The designated default AdSense code is included in a post by inserting this: <!--adsense--> wherever you want the ads to appear. To insert an alternate AdSense block which you've defined by a keyword (for example, "wide_banner", you would use: <!--adsense#wide_banner-->. Please restrict your keywords to the letters a-zA-Z, 0-9 and underscore (_). Matching is case- sensitive, so you might save yourself headaches by sticking to lowercase keywords. Also avoid extraneous spaces inside the html comments; regular expressions (which could account for extra whitespace) are not used so that replacements when the page is serving are as fast as possible. Name This is the name by which you reference an AdSense block of code when creating posts. For example, if you name a block "wide_banner", you would insert into your post "<!--adsense#wide_banner-->". Whichever block is designated as the default AdSense block will be substituted wherever the default comment string is found ("<!--adsense-->"), and also for any comment strings which reference it by its unique name (e.g., "<!--adsense#test-->"). You'll want to set the default AdSense block to the AdSense code you will use in the most places within your posts. AdSense Code This is the block of AdSense code to substitute for the given keyword. Description This is for your own use to help remember what each block of AdSense code looks like. You might use something like "banner 468x60, white background" Please make sure you read Google's TOS before using this plugin! *This plugin is loosely based on "Adsense" Plugin by Phil Hord, http://philhord.com/wp-hacks/adsense Log into your Adsense account and copy your Adsense code. According to google reports, the most popular Adsense size is the 300 x 250 block. You may want to make a channel as well. Copy the Adsense block into the box labeled Adsense Code. Next, name the block in the left hand box (I usually name it “half-banner, 300x250, etc). Additionally, you can add a description to help you identify the code. New AdSense Block 5
- 6. Name AdSense Code Description (optional) Make Default Discard Changes Add AdSense Block » Once your Adsense block configuration is complete, press Add Adsense Block. The block will be saved and you’re all ready to add an Adsense block inside of a post. AdSense Blocks Name Description Actions On <!--adsense--> Block delete | default | edit The options below this line control where Ads will be shown. Enable Ads on Individual Posts Enable Ads on Home page Enable Ads on "pages" Enable Ads on any Archive page Globally enable/disable all ads Update Enabled Options » When you write a post you will see a small pulldown box below the Quicktags menu bar named Ad$ense-Deluxe. To insert an Adsense block, first select the area in the post you want the Adsense block to appear and then select the appropriate Adsense block from the pulldown list. The Adsense block will appear in the post in commented form – don’t worry, the ad will appear in the main post. 6
- 7. That’s all there is to it! WP-Head Before you edit and work on the WP Head Plug-in you should make sure you have proper Search Engine Optimization entries already entered into the default Wordpress configuration. You have them, don’t you? Here are a few tips for selecting the correct SEO values for your Wordpress Blog: From Options - General you Name your Wordpress blog with a Title Tag, in this title tag you should use your 3 major Keywords. Weblog Title tag: Keyword 1 | Keyword 2 | Keyword 3 | Tag Line (description) : Keyword 1 blah blah Keyword 2 blah Keyword 3 7
- 8. General Options Weblog title: Keyw ord 1 | Keyw ord 2| Keyw ord 3 Tagline: Keyw ord 1 blah blah Keyw ord 2 blah keyw ord In a few words, explain what this weblog is about. WordPress address (URI): Blog address (URI): If you want your blog homepage to be different than the directory you installed WordPress in, enter that address here. E-mail address: This address is used only for admin purposes. Membership: Anyone can register Users must be registered and logged in to comment Notice that only a few of the important header entries are in the default Wordpress configuration – that is where WP Head comes in. WP Martin Insert Meta Data into your Head - without the need to edit your 1.0 Head Hipfinger template. Go to Options >> WP-Head to configure. Once activated, go to Options and click on WP Head 8
- 9. Copy / paste / edit the Meta tags. From an SEO Standpoint your Meta tags are very important. Consistency of your major Keywords is very important. Make sure you keep your keywords consistent throughout your Meta tags as well as your title tags. Here is a break down of these Meta’s: <meta name="Author" content="your name" /> Here you want to brand your website or your name. <meta name="Description" content=" This will be loaded form the description from your Blog set up – don’t leave this blank" /> 9
- 10. It should be filled out from the prior step, If not scroll back up and fix through the Options - General tab <meta name="Abstract" content="Recovery and Health related information to improve your recovery from related illness and disease" /> Abstract is a copy of the description. Keep it the same for keyword density issues <meta name="KeyWords" content="your keywords" /> Enter your Keywords. They should be the same as the title tag and as the description keywords <meta name="page-topic" content="blog" /> Keep the same- No Edits <meta name="audience" content="Alle" /> Alle is a German Word. Change to ALL if you are English speaking audience <meta name="robots" content="index, follow" /> Keep the same- No Edits <meta name="Content-Language" content="de, at, ch, deutsch, german" /> Change to your Language. English , en <meta name="Language" content="Deutsch" /> Change to your Language – English <meta name="revisit-after" content="2" /> Keep the same- No Edits <meta name="Revisit" content="After 2 days" /> Keep the same- No Edits 10
- 11. <meta name="Publisher" content="your name" /> Use your name or Company for branding purposes <meta name="Copyright" content="your name" /> Use your name or Company for branding purposes <meta name="distribution" content="global" /> Keep the same- no Editing <meta name="ICBM" content="48.1867, 16.3911" /> This can be deleted if you don’t know your geo target codes <meta name="DC.title" content="pre established title tag" /> This should be the title tag with keywords established earlier. <meta name="geo.position" content="48.1867;16.3908" /> This can be deleted if you don’t know your geo target codes <meta name="geo.region" content="AT" /> This can be deleted if you don’t know your geo target codes <meta name="geo.placename" content="Vienna" /> Change to your country- USA Once you edit the Meta Tags make sure you check the Check box at the top left corner to activate your new Meta tags. These tags will be placed into your source code 11
- 12. Jerome’s Keywords Allows keywords to be associated with each post. These Jerome's Jerome 1.8 keywords can be used for page meta tags, included in posts for Keywords Lavigne site searching or linked like Technorati tags. In the Dashboard Write function as you post to your Blog you can associate keyword with each post. Below the Text box where you type in your Blog Post you can enter keywords, separated by a coma, which are associated with this post. See example below. Look for the word Keyword Highlighted in yellow Write Post Title Categories Uncategorized Post Quicktags: Ad$ense-Delx TrackBack a URI: (Separate multiple URIs with spaces.) Save as Draft Save as Private Publish Advanced Editing » Keywords Suggested Keywords: 12
- 13. Google Sitemap Google Arne This generator will create a Google compliant sitemap of 2.7 Sitemaps Brachhold your WordPress blog. From Dashboard - Options click Sitemap You will See: Sitemap Generator 2.7 Manual rebuildIf you want to build the sitemap without editing a post, click on here! Rebuild Sitemap Additional pagesHere you can specify files or URLs which should be included in the sitemap, but do not belong to your Blog/WordPress. For example, if your domain is www.foo.com and your blog is located on www.foo.com/blog you might want to include your homepage at www.foo.com • Note: If your blog is in a subdirectory and you want to add pages which are NOT in the blog directory or beneath, you MUST place your sitemap file in the root directory (Look at the "Location of your sitemap file" section on this page)! • URL to the page: Enter the URL to the page. Examples: http://www.foo.com/index.html or www.foo.com/home • Priority: Choose the priority of the page relative to the other pages. For example, your homepage might have a higher priority than your imprint. • Last Changed: Enter the date of the last change as YYYY-MM-DD (2005-12-31 for example) (optional). URL to the page Priority Change Frequency Last Changed # No pages defined. Add new page Save page changes Undo all page changes Delete marked page Basic Options • Enable automatic priority calculation for posts based on comment count • Write debug comments • Write a normal XML file (your filename) • Write a gzipped file (your filename + .gz) 13
- 14. • Auto-Ping Google Sitemaps This option will automatically tell Google about changes. Location of your sitemap file Automatic location sitemap.xml • Filename of the sitemap file Detected Path: /home/recovery/public_html/sitemap.xml Detected URL: http://recovery-health.info/sitemap.xml OR Manual location • Absolute or relative path to the sitemap file, including name. Example: /var/www/htdocs/wordpress/sitemap.xml /home/recover • Complete URL to the sitemap file, including name. Example: http://www.yourdomain.com/sitemap.xml http://recovery Includings • Include homepage • Include posts • Include static pages • Include categories • Include archives Change frequencies Note: Please note that the value of this tag is considered a hint and not a command. Even though search engine crawlers consider this information when making decisions, they may crawl pages marked "hourly" less frequently than that, and they may crawl pages marked "yearly" more frequently than that. It is also likely that crawlers will periodically crawl pages marked "never" so that they can handle unexpected changes to those pages. Daily • Homepage Monthly • Posts Weekly • Static pages 14
- 15. Weekly • Categories Daily • The current archive of this month (Should be the same like your homepage) Yearly • Older archives (Changes only if you edit an old post) Priorities 1 • Homepage 0.7 • Posts (If auto calculation is disabled) 0.1 • Minimum post priority (Even if auto calculation is enabled) 0.6 • Static pages 0.5 • Categories 0.5 • Archives Update options Information and support Check http://www.arnebrachhold.de/2005/06/05/google-sitemaps-generator-v2-final for updates and comment there if you have any problems / questions / suggestions. Probably the most important aspect of your sitemap is just creating it. It will help you get indexed much faster. Generating and submitting a sitemap is something you should definitely do. Google’s information on building and submitting a sitemap can be found here: http://www.google.com/webmasters/sitemaps/login 15
- 16. Summary: When concentrating on the Search Engine Optimization of your Blog - consistency of your Keywords is important. Make sure that your Title tag, Description and Keywords all use the Same Keyword Phrases and in the same syntax. Use keywords Phrases inside your titles of new Blog post as well as inside the text article itself. Make sure you link back to your index page in your posts with Keyword Rich Anchor Links. Use Keyword rich Anchor links to reference other aspects of your Blog or relevant Blog posts. Use images if possible and use alt image tags with keywords. Once you have set up your Blog correctly your on site SEO is complete. Use a program like ABC’s Plug in by the STMADEVELOPER Group to fill your Blog with relevant content. Work on a few back links via your own article submissions, Press Release, forum signatures or posts. Link to and from other website you own. Remember Keyword Research is Important, and your results will depend upon the competition for that keyword itself. So make sure you are researching your keywords and are not attempting to tap into a market that is virtually impossible from new Blog starting position. Expand your keywords, make sure your Niche market is not filled with million upon millions of competition. 16
- 17. If you need additional professional SEO Help, please contact me via my website www.Eric-gehler.biz If you need help creating a network of websites professionally with professional Design and SEO contact Ed Charkow or Eric Gehler at www.stmadeveloper.com Copyright 2005 Eric Gehler All Rights Reserved. No portion of this report maybe reprinted or published without written permission. 17