Flashing Eye Robot / Teaching Electronic Circuits
•Als PPTX, PDF herunterladen•
5 gefällt mir•3,320 views

Developed for a class of 7 - 10 year olds. Produce a “Flashing Eye Robot” Learning basic electronic circuit Agenda Build and understand basic LED circuit with switch Make a flashing light circuit with 2 LEDs and 2 transistors Technical name: “astable multivibrator” Understand how it works

Empfohlen
Weitere ähnliche Inhalte
Was ist angesagt?
Was ist angesagt? (12)
Andere mochten auch
Andere mochten auch (13)
Ähnlich wie Flashing Eye Robot / Teaching Electronic Circuits
Ähnlich wie Flashing Eye Robot / Teaching Electronic Circuits (20)
Mehr von CustomerGauge
Mehr von CustomerGauge (19)
Kürzlich hochgeladen
Kürzlich hochgeladen (20)
Flashing Eye Robot / Teaching Electronic Circuits
- 1. Flashing Eye Robot Multivibrator circuit Clubjesmiddag 18 Mar 2014 Adam Dorrell
- 2. Adam Dorrell / Clubjesdag 18 Mar 2014 What this is • Produce a “Flashing Eye Robot” • Learning basic electronic circuit • Agenda – Build and understand basic LED circuit with switch – Make a flashing light circuit with 2 LEDs and 2 transistors • Technical name: “astable multivibrator” – Understand how it works • Advanced – Change some components to change flashing rate – Two LEDs 1:1 duty cycle also 1 LED like lighthouse 1:10 duty cycle – Make a lighthouse
- 3. Adam Dorrell / Clubjesdag 18 Mar 2014 Our first circuit Electricity BatteryResistor Push button switch
- 4. Adam Dorrell / Clubjesdag 18 Mar 2014 Battery • A source of electricity • We will use a 9v (9 volt) battery • Electricity flows from + to - • DO NOT LET THE WIRES TOUCH! – This will cause a short circuit. – May cause a fire, will certainly flatten battery!
- 5. Adam Dorrell / Clubjesdag 18 Mar 2014 LED • LED is a “Light Emitting Diode” • Invented in 1962 • Light is produced directly from electricity • Can only work one way round – Long lead goes to + • Needs a resistor (or it burns out)
- 6. Adam Dorrell / Clubjesdag 18 Mar 2014 Resistor • Resistor reduces voltage level • It “squeezes” the electricity, letting only some of it through • They are measured in “Ohms” • Symbol: Ω or R • Today we will use 2 types: – Orange-Orange-Brown-Silver = 330R = 330Ω – Brown-Blk-Yellow-Silver = 100K = 100,000Ω
- 7. Adam Dorrell / Clubjesdag 18 Mar 2014 Push button • Makes a contact when pushed • Completes our circuit and allows electricity to flow through it
- 8. Adam Dorrell / Clubjesdag 18 Mar 2014 Learning about the breadboard Row 1 All holes in the selected column are internally connected. Row 10 etc
- 9. Adam Dorrell / Clubjesdag 18 Mar 2014 Circuit Layout – Simple LED 330Ω Breadboard LED D1 R1 – 330R Button +9v -9v Battery
- 10. Adam Dorrell / Clubjesdag 18 Mar 2014 Our first circuit – on the breadboard What happens when you push button? What happens if you have the LED in the wrong way?
- 11. Adam Dorrell / Clubjesdag 18 Mar 2014 LED Circuit
- 12. Adam Dorrell / Clubjesdag 18 Mar 2014 Press the button
- 13. Adam Dorrell / Clubjesdag 18 Mar 2014 2. Flashing Light Circuit • We can make a simple circuit to flash LEDs • It uses 2 transistors as switches • Also capacitors to store the electrical charge, for the length of flash • This is the basic part of any computer
- 14. Adam Dorrell / Clubjesdag 18 Mar 2014 Circuit Diagram - Flashing LEDs Battery Transistor Capacitor Correct name: Astable Multivibrator
- 15. Adam Dorrell / Clubjesdag 18 Mar 2014 Transistor • Invented in 1947 • A transistor is a “Switch” • It is in every item of electronics • In an iphone or computer, there are 1,000,000s in a tiny “chip” • Today we will use a BC547 – It costs EUR 0.10 B = Base C = Collector E = Emitter BC547 NPN bipolar transistor
- 16. Adam Dorrell / Clubjesdag 18 Mar 2014 Capacitor • A capacitor stores electricity – It holds an electrical “charge” for some time – We use it to make the switch stay on for about 1 second
- 17. Adam Dorrell / Clubjesdag 18 Mar 2014 Building it 1 Put in the 1st transistor Make sure it is in the right way! C – B - E
- 18. Adam Dorrell / Clubjesdag 18 Mar 2014 2 Put in the 1st LED. Make sure it is in the right way Long lead goes in row 1 Row 1
- 19. Adam Dorrell / Clubjesdag 18 Mar 2014 3 Add the power leads Red goes in Row 1 Black connects to the transistor (E – Emitter) DO NOT CONNECT THE BATTERY YET! Row 1 (+) Emitter of transistor (-)
- 20. Adam Dorrell / Clubjesdag 18 Mar 2014 4 Put in the 1st resistor This is the 330R resistor (orange, orange, brown) Row 2 to the transistor (Collector C) You can bend it into shape
- 21. Adam Dorrell / Clubjesdag 18 Mar 2014 5 Add the small yellow wire to Row 1 This connects the (+) up the two halves of the circuit
- 22. Adam Dorrell / Clubjesdag 18 Mar 2014 6 Now add the 2nd resistor. This is the 100K resistor Brown-Blk-Yellow-Silver = 100K = 100,000Ω It connects from row 1 to the centre of the transistor (Base = B)
- 23. Adam Dorrell / Clubjesdag 18 Mar 2014 7 Add the black wire to the transistor E connection (-) This will supply the (-) power to the other half of the circuit
- 24. Adam Dorrell / Clubjesdag 18 Mar 2014 8 Add the 1st capacitor. This connects to the C Collector of transistor 1 and the B Base of transistor 2 Add the 2nd capacitor. This connects to the B base (centre) of transistor 1 and the C Collector of transistor 2 BE CAREFUL NOT TO LET THE WIRES TOUCH! Don’t let the wires cross ⊖ ⊖
- 25. Adam Dorrell / Clubjesdag 18 Mar 2014 9 Connect the yellow wire Add resistor 4 This is the 330R This is the 330R resistor (orange, orange, brown) Row 2 to the transistor 2 (Collector C) Now add the 3nd resistor. This is the 100K resistor Brown-Blk-Yellow-Silver = 100K = 100,000Ω It connects from row 1 to the centre of the transistor 2 (Base = B)
- 26. Adam Dorrell / Clubjesdag 18 Mar 2014 10 Bend the resistor into shape Don’t let the wires touch
- 27. Adam Dorrell / Clubjesdag 18 Mar 2014 11 Connect the black wire Add transistor 2 Take care to put in the right way! ⊖ ⊖
- 28. Adam Dorrell / Clubjesdag 18 Mar 2014 12 Add LED 2 Careful to put in the right way! The long lead goes into row 1
- 29. Adam Dorrell / Clubjesdag 18 Mar 2014 13 Now you can connect to the battery! Let’s check it works!
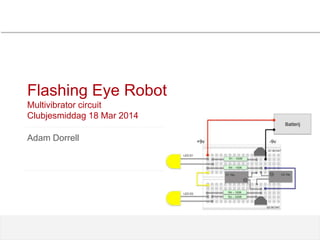
- 30. Adam Dorrell / Clubjesdag 18 Mar 2014 Circuit Layout – Flashing Lights +9v -9v LED D1 LED D2 Q1 BC547 R1 – 330R Q2 BC547 R2 – 330R R4 – 100K C2 10u⊖ R4 – 100K C1 10u ⊖ Battery
- 31. Adam Dorrell / Clubjesdag 18 Mar 2014 Making the Robot
- 32. Adam Dorrell / Clubjesdag 18 Mar 2014
- 33. Adam Dorrell / Clubjesdag 18 Mar 2014 How it works Battery Transistor Capacitor
- 34. Adam Dorrell / Clubjesdag 18 Mar 2014 How it works 2 Battery Transistor Capacitor
- 35. Adam Dorrell / Clubjesdag 18 Mar 2014 Advanced (if time) • Change colour of LEDs • Add more LEDs • Change the values of the resistor and capacitor • Make the flash 1:10 instead of 1:1
- 36. Adam Dorrell / Clubjesdag 18 Mar 2014 Parts list • PARTS LIST – 2 x BC548 NPN transistor – 2 x LED 10mm mix colour – 2 x 330R resistor (0.5w) – 2 x 10u Capacitor – 2 x 100K Resistor – 1 x 9v battery – 1 x 9v holder – 1 x button 6mm sq – Small breadboard • PARTS LIST (NL) – 2 x BC548 Bipolaire NPN transistor – 2 x LED 10mm mix kleur – 2 x 330R weerstand (0.5w) – 2 x 10u Elektrolyt condensator – 2 x 100K weerstand – 1 x 9v 9V batterij (blok) – 1 x 9v Batterijclip – 1 x Druktoets 6mm sq – Insteekprintplaat