SlideShare ist ein Scribd-Unternehmen logo
1 von 49
Garments introduction:
To produce high quality garment in apparel manufacturing industry, a perfect machine layout
plan must be required. To assemble the t-shirt, different types of industrial sewing machines are
arranged by following the layout plan. Line balancing of sewing machines are mainly depends
on the process of t-shirt manufacturing. However, the t-shirt manufacturing process can be
changed according to the style of garment.
Parts of T- shirt
Various parts of Basic T
Flow chart of t- shirt making
Here I have mentioned the sewing sequence of t-shirt production:
Matching the number and size with back and front part
↓
Join the shoulder
↓
Attached Interlining
↓
Over lock the lining
↓
Ready the neck rib for collar
↓
Join the neck rib piping edge by plain m/c
↓
Neck joint
↓
Over locking the neck
↓
Neck tape join and also attached the size label
↓
Neck rib top stitch
↓
Attached the main label
↓
Sleeve marking and numbering with body parts
↓
Sleeve hem
↓
Sleeve joint with the body part
↓
Attached arm side hem
↓
Side seam and at this moment join the care label
↓
Sleeve tuck
↓
Bottom hem tuck at the end
↓
Bottom hem
↓
Inspection
T shirt with print
Machines required for sewing a T-shirt
Generally three types of machines are required to stitch a basic t shirt. Number of machine can
be changed according to style and lay out. Also product may vary in case of changing the
machine.
N.B: This particular chart is for information purpose only.
Seq. No. Operations M/c Type No. Of Machines
1 Shoulder join 4 Thread Over Lock 1
2 Neck rib Tuck 1N Lock Stitch 1
3 Neck Join 4 Thread Over Lock 2
4 Label Make 1N Lock Stitch 1
5 Back Neck Binding Flat lock/1NLS 1
6 Front Neck Top Flat lock 1
7 Back Neck Top 1N Lock Stitch 2
8 Sleeve Hem Flat lock 1
9 Sleeve Join 4 Thread Over Lock 2
10 Side Seam Flat lock 2
11 Sleeve tuck 1N Lock Stitch 1
12 Body Hem Flat lock 1
Total 16
Operation wise machine types and machine requirement
Various sewing action
1. Shoulder join:
Shoulder join can be done by over-lock machine. Both shoulders can be stitched by one operator
for basic T-shirt. For critical style like this picture two operators may required.
Image of a shoulder joint in a Polo- shirt
2. Neck rib tuck
After cutting the neck rib by rib cutter machine, the rib is the measure and attached by single
needle lock stitch machine (SNLS) which is known as neck rib measurement and tuck which also
include thread cutting after neck tuck.
3. Neck rib join/ attach
Over-lock machine is to join neck rib with the garment. For basic style neck rib is attached by
one person. For critical style two or more operator may required to complete the whole
operation.
Neck rib joint done by over-lock machine
4. Label making
Label is an important accessory of a garment. Mainly there are 3 types of label for example size
label, main label, and care label. Label making and label attach both can be done by single
needle lock stitch machine. One is for making and one is for attaching the label.
Image of a size label in a basic t-shirt
5. Back neck binding/ piping
This operation includes tape piping at the back side of the garments. Flat lock machine or SNLS
machine can be used to complete this process.
Back neck piping (hidden)
6. Sleeve hem
Sleeve hem is done by flat lock machine. One operator is enough to complete this process. Two
or more operator is required if too much work is left to be done within scheduled time. One
person is required to cut thread from the hem.
Image of a sleeve hem completed by flat- lock
7. Sleeve join
Normally two operators are needed to attach sleeve to the body in case of large production scale.
One operator is enough to attach sleeve in small scale production. This process is done by over-
lock machine. One or two helper is needed to cut the unnecessary thread/ waste thread from the
sleeve.
Image of a joint of a sleeve
8. Side seam/ Side join
This process is the most time consuming process of whole production. Normally it would take
two operators to complete this process. May requires additional operators to support them
according to garments style or to help them in large scale production. Two or three helper is
required to cut the unnecessary thread form the product.
Image of a completed side
9. Sleeve tuck
This is an optional operation. This operation is completed as per buyer requirement. It is attached
between the start and the end point of the sleeve. SNLS machine is used to complete this
operation.
10. Body hem/ bottomhem
Normally it would take 7-9 seconds to complete a body hem. This process is done by a flat lock
machine. This operation need to be very precise otherwise the garment will be rejected. One
skilled operator is enough to complete this process. Two or more helper is required to cut the
unwanted thread.
Bottom hem/ body hem
Parts of Polo shirt
Flow chart of polo shirt processing
A polo shirt, also known as a golf shirt and tennis shirt, is a form of shirt with a collar, a placket
with typically two or three buttons, and an optional pocket. It is the most stylist and popular
dress in apparel world. Collar is the basic different between t-shirt and polo shirt. Manufacturing
process of polo shirt is divided by some steps. Step wise flow chart of polo shirt is given below.
A. Collar making:
If collar is made by fabric then we have to follow the following process-
Interlining attached on the front part of collar
↓
Sewing mark around the collar
↓
Sewing the two part of collar
↓
Collar edge cutting
↓
Collar turning
↓
Top stitch around the collar
↓
Collar bottom cutting
↓
Mark the mid-point of collar
B. Placket making:
Interlining attach on packet with iron
↓
Top stitch on packet in length direction
↓
Bottom sewing mark
C. Sleeve making
Sleeve hemming
↓
Side seam of sleeve
↓
Turning of sleeve
D. Body making and assembling
Shoulder join with tape
↓
Placket attach with body
↓
Button hole on upper placket
↓
Button attach on lower placket
↓
Right side seam
↓
Bottom hemming
↓
Left side seam with care label
↓
Both sleeve attach
↓
Collar join
↓
Back taping
↓
Bottom tuck
Polo shirt
Machine layout for polo shirt
Normally six types of machines are used in making basic Polo Shirt. They are such as plain
machine (Single Needle), over the edge (Over lock), Button holing, Button attaching, Bar Tack
and Flat lock (Flatbed). But multiple uses, one machine can be used different operation in sewing
floor. Here given a machine layout for basic polo shirt-
S/L
No.
Operation Used Machine No. of
Machine
1 Main Level Join Plain M/C 1
2 Moon Tuck Plain M/C 1
3 Moon Top Seem Flat Lock M/C 1
4 Shoulder Join Over Lock M/C 2
5 Shoulder Top Seem Flat Lock M/C 1
6 Pocket Hem Flat Lock M/C 2
7 Pocket Join Plain M/C 2
8 Placket Rolling Plain M/C 1
9 Placket Servicing Over Lock M/C 1
10 Lower
Placket Join+
Placket Top Seem
Plain M/C 1
11 Nose Tuck Plain M/C 1
12 Collar Servicing Over Lock M/C 1
9 Care label join Plain machine 1
10 Side seam Over lock 3
11 Sleeve tuck Plain machine 2
12 Sleeve soap tuck Plain machine 2
13 Body hem Flat lock 2
Total Machine 26
Polo shirt’s various operations
In polo shirt some operations are same as t shirt. These are
- Shoulder join
- Sleeve join
- Side seam
- Bottom hem
So I am going to ignore those operations and explain the uncommon operations for making a
basic polo shirt.
1. Interlining attaching on collar
Interlining is a layer of material between the outer fabric and the lining. It’s usually included to
give garments additional warmth, but can also be used to change the garment’s drape if you need
to add more body. Interlining can be removable (a good example would be a winter jacket that
has an outer shell made from thicker fabric and then an additional layer that can be zipped in and
out), but can also be a permanent part of the garment. In garments factory interlining generally
attached to the collar by heating/pressing by iron.
Fusible interlining
2. Marking collar
One helper marks two collar parts to make it easy to sew. In case of skilled operator there is no
need to mark the collar.
Collar marking
3. Main label join
Main label indicates brand name of the buyer. Consist of one or more parts. Main label is
attached on the back (inside, around neck) part of the garments. SNLS is used to attach the main
label.
Main label (Adler)
4. Placket marking and tuck
Plackets are accessories which are attached on the main garments. Placket has two parts. Plackets
are marked by a helper before attaching them to the body. Then a helper attached two plackets by
a tuck which can be done by SNLS.
Placket marking
5. Placket attach
In this operation placket is attached below the neck. This is one of the most critical operations of
polo shirt. Quality must be maintained thoroughly. Garments can be rejected if the quality is not
maintained properly. Normally requires two skilled operators to complete this operation. SNLS
is used to attach the placket with the main body.
Placket
6. Placket box
This is another critical operation of polo shirt. Require minimum two operators. Here quality
must maintain thoroughly. One helper is needed to cut the thread from placket and placket box.
This operation can be done by SNLS.
Placket box
7. Back tape attach
Back tape is attached by SNLS. One operator is enough to attach back tape. Back tape can be
attached before/after attaching main label with the garment.
Back tape
8. Back tape top stitch
Next operation after attaching the back tape is back tape top stitch. Sometimes main label can be
joined during back tape top stitch if main label is not attached beforehand. This operation also
requires SNLS. An operator is required to complete this operation.
9. Cuff attach
Normally cuff color is same as collar rib. Sometimes it may vary. Ribs are attached to the body
by over-lock machine. One operator is required to complete this operation.
Cuff
10.Button hole
To make hole for button, button holing machine is used. One operator is required to make hole
on for button attachment. Garments may have two or three button. It depends on buyer
requirement. It takes 18-25 seconds to make three holes on placket.
Button holing machine
Button hole
11.Button attachment
Button are attached by button attach machine. One operator can complete this process himself.
Button size, types, quantity can vary according to buyer. It takes 28-35 seconds to attach 3
buttons with the garment.
Button attach machine
Types of sewing
Understanding the stitches used in manufacturing can help you make an informed decision about
which are best for your next order of garments. When designing or inspecting a garment, your
analysis of seams and stitches should include stitches per inch, seam strength and the size,
consistency and tension of the stitches.
Different stitch and their pros and cons
1.1 Advantage of chain stitch
Chain stitch’s main purpose is to decorate the garments because it leaves a thick and textured
line. The size of this stitch is larger than any other types of stitch and used to fill the gap space in
garments. This type of stitch has a nice- looking “roping” effect which helps to make a better
fading pattern.
Image of chain stitch
1.2 Disadvantages of chain stitch
This type of stitches uses more thread but they are not very strong for that reason they can be
unraveled very easily. Chain stitch requires more thread and consume more time than any other
types of stitch.
2.1 Advantages of multi thread chain stitch
It’s formed when one or more needle threads move through the fabric and inter-loop with a
group of looping threads on the underside of the garment as a result stitch looks different on the
top and bottom of fabric. It may look similar as chain stitch but it has more durability and
elongation. Multi thread chain stitch is used to create elasticity in waistbands, jackets, blazers, t
shirts and more. They create less seam puckering because they located underneath the fabric.
Multi thread chain stitch
2.2 Disadvantages of multi thread chain stitch
Multi thread chain stitches generally consume more thread and require long time to sew even if
the operator is skilled and machine is new. If a thread is damaged or broken the stitch can
unravel easily which threaten the entire the seam. This problem can be prevented by over-
sewing or bar- taking the stitch.
3.1. Advantages of lock stitch
Also known as single needle stitching, the class 300 lockstitch is made when two threads lock
together at minor intervals. It’s the result of a rotary hook catching a needle thread loop as it goes
around the bobbin and interlocks two threads.
This stitch is very common as it’s one of the fastest and cheapest to sew. On the inside and
outside of the garment, this stitch will appear the same. The lockstitch can become very tight,
such as the 301 twin needle lockstitch. So it’s typically not suitable for knit and elastic fabrics
that need flexibility.
Lock stitch construction
3.2. Disadvantages of lock stitch
Not all lockstitches are appropriate for the same purposes. Some classes of lockstitches, like 313
and 314, are good for dress slacks and waistbands. Others, like the 304 zigzag lockstitches, are
more appropriate for decorative stitching or particular parts of athletic wear. The suitability of a
certain lockstitch for a garment depends on the stitching properties a customer requires.
4.1. Advantages of over lock stitch
The class 500 over-lock stitch goes by many other names, including over edge, over lock, serge,
overcast or merrow. It’s typically used in over-sewing, the sewing technique of creating a stitch
over the edge of cut fabric. One group of thread goes around the edge of the fabric so that the
threads from it are contained, which typically reinforces the inner stitching.
By choosing anywhere from one to five threads, the over-lock stitch significantly changes in use:
 Class 501, one thread: end-to-end seaming and hems
 Class 502-504, two to three threads: edging and seaming
 Four threads: mock safety stitches that are strong and flexible
 Five threads: very strong safety stitches
The over-lock stitch is relatively flexible and often used for edge neatening of knitted fabrics. It’s
a popular choice among manufacturers of sportswear, dance clothing, spandex and other
garments and materials that needs to stretch. Aside from these applications, the stitch is also used
on the edge of garments for added aesthetics and to prevent fraying.
Over lock stitch construction
4.2. Disadvantages of over lock stitch
Over lock stitch machine does not have much disadvantages. Its main disadvantage is it
consumes high quantity of thread. But over lock stitching machine sew faster than any other
stitching machine.
Thread consumption
A specified length of a given seam is measured and then the thread is pulled out of this length.
We can use the amount pulled out of this specified length to calculate the ratio of thread
consumed in the entire seam.
Thread cone
Thread consumption formula
Thread consumption means how much thread we need to make a cloth. By using a standard
formula, you will get multiplied factors according to machine type and stitching classes. To
estimate sewing thread consumption, you have to multiply seam length with the factors. A unit
length of seam depends on the following factors for actual sewing thread consumption;
1. Classes of stitch
2. Stitches per inches (SPI)
3. Fabric thickness of the seam
4. Thread tension
5. Sewing thread count
There is various way of measuring thread consumption.
 Estimating consumed actual sewing thread in a specific length of seam
 Finding out the thread consumption by using mathematical stitch formulas based on
thickness (fabric) of the seam and SPI (stitches per inch)
 Calculating sewing thread consumption by using A&E thread consumption calculation
spreadsheets.
For better understanding, let’s find the below example;
Example 1:
Thickness of the seam (fabric thickness): 0.075 inches
SPI (stitches per inch): 11
Length of the seam: 44 inches
Mathematical equation for consumption: C = 4 + 2ts
Where,
T = thickness
S = stitch per inch
So, the result is: C= 4 + 2ts
= 4 + 2 (0.075 x 11) = 5.65
Here, 44-inch x 5.65 = 248.6 inch / seam
With 15% seam wastage, 248.6 inch/ seam x 1.15 = 285.89 inch per seam or 7.94 yards per
seam.
Let’s find out the estimate thread consumption of machine wise for garments sewing;
Machine Thread per inch stitching for sewing
Plain Machine - Single needles 2.75 inches
Plain Machine - Two needles 5.5 inches
Over lock Machine - Three threads 15 inches
Over lock Machine - Four threads 18.75 inches or 20 inches
Over lock Machine - Five threads 23 inches
Safety stitch 20 inches
Flat lock stitch 22 inches
Chain stitches - one needles 12.5 inches
Chain stitches - two needles 25 inches
Button Hole 24 inches
Bar take machine 26 inches
By using above consumption based on machine, let’s take a look example for better
understanding;
Example 2 Suppose, we will estimate sewing thread consumption for kid’s basic T-shirt and T-
shirt has used 94 inch four thread over lock stitching, flat lock 48 inches, two needle chain
stitches 18 inches and plain machine one needle 30 inches.
Now, as per above information the sewing thread consumption of kid’s basic T-shirt is;
In meter: (94 x 4 thread O/L) + (48 x F/L) + (18 x 2 needles chain stitches) + (30 x one needle
P/M)
= (94 x 18.75) + (48 x 22) + (18 x 25) + (30 x 2.75)
= 1762.5 + 1056 + 450 + 82.5
= 3351 inch
= 3351 inch / 39.37 = 85 meter (As we know, 1 meter = 39.37 inches)
= 85 meter + 15% wastage
= 98 meter / body
So, as per above information, we need sewing thread for basic kid’s T-shirt is 98 meters per
garment to complete the cloth stitching.
As we already know the way to determine sewing thread consumption per garments. Now let’s
find out the cost of consuming sewing thread per garments. Take a look below example for clear
understanding
Example 3: Suppose, a spun polyester 40/2 color sewing thread cone price is $0.80 for 4000
meters. And our consumption of per garment is 98 meters. So, what will be the cost of sewing
thread per garment?
The unit price of a cone / total meter X consumption of per body
= 0.80 / 4000 x 98
= $ 0.0196
So, as per above consumption per body sewing thread cost is 0.0196$.
We already know the way of determine sewing thread consumption and costing per garments.
Now let’s find the way to book bulk sewing thread for an order.
Suppose, our bulk order quantity is 150,000 pcs for basic T-shirt style and our sewing thread
consumption is 98 meters per body. If per cone sewing thread is 4000 meters, then what will be
the bulk sewing thread consumption for 150,000 pcs garments?
Total order quantity x Sewing thread per body / Per cone sewing thread
= 150,000 x 98 / 4000
= 3675 cones
So, we need 3675 cones for completing sewing 150,000 pcs garments.
Example 3
Union Special Machine Company published a “Thread Consumption Booklet” that consists of a
number of thread consumption formulas for various stitch types based on the stitch length and
thickness of the seam. These mathematically derived consumption factors can be multiplied
times the length of the seam to estimate the combined amount of top and bottom threads. On
some over edge and cover stitch types it is necessary to also know the seam width or needle
spacing to properly calculate the amount of thread consumed.
Example:
Stitch and seam: 401 SSa-1
Stitches per inch: 8
Thickness of the seam: .075 inches (measured with a micrometer)
Length of the seam: 42 inches or 1.17 yds.
Seam thickness 8 SPI
.055 4.88
.060 4.96
.065 5.04
.070 5.12
.075 5.20
Consumption based on the mathematical equation –
C = 4 + 2ts
C = 4 + 2(.075 X 8) = 5.20
t = thickness of the seam
s = stitches per inch
1.17 yds X 5.20= 6.08 yds / seam.
6.08 yds/seam X 1.15 = 7.00 yds per seam including a 15% waste factor.
*** A shirt having 104 inches 4 Threads Over lock stitches, 52 inches Flat lock stitches, 20
inches 1 Needle Chain stitches, 15 inches Single Needle Plain Machine stitches, GSM is normal,
find out its thread consumption in meters?
Answer: {(104 x 19) + (52 x 32) + (20 x 5) + (15 x 2.75) + 10%} / 39.37 = 106.71 Meters.
(39.37 inches = 1 Meter)
*** Suppose, we want to buy thread cones with 2000 meters thread, now figure out how many
cones do we need to stitch 3000 pcs of garments, per garment’s thread consumption 106.71
meters? Answer: 106.71 x 3000 / 2000 = 160 cones.
*** Suppose, we want to buy thread cones with 2000 meters thread, now figure out how many
cones do we need to stitch 3000 pcs of garments, per garment’s thread consumption 106.71
meters? Answer: 106.71 x 3000 / 2000 = 160 cones.
Sewing Thread Consumption for Different Garments
Thread consumption for some garments which can be used as rough has shown in the below
table.
SL No. Name ofGarments For Using SewingThread
Consumption(m)
01 Aprons All 20
02 Blouses Girls,ladies 85
03 Brassieres Girls,ladies 40
04 Brief Childs,men’s,ladies 40/ 50/ 65
05 Dressinggown Childs,men’s 165 / 250
06 Jacket Men’s 200
07 Jeans Men’s 170
08 Neatwear Ladies,men’s 70 / 80
09 Nightdress Childs,ladies 55 /100
10 Overcoat Childs,ladies,men’s 135 / 315 / 520
11 Skirts Childs 100
12 Raincoat All 285
13 Trouser Childs,ladies,men’s 100 / 140 / 190
14 Shirt Men’s,child’s 110 / 75
15 Slippingbag Adult,child’s 275 / 185
16 Suits Ladies,men’s 365 / 480
17 Swimwear Ladies 75
18 Tie Men’s 5
19 Towel All 10
20 Track suit Ladies,men’s 160
21 Trouser Men’s 270
22 Under wear Men’s 50
23 T-shirt Childs,ladies,men’s 25 / 45 / 35
24 Waistcoat Ladies,men’s 180
Sewing Thread Consumption Ratio for Different Types of Stitches
The amount of thread consumption varies according to the types of stitches.
Stitch Type Thread consumption
for per cm seam (cm)
No. of
needle
Needle threadand
looperthread ratio
101, chain stitch 4.0 1 1:0
301, lock stitch 2.5 1 1:1
304, zigzag lock stitch 7.0 1 1:1
402, 2- thread chain stitch 5.5 1 1:3
503, 2- thread overedge stitch 12.0 1 1.2:1
504, 3- thread overedge stitch 14.0 1 1:5
512, 4- thread mock safety
stitch
18.0 2 1:3.3
602, 4- thread coveringstitch 25.0 2 1:3.3
606, 9- thread flat lock stitch 32.0 4 1:3.5
801, 4- thread safetystitch 17.5 2 1:1.4
802, 2- thread safetystitch 20.0 2 1:1.34
805, 2- thread safetystitch 21.0 3 1:2
Yarn consumption
Problem 1: Calculate the yarn consumption per yard of a woven fabric of specification (20 X
16)/(128 X 60) X 58”, 100% cotton 3/1 twill fabric.
Solution:
Requirement of yarn for the fabric is to be calculated for both warp yarn and weft yarn separately
as because the warp and weft yarns are of 20s and 16s respectively. Here, for easy understanding
yarn consumption for 100 yards grey fabric production is done. At the end, yarn consumption per
yard of grey fabric will be converted.
Warp yarn (20s) requirement
= (128 X 58)/1 X 100/1 X 1/(840 X 20) lbs
= 44.19 lbs
Weft yarn (16s) requirement
= (60 X 36 X 100 X 58)/(1 X 36) X 1/(840 X 20) lbs
= 25.89 lbs
Some allowances to be added to the yarn requirements for the following factors:
a. Crimp allowances ………. 10%
b. Yarn wastage ………….... 5%
………………………………………………….
Total ………..................… = 15%
Hence the actual yarn requirements including crimp allowance and yarn wastage allowance will
be –
Warp yarn (20s) = 44.19 lbs X 1.15 = 50.82 lbs
Weft yarn (16s) = 25.89 X 1.15 = 29.77 lbs
Now, for each yard of the said fabric production yarn consumption will be –
Warp yarn (20s) = 50.82 / 100 = 0.51 lbs
Weft yarn (16s) = 29.77 / 100 = 0.30 lbs
Problem 2: Suppose, you receive a yarn dyed t-shirt order from buyer. Details as below
Style: 100% cotton, Single jersey, 160 gsm yarn dyed round neck t-shirt.
Color: Beige/Navy (only one combo)
Quantity: 10,000 pcs (in four sizes, S, M, L & XL)
Stripe: Beige 7 cm & Navy 1.5 cm (Total 8.5 cm)
Body length: 73 cm
Sleeve length: 19.5 cm
½ Chest: 52 cm
Consumption: 2.78 kgs/dozen (considering total wastage 18%) you may use this for pricing.
Normally the wastage of yarn dyed garments depends on styling.
Normal wastage for yarn dyed:
Dyeing (yarn) wastage: 6%
Knitting wastage: 3%
Wash wastage: 5%
So, you should need 116 kgs yarn to produce 100 kgs fabric
But be careful, during the bulk yarn booking you should booked the yarn based on the
consumption you got by using pattern & marka. Some time I saw buyer asked for match the body
stripe with sleeve then the cutting wastage become more than 5%.
We know the body length is 73 cm
Where, beige color stripe is 7 cm
And Navy color stripe is 1.5 cm
Then total length of one repetition is 8.5 cm
So, we need total (73/8.5) = 8.58824 repletion to complete a body (but here we will count 9
repetition for cutting & sewing wastage.)
So, total sum of Navy stripe will be (1.5 cm X 8.58824) = 12.8824 cm
And total sum of Beige color stripe will be (7 cm X 8.58824) = 60.1177 cm
So, 12.8824 cm + 60.1177 cm = 73 cm (total body length)
Now we just calculate the percentage of each color in a body
Navy color percentage in the body will be
= (12.8824 ÷ 73) %
= 17.65 %
= (60.1177÷73) %
= 82.35 %
= 17.65 + 82.35
= 100 %
So, now if the consumption is 2.78 kg
Then
Navy color will be = 0.49067 kg ( 2.78 kg X 17.65% )
And Beige color will be = 2.28933 kg ( 2.78 kg X 82.35% )
Fabric consumption
Fabric consumption is an important task for garments merchandiser. Because 50% cost for
garments making is fabric. If fabric consumption and calculation is not correct then company
will face to huge loss. There are two formulas or process of fabric consumption for basic t-shirt.
One is in Centimeter and another one in Inch. They are given below.
Calculation – 01: Formula in Centimeter:
Suppose one of T-shirt’s Body length (72+4) cm, Sleeve length (23+2) cm, Chest length (Dia)
(53+2) cm and G.S.M 180. Determine the fabric consumption for the basic T-Shirt.
Solution:
Here, Body Length = 76 cm
Sleeve Length = 25 cm
Chest Length = 55×2=110 cm (For both side)
We get,
(Body length + Sleeve length) x (Chest x 2) x G.S.Μ
Fabric consumption = ……………………………………………......………….. Kg
1000 x 10000
(76 + 25) x (55x2) x 180
= …………………………………
1000 x 10000
101 x 19800
= …………………
10000000
1999800
= ………………….
10000000
= 0.19998 kg
The amount of fabric is just for 1 piece. Generally 12 pieces are counted with one.
Fabric consumption for 1 Dozen = 12×0.19998 kgs
= 2.399 kgs
Fabric consumption for 1 Dozen 2 kgs and 399 gms.
Calculation – 02: Formula in Inch:
Here, Body Length = (28+ 1) inch
Sleeve Length = (9+1) inch
Chest Length = (21+1) inch =22 inch×2
= 44 inch
G.S.M = 180
According to formula,
(Body length + Sleeve length) x (Chest x 2) x G.S.Μ
Fabric consumption = ……………………………………………….........……….. Kg
1550 x 1000
(29 + 10) x (22x2) x 180
= …………………………………..
1550 x 1000
308880
= ………………….
1550000
= 0.199920 kgs
The amount of fabric is just for 1 piece. Generally 12 pieces are counted with one.
Fabric consumption for 1 Dozen = 12×0.199920 kg
= 2.391 kg
Fabric consumption for 1 Dozen 2 kg and 391 gm.
Costing
Cost typically can be defined as’ the economic value placed upon the resources consumed to
make a product.’ Costing is the process of estimating and then determining the total cost of
producing a garment, including the cost of materials, labor and transportation as well as the
general expenses of the operating the business.
Components of costof garment:
 Fabric
 Trims
 Cut Make & Trim charges
 Value added services: printing, embroidery, washing, applique
 Testing of the garment
 Quality
 Transportation and logistics cost
 Profit of the manufacturing organization
The parameters that affect the garment cost mostly are; Unit of Measurement, MOQ, Incoterm
decided between raw material vendor and garment manufacturer, order quantity, etc.
Fabric:
Fabric is generally the most significant factor in costing of garment. Fabric accounts for 60 to
70% of the total cost of basic-styled garments .In many cases, evaluating the quality and the
quantity of fabric consumed in the garment indicates better than any other factor the cost of
producing it. The cost of fabric depends upon the type of fabric is going to be utilized in the
garment. Types of fabrics are
Woven/knitted fabric
Power loom/automatic loom fabric
Fiber/yarn/fabric dyed fabric
Fiber content of fabric i.e. cotton, wool, polyester, silk, blended fabric etc.
Type of dyeing and finish used
GSM/ Weight of fabric.
Type of yarn used i.e. ring spun, open ended, or carded/combed etc.
UOM: Unit of Measurement (UOM) is a quantity used as a standard of measurement. The Unit
of Measurement for woven fabric is normally in meters or yard, while knitted fabric measured in
Kilograms or some time it is in yards also. Merchandiser should aware of unit of measurements
while finding out the cost of fabric. Sometimes buyer specifies the UOM of fabric.
MOQ: Fabric Minimum Order Quantity (MOQ) is nothing but the smallest quantity of a product
that a fabric manufacturer can supply. The MOQ depends on the type of fabric and on capacity
of vendor.
Order quantity: The cost of fabric may vary with the order quantity, more the order quantity; cost
of fabric can be optimized till certain level. But this is again depends on the type of fabric
required and fabric manufacturer capacity along with negotiation between fabric buyer and
supplier.
Incoterm used: This factor makes the huge difference in fabric cost. While importing the fabric
from another country merchandiser need to deal with the supplier for delivery of the fabric on the
basis of incoterms like EXW, FOB, CIF, DDP etc. based on which it will be decided that who
will bear the cost of transportation and risk. No matter which incoterm is used but all the cost
needs to be charged to buyer. If fabric is getting purchased by using EXW incoterm then
merchandiser needs to add the transportation cost along with the custom clearance charges along
with the price of fabric while calculating the garment cost.
The cost of fabric can be calculated by following way
Yarn cost + fabric manufacturing cost (knitting or woven) + dyeing cost + finishing cost= total
fabric manufacturing cost
Dyeing cost indicate that if fabric is yarn dyed or fiber dyed or piece dyed respective cost will be
added depending upon fabric type. Finishing cost included heat setting cost, normal finishing,
compacting (knitted fabric) etc.
Costcalculations of fabric in garment:
Considering the knitted fabric and t-shirt as an end product, then fabric consumption can be
calculated as
And for woven fabric and shirt as an end product, then the fabric consumption can be calculated
as
The marker efficiency considered 80-85% depending upon the fabric type i.e. solid dyed, stripe,
checks fabric.
Efficiency can be changed depending upon the fabric parameters, matching parameters of the
buyer, type of style.
The buffer in the consumption should be added to the fabric by merchandiser, generally it is
0.03-0.08% of total fabric consumption.
In case of trim fabric i.e. interlining the 10-20% more buffers is kept while ordering the
interlining, in order to maintain the inventory and to avoid the shortage during the production.
Fabric wastage percentage to be added in calculating fabric consumption. Considerable wastage
depends on factory practices, type of fabric and type of garment.
Trims
Trims include all materials other than fabric used in the garment. For example most garments
have accessories such as threads, buttons, zippers, labels, elastics and miscellaneous items.
Quality and quantity of trim and labor required to apply it on garment are directly related to cost
of garment. The different trims have different UOM; even same trim can have 2-3 different
UOMs that can be summarized as
Trims UOM
Thread 1000 meter tube, 2000/5000 Meter Cone
Labels Unit
Zippers Unit
Buttons Gross (144 Units)
Poly-bag Unit , thickness is measured in mm. or gauge
Carton Unit
Hand tags Unit
Shanks Gross
Rivets Unit
Lace 50 Meter
Hanger Unit
Tapes / Velcro 50 Meter or Kg.
Elastics 50 Meter
UOM of Various Trims used in Garment
Other factors that need to consider while calculating the trims cost is MOQ, order quantity, lead
time and quality of raw material used to make the trims.
Thread: After fabric, thread is another component which needs to be considered for calculating
the cost of garments most. It is dependent upon the type of seam and SPI. While ordering the
thread the operation break down and number of sewing M/c for that particular style should be
taken in account. Accordingly number of cones of thread needs to order. In order to calculate
thread consumption special software’s are also available which gives the accurate thread
consumption.
Labels: Several labels are used in garment i.e. main label, care label, content label, the cost of
label depends upon make of label i.e. fiber content, printed, jacquard label, size of labels, colors
used in label, etc. for a unit garment label cost may not play a significant role but in case of mass
production it plays vital role. The other factors that are important while ordering the labels are
MOQ, order quantity.
Zipper: Zippers also has several types like metallic zipper, nylon zipper etc. which plays the
drastic role in cost of zipper. Merchandiser should be aware of the parameters of zipper for
accurate costing and negotiation. MOQ is the parameter which affects the cost of zipper
considerably; at certain MOQ only zipper will get at desired price.
Buttons: Buttons can be made up of different types, nylon buttons, plastic buttons, acrylic based
buttons, wood, shell, metal. Every type of button has its own MOQ decided by manufacturer of
button. Buttons are purchased on gross with the ligne specified.
1 gross = 1 packet =144 buttons= 12 dozens
Poly-bags: The cost of poly bag is highly dependent on thickness, dimension and raw material
used. The poly bag ordered in terms of number of pieces. The cost of poly bag is equally
important as it give significant difference when we consider the whole order quantity.
Cartons: Same like poly bag cost of cartons are highly dependent on material used and
dimensions. Depending upon these factors cost of cartons is decided, the UOM of cartons
generally is number of pieces while cost varies with MOQ. These are procured based on the
number of plies, dimensions of the carton and GSM of the paper used to make the carton.
Generally the number of plies used in carton box is 3, 7 and 9 ply. For example: 9 ply, 60 X 40
X40, 4 side calico, 1 side print and 180 GSM.
Hand tags: Hand tags or price tags are used as packing material, the cost of hand tags are
dependent upon material used, printing on it, and MOQ.
Shanks and rivets: Generally these trims are made up of metallic, the UOM of rivets and shanks
is gross and No. of pieces respectively. The cost of shanks and rivets is dependent upon the
MOQ and material used.
Hangers: Hangers are made up of generally hard plastics sometimes wood, the cost of hanger is
depend on material used, size, print and color on it. Generally transparent hangers are more
costly than colored one.
Taps and Velcro: Tapes are purchased based on the width and mobilon tapes are purchased in kg.
Thus increase in width by 100% increases the cost by 80%. For satin tapes increase in width by
150% increases the cost by 250%. Another factor that affects cost is MOQ.
Trims charges are generally calculated as for the different type of sourcing and mode of
transportation.
If shipment is by air then the trim cost + 15-25% more cost is quoted to buyer, depending on the
freight charges
If shipment is by sea then trim cost + 10-15% more cost is quoted to buyer depending upon
freight charges.
These additions are done by merchandiser, depending upon the business outlook.
Other charges included during the costing by merchandiser
Charges In %
Rejection and wastage 2-5 % (depending upon order
quantity)
Commission on foreign exchange 2-3%
Commission of buying house (if applicable) 1-1.5%
Transportation charges internally 1-2 $/ garment
Margin (decided by marketing department by
looking business scenario)
10-15%
Testing inspection charges 1-2%
Items Consumption UOM* Rate ($) Amount ($) Remarks
1 2/60s single jersey 0.224 KGs 6.5 1.45
2 Cuff and collar ribs 0.08 KGs 5 0.4
3 Sewing thread 150 Meters 0.08 approx.
4 Buttons 3 Gross 0.04 approx.
5 Main label 1 Unit 0.02 approx.
6 Care label 1 Unit 0.02 approx.
7 Hang Tags 1 Unit 0.06 approx.
8 Price Tags 1 Unit 0.04 approx.
9 Poly bags 1 Unit 0.02 approx.
Total Cost 2.13
Costof making
The cost of making done “in house” is based on the total cost per hour multiplied by the number
of hours it takes to make the style and divided by the number of units produced if the making is
done by a contractor; the contractor adds profit on to this amount.
Labor cost per minute = (Monthly salary of an operators/Total minutes available in the month) at
100% efficiency
CM cost = (SAM of the garment * Minute cost of the labor)/Line efficiency (%)
Value added services:
This is cost added to for special process like embroidery, printing, washing used to impart the
type of look buyers wants. These are associated cost of garment manufacturing are wet
processing chemicals, washing and contracted operations.
Example of garment costing:
The example of garment cost is given by assuming the following dimensions for polo neck T-
shirt, no. of pieces = 4000, salary of the operator =6000 Rs./month=120$/month no. of working
days = 26, line efficiency considered= 50%, sewing SAM= 15 min., Cutting SAM= 7 min.
1$=50INR
Chest = 60 cm, Length (HSP to waist) = 75 cm, Sleeve length = 25 cm
Fabric used is 2/60s 100% cotton S/J fabric. GSM is 180
The fabric consumption can be calculated as
= (75 + 25 + 2) X (60 +1) X2X 180/10000
= 0.224kg + 0.08(weight of cuff and collar)
CMT charges are calculated as:
Total available capacity per month (in minute) = 26 working days*8 hours/day*60=12,480
minutes
Labor cost per minute = (Monthly salary of an operators/Total minutes available in the month) at
100% efficiency
= 6000/12480
=0.480 Rs.
Sewing cost = (SAM of the garment * Minute cost of the labor)/Line efficiency (%)
=15* 0.480/50
=0.288$
Cutting cost = (SAM of cutting * Minute cost of the labor)/cutting efficiency (%)
= 7*0.480/50
=0.134$
Trimming cost is considered as 0.06$as it depends upon how many operators are there for
trimming.
Production cost of garment (CMT) = sewing cost+ cutting cost + trimming cost
= 0.288+0.134+0.06
= 0.482$
FOB costof garment
Fabric cost + 7% duty 1.97$
Trim cost + 7% duty 0.3$
Fabric and trims transportation charges 0.06$
Testing + inspection charges 0.2$
Commission on foreign exchange 0.08$
Buying house commission 0.16$
Rejection 5% 0.16$
Value addition services 0.2$
CMT 0.482$
Margin 0.5$
Total FOB cost of garment 4.11$
Various types of printing
1. Screen printing
A process, where ink is mechanically applied to a substrate with the use of a screen and
Squeegee.
Process of screen printing
Color separation
Each color of the design requires an individual screen so we must separate the design into its
component colors. This is done on the computer and each color separation is printed to a
transparent sheet.
4- color separation
4-colour process is a more advanced separation and printing technique. Use 4 colors of
transparent ink to produce the colors from the original design. The four colors, Cyan, Magenta,
Yellow, and black (CMYK), are printed as half-tones that interact with each other and the white
background of the shirt to create color and tonal values.
Various colors prints
2. Plastisol printing
Good color opacity onto dark garments and clear graphic detail with, as the name suggests, a
more plasticized texture. Plastisol inks require heat (approx. 150°C) to cure the print. Due to
excess phthalate in PVC, this is banned for Children’s wear.
Plastisol printing
3. Non-PVC
Relatively new breed of ink and printing with the benefits of Plastisol but without the main toxic
components – soft feeling print. Suitable for kids wear.
Non- PVC print
4. High density print
This is one of the recent developments in printing which gives thick prints on the surface of
garments. Achieved by either giving more number of coats or by using thickener indirect films
used for making the screens.
5. Suedo ink print
Suede is a milky coloured additive that is added to Plastisol. With suede additive you can make
any colour of Plastisol have ‘suede’ feel. Generally 50% suede additive to your normal Plastisol.
Suedo ink print
6. Discharge print
Used to print lighter colors onto dark background fabrics, they work by removing the dye already
present in the garment. This gives a much softer texture.
Discharge print
7. Sticker print
This is ready to transfer print. The plastisol print is already printed on paper and will be
transferred on to garment in the fusing process. The main advantage of this method is less
expensive.
Sticker print
8. Pigment print
These penetrate the fabric more than the Plastisole inks and create a much softer feel. Also useful
for larger area prints where texture is important.
Pigment print
9. Glitter print
Metallic flakes are suspended in the ink base to create this sparkle effect. Usually available in
gold or silver but can be mixed to make most colors.
Glitter print
10. Metallic print
Give metallic look. Similar to glitter, but smaller particles suspended in the ink. Smooth in
texture when compared to glitter.
Metallic print
11. Foil print
This printing method is based on the use of metallic foil paper of aluminum or copper one. The
print fixation method is similar to transfer printing. This print method is popular amongst
youngsters.
Foil print
12. Distressed/ Khadi print
It consists of titanium dioxide with other auxiliaries. The important factor in
printing of this is right combination of titanium dioxide and proper choice of
binder.
Khadi print
13. Puff print
An additive to Plastisol inks which raises the print off the garment, creating a 3D feel. In this
method when the paste is printed and dries it look like normal printing garments but once it is
cured the prints gets raised from the surface of fabric.
Puff print
14. Cavier bead print
Glue is printed in the shape of the design, to which small plastic beads are then applied. Works
well with solid block areas creating an interesting tactile surface.
15.Silicone print
To counter inferior wash and weather durability, poor hand feel of some prints like plastisol
printing mills tried silicone inks because of their good washing durability, hand feel, elongation
properties and environmental friendliness.
Silicone print
16. Flock print
This process involves printing of glue on the fabric first, applying the fiber flock on the gel
printed by keeping the fabric on special table (electro statically charged). It requires a little high
time for curing than normal prints. 120 seconds at 160C will be sufficient for curing.
Flock print
17. Organic print
Organic print range covers the natural dyes, and the other pigment dyes which lie under the
specifications made by G.O.T.S. For Printing Organic Dyes the company/manufacturer should
get the certification from G.O.T.S.
Organic print
Conclusion
Before completing a final garments there are various process which need to be completed first.
One cannot deliver complete garments for shipment without sourcing various material and
complete various process. Before shipment one need to assume yarn, thread, fabric consumption
and costing properly. Then he needs to collect those raw materials to for sewing. After sewing
washing is required because dirt, oil, wax, or toxic material can be with the product. When every
process in every sector is done then products moved to the finishing section for poly. At the very
last products are ready for delivery.
References
https://www.coats.com/Guidance/Basic-stitch-types
https://www.intouch-quality.com/blog/4-sewing-stitches-used-in-manufacturing-and-their-
benefits
https://www.textiletoday.com.bd/fashion-merchandising-garment-costing/
http://www.amefird.com/wp-content/uploads/2012/09/Estimating-Thread-Consumption-.pdf
https://apparelcosting.blogspot.com/2017/05/sewing-thread-consumption-stitch-machine.html
https://textilecalculation.blogspot.com/2015/05/sewing-thread-consumption-formula-with.html
https://www.slideshare.net/sivajagadish/garment-printing?from_action=save
https://textilecalculation.blogspot.com/2015/08/yarn-consumption-for-fabric.html
https://textilecalculation.blogspot.com/2016/02/fabric-consumption-for-basic-t-shirt.html
http://onlineapparelsolution.blogspot.com/2016/08/how-to-calculate-garment-sewing-thread.html
http://learnapparelmerchandising.blogspot.com/2011/10/how-do-calculate-yarn-consumption-
of.html

Weitere ähnliche Inhalte

Was ist angesagt?

Multi thread chain stitch machines
Multi thread chain stitch machinesMulti thread chain stitch machines
Multi thread chain stitch machinesShubham Singh
 
Study on differents types of sewing machine
Study on differents types of sewing machineStudy on differents types of sewing machine
Study on differents types of sewing machinePacific Cotton
 
PRODUCTION PLANNING AND CONTROL
PRODUCTION PLANNING AND CONTROLPRODUCTION PLANNING AND CONTROL
PRODUCTION PLANNING AND CONTROLDisha Pawar
 
Internship presentation in knit composite garments
Internship presentation in knit composite garmentsInternship presentation in knit composite garments
Internship presentation in knit composite garmentsNoorul Islam Saiful
 
Presentation on Garments Cutting
Presentation on Garments CuttingPresentation on Garments Cutting
Presentation on Garments CuttingAmanuzzaman Aman
 
Garments Inspection
Garments InspectionGarments Inspection
Garments InspectionTakbir Ahmed
 
Button attaching machine
Button attaching machineButton attaching machine
Button attaching machinePacific Cotton
 
Apparel Quality Control & Quality Assurance
Apparel Quality Control & Quality AssuranceApparel Quality Control & Quality Assurance
Apparel Quality Control & Quality AssuranceSAMultimedia
 
Garment Industries Finishing Department
Garment Industries Finishing DepartmentGarment Industries Finishing Department
Garment Industries Finishing DepartmentsanjeevSingla10
 

Was ist angesagt? (20)

Multi thread chain stitch machines
Multi thread chain stitch machinesMulti thread chain stitch machines
Multi thread chain stitch machines
 
Fabric spreading
Fabric spreadingFabric spreading
Fabric spreading
 
Study on differents types of sewing machine
Study on differents types of sewing machineStudy on differents types of sewing machine
Study on differents types of sewing machine
 
Industrial pattern making
Industrial pattern makingIndustrial pattern making
Industrial pattern making
 
PRODUCTION PLANNING AND CONTROL
PRODUCTION PLANNING AND CONTROLPRODUCTION PLANNING AND CONTROL
PRODUCTION PLANNING AND CONTROL
 
Garment production and productivity
Garment production and productivityGarment production and productivity
Garment production and productivity
 
Internship presentation in knit composite garments
Internship presentation in knit composite garmentsInternship presentation in knit composite garments
Internship presentation in knit composite garments
 
stitch classification
stitch classificationstitch classification
stitch classification
 
Garment finishing
Garment finishingGarment finishing
Garment finishing
 
Garment technology
Garment technologyGarment technology
Garment technology
 
fabric spreading
fabric spreading fabric spreading
fabric spreading
 
Garment Faults
Garment  Faults Garment  Faults
Garment Faults
 
Presentation on Garments Cutting
Presentation on Garments CuttingPresentation on Garments Cutting
Presentation on Garments Cutting
 
Garments Inspection
Garments InspectionGarments Inspection
Garments Inspection
 
Over dyeing on Apparel
Over dyeing on ApparelOver dyeing on Apparel
Over dyeing on Apparel
 
Garments Accessories & Trims
Garments Accessories & TrimsGarments Accessories & Trims
Garments Accessories & Trims
 
Button attaching machine
Button attaching machineButton attaching machine
Button attaching machine
 
Apparel Quality Control & Quality Assurance
Apparel Quality Control & Quality AssuranceApparel Quality Control & Quality Assurance
Apparel Quality Control & Quality Assurance
 
Apparel Promoters ltd. for internship report
Apparel Promoters ltd. for internship report Apparel Promoters ltd. for internship report
Apparel Promoters ltd. for internship report
 
Garment Industries Finishing Department
Garment Industries Finishing DepartmentGarment Industries Finishing Department
Garment Industries Finishing Department
 

Ähnlich wie All you have to know to make a knit garments.

Textile Internship Report (Part-3)
Textile Internship Report (Part-3)Textile Internship Report (Part-3)
Textile Internship Report (Part-3)Sayakh Mahmud
 
types of SEWING MACHINES and parts .pptx
types of SEWING MACHINES and parts .pptxtypes of SEWING MACHINES and parts .pptx
types of SEWING MACHINES and parts .pptxClarinaBergante
 
Working aids for amm department of bgmea
Working aids for amm department of bgmeaWorking aids for amm department of bgmea
Working aids for amm department of bgmeaazarif200
 
operating specialized industrial garment machines level 2.1.ppt
operating specialized industrial garment machines level 2.1.pptoperating specialized industrial garment machines level 2.1.ppt
operating specialized industrial garment machines level 2.1.ppthenok16
 
How to Assemble All Components (Fly,Pockets,Waist Bank) and Prepare Pant ?
How to Assemble All Components (Fly,Pockets,Waist Bank) and Prepare Pant ?How to Assemble All Components (Fly,Pockets,Waist Bank) and Prepare Pant ?
How to Assemble All Components (Fly,Pockets,Waist Bank) and Prepare Pant ?Introcanvas
 
Babies sewing intructions
Babies sewing intructionsBabies sewing intructions
Babies sewing intructionsVictorOrtega103
 
Magnum Clothing Private Limited, Industrial Report
Magnum Clothing Private Limited, Industrial ReportMagnum Clothing Private Limited, Industrial Report
Magnum Clothing Private Limited, Industrial ReportSaranya Narayana Moorthy
 
study on threading and bobbin winding
study on threading and bobbin windingstudy on threading and bobbin winding
study on threading and bobbin windingPacific Cotton
 
How To Make a Soap Saver Shower Mitt
How To Make a Soap Saver Shower MittHow To Make a Soap Saver Shower Mitt
How To Make a Soap Saver Shower Mittkootoyoo
 
[Singer sewing machine_company]_singer_instruction
[Singer sewing machine_company]_singer_instruction[Singer sewing machine_company]_singer_instruction
[Singer sewing machine_company]_singer_instructionThu Vien Luan Van
 
Tanuja Sahu,Fashion Design ,Dezyne E'cole College
Tanuja Sahu,Fashion Design ,Dezyne E'cole CollegeTanuja Sahu,Fashion Design ,Dezyne E'cole College
Tanuja Sahu,Fashion Design ,Dezyne E'cole Collegedezyneecole
 
Geeta Kumari ,Fashion Design ,Dezyne E'cole College
Geeta Kumari  ,Fashion Design ,Dezyne E'cole CollegeGeeta Kumari  ,Fashion Design ,Dezyne E'cole College
Geeta Kumari ,Fashion Design ,Dezyne E'cole Collegedezyneecole
 

Ähnlich wie All you have to know to make a knit garments. (20)

Textile Internship Report (Part-3)
Textile Internship Report (Part-3)Textile Internship Report (Part-3)
Textile Internship Report (Part-3)
 
Work aids of sewing machines
Work aids of sewing machinesWork aids of sewing machines
Work aids of sewing machines
 
types of SEWING MACHINES and parts .pptx
types of SEWING MACHINES and parts .pptxtypes of SEWING MACHINES and parts .pptx
types of SEWING MACHINES and parts .pptx
 
Working aids for amm department of bgmea
Working aids for amm department of bgmeaWorking aids for amm department of bgmea
Working aids for amm department of bgmea
 
operating specialized industrial garment machines level 2.1.ppt
operating specialized industrial garment machines level 2.1.pptoperating specialized industrial garment machines level 2.1.ppt
operating specialized industrial garment machines level 2.1.ppt
 
How to Assemble All Components (Fly,Pockets,Waist Bank) and Prepare Pant ?
How to Assemble All Components (Fly,Pockets,Waist Bank) and Prepare Pant ?How to Assemble All Components (Fly,Pockets,Waist Bank) and Prepare Pant ?
How to Assemble All Components (Fly,Pockets,Waist Bank) and Prepare Pant ?
 
Babies sewing intructions
Babies sewing intructionsBabies sewing intructions
Babies sewing intructions
 
INDUSTRIAL ATTACHMENT OF BISWAS GROUP LTD
INDUSTRIAL ATTACHMENT OF BISWAS GROUP LTDINDUSTRIAL ATTACHMENT OF BISWAS GROUP LTD
INDUSTRIAL ATTACHMENT OF BISWAS GROUP LTD
 
Magnum clothing iv report
Magnum clothing iv reportMagnum clothing iv report
Magnum clothing iv report
 
Bai Sua
Bai SuaBai Sua
Bai Sua
 
Magnum Clothing Private Limited, Industrial Report
Magnum Clothing Private Limited, Industrial ReportMagnum Clothing Private Limited, Industrial Report
Magnum Clothing Private Limited, Industrial Report
 
Drape 1-short
Drape 1-shortDrape 1-short
Drape 1-short
 
study on threading and bobbin winding
study on threading and bobbin windingstudy on threading and bobbin winding
study on threading and bobbin winding
 
Polo shirt
Polo shirtPolo shirt
Polo shirt
 
AHook Style 1
AHook Style 1AHook Style 1
AHook Style 1
 
Garments Sewing.
Garments Sewing. Garments Sewing.
Garments Sewing.
 
How To Make a Soap Saver Shower Mitt
How To Make a Soap Saver Shower MittHow To Make a Soap Saver Shower Mitt
How To Make a Soap Saver Shower Mitt
 
[Singer sewing machine_company]_singer_instruction
[Singer sewing machine_company]_singer_instruction[Singer sewing machine_company]_singer_instruction
[Singer sewing machine_company]_singer_instruction
 
Tanuja Sahu,Fashion Design ,Dezyne E'cole College
Tanuja Sahu,Fashion Design ,Dezyne E'cole CollegeTanuja Sahu,Fashion Design ,Dezyne E'cole College
Tanuja Sahu,Fashion Design ,Dezyne E'cole College
 
Geeta Kumari ,Fashion Design ,Dezyne E'cole College
Geeta Kumari  ,Fashion Design ,Dezyne E'cole CollegeGeeta Kumari  ,Fashion Design ,Dezyne E'cole College
Geeta Kumari ,Fashion Design ,Dezyne E'cole College
 

Kürzlich hochgeladen

SOFTWARE ESTIMATION COCOMO AND FP CALCULATION
SOFTWARE ESTIMATION COCOMO AND FP CALCULATIONSOFTWARE ESTIMATION COCOMO AND FP CALCULATION
SOFTWARE ESTIMATION COCOMO AND FP CALCULATIONSneha Padhiar
 
Comparative study of High-rise Building Using ETABS,SAP200 and SAFE., SAFE an...
Comparative study of High-rise Building Using ETABS,SAP200 and SAFE., SAFE an...Comparative study of High-rise Building Using ETABS,SAP200 and SAFE., SAFE an...
Comparative study of High-rise Building Using ETABS,SAP200 and SAFE., SAFE an...Erbil Polytechnic University
 
ROBOETHICS-CCS345 ETHICS AND ARTIFICIAL INTELLIGENCE.ppt
ROBOETHICS-CCS345 ETHICS AND ARTIFICIAL INTELLIGENCE.pptROBOETHICS-CCS345 ETHICS AND ARTIFICIAL INTELLIGENCE.ppt
ROBOETHICS-CCS345 ETHICS AND ARTIFICIAL INTELLIGENCE.pptJohnWilliam111370
 
priority interrupt computer organization
priority interrupt computer organizationpriority interrupt computer organization
priority interrupt computer organizationchnrketan
 
multiple access in wireless communication
multiple access in wireless communicationmultiple access in wireless communication
multiple access in wireless communicationpanditadesh123
 
"Exploring the Essential Functions and Design Considerations of Spillways in ...
"Exploring the Essential Functions and Design Considerations of Spillways in ..."Exploring the Essential Functions and Design Considerations of Spillways in ...
"Exploring the Essential Functions and Design Considerations of Spillways in ...Erbil Polytechnic University
 
Robotics-Asimov's Laws, Mechanical Subsystems, Robot Kinematics, Robot Dynami...
Robotics-Asimov's Laws, Mechanical Subsystems, Robot Kinematics, Robot Dynami...Robotics-Asimov's Laws, Mechanical Subsystems, Robot Kinematics, Robot Dynami...
Robotics-Asimov's Laws, Mechanical Subsystems, Robot Kinematics, Robot Dynami...Sumanth A
 
Computer Graphics Introduction, Open GL, Line and Circle drawing algorithm
Computer Graphics Introduction, Open GL, Line and Circle drawing algorithmComputer Graphics Introduction, Open GL, Line and Circle drawing algorithm
Computer Graphics Introduction, Open GL, Line and Circle drawing algorithmDeepika Walanjkar
 
Mine Environment II Lab_MI10448MI__________.pptx
Mine Environment II Lab_MI10448MI__________.pptxMine Environment II Lab_MI10448MI__________.pptx
Mine Environment II Lab_MI10448MI__________.pptxRomil Mishra
 
Immutable Image-Based Operating Systems - EW2024.pdf
Immutable Image-Based Operating Systems - EW2024.pdfImmutable Image-Based Operating Systems - EW2024.pdf
Immutable Image-Based Operating Systems - EW2024.pdfDrew Moseley
 
Artificial Intelligence in Power System overview
Artificial Intelligence in Power System overviewArtificial Intelligence in Power System overview
Artificial Intelligence in Power System overviewsandhya757531
 
Katarzyna Lipka-Sidor - BIM School Course
Katarzyna Lipka-Sidor - BIM School CourseKatarzyna Lipka-Sidor - BIM School Course
Katarzyna Lipka-Sidor - BIM School Coursebim.edu.pl
 
11. Properties of Liquid Fuels in Energy Engineering.pdf
11. Properties of Liquid Fuels in Energy Engineering.pdf11. Properties of Liquid Fuels in Energy Engineering.pdf
11. Properties of Liquid Fuels in Energy Engineering.pdfHafizMudaserAhmad
 
Curve setting (Basic Mine Surveying)_MI10412MI.pptx
Curve setting (Basic Mine Surveying)_MI10412MI.pptxCurve setting (Basic Mine Surveying)_MI10412MI.pptx
Curve setting (Basic Mine Surveying)_MI10412MI.pptxRomil Mishra
 
Triangulation survey (Basic Mine Surveying)_MI10412MI.pptx
Triangulation survey (Basic Mine Surveying)_MI10412MI.pptxTriangulation survey (Basic Mine Surveying)_MI10412MI.pptx
Triangulation survey (Basic Mine Surveying)_MI10412MI.pptxRomil Mishra
 
Module-1-(Building Acoustics) Noise Control (Unit-3). pdf
Module-1-(Building Acoustics) Noise Control (Unit-3). pdfModule-1-(Building Acoustics) Noise Control (Unit-3). pdf
Module-1-(Building Acoustics) Noise Control (Unit-3). pdfManish Kumar
 
TEST CASE GENERATION GENERATION BLOCK BOX APPROACH
TEST CASE GENERATION GENERATION BLOCK BOX APPROACHTEST CASE GENERATION GENERATION BLOCK BOX APPROACH
TEST CASE GENERATION GENERATION BLOCK BOX APPROACHSneha Padhiar
 
List of Accredited Concrete Batching Plant.pdf
List of Accredited Concrete Batching Plant.pdfList of Accredited Concrete Batching Plant.pdf
List of Accredited Concrete Batching Plant.pdfisabel213075
 
Secure Key Crypto - Tech Paper JET Tech Labs
Secure Key Crypto - Tech Paper JET Tech LabsSecure Key Crypto - Tech Paper JET Tech Labs
Secure Key Crypto - Tech Paper JET Tech Labsamber724300
 
Theory of Machine Notes / Lecture Material .pdf
Theory of Machine Notes / Lecture Material .pdfTheory of Machine Notes / Lecture Material .pdf
Theory of Machine Notes / Lecture Material .pdfShreyas Pandit
 

Kürzlich hochgeladen (20)

SOFTWARE ESTIMATION COCOMO AND FP CALCULATION
SOFTWARE ESTIMATION COCOMO AND FP CALCULATIONSOFTWARE ESTIMATION COCOMO AND FP CALCULATION
SOFTWARE ESTIMATION COCOMO AND FP CALCULATION
 
Comparative study of High-rise Building Using ETABS,SAP200 and SAFE., SAFE an...
Comparative study of High-rise Building Using ETABS,SAP200 and SAFE., SAFE an...Comparative study of High-rise Building Using ETABS,SAP200 and SAFE., SAFE an...
Comparative study of High-rise Building Using ETABS,SAP200 and SAFE., SAFE an...
 
ROBOETHICS-CCS345 ETHICS AND ARTIFICIAL INTELLIGENCE.ppt
ROBOETHICS-CCS345 ETHICS AND ARTIFICIAL INTELLIGENCE.pptROBOETHICS-CCS345 ETHICS AND ARTIFICIAL INTELLIGENCE.ppt
ROBOETHICS-CCS345 ETHICS AND ARTIFICIAL INTELLIGENCE.ppt
 
priority interrupt computer organization
priority interrupt computer organizationpriority interrupt computer organization
priority interrupt computer organization
 
multiple access in wireless communication
multiple access in wireless communicationmultiple access in wireless communication
multiple access in wireless communication
 
"Exploring the Essential Functions and Design Considerations of Spillways in ...
"Exploring the Essential Functions and Design Considerations of Spillways in ..."Exploring the Essential Functions and Design Considerations of Spillways in ...
"Exploring the Essential Functions and Design Considerations of Spillways in ...
 
Robotics-Asimov's Laws, Mechanical Subsystems, Robot Kinematics, Robot Dynami...
Robotics-Asimov's Laws, Mechanical Subsystems, Robot Kinematics, Robot Dynami...Robotics-Asimov's Laws, Mechanical Subsystems, Robot Kinematics, Robot Dynami...
Robotics-Asimov's Laws, Mechanical Subsystems, Robot Kinematics, Robot Dynami...
 
Computer Graphics Introduction, Open GL, Line and Circle drawing algorithm
Computer Graphics Introduction, Open GL, Line and Circle drawing algorithmComputer Graphics Introduction, Open GL, Line and Circle drawing algorithm
Computer Graphics Introduction, Open GL, Line and Circle drawing algorithm
 
Mine Environment II Lab_MI10448MI__________.pptx
Mine Environment II Lab_MI10448MI__________.pptxMine Environment II Lab_MI10448MI__________.pptx
Mine Environment II Lab_MI10448MI__________.pptx
 
Immutable Image-Based Operating Systems - EW2024.pdf
Immutable Image-Based Operating Systems - EW2024.pdfImmutable Image-Based Operating Systems - EW2024.pdf
Immutable Image-Based Operating Systems - EW2024.pdf
 
Artificial Intelligence in Power System overview
Artificial Intelligence in Power System overviewArtificial Intelligence in Power System overview
Artificial Intelligence in Power System overview
 
Katarzyna Lipka-Sidor - BIM School Course
Katarzyna Lipka-Sidor - BIM School CourseKatarzyna Lipka-Sidor - BIM School Course
Katarzyna Lipka-Sidor - BIM School Course
 
11. Properties of Liquid Fuels in Energy Engineering.pdf
11. Properties of Liquid Fuels in Energy Engineering.pdf11. Properties of Liquid Fuels in Energy Engineering.pdf
11. Properties of Liquid Fuels in Energy Engineering.pdf
 
Curve setting (Basic Mine Surveying)_MI10412MI.pptx
Curve setting (Basic Mine Surveying)_MI10412MI.pptxCurve setting (Basic Mine Surveying)_MI10412MI.pptx
Curve setting (Basic Mine Surveying)_MI10412MI.pptx
 
Triangulation survey (Basic Mine Surveying)_MI10412MI.pptx
Triangulation survey (Basic Mine Surveying)_MI10412MI.pptxTriangulation survey (Basic Mine Surveying)_MI10412MI.pptx
Triangulation survey (Basic Mine Surveying)_MI10412MI.pptx
 
Module-1-(Building Acoustics) Noise Control (Unit-3). pdf
Module-1-(Building Acoustics) Noise Control (Unit-3). pdfModule-1-(Building Acoustics) Noise Control (Unit-3). pdf
Module-1-(Building Acoustics) Noise Control (Unit-3). pdf
 
TEST CASE GENERATION GENERATION BLOCK BOX APPROACH
TEST CASE GENERATION GENERATION BLOCK BOX APPROACHTEST CASE GENERATION GENERATION BLOCK BOX APPROACH
TEST CASE GENERATION GENERATION BLOCK BOX APPROACH
 
List of Accredited Concrete Batching Plant.pdf
List of Accredited Concrete Batching Plant.pdfList of Accredited Concrete Batching Plant.pdf
List of Accredited Concrete Batching Plant.pdf
 
Secure Key Crypto - Tech Paper JET Tech Labs
Secure Key Crypto - Tech Paper JET Tech LabsSecure Key Crypto - Tech Paper JET Tech Labs
Secure Key Crypto - Tech Paper JET Tech Labs
 
Theory of Machine Notes / Lecture Material .pdf
Theory of Machine Notes / Lecture Material .pdfTheory of Machine Notes / Lecture Material .pdf
Theory of Machine Notes / Lecture Material .pdf
 

All you have to know to make a knit garments.

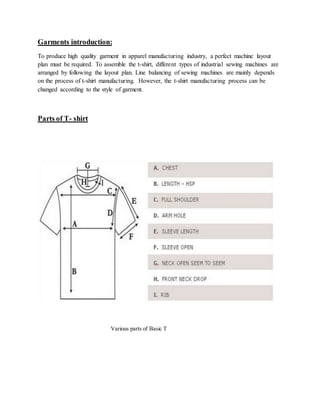
  • 1. Garments introduction: To produce high quality garment in apparel manufacturing industry, a perfect machine layout plan must be required. To assemble the t-shirt, different types of industrial sewing machines are arranged by following the layout plan. Line balancing of sewing machines are mainly depends on the process of t-shirt manufacturing. However, the t-shirt manufacturing process can be changed according to the style of garment. Parts of T- shirt Various parts of Basic T
  • 2. Flow chart of t- shirt making Here I have mentioned the sewing sequence of t-shirt production: Matching the number and size with back and front part ↓ Join the shoulder ↓ Attached Interlining ↓ Over lock the lining ↓ Ready the neck rib for collar ↓ Join the neck rib piping edge by plain m/c ↓ Neck joint ↓ Over locking the neck ↓ Neck tape join and also attached the size label ↓ Neck rib top stitch ↓ Attached the main label ↓ Sleeve marking and numbering with body parts ↓ Sleeve hem ↓ Sleeve joint with the body part ↓ Attached arm side hem ↓ Side seam and at this moment join the care label ↓ Sleeve tuck ↓
  • 3. Bottom hem tuck at the end ↓ Bottom hem ↓ Inspection T shirt with print Machines required for sewing a T-shirt Generally three types of machines are required to stitch a basic t shirt. Number of machine can be changed according to style and lay out. Also product may vary in case of changing the machine. N.B: This particular chart is for information purpose only. Seq. No. Operations M/c Type No. Of Machines 1 Shoulder join 4 Thread Over Lock 1 2 Neck rib Tuck 1N Lock Stitch 1 3 Neck Join 4 Thread Over Lock 2 4 Label Make 1N Lock Stitch 1 5 Back Neck Binding Flat lock/1NLS 1
  • 4. 6 Front Neck Top Flat lock 1 7 Back Neck Top 1N Lock Stitch 2 8 Sleeve Hem Flat lock 1 9 Sleeve Join 4 Thread Over Lock 2 10 Side Seam Flat lock 2 11 Sleeve tuck 1N Lock Stitch 1 12 Body Hem Flat lock 1 Total 16 Operation wise machine types and machine requirement Various sewing action 1. Shoulder join: Shoulder join can be done by over-lock machine. Both shoulders can be stitched by one operator for basic T-shirt. For critical style like this picture two operators may required. Image of a shoulder joint in a Polo- shirt 2. Neck rib tuck
  • 5. After cutting the neck rib by rib cutter machine, the rib is the measure and attached by single needle lock stitch machine (SNLS) which is known as neck rib measurement and tuck which also include thread cutting after neck tuck. 3. Neck rib join/ attach Over-lock machine is to join neck rib with the garment. For basic style neck rib is attached by one person. For critical style two or more operator may required to complete the whole operation. Neck rib joint done by over-lock machine 4. Label making Label is an important accessory of a garment. Mainly there are 3 types of label for example size label, main label, and care label. Label making and label attach both can be done by single needle lock stitch machine. One is for making and one is for attaching the label.
  • 6. Image of a size label in a basic t-shirt 5. Back neck binding/ piping This operation includes tape piping at the back side of the garments. Flat lock machine or SNLS machine can be used to complete this process. Back neck piping (hidden) 6. Sleeve hem Sleeve hem is done by flat lock machine. One operator is enough to complete this process. Two or more operator is required if too much work is left to be done within scheduled time. One person is required to cut thread from the hem.
  • 7. Image of a sleeve hem completed by flat- lock 7. Sleeve join Normally two operators are needed to attach sleeve to the body in case of large production scale. One operator is enough to attach sleeve in small scale production. This process is done by over- lock machine. One or two helper is needed to cut the unnecessary thread/ waste thread from the sleeve. Image of a joint of a sleeve 8. Side seam/ Side join This process is the most time consuming process of whole production. Normally it would take two operators to complete this process. May requires additional operators to support them
  • 8. according to garments style or to help them in large scale production. Two or three helper is required to cut the unnecessary thread form the product. Image of a completed side 9. Sleeve tuck This is an optional operation. This operation is completed as per buyer requirement. It is attached between the start and the end point of the sleeve. SNLS machine is used to complete this operation. 10. Body hem/ bottomhem Normally it would take 7-9 seconds to complete a body hem. This process is done by a flat lock machine. This operation need to be very precise otherwise the garment will be rejected. One skilled operator is enough to complete this process. Two or more helper is required to cut the unwanted thread. Bottom hem/ body hem
  • 9. Parts of Polo shirt Flow chart of polo shirt processing A polo shirt, also known as a golf shirt and tennis shirt, is a form of shirt with a collar, a placket with typically two or three buttons, and an optional pocket. It is the most stylist and popular dress in apparel world. Collar is the basic different between t-shirt and polo shirt. Manufacturing process of polo shirt is divided by some steps. Step wise flow chart of polo shirt is given below. A. Collar making: If collar is made by fabric then we have to follow the following process- Interlining attached on the front part of collar ↓ Sewing mark around the collar ↓ Sewing the two part of collar ↓ Collar edge cutting ↓ Collar turning
  • 10. ↓ Top stitch around the collar ↓ Collar bottom cutting ↓ Mark the mid-point of collar B. Placket making: Interlining attach on packet with iron ↓ Top stitch on packet in length direction ↓ Bottom sewing mark C. Sleeve making Sleeve hemming ↓ Side seam of sleeve ↓ Turning of sleeve D. Body making and assembling Shoulder join with tape ↓ Placket attach with body ↓ Button hole on upper placket ↓ Button attach on lower placket ↓ Right side seam ↓ Bottom hemming ↓
  • 11. Left side seam with care label ↓ Both sleeve attach ↓ Collar join ↓ Back taping ↓ Bottom tuck Polo shirt Machine layout for polo shirt Normally six types of machines are used in making basic Polo Shirt. They are such as plain machine (Single Needle), over the edge (Over lock), Button holing, Button attaching, Bar Tack and Flat lock (Flatbed). But multiple uses, one machine can be used different operation in sewing floor. Here given a machine layout for basic polo shirt-
  • 12. S/L No. Operation Used Machine No. of Machine 1 Main Level Join Plain M/C 1 2 Moon Tuck Plain M/C 1 3 Moon Top Seem Flat Lock M/C 1 4 Shoulder Join Over Lock M/C 2 5 Shoulder Top Seem Flat Lock M/C 1 6 Pocket Hem Flat Lock M/C 2 7 Pocket Join Plain M/C 2 8 Placket Rolling Plain M/C 1 9 Placket Servicing Over Lock M/C 1 10 Lower Placket Join+ Placket Top Seem Plain M/C 1 11 Nose Tuck Plain M/C 1 12 Collar Servicing Over Lock M/C 1 9 Care label join Plain machine 1 10 Side seam Over lock 3 11 Sleeve tuck Plain machine 2 12 Sleeve soap tuck Plain machine 2 13 Body hem Flat lock 2 Total Machine 26
  • 13. Polo shirt’s various operations In polo shirt some operations are same as t shirt. These are - Shoulder join - Sleeve join - Side seam - Bottom hem So I am going to ignore those operations and explain the uncommon operations for making a basic polo shirt. 1. Interlining attaching on collar Interlining is a layer of material between the outer fabric and the lining. It’s usually included to give garments additional warmth, but can also be used to change the garment’s drape if you need to add more body. Interlining can be removable (a good example would be a winter jacket that has an outer shell made from thicker fabric and then an additional layer that can be zipped in and out), but can also be a permanent part of the garment. In garments factory interlining generally attached to the collar by heating/pressing by iron. Fusible interlining 2. Marking collar One helper marks two collar parts to make it easy to sew. In case of skilled operator there is no need to mark the collar.
  • 14. Collar marking 3. Main label join Main label indicates brand name of the buyer. Consist of one or more parts. Main label is attached on the back (inside, around neck) part of the garments. SNLS is used to attach the main label. Main label (Adler) 4. Placket marking and tuck Plackets are accessories which are attached on the main garments. Placket has two parts. Plackets are marked by a helper before attaching them to the body. Then a helper attached two plackets by a tuck which can be done by SNLS.
  • 15. Placket marking 5. Placket attach In this operation placket is attached below the neck. This is one of the most critical operations of polo shirt. Quality must be maintained thoroughly. Garments can be rejected if the quality is not maintained properly. Normally requires two skilled operators to complete this operation. SNLS is used to attach the placket with the main body. Placket 6. Placket box This is another critical operation of polo shirt. Require minimum two operators. Here quality must maintain thoroughly. One helper is needed to cut the thread from placket and placket box. This operation can be done by SNLS.
  • 16. Placket box 7. Back tape attach Back tape is attached by SNLS. One operator is enough to attach back tape. Back tape can be attached before/after attaching main label with the garment. Back tape 8. Back tape top stitch Next operation after attaching the back tape is back tape top stitch. Sometimes main label can be joined during back tape top stitch if main label is not attached beforehand. This operation also requires SNLS. An operator is required to complete this operation. 9. Cuff attach Normally cuff color is same as collar rib. Sometimes it may vary. Ribs are attached to the body by over-lock machine. One operator is required to complete this operation.
  • 17. Cuff 10.Button hole To make hole for button, button holing machine is used. One operator is required to make hole on for button attachment. Garments may have two or three button. It depends on buyer requirement. It takes 18-25 seconds to make three holes on placket. Button holing machine Button hole
  • 18. 11.Button attachment Button are attached by button attach machine. One operator can complete this process himself. Button size, types, quantity can vary according to buyer. It takes 28-35 seconds to attach 3 buttons with the garment. Button attach machine Types of sewing Understanding the stitches used in manufacturing can help you make an informed decision about which are best for your next order of garments. When designing or inspecting a garment, your analysis of seams and stitches should include stitches per inch, seam strength and the size, consistency and tension of the stitches. Different stitch and their pros and cons 1.1 Advantage of chain stitch Chain stitch’s main purpose is to decorate the garments because it leaves a thick and textured line. The size of this stitch is larger than any other types of stitch and used to fill the gap space in garments. This type of stitch has a nice- looking “roping” effect which helps to make a better fading pattern. Image of chain stitch
  • 19. 1.2 Disadvantages of chain stitch This type of stitches uses more thread but they are not very strong for that reason they can be unraveled very easily. Chain stitch requires more thread and consume more time than any other types of stitch. 2.1 Advantages of multi thread chain stitch It’s formed when one or more needle threads move through the fabric and inter-loop with a group of looping threads on the underside of the garment as a result stitch looks different on the top and bottom of fabric. It may look similar as chain stitch but it has more durability and elongation. Multi thread chain stitch is used to create elasticity in waistbands, jackets, blazers, t shirts and more. They create less seam puckering because they located underneath the fabric. Multi thread chain stitch 2.2 Disadvantages of multi thread chain stitch Multi thread chain stitches generally consume more thread and require long time to sew even if the operator is skilled and machine is new. If a thread is damaged or broken the stitch can unravel easily which threaten the entire the seam. This problem can be prevented by over- sewing or bar- taking the stitch. 3.1. Advantages of lock stitch Also known as single needle stitching, the class 300 lockstitch is made when two threads lock together at minor intervals. It’s the result of a rotary hook catching a needle thread loop as it goes around the bobbin and interlocks two threads. This stitch is very common as it’s one of the fastest and cheapest to sew. On the inside and outside of the garment, this stitch will appear the same. The lockstitch can become very tight,
  • 20. such as the 301 twin needle lockstitch. So it’s typically not suitable for knit and elastic fabrics that need flexibility. Lock stitch construction 3.2. Disadvantages of lock stitch Not all lockstitches are appropriate for the same purposes. Some classes of lockstitches, like 313 and 314, are good for dress slacks and waistbands. Others, like the 304 zigzag lockstitches, are more appropriate for decorative stitching or particular parts of athletic wear. The suitability of a certain lockstitch for a garment depends on the stitching properties a customer requires. 4.1. Advantages of over lock stitch The class 500 over-lock stitch goes by many other names, including over edge, over lock, serge, overcast or merrow. It’s typically used in over-sewing, the sewing technique of creating a stitch over the edge of cut fabric. One group of thread goes around the edge of the fabric so that the threads from it are contained, which typically reinforces the inner stitching. By choosing anywhere from one to five threads, the over-lock stitch significantly changes in use:  Class 501, one thread: end-to-end seaming and hems  Class 502-504, two to three threads: edging and seaming  Four threads: mock safety stitches that are strong and flexible  Five threads: very strong safety stitches The over-lock stitch is relatively flexible and often used for edge neatening of knitted fabrics. It’s a popular choice among manufacturers of sportswear, dance clothing, spandex and other garments and materials that needs to stretch. Aside from these applications, the stitch is also used on the edge of garments for added aesthetics and to prevent fraying.
  • 21. Over lock stitch construction 4.2. Disadvantages of over lock stitch Over lock stitch machine does not have much disadvantages. Its main disadvantage is it consumes high quantity of thread. But over lock stitching machine sew faster than any other stitching machine. Thread consumption A specified length of a given seam is measured and then the thread is pulled out of this length. We can use the amount pulled out of this specified length to calculate the ratio of thread consumed in the entire seam. Thread cone
  • 22. Thread consumption formula Thread consumption means how much thread we need to make a cloth. By using a standard formula, you will get multiplied factors according to machine type and stitching classes. To estimate sewing thread consumption, you have to multiply seam length with the factors. A unit length of seam depends on the following factors for actual sewing thread consumption; 1. Classes of stitch 2. Stitches per inches (SPI) 3. Fabric thickness of the seam 4. Thread tension 5. Sewing thread count There is various way of measuring thread consumption.  Estimating consumed actual sewing thread in a specific length of seam  Finding out the thread consumption by using mathematical stitch formulas based on thickness (fabric) of the seam and SPI (stitches per inch)  Calculating sewing thread consumption by using A&E thread consumption calculation spreadsheets. For better understanding, let’s find the below example; Example 1: Thickness of the seam (fabric thickness): 0.075 inches SPI (stitches per inch): 11 Length of the seam: 44 inches Mathematical equation for consumption: C = 4 + 2ts Where, T = thickness S = stitch per inch So, the result is: C= 4 + 2ts = 4 + 2 (0.075 x 11) = 5.65 Here, 44-inch x 5.65 = 248.6 inch / seam With 15% seam wastage, 248.6 inch/ seam x 1.15 = 285.89 inch per seam or 7.94 yards per seam. Let’s find out the estimate thread consumption of machine wise for garments sewing;
  • 23. Machine Thread per inch stitching for sewing Plain Machine - Single needles 2.75 inches Plain Machine - Two needles 5.5 inches Over lock Machine - Three threads 15 inches Over lock Machine - Four threads 18.75 inches or 20 inches Over lock Machine - Five threads 23 inches Safety stitch 20 inches Flat lock stitch 22 inches Chain stitches - one needles 12.5 inches Chain stitches - two needles 25 inches Button Hole 24 inches Bar take machine 26 inches By using above consumption based on machine, let’s take a look example for better understanding; Example 2 Suppose, we will estimate sewing thread consumption for kid’s basic T-shirt and T- shirt has used 94 inch four thread over lock stitching, flat lock 48 inches, two needle chain stitches 18 inches and plain machine one needle 30 inches. Now, as per above information the sewing thread consumption of kid’s basic T-shirt is; In meter: (94 x 4 thread O/L) + (48 x F/L) + (18 x 2 needles chain stitches) + (30 x one needle P/M) = (94 x 18.75) + (48 x 22) + (18 x 25) + (30 x 2.75) = 1762.5 + 1056 + 450 + 82.5 = 3351 inch = 3351 inch / 39.37 = 85 meter (As we know, 1 meter = 39.37 inches) = 85 meter + 15% wastage
  • 24. = 98 meter / body So, as per above information, we need sewing thread for basic kid’s T-shirt is 98 meters per garment to complete the cloth stitching. As we already know the way to determine sewing thread consumption per garments. Now let’s find out the cost of consuming sewing thread per garments. Take a look below example for clear understanding Example 3: Suppose, a spun polyester 40/2 color sewing thread cone price is $0.80 for 4000 meters. And our consumption of per garment is 98 meters. So, what will be the cost of sewing thread per garment? The unit price of a cone / total meter X consumption of per body = 0.80 / 4000 x 98 = $ 0.0196 So, as per above consumption per body sewing thread cost is 0.0196$. We already know the way of determine sewing thread consumption and costing per garments. Now let’s find the way to book bulk sewing thread for an order. Suppose, our bulk order quantity is 150,000 pcs for basic T-shirt style and our sewing thread consumption is 98 meters per body. If per cone sewing thread is 4000 meters, then what will be the bulk sewing thread consumption for 150,000 pcs garments? Total order quantity x Sewing thread per body / Per cone sewing thread = 150,000 x 98 / 4000 = 3675 cones So, we need 3675 cones for completing sewing 150,000 pcs garments. Example 3 Union Special Machine Company published a “Thread Consumption Booklet” that consists of a number of thread consumption formulas for various stitch types based on the stitch length and thickness of the seam. These mathematically derived consumption factors can be multiplied times the length of the seam to estimate the combined amount of top and bottom threads. On some over edge and cover stitch types it is necessary to also know the seam width or needle spacing to properly calculate the amount of thread consumed. Example: Stitch and seam: 401 SSa-1 Stitches per inch: 8
  • 25. Thickness of the seam: .075 inches (measured with a micrometer) Length of the seam: 42 inches or 1.17 yds. Seam thickness 8 SPI .055 4.88 .060 4.96 .065 5.04 .070 5.12 .075 5.20 Consumption based on the mathematical equation – C = 4 + 2ts C = 4 + 2(.075 X 8) = 5.20 t = thickness of the seam s = stitches per inch 1.17 yds X 5.20= 6.08 yds / seam. 6.08 yds/seam X 1.15 = 7.00 yds per seam including a 15% waste factor. *** A shirt having 104 inches 4 Threads Over lock stitches, 52 inches Flat lock stitches, 20 inches 1 Needle Chain stitches, 15 inches Single Needle Plain Machine stitches, GSM is normal, find out its thread consumption in meters? Answer: {(104 x 19) + (52 x 32) + (20 x 5) + (15 x 2.75) + 10%} / 39.37 = 106.71 Meters. (39.37 inches = 1 Meter) *** Suppose, we want to buy thread cones with 2000 meters thread, now figure out how many cones do we need to stitch 3000 pcs of garments, per garment’s thread consumption 106.71 meters? Answer: 106.71 x 3000 / 2000 = 160 cones. *** Suppose, we want to buy thread cones with 2000 meters thread, now figure out how many cones do we need to stitch 3000 pcs of garments, per garment’s thread consumption 106.71 meters? Answer: 106.71 x 3000 / 2000 = 160 cones. Sewing Thread Consumption for Different Garments Thread consumption for some garments which can be used as rough has shown in the below table. SL No. Name ofGarments For Using SewingThread Consumption(m) 01 Aprons All 20
  • 26. 02 Blouses Girls,ladies 85 03 Brassieres Girls,ladies 40 04 Brief Childs,men’s,ladies 40/ 50/ 65 05 Dressinggown Childs,men’s 165 / 250 06 Jacket Men’s 200 07 Jeans Men’s 170 08 Neatwear Ladies,men’s 70 / 80 09 Nightdress Childs,ladies 55 /100 10 Overcoat Childs,ladies,men’s 135 / 315 / 520 11 Skirts Childs 100 12 Raincoat All 285 13 Trouser Childs,ladies,men’s 100 / 140 / 190 14 Shirt Men’s,child’s 110 / 75 15 Slippingbag Adult,child’s 275 / 185 16 Suits Ladies,men’s 365 / 480 17 Swimwear Ladies 75 18 Tie Men’s 5 19 Towel All 10 20 Track suit Ladies,men’s 160 21 Trouser Men’s 270 22 Under wear Men’s 50 23 T-shirt Childs,ladies,men’s 25 / 45 / 35
  • 27. 24 Waistcoat Ladies,men’s 180 Sewing Thread Consumption Ratio for Different Types of Stitches The amount of thread consumption varies according to the types of stitches. Stitch Type Thread consumption for per cm seam (cm) No. of needle Needle threadand looperthread ratio 101, chain stitch 4.0 1 1:0 301, lock stitch 2.5 1 1:1 304, zigzag lock stitch 7.0 1 1:1 402, 2- thread chain stitch 5.5 1 1:3 503, 2- thread overedge stitch 12.0 1 1.2:1 504, 3- thread overedge stitch 14.0 1 1:5 512, 4- thread mock safety stitch 18.0 2 1:3.3 602, 4- thread coveringstitch 25.0 2 1:3.3 606, 9- thread flat lock stitch 32.0 4 1:3.5 801, 4- thread safetystitch 17.5 2 1:1.4 802, 2- thread safetystitch 20.0 2 1:1.34 805, 2- thread safetystitch 21.0 3 1:2 Yarn consumption Problem 1: Calculate the yarn consumption per yard of a woven fabric of specification (20 X 16)/(128 X 60) X 58”, 100% cotton 3/1 twill fabric.
  • 28. Solution: Requirement of yarn for the fabric is to be calculated for both warp yarn and weft yarn separately as because the warp and weft yarns are of 20s and 16s respectively. Here, for easy understanding yarn consumption for 100 yards grey fabric production is done. At the end, yarn consumption per yard of grey fabric will be converted. Warp yarn (20s) requirement = (128 X 58)/1 X 100/1 X 1/(840 X 20) lbs = 44.19 lbs Weft yarn (16s) requirement = (60 X 36 X 100 X 58)/(1 X 36) X 1/(840 X 20) lbs = 25.89 lbs Some allowances to be added to the yarn requirements for the following factors: a. Crimp allowances ………. 10% b. Yarn wastage ………….... 5% …………………………………………………. Total ………..................… = 15% Hence the actual yarn requirements including crimp allowance and yarn wastage allowance will be – Warp yarn (20s) = 44.19 lbs X 1.15 = 50.82 lbs Weft yarn (16s) = 25.89 X 1.15 = 29.77 lbs Now, for each yard of the said fabric production yarn consumption will be – Warp yarn (20s) = 50.82 / 100 = 0.51 lbs Weft yarn (16s) = 29.77 / 100 = 0.30 lbs Problem 2: Suppose, you receive a yarn dyed t-shirt order from buyer. Details as below Style: 100% cotton, Single jersey, 160 gsm yarn dyed round neck t-shirt. Color: Beige/Navy (only one combo) Quantity: 10,000 pcs (in four sizes, S, M, L & XL) Stripe: Beige 7 cm & Navy 1.5 cm (Total 8.5 cm)
  • 29. Body length: 73 cm Sleeve length: 19.5 cm ½ Chest: 52 cm Consumption: 2.78 kgs/dozen (considering total wastage 18%) you may use this for pricing. Normally the wastage of yarn dyed garments depends on styling. Normal wastage for yarn dyed: Dyeing (yarn) wastage: 6% Knitting wastage: 3% Wash wastage: 5% So, you should need 116 kgs yarn to produce 100 kgs fabric But be careful, during the bulk yarn booking you should booked the yarn based on the consumption you got by using pattern & marka. Some time I saw buyer asked for match the body stripe with sleeve then the cutting wastage become more than 5%. We know the body length is 73 cm Where, beige color stripe is 7 cm And Navy color stripe is 1.5 cm Then total length of one repetition is 8.5 cm So, we need total (73/8.5) = 8.58824 repletion to complete a body (but here we will count 9 repetition for cutting & sewing wastage.) So, total sum of Navy stripe will be (1.5 cm X 8.58824) = 12.8824 cm And total sum of Beige color stripe will be (7 cm X 8.58824) = 60.1177 cm So, 12.8824 cm + 60.1177 cm = 73 cm (total body length) Now we just calculate the percentage of each color in a body Navy color percentage in the body will be = (12.8824 ÷ 73) % = 17.65 % = (60.1177÷73) % = 82.35 %
  • 30. = 17.65 + 82.35 = 100 % So, now if the consumption is 2.78 kg Then Navy color will be = 0.49067 kg ( 2.78 kg X 17.65% ) And Beige color will be = 2.28933 kg ( 2.78 kg X 82.35% ) Fabric consumption Fabric consumption is an important task for garments merchandiser. Because 50% cost for garments making is fabric. If fabric consumption and calculation is not correct then company will face to huge loss. There are two formulas or process of fabric consumption for basic t-shirt. One is in Centimeter and another one in Inch. They are given below. Calculation – 01: Formula in Centimeter: Suppose one of T-shirt’s Body length (72+4) cm, Sleeve length (23+2) cm, Chest length (Dia) (53+2) cm and G.S.M 180. Determine the fabric consumption for the basic T-Shirt. Solution: Here, Body Length = 76 cm Sleeve Length = 25 cm Chest Length = 55×2=110 cm (For both side) We get, (Body length + Sleeve length) x (Chest x 2) x G.S.Μ
  • 31. Fabric consumption = ……………………………………………......………….. Kg 1000 x 10000 (76 + 25) x (55x2) x 180 = ………………………………… 1000 x 10000 101 x 19800 = ………………… 10000000 1999800 = …………………. 10000000 = 0.19998 kg The amount of fabric is just for 1 piece. Generally 12 pieces are counted with one. Fabric consumption for 1 Dozen = 12×0.19998 kgs = 2.399 kgs Fabric consumption for 1 Dozen 2 kgs and 399 gms. Calculation – 02: Formula in Inch: Here, Body Length = (28+ 1) inch Sleeve Length = (9+1) inch Chest Length = (21+1) inch =22 inch×2 = 44 inch G.S.M = 180 According to formula, (Body length + Sleeve length) x (Chest x 2) x G.S.Μ Fabric consumption = ……………………………………………….........……….. Kg 1550 x 1000 (29 + 10) x (22x2) x 180
  • 32. = ………………………………….. 1550 x 1000 308880 = …………………. 1550000 = 0.199920 kgs The amount of fabric is just for 1 piece. Generally 12 pieces are counted with one. Fabric consumption for 1 Dozen = 12×0.199920 kg = 2.391 kg Fabric consumption for 1 Dozen 2 kg and 391 gm. Costing Cost typically can be defined as’ the economic value placed upon the resources consumed to make a product.’ Costing is the process of estimating and then determining the total cost of producing a garment, including the cost of materials, labor and transportation as well as the general expenses of the operating the business. Components of costof garment:  Fabric  Trims  Cut Make & Trim charges  Value added services: printing, embroidery, washing, applique  Testing of the garment  Quality  Transportation and logistics cost  Profit of the manufacturing organization The parameters that affect the garment cost mostly are; Unit of Measurement, MOQ, Incoterm decided between raw material vendor and garment manufacturer, order quantity, etc.
  • 33. Fabric: Fabric is generally the most significant factor in costing of garment. Fabric accounts for 60 to 70% of the total cost of basic-styled garments .In many cases, evaluating the quality and the quantity of fabric consumed in the garment indicates better than any other factor the cost of producing it. The cost of fabric depends upon the type of fabric is going to be utilized in the garment. Types of fabrics are Woven/knitted fabric Power loom/automatic loom fabric Fiber/yarn/fabric dyed fabric Fiber content of fabric i.e. cotton, wool, polyester, silk, blended fabric etc. Type of dyeing and finish used GSM/ Weight of fabric. Type of yarn used i.e. ring spun, open ended, or carded/combed etc. UOM: Unit of Measurement (UOM) is a quantity used as a standard of measurement. The Unit of Measurement for woven fabric is normally in meters or yard, while knitted fabric measured in Kilograms or some time it is in yards also. Merchandiser should aware of unit of measurements while finding out the cost of fabric. Sometimes buyer specifies the UOM of fabric. MOQ: Fabric Minimum Order Quantity (MOQ) is nothing but the smallest quantity of a product that a fabric manufacturer can supply. The MOQ depends on the type of fabric and on capacity of vendor. Order quantity: The cost of fabric may vary with the order quantity, more the order quantity; cost of fabric can be optimized till certain level. But this is again depends on the type of fabric required and fabric manufacturer capacity along with negotiation between fabric buyer and supplier. Incoterm used: This factor makes the huge difference in fabric cost. While importing the fabric from another country merchandiser need to deal with the supplier for delivery of the fabric on the basis of incoterms like EXW, FOB, CIF, DDP etc. based on which it will be decided that who will bear the cost of transportation and risk. No matter which incoterm is used but all the cost needs to be charged to buyer. If fabric is getting purchased by using EXW incoterm then merchandiser needs to add the transportation cost along with the custom clearance charges along with the price of fabric while calculating the garment cost. The cost of fabric can be calculated by following way
  • 34. Yarn cost + fabric manufacturing cost (knitting or woven) + dyeing cost + finishing cost= total fabric manufacturing cost Dyeing cost indicate that if fabric is yarn dyed or fiber dyed or piece dyed respective cost will be added depending upon fabric type. Finishing cost included heat setting cost, normal finishing, compacting (knitted fabric) etc. Costcalculations of fabric in garment: Considering the knitted fabric and t-shirt as an end product, then fabric consumption can be calculated as And for woven fabric and shirt as an end product, then the fabric consumption can be calculated as The marker efficiency considered 80-85% depending upon the fabric type i.e. solid dyed, stripe, checks fabric. Efficiency can be changed depending upon the fabric parameters, matching parameters of the buyer, type of style. The buffer in the consumption should be added to the fabric by merchandiser, generally it is 0.03-0.08% of total fabric consumption. In case of trim fabric i.e. interlining the 10-20% more buffers is kept while ordering the interlining, in order to maintain the inventory and to avoid the shortage during the production. Fabric wastage percentage to be added in calculating fabric consumption. Considerable wastage depends on factory practices, type of fabric and type of garment. Trims Trims include all materials other than fabric used in the garment. For example most garments have accessories such as threads, buttons, zippers, labels, elastics and miscellaneous items. Quality and quantity of trim and labor required to apply it on garment are directly related to cost of garment. The different trims have different UOM; even same trim can have 2-3 different UOMs that can be summarized as
  • 35. Trims UOM Thread 1000 meter tube, 2000/5000 Meter Cone Labels Unit Zippers Unit Buttons Gross (144 Units) Poly-bag Unit , thickness is measured in mm. or gauge Carton Unit Hand tags Unit Shanks Gross Rivets Unit Lace 50 Meter Hanger Unit Tapes / Velcro 50 Meter or Kg. Elastics 50 Meter UOM of Various Trims used in Garment Other factors that need to consider while calculating the trims cost is MOQ, order quantity, lead time and quality of raw material used to make the trims. Thread: After fabric, thread is another component which needs to be considered for calculating the cost of garments most. It is dependent upon the type of seam and SPI. While ordering the thread the operation break down and number of sewing M/c for that particular style should be taken in account. Accordingly number of cones of thread needs to order. In order to calculate thread consumption special software’s are also available which gives the accurate thread consumption. Labels: Several labels are used in garment i.e. main label, care label, content label, the cost of label depends upon make of label i.e. fiber content, printed, jacquard label, size of labels, colors used in label, etc. for a unit garment label cost may not play a significant role but in case of mass production it plays vital role. The other factors that are important while ordering the labels are MOQ, order quantity.
  • 36. Zipper: Zippers also has several types like metallic zipper, nylon zipper etc. which plays the drastic role in cost of zipper. Merchandiser should be aware of the parameters of zipper for accurate costing and negotiation. MOQ is the parameter which affects the cost of zipper considerably; at certain MOQ only zipper will get at desired price. Buttons: Buttons can be made up of different types, nylon buttons, plastic buttons, acrylic based buttons, wood, shell, metal. Every type of button has its own MOQ decided by manufacturer of button. Buttons are purchased on gross with the ligne specified. 1 gross = 1 packet =144 buttons= 12 dozens Poly-bags: The cost of poly bag is highly dependent on thickness, dimension and raw material used. The poly bag ordered in terms of number of pieces. The cost of poly bag is equally important as it give significant difference when we consider the whole order quantity. Cartons: Same like poly bag cost of cartons are highly dependent on material used and dimensions. Depending upon these factors cost of cartons is decided, the UOM of cartons generally is number of pieces while cost varies with MOQ. These are procured based on the number of plies, dimensions of the carton and GSM of the paper used to make the carton. Generally the number of plies used in carton box is 3, 7 and 9 ply. For example: 9 ply, 60 X 40 X40, 4 side calico, 1 side print and 180 GSM. Hand tags: Hand tags or price tags are used as packing material, the cost of hand tags are dependent upon material used, printing on it, and MOQ. Shanks and rivets: Generally these trims are made up of metallic, the UOM of rivets and shanks is gross and No. of pieces respectively. The cost of shanks and rivets is dependent upon the MOQ and material used. Hangers: Hangers are made up of generally hard plastics sometimes wood, the cost of hanger is depend on material used, size, print and color on it. Generally transparent hangers are more costly than colored one. Taps and Velcro: Tapes are purchased based on the width and mobilon tapes are purchased in kg. Thus increase in width by 100% increases the cost by 80%. For satin tapes increase in width by 150% increases the cost by 250%. Another factor that affects cost is MOQ. Trims charges are generally calculated as for the different type of sourcing and mode of transportation. If shipment is by air then the trim cost + 15-25% more cost is quoted to buyer, depending on the freight charges If shipment is by sea then trim cost + 10-15% more cost is quoted to buyer depending upon freight charges.
  • 37. These additions are done by merchandiser, depending upon the business outlook. Other charges included during the costing by merchandiser Charges In % Rejection and wastage 2-5 % (depending upon order quantity) Commission on foreign exchange 2-3% Commission of buying house (if applicable) 1-1.5% Transportation charges internally 1-2 $/ garment Margin (decided by marketing department by looking business scenario) 10-15% Testing inspection charges 1-2% Items Consumption UOM* Rate ($) Amount ($) Remarks 1 2/60s single jersey 0.224 KGs 6.5 1.45 2 Cuff and collar ribs 0.08 KGs 5 0.4 3 Sewing thread 150 Meters 0.08 approx. 4 Buttons 3 Gross 0.04 approx. 5 Main label 1 Unit 0.02 approx. 6 Care label 1 Unit 0.02 approx. 7 Hang Tags 1 Unit 0.06 approx. 8 Price Tags 1 Unit 0.04 approx. 9 Poly bags 1 Unit 0.02 approx. Total Cost 2.13
  • 38. Costof making The cost of making done “in house” is based on the total cost per hour multiplied by the number of hours it takes to make the style and divided by the number of units produced if the making is done by a contractor; the contractor adds profit on to this amount. Labor cost per minute = (Monthly salary of an operators/Total minutes available in the month) at 100% efficiency CM cost = (SAM of the garment * Minute cost of the labor)/Line efficiency (%) Value added services: This is cost added to for special process like embroidery, printing, washing used to impart the type of look buyers wants. These are associated cost of garment manufacturing are wet processing chemicals, washing and contracted operations. Example of garment costing: The example of garment cost is given by assuming the following dimensions for polo neck T- shirt, no. of pieces = 4000, salary of the operator =6000 Rs./month=120$/month no. of working days = 26, line efficiency considered= 50%, sewing SAM= 15 min., Cutting SAM= 7 min. 1$=50INR Chest = 60 cm, Length (HSP to waist) = 75 cm, Sleeve length = 25 cm Fabric used is 2/60s 100% cotton S/J fabric. GSM is 180 The fabric consumption can be calculated as = (75 + 25 + 2) X (60 +1) X2X 180/10000 = 0.224kg + 0.08(weight of cuff and collar) CMT charges are calculated as: Total available capacity per month (in minute) = 26 working days*8 hours/day*60=12,480 minutes Labor cost per minute = (Monthly salary of an operators/Total minutes available in the month) at 100% efficiency = 6000/12480 =0.480 Rs. Sewing cost = (SAM of the garment * Minute cost of the labor)/Line efficiency (%) =15* 0.480/50
  • 39. =0.288$ Cutting cost = (SAM of cutting * Minute cost of the labor)/cutting efficiency (%) = 7*0.480/50 =0.134$ Trimming cost is considered as 0.06$as it depends upon how many operators are there for trimming. Production cost of garment (CMT) = sewing cost+ cutting cost + trimming cost = 0.288+0.134+0.06 = 0.482$ FOB costof garment Fabric cost + 7% duty 1.97$ Trim cost + 7% duty 0.3$ Fabric and trims transportation charges 0.06$ Testing + inspection charges 0.2$ Commission on foreign exchange 0.08$ Buying house commission 0.16$ Rejection 5% 0.16$ Value addition services 0.2$ CMT 0.482$ Margin 0.5$ Total FOB cost of garment 4.11$ Various types of printing 1. Screen printing A process, where ink is mechanically applied to a substrate with the use of a screen and Squeegee.
  • 40. Process of screen printing Color separation Each color of the design requires an individual screen so we must separate the design into its component colors. This is done on the computer and each color separation is printed to a transparent sheet. 4- color separation 4-colour process is a more advanced separation and printing technique. Use 4 colors of transparent ink to produce the colors from the original design. The four colors, Cyan, Magenta, Yellow, and black (CMYK), are printed as half-tones that interact with each other and the white background of the shirt to create color and tonal values.
  • 41. Various colors prints 2. Plastisol printing Good color opacity onto dark garments and clear graphic detail with, as the name suggests, a more plasticized texture. Plastisol inks require heat (approx. 150°C) to cure the print. Due to excess phthalate in PVC, this is banned for Children’s wear. Plastisol printing 3. Non-PVC Relatively new breed of ink and printing with the benefits of Plastisol but without the main toxic components – soft feeling print. Suitable for kids wear.
  • 42. Non- PVC print 4. High density print This is one of the recent developments in printing which gives thick prints on the surface of garments. Achieved by either giving more number of coats or by using thickener indirect films used for making the screens. 5. Suedo ink print Suede is a milky coloured additive that is added to Plastisol. With suede additive you can make any colour of Plastisol have ‘suede’ feel. Generally 50% suede additive to your normal Plastisol.
  • 43. Suedo ink print 6. Discharge print Used to print lighter colors onto dark background fabrics, they work by removing the dye already present in the garment. This gives a much softer texture. Discharge print 7. Sticker print This is ready to transfer print. The plastisol print is already printed on paper and will be transferred on to garment in the fusing process. The main advantage of this method is less expensive.
  • 44. Sticker print 8. Pigment print These penetrate the fabric more than the Plastisole inks and create a much softer feel. Also useful for larger area prints where texture is important. Pigment print 9. Glitter print Metallic flakes are suspended in the ink base to create this sparkle effect. Usually available in gold or silver but can be mixed to make most colors.
  • 45. Glitter print 10. Metallic print Give metallic look. Similar to glitter, but smaller particles suspended in the ink. Smooth in texture when compared to glitter. Metallic print 11. Foil print This printing method is based on the use of metallic foil paper of aluminum or copper one. The print fixation method is similar to transfer printing. This print method is popular amongst youngsters. Foil print 12. Distressed/ Khadi print It consists of titanium dioxide with other auxiliaries. The important factor in printing of this is right combination of titanium dioxide and proper choice of binder.
  • 46. Khadi print 13. Puff print An additive to Plastisol inks which raises the print off the garment, creating a 3D feel. In this method when the paste is printed and dries it look like normal printing garments but once it is cured the prints gets raised from the surface of fabric. Puff print 14. Cavier bead print Glue is printed in the shape of the design, to which small plastic beads are then applied. Works well with solid block areas creating an interesting tactile surface.
  • 47. 15.Silicone print To counter inferior wash and weather durability, poor hand feel of some prints like plastisol printing mills tried silicone inks because of their good washing durability, hand feel, elongation properties and environmental friendliness. Silicone print 16. Flock print This process involves printing of glue on the fabric first, applying the fiber flock on the gel printed by keeping the fabric on special table (electro statically charged). It requires a little high time for curing than normal prints. 120 seconds at 160C will be sufficient for curing. Flock print
  • 48. 17. Organic print Organic print range covers the natural dyes, and the other pigment dyes which lie under the specifications made by G.O.T.S. For Printing Organic Dyes the company/manufacturer should get the certification from G.O.T.S. Organic print
  • 49. Conclusion Before completing a final garments there are various process which need to be completed first. One cannot deliver complete garments for shipment without sourcing various material and complete various process. Before shipment one need to assume yarn, thread, fabric consumption and costing properly. Then he needs to collect those raw materials to for sewing. After sewing washing is required because dirt, oil, wax, or toxic material can be with the product. When every process in every sector is done then products moved to the finishing section for poly. At the very last products are ready for delivery. References https://www.coats.com/Guidance/Basic-stitch-types https://www.intouch-quality.com/blog/4-sewing-stitches-used-in-manufacturing-and-their- benefits https://www.textiletoday.com.bd/fashion-merchandising-garment-costing/ http://www.amefird.com/wp-content/uploads/2012/09/Estimating-Thread-Consumption-.pdf https://apparelcosting.blogspot.com/2017/05/sewing-thread-consumption-stitch-machine.html https://textilecalculation.blogspot.com/2015/05/sewing-thread-consumption-formula-with.html https://www.slideshare.net/sivajagadish/garment-printing?from_action=save https://textilecalculation.blogspot.com/2015/08/yarn-consumption-for-fabric.html https://textilecalculation.blogspot.com/2016/02/fabric-consumption-for-basic-t-shirt.html http://onlineapparelsolution.blogspot.com/2016/08/how-to-calculate-garment-sewing-thread.html http://learnapparelmerchandising.blogspot.com/2011/10/how-do-calculate-yarn-consumption- of.html