SlideShare a Scribd company logo
1 of 10
Download to read offline
SERVICEABILITY COMPARISON: DELL PCIe EXPRESS
FLASH SSDs VS. HP IO ACCELERATORS


 EXECUTIVE SUMMARY
         Advances in PCIe flash storage technologies are enabling remarkable throughput in today’s servers. Server
 manufacturers are now taking this technology to the next level by focusing on the serviceability of these same
 technologies. Simplifying common tasks such as expanding existing PCIe flash storage can free up your IT staff for
 innovation. We tested the serviceability of two PCIe flash server-storage solutions—a Dell PowerEdge R820 server with
 Dell PowerEdge PCIe Express Flash SSDs (Dell PCIe Express Flash solution) and an HP ProLiant DL585 G7 server using HP
 IO Accelerators for ProLiant Servers (HP IO Accelerator solution).
         While the initial physical installation of the Dell PCIe Express Flash SSD storage device took more time and more
 steps than installing the first HP IO Accelerator in the HP server, the Dell PCIe Express Flash solution was significantly
 easier to service in all other scenarios. (Note: Because Dell typically ships systems with the Dell PCIe Express Flash SSD
 storage already installed, these initial installation steps should not be required.) With the Dell PCIe Express Flash
 solution, setting up the volumes for SSD deployment was dramatically easier than with the HP IO Accelerator solution—
 it took only 1 minute and 0 seconds to have it up and running, 98.0 percent less time than the HP IO Accelerator
 solution’s 49 minutes and 0 seconds. The significant difference in the two solutions came when we expanded the
 storage. The Dell PCIe Express Flash solution was considerably easier, was quicker by 93.0 percent, and required no
 costly user downtime. We needed only insert an SSD into the outside slot, while the HP IO Accelerator solution required
 us to power down the server and open the top access panel to add another storage card. The same would be true for
 adding any additional storage card; the HP requires a power down and user downtime while the Dell is as simple as
 adding a hot-swap drive. Figure 1 shows the times and number of steps it took to complete each task with the two
 solutions.

                                         Dell PCIe Express Flash             HP IO Accelerator
                                                                                                                   Dell win
                                                solution                         solution
 Initial physical installation
 Time (minutes:seconds)                            15:15                           08:55
 Number of steps                                     8                               5
 Volume setup
 Time (minutes:seconds)                            1:00                            49:00                            98.0%
 Number of steps                                     5                              29                              82.8%
 Adding storage
 Time (minutes:seconds)                            0:40                            9:30*                            93.0%
 Number of steps                                     6                              14*                             57.1%
 Figure 1: Serviceability testing results for the two solutions. Less time and fewer steps are better. *The HP solution requires
 powering off and opening the server to add more capacity.

         The sections below detail the steps and times it took to complete the tasks for both solutions. Appendix A
 presents configuration information for the servers we tested, and Appendix B details our methodology.


                                                                                                                              MAY 2012
                                                           A PRINCIPLED TECHNOLOGIES TEST REPORT
                                                                                                               Commissioned by Dell Inc.
Initial physical installation
         Figure 2 presents our detailed findings for the physical setup for SSD deployment and configuration when we
used the Dell PCIe Express Flash solution and the HP IO Accelerator solution. Note: For both servers, we assume that
Windows Server 2008 R2 SP1 has already been installed and updated. Note: Because Dell ships systems with the PCIe
Express Flash SSD storage already installed, these initial install steps should not be required.

               Dell PCIe Express Flash solution                                       HP IO Accelerator solution
                    8 steps (15 min, 15 sec)                                            5 steps (8 min, 55 sec)
    1.   Power down the server. (30 sec)                                1.   Power down the server. (30 sec)
    2.   Disconnect the power cables, slide the server out              2.   Disconnect the power cables, slide the server out
         using the rails, and remove the top access panel. (1                using the rails, and remove the top access panel.
         min)                                                                (1 min)
    3.   Remove the fan module, and install the backplane               3.   Install the HP IO Accelerator card. (40 sec)
         to be used. (1 min, 20 sec)                                    4.   Replace the top access panel, slide the server back
    4.   Install the PCIe pass-through card. (1 min)                         into position, and reconnect all power cables. (1
    5.   Install cabling from the new backplane to the PCIe                  min)
         pass-through card. (4 min)                                     5.   Power the server on, and log in. (5 min, 45 sec)
    6.   Replace the fan module and top access panel, slide
         the server back into position, and reconnect all
         power cables. (45 sec)
    7.   Plug the SSD into the open bay slot. (10 sec)
    8.   Power the server on, and log in. (6 min, 30 sec)
Figure 2: Steps and times each solution required to install the initial components.

Volume setup
         Figure 3 presents our detailed findings for the setup for SSD deployment and configuration with the two
solutions. The HP IO Accelerator solution took 29 steps and a total of 49 minutes to complete setup, and required a
firmware update—which took 35 minutes, 35 seconds—before the solution was operable. The Dell PCIe Express Flash
solution, which took only 1 minute and five steps to completely set up, required no downloads and no such firmware
update. Setting up the OS for SSD deployment and configuration for the Dell PCIe Express Flash solution took 98.0
percent less time and 82.8 percent fewer steps than with the HP IO Accelerator solution. Even excluding the lengthy
firmware update, it took the HP IO Accelerator solution 13 minutes 25 seconds to complete setup, significantly longer
than the 1 minute the Dell PCIe Express Flash solution required.

              Dell PCIe Express Flash solution                                        HP IO Accelerator solution
                       5 steps (1 min)                                                    29 steps (49 min)
Setting up new disk volumes (1 min)                                Installing HP IO Accelerator using all default settings (11
    1. Once the server reboots, navigate to Disk                   min, 55 sec)
        Management.                                                    1. Ensure that no existing IO Accelerator drivers have
    2. At the prompt to initialize disks, keep defaults, and                been used. (10 sec)
        click OK.                                                              a. Open Device Manager.
    3. Right-click on the unallocated disks, and select                        b. Two mass storage controllers should be
        New Simple Volume.                                                          listed with yellow bangs.


Serviceability comparison: Dell PCIe Express Flash SSDs vs.                           A Principled Technologies test report 2
HP IO Accelerators
Dell PCIe Express Flash solution                              HP IO Accelerator solution
                     5 steps (1 min)                                            29 steps (49 min)
   4. Click Next on the next four screens, and click         2. Download latest HP IO Accelerator from HP site
      Finish.                                                     (2.3.10 current). (2 min, 30 sec)+(2 min download)
   5. Check that the disks show up as normal.                          a. Extract zip file, which should contain two
                                                                          executable files.
                                                             3. Run
                                                                  HP_IO_Accelerator_SNMPDefault_2.3.10.110_x64.
                                                                  exe.
                                                             4. Click Next.
                                                             5. Check I accept.
                                                             6. Click Next.
                                                             7. Click Next.
                                                             8. Click Install.
                                                             9. Wait for install to finish.
                                                             10. Click Finish. (1 min, 5 sec)
                                                             11. Restart the server. (6 min, 10 sec)
                                                         Installing HP IO Accelerator Manager (30 sec)
                                                             12. Run
                                                                  HP_IO_Accelerator_IO_Manager_3.1.0_x64.exe.
                                                             13. Click Next.
                                                             14. Click Next.
                                                             15. At the pop-up, click OK.
                                                             16. Click Install.
                                                             17. Wait for the install to finish.
                                                             18. Click Finish.
                                                             19. After installation is finished, IE will launch to
                                                                  access the management page. Close it for now.
                                                         Updating the firmware on the device (35 min, 35 sec)
                                                             20. Open a command prompt.
                                                             21. Enter the following commands after verifying the
                                                                  firmware file is correct.
                                                                  cd c:program fileshp io
                                                         acceleratorutils
                                                                  fio-update-iodrive “C:Program
                                                         FilesHP IO
                                                         AcceleratorFirmwareioaccelerator_1070
                                                         53.fff”
                                                             22. Wait for the firmware update to finish completely.
                                                                  (29 min, 25 sec)
                                                             23. Restart the server. (6 min, 10 sec)
                                                         Setting up new disk volumes (1 min)
                                                             24. Once server reboots, navigate to Disk
                                                                  Management.
                                                             25. At the prompt to initialize disks, keep defaults and
                                                                  click OK.


Serviceability comparison: Dell PCIe Express Flash SSDs vs.               A Principled Technologies test report 3
HP IO Accelerators
Dell PCIe Express Flash solution                                         HP IO Accelerator solution
                        5 steps (1 min)                                                     29 steps (49 min)
                                                                         26.   Right-click on the unallocated disks and select New
                                                                               Simple Volume.
                                                                         27.   Click Next on the next four screens, and click
                                                                               Finish.
                                                                         28.   Repeat steps 26 and 27 for the next disk.
                                                                         29.   Check that the disks show up as normal.

Figure 3: Steps and times each solution required to finish setup after the initial OS setup.

Adding storage
         We compared how long it took to add more storage after initial setup and installation for both solutions, adding
an SSD with the Dell PCIe Express Flash solution and another IO Accelerator card for the HP solution. The Dell approach
of exposing four PCIe flash bays to the front of the server made adding additional capacity far easier than the HP
approach of requiring discrete internal accelerator cards. Adding additional PCIe flash capacity to the Dell PowerEdge
R820 took 93.0 percent less time and 57.1 percent fewer steps than with the HP IO Accelerator solution. Upgrading the
HP IO Accelerator solution requires a server reboot and reconfiguration, activities which can lead to an increased risk of
unplanned downtime. According to Emerson Network Power’s February 2011 study
(http://www.emersonnetworkpower.com/en-US/Brands/Liebert/Documents/White%20Papers/sl-24659.pdf), such
unplanned downtime can cost tens of thousands of dollars per incident. The hot-plug capabilities of the Dell PCIe
Express Flash solution help avoid this potential downtime risk.

         Figure 4 shows the steps we followed to add storage to the servers.

               Dell PCIe Express Flash solution                                        HP IO Accelerator solution
                     6 steps (40 seconds)                                             14 steps (9 min, 30 seconds)
Adding the new storage (10 seconds)                                 Adding the new storage (8 min, 55 seconds)
    1. Insert the SSD into the server.                                  1. Power down the server. (30 sec)
Setting up new disk volumes (30 seconds)                                2. Disconnect the power cables, slide the server out
                                                                            using the rails, and remove the top access panel.
    2. Navigate to Disk Management.
                                                                            (1 min)
    3. At the prompt to initialize disks, keep defaults, and
                                                                        3. Install the IO Accelerator card. (40 sec)
        click OK.
                                                                        4. Replace the top access panel, slide the server back
    4. Right-click on the unallocated disks, and select
                                                                            into position, and reconnect all power cables. (1
        New Simple Volume.
                                                                            min)
    5. Click Next on the next four screens, and click
                                                                        5. Power the server on, and log in. (5 min, 45 sec)
        Finish.
    6. Check that the disks show up as normal.                      Setting up new disk volumes (35 seconds)
                                                                        6. Once server reboots, go to disk management.
                                                                        7. At the prompt to initialize disks, keep defaults and
                                                                            click OK.
                                                                        8. Right-click on the first unallocated disk, and select
                                                                            New Spanned Volume.
                                                                        9. At the Welcome screen, click Next.
                                                                        10. On the Select Disks screen, select the other


Serviceability comparison: Dell PCIe Express Flash SSDs vs.                            A Principled Technologies test report 4
HP IO Accelerators
Dell PCIe Express Flash solution                                        HP IO Accelerator solution
                    6 steps (40 seconds)                                             14 steps (9 min, 30 seconds)
                                                                              available drive in the left box, and click the Add >
                                                                              button.
                                                                        11.   Click Next.
                                                                        12.   Click Next at the next two screens, and click Finish.
                                                                        13.   At the warning about converting basic disks to
                                                                              dynamic disks, click Yes.
                                                                        14.   Check that the disk shows up as normal.

Figure 4: Steps and times each solution required to add an SSD after initial setup is complete.


CONCLUSION
        Companies who invest in PCIe flash storage technologies benefit from devices that are quick and easy to service.
While the Dell PCIe Express Flash storage device required more time upfront to install the first time, once in place it
made setting up volumes and adding storage dramatically faster. Thanks to the Dell design and not needing to power
down the server, we were able to complete each of these tasks in about 1 minute and we would expect no user
downtime. In contrast, using the HP IO Accelerator solution setting up volumes took 49 minutes and adding storage took
just under 10 minutes and could require significant user downtime or after-hours installation. These time savings and
the lack of required downtime make the Dell PCIe Express Flash solution a good choice for your enterprise.


Serviceability comparison: Dell PCIe Express Flash SSDs vs.                            A Principled Technologies test report 5
HP IO Accelerators
APPENDIX A – SERVER CONFIGURATION INFORMATION
       Figure 5 provides detailed configuration information for the test servers.

System                                           Dell PowerEdge R820                        HP ProLiant DL585 G7
Power supplies
Total number                            2                                           4
Vendor and model number                 Dell E1100E-S0                              HP DPS-1200FB-1 A
Wattage of each (W)                     1,100                                       1,200
Cooling fans
Total number                            6                                           4
Vendor and model number                 San Ace 60 9GA0612P1J611                    DC Brushless PFC0912DE
Dimensions (h x w) of each              2.5" x 2.5"                                 3.5" x 3.5"
Volts                                   12                                          12
Amps                                    1.50                                        4.32
General
Number of processor packages            4                                           4
Number of cores per processor           8                                           16
Number of hardware threads per core     2                                           1
System power management policy          Balanced                                    Balanced
CPU
Vendor                                  Intel                                       AMD
Name                                    Xeon                                        Opteron™
Model number                            E5-4650                                     6282 SE
Stepping                                7                                           B2
Socket type                             LGA2011                                     G34
Core frequency (GHz)                    2.70                                        2.60
Bus frequency (GT/s)                    8.0                                         6.4
L1 cache                                32 KB                                       8 x 64 KB, 16 x 16 KB
L2 cache                                256 KB                                      8 x 2 MB
L3 cache (MB)                           20                                          16
Platform
Vendor and model number                 Dell PowerEdge R820                         HP DL585 G7
Motherboard model number                Dell UL94V-0                                HP 604046-001
BIOS name and version                   Dell 1.0.0                                  ProLiant System BIOS A16
BIOS settings                           Default                                     Default
Memory module(s)
Total RAM in system (GB)                256                                         256
Vendor and model number                 Samsung® M393B2G70BH0-YH9                   Samsung M393B1K70BH1-CH9
Type                                    PC3L-10600R                                 PC3-10600R
Speed (MHz)                             1,333                                       1,333
Speed running in the system (MHz)       1,333                                       1,333
Timing/Latency (tCL-tRCD-tRP-
                                        9-9-9-36                                    9-9-9-24
tRASmin)
Size (GB)                               16                                          8


Serviceability comparison: Dell PCIe Express Flash SSDs vs.                   A Principled Technologies test report 6
HP IO Accelerators
System                                              Dell PowerEdge R820                   HP ProLiant DL585 G7
Number of RAM module(s)                     16                                     32
Chip organization                           Double-sided                           Double-sided
Rank                                        Dual                                   Dual
Operating system
                                            Windows Server 2008 R2 Enterprise      Windows Server 2008 R2 Enterprise
Name
                                            64-bit                                 64-bit
Build number                                7601                                   7601
File system                                 NTFS                                   NTFS
Service Pack                                SP1                                    SP1
Language                                    English                                English
Graphics
Vendor and model number                     Matrox® G200eR                         ATI ES1000
Graphics memory (MB)                        16                                     16
RAID controller
Vendor and model number                     Dell PERC H710P Adapter                HP Smart Array P410i
Firmware version                            21.0.1-0130                            3.66
Cache size                                  1 GB                                   512 MB
Hard drive 1 (operating system)
Vendor and model number                     Seagate® ST9300653SS                   Seagate ST9300653SS
Number of drives                            2                                      2
Size (GB)                                   300                                    300
RPM                                         15,000                                 15,000
Type                                        SAS                                    SAS
Hard drive 2
                                                                                   HP 320GB SLC PCIe ioDrive Duo for
Vendor and model number                     Dell RealSSD P320h MTFDGAL350SAH
                                                                                   ProLiant Servers
Number of drives                            2                                      1
Size (GB)                                   350                                    320
RPM                                         n/a                                    n/a
Type                                        PCIe                                   PCIe
Ethernet adapter
Vendor and model number                     Intel Gigabit 4P I350-t                HP NC375i
Type                                        Integrated                             Integrated
Optical drive(s)
Vendor and model number                     PLDS DVD+-RW DS-8A5SH                  None
Type                                        Internal                               N/A
USB ports
Number                                      4 external, 1 internal                 4 external, 1 internal
Type                                        2.0                                    2.0
Figure 5: System configuration information for the test servers.


Serviceability comparison: Dell PCIe Express Flash SSDs vs.                     A Principled Technologies test report 7
HP IO Accelerators
APPENDIX B – HOW WE TESTED
Testing the HP IO Accelerator solution
Installing the HP IO Accelerator
   1.    Cleanly shut down the server.
   2.    Disconnect the power cables.
   3.    Pull out server and remove the top access panel.
   4.    Verify an open PCIe slot is available.
   5.    Install the card in any available PCIe slot.
   6.    Secure the card to the chassis with the latch.
   7.    Replace the top access panel.
   8.    Push the server back into place.
   9.    Reconnect the cables.
   10.   Turn the server on.
Installing HP IO Accelerator using all default settings
   1. Ensure that no existing IO Accelerator drivers have been used.
           a. Open Device Manager and check for two unconfigured mass storage controllers.
   2. Download latest HP IO Accelerator from HP site (2.3.10 current).
           a. Extract the zip file, which should contain two executable files.
   3. Run HP_IO_Accelerator_SNMPDefault_2.3.10.110_x64.exe.
   4. Click Next.
   5. Check I accept.
   6. Click Next.
   7. Click Next.
   8. Click Install.
   9. Wait for install to finish.
   10. Click Finish.
   11. Restart the server.
Installing HP IO Accelerator Manager
   1.    Run HP_IO_Accelerator_IO_Manager_3.1.0_x64.exe
   2.    Click Next.
   3.    Click Next.
   4.    At the pop-up, click OK.
   5.    Click Install.
   6.    Wait for install to finish.
   7.    Click Finish.
   8.    After installation is finished, IE will launch to access the management page. Close it for now.
Updating the firmware on the device
   1. Open a command prompt.
   2. Enter the following commands after verifying the firmware file is correct.
      cd c:program fileshp io acceleratorutils
      fio-update-iodrive “c:program fileshp
      acceleratorioaccelerator_107053.fff”
   3. Wait for firmware to finish completely.
   4. Restart the server.


Serviceability comparison: Dell PCIe Express Flash SSDs vs.                      A Principled Technologies test report 8
HP IO Accelerators
Setting up new disk volumes
   1.    After server reboot, navigate to Disk Management.
   2.    At the prompt to initialize disks, keep defaults and click OK.
   3.    Right-click on the unallocated disks and select New Simple Volume.
   4.    Click Next four times.
   5.    Click Finish.
   6.    Check that the disks show up as normal.
Testing the Dell PCIe Express Flash solution
Installing the SSD and related components
   1.    Cleanly shut down the server.
   2.    Disconnect the power cables.
   3.    Pull out the server and remove the top access panel.
   4.    Remove the fan module.
   5.    Install the backplane to be used in the open backplane slot.
   6.    Lift the PCIe cage from the back of the server.
   7.    Plug in the PCIe pass-through card
   8.    Secure the card in place using the brackets.
   9.    Replace the PCIe cage.
   10.   Install cabling from the new backplane to the PCIe pass-through card. Cabling should route around the CPU and
         memory trays.
   11.   Replace the fan module.
   12.   Replace top access panel.
   13.   Push the server back into place.
   14.   Reconnect the cables.
   15.   Plug in the SSD to the first open bay slot on the side where the new backplane was installed.
   16.   Turn the server on.
Setting up new disk volumes
   1.    From the Start Menu, select Control PanelAdministrative ToolsComputer Management.
   2.    Expand Storage, and select Disk Management.
   3.    At the prompt to initialize disks, keep defaults and click OK.
   4.    If you do not see the prompt.
              a. Check if the disk is listed in the center panel.
                       i. Right click on the left hand box representing your disk and choose initialize disk.
              b. Rescan the disks by right clicking disk management and selecting Rescan Disks.
              c. If disk does not appear after some time, a reboot may be required.
   5.    Right click on the left hand box representing your disk and choose Online.
   6.    Right click the box labeled “unallocated” in the box representing your disk.
   7.    Select New Simple Volume.
   8.    Click Next four times.
   9.    Click Finish.
   10.   Check that the disks show up as normal.


Serviceability comparison: Dell PCIe Express Flash SSDs vs.                       A Principled Technologies test report 9
HP IO Accelerators
ABOUT PRINCIPLED TECHNOLOGIES
                                               We provide industry-leading technology assessment and fact-based
                                               marketing services. We bring to every assignment extensive experience
                                               with and expertise in all aspects of technology testing and analysis, from
                                               researching new technologies, to developing new methodologies, to
Principled Technologies, Inc.
                                               testing with existing and new tools.
1007 Slater Road, Suite 300
Durham, NC, 27703                              When the assessment is complete, we know how to present the results to
www.principledtechnologies.com
                                               a broad range of target audiences. We provide our clients with the
                                               materials they need, from market-focused data to use in their own
                                               collateral to custom sales aids, such as test reports, performance
                                               assessments, and white papers. Every document reflects the results of
                                               our trusted independent analysis.

                                               We provide customized services that focus on our clients’ individual
                                               requirements. Whether the technology involves hardware, software, Web
                                               sites, or services, we offer the experience, expertise, and tools to help our
                                               clients assess how it will fare against its competition, its performance, its
                                               market readiness, and its quality and reliability.

                                               Our founders, Mark L. Van Name and Bill Catchings, have worked
                                               together in technology assessment for over 20 years. As journalists, they
                                               published over a thousand articles on a wide array of technology subjects.
                                               They created and led the Ziff-Davis Benchmark Operation, which
                                               developed such industry-standard benchmarks as Ziff Davis Media’s
                                               Winstone and WebBench. They founded and led eTesting Labs, and after
                                               the acquisition of that company by Lionbridge Technologies were the
                                               head and CTO of VeriTest.


Principled Technologies is a registered trademark of Principled Technologies, Inc.
All other product names are the trademarks of their respective owners.

Disclaimer of Warranties; Limitation of Liability:
PRINCIPLED TECHNOLOGIES, INC. HAS MADE REASONABLE EFFORTS TO ENSURE THE ACCURACY AND VALIDITY OF ITS TESTING, HOWEVER,
PRINCIPLED TECHNOLOGIES, INC. SPECIFICALLY DISCLAIMS ANY WARRANTY, EXPRESSED OR IMPLIED, RELATING TO THE TEST RESULTS AND
ANALYSIS, THEIR ACCURACY, COMPLETENESS OR QUALITY, INCLUDING ANY IMPLIED WARRANTY OF FITNESS FOR ANY PARTICULAR PURPOSE.
ALL PERSONS OR ENTITIES RELYING ON THE RESULTS OF ANY TESTING DO SO AT THEIR OWN RISK, AND AGREE THAT PRINCIPLED
TECHNOLOGIES, INC., ITS EMPLOYEES AND ITS SUBCONTRACTORS SHALL HAVE NO LIABILITY WHATSOEVER FROM ANY CLAIM OF LOSS OR
DAMAGE ON ACCOUNT OF ANY ALLEGED ERROR OR DEFECT IN ANY TESTING PROCEDURE OR RESULT.

IN NO EVENT SHALL PRINCIPLED TECHNOLOGIES, INC. BE LIABLE FOR INDIRECT, SPECIAL, INCIDENTAL, OR CONSEQUENTIAL DAMAGES IN
CONNECTION WITH ITS TESTING, EVEN IF ADVISED OF THE POSSIBILITY OF SUCH DAMAGES. IN NO EVENT SHALL PRINCIPLED TECHNOLOGIES,
INC.’S LIABILITY, INCLUDING FOR DIRECT DAMAGES, EXCEED THE AMOUNTS PAID IN CONNECTION WITH PRINCIPLED TECHNOLOGIES, INC.’S
TESTING. CUSTOMER’S SOLE AND EXCLUSIVE REMEDIES ARE AS SET FORTH HEREIN.


Serviceability comparison: Dell PCIe Express Flash SSDs vs.                          A Principled Technologies test report 10
HP IO Accelerators

More Related Content

Viewers also liked

Simple math fusion-io_v4
Simple math fusion-io_v4Simple math fusion-io_v4
Simple math fusion-io_v4
Steve Lee
 

Viewers also liked (18)

The Future of Cloud Networking is VMware NSX (Danish VMUG edition)
The Future of Cloud Networking is VMware NSX (Danish VMUG edition)The Future of Cloud Networking is VMware NSX (Danish VMUG edition)
The Future of Cloud Networking is VMware NSX (Danish VMUG edition)
 
VMworld Europe 2014: Storage DRS - Deep Dive and Best Practices
VMworld Europe 2014: Storage DRS - Deep Dive and Best PracticesVMworld Europe 2014: Storage DRS - Deep Dive and Best Practices
VMworld Europe 2014: Storage DRS - Deep Dive and Best Practices
 
An Introduction to Vagrant and Docker
An Introduction to Vagrant and DockerAn Introduction to Vagrant and Docker
An Introduction to Vagrant and Docker
 
Astrology basic
Astrology basicAstrology basic
Astrology basic
 
Solving io bottleneck
Solving io bottleneckSolving io bottleneck
Solving io bottleneck
 
Next-Generation Best Practices for VMware and Storage
Next-Generation Best Practices for VMware and StorageNext-Generation Best Practices for VMware and Storage
Next-Generation Best Practices for VMware and Storage
 
Simple math fusion-io_v4
Simple math fusion-io_v4Simple math fusion-io_v4
Simple math fusion-io_v4
 
The Vision for the Future of Network Virtualization with VMware NSX
The Vision for the Future of Network Virtualization with VMware  NSXThe Vision for the Future of Network Virtualization with VMware  NSX
The Vision for the Future of Network Virtualization with VMware NSX
 
The Full Stack Journey (DFW)
The Full Stack Journey (DFW)The Full Stack Journey (DFW)
The Full Stack Journey (DFW)
 
The Vision for the Future of Network Virtualization with VMware NSX (Q2 2016)
The Vision for the Future of Network Virtualization with VMware NSX (Q2 2016)The Vision for the Future of Network Virtualization with VMware NSX (Q2 2016)
The Vision for the Future of Network Virtualization with VMware NSX (Q2 2016)
 
Areas of KP research 2015
Areas of KP research 2015Areas of KP research 2015
Areas of KP research 2015
 
An Overview of Linux Networking Options
An Overview of Linux Networking OptionsAn Overview of Linux Networking Options
An Overview of Linux Networking Options
 
Kp interpretation of 6th house
Kp interpretation of 6th houseKp interpretation of 6th house
Kp interpretation of 6th house
 
The Future of Cloud Networking is VMware NSX
The Future of Cloud Networking is VMware NSXThe Future of Cloud Networking is VMware NSX
The Future of Cloud Networking is VMware NSX
 
Primer on kp
Primer on kpPrimer on kp
Primer on kp
 
VMware Advance Troubleshooting Workshop - Day 3
VMware Advance Troubleshooting Workshop - Day 3VMware Advance Troubleshooting Workshop - Day 3
VMware Advance Troubleshooting Workshop - Day 3
 
Network Virtualization with VMware NSX
Network Virtualization with VMware NSXNetwork Virtualization with VMware NSX
Network Virtualization with VMware NSX
 
Basics of IO techniques in Storage Technology Networks
Basics of IO techniques in Storage Technology NetworksBasics of IO techniques in Storage Technology Networks
Basics of IO techniques in Storage Technology Networks
 

More from Principled Technologies

Improve performance and gain room to grow by easily migrating to a modern Ope...
Improve performance and gain room to grow by easily migrating to a modern Ope...Improve performance and gain room to grow by easily migrating to a modern Ope...
Improve performance and gain room to grow by easily migrating to a modern Ope...
Principled Technologies
 
Increase security, sustainability, and efficiency with robust Dell server man...
Increase security, sustainability, and efficiency with robust Dell server man...Increase security, sustainability, and efficiency with robust Dell server man...
Increase security, sustainability, and efficiency with robust Dell server man...
Principled Technologies
 

More from Principled Technologies (20)

Dell APEX Cloud Platform for Red Hat OpenShift: An easily deployable and powe...
Dell APEX Cloud Platform for Red Hat OpenShift: An easily deployable and powe...Dell APEX Cloud Platform for Red Hat OpenShift: An easily deployable and powe...
Dell APEX Cloud Platform for Red Hat OpenShift: An easily deployable and powe...
 
Upgrade your cloud infrastructure with Dell PowerEdge R760 servers and VMware...
Upgrade your cloud infrastructure with Dell PowerEdge R760 servers and VMware...Upgrade your cloud infrastructure with Dell PowerEdge R760 servers and VMware...
Upgrade your cloud infrastructure with Dell PowerEdge R760 servers and VMware...
 
Upgrade your cloud infrastructure with Dell PowerEdge R760 servers and VMware...
Upgrade your cloud infrastructure with Dell PowerEdge R760 servers and VMware...Upgrade your cloud infrastructure with Dell PowerEdge R760 servers and VMware...
Upgrade your cloud infrastructure with Dell PowerEdge R760 servers and VMware...
 
Realize 2.1X the performance with 20% less power with AMD EPYC processor-back...
Realize 2.1X the performance with 20% less power with AMD EPYC processor-back...Realize 2.1X the performance with 20% less power with AMD EPYC processor-back...
Realize 2.1X the performance with 20% less power with AMD EPYC processor-back...
 
Improve performance and gain room to grow by easily migrating to a modern Ope...
Improve performance and gain room to grow by easily migrating to a modern Ope...Improve performance and gain room to grow by easily migrating to a modern Ope...
Improve performance and gain room to grow by easily migrating to a modern Ope...
 
Boost PC performance: How more available memory can improve productivity
Boost PC performance: How more available memory can improve productivityBoost PC performance: How more available memory can improve productivity
Boost PC performance: How more available memory can improve productivity
 
Deploy with confidence: VMware Cloud Foundation 5.1 on next gen Dell PowerEdg...
Deploy with confidence: VMware Cloud Foundation 5.1 on next gen Dell PowerEdg...Deploy with confidence: VMware Cloud Foundation 5.1 on next gen Dell PowerEdg...
Deploy with confidence: VMware Cloud Foundation 5.1 on next gen Dell PowerEdg...
 
Upgrade your cloud infrastructure with Dell PowerEdge R760 servers and VMware...
Upgrade your cloud infrastructure with Dell PowerEdge R760 servers and VMware...Upgrade your cloud infrastructure with Dell PowerEdge R760 servers and VMware...
Upgrade your cloud infrastructure with Dell PowerEdge R760 servers and VMware...
 
A comparison of security features in Dell, HP, and Lenovo PC systems
A comparison of security features in Dell, HP, and Lenovo PC systemsA comparison of security features in Dell, HP, and Lenovo PC systems
A comparison of security features in Dell, HP, and Lenovo PC systems
 
Increase security, sustainability, and efficiency with robust Dell server man...
Increase security, sustainability, and efficiency with robust Dell server man...Increase security, sustainability, and efficiency with robust Dell server man...
Increase security, sustainability, and efficiency with robust Dell server man...
 
Increase security, sustainability, and efficiency with robust Dell server man...
Increase security, sustainability, and efficiency with robust Dell server man...Increase security, sustainability, and efficiency with robust Dell server man...
Increase security, sustainability, and efficiency with robust Dell server man...
 
Scale up your storage with higher-performing Dell APEX Block Storage for AWS ...
Scale up your storage with higher-performing Dell APEX Block Storage for AWS ...Scale up your storage with higher-performing Dell APEX Block Storage for AWS ...
Scale up your storage with higher-performing Dell APEX Block Storage for AWS ...
 
Scale up your storage with higher-performing Dell APEX Block Storage for AWS
Scale up your storage with higher-performing Dell APEX Block Storage for AWSScale up your storage with higher-performing Dell APEX Block Storage for AWS
Scale up your storage with higher-performing Dell APEX Block Storage for AWS
 
Get in and stay in the productivity zone with the HP Z2 G9 Tower Workstation
Get in and stay in the productivity zone with the HP Z2 G9 Tower WorkstationGet in and stay in the productivity zone with the HP Z2 G9 Tower Workstation
Get in and stay in the productivity zone with the HP Z2 G9 Tower Workstation
 
Open up new possibilities with higher transactional database performance from...
Open up new possibilities with higher transactional database performance from...Open up new possibilities with higher transactional database performance from...
Open up new possibilities with higher transactional database performance from...
 
Improving database performance and value with an easy migration to Azure Data...
Improving database performance and value with an easy migration to Azure Data...Improving database performance and value with an easy migration to Azure Data...
Improving database performance and value with an easy migration to Azure Data...
 
Realize better value and performance migrating from Azure Database for Postgr...
Realize better value and performance migrating from Azure Database for Postgr...Realize better value and performance migrating from Azure Database for Postgr...
Realize better value and performance migrating from Azure Database for Postgr...
 
Realize better value and performance migrating from Azure Database for Postgr...
Realize better value and performance migrating from Azure Database for Postgr...Realize better value and performance migrating from Azure Database for Postgr...
Realize better value and performance migrating from Azure Database for Postgr...
 
Set up students and teachers to excel now and in the future with Intel proces...
Set up students and teachers to excel now and in the future with Intel proces...Set up students and teachers to excel now and in the future with Intel proces...
Set up students and teachers to excel now and in the future with Intel proces...
 
Finding the path to AI success with the Dell AI portfolio - Summary
Finding the path to AI success with the Dell AI portfolio - SummaryFinding the path to AI success with the Dell AI portfolio - Summary
Finding the path to AI success with the Dell AI portfolio - Summary
 

Serviceability comparison: Dell PCIe Express Flash SSDs vs. HP IO Accelerators

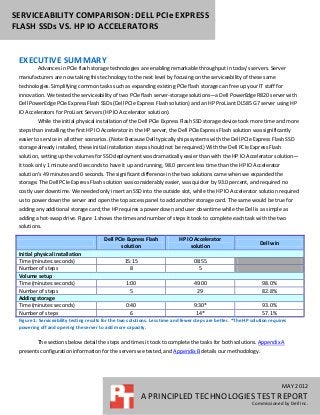
  • 1. SERVICEABILITY COMPARISON: DELL PCIe EXPRESS FLASH SSDs VS. HP IO ACCELERATORS EXECUTIVE SUMMARY Advances in PCIe flash storage technologies are enabling remarkable throughput in today’s servers. Server manufacturers are now taking this technology to the next level by focusing on the serviceability of these same technologies. Simplifying common tasks such as expanding existing PCIe flash storage can free up your IT staff for innovation. We tested the serviceability of two PCIe flash server-storage solutions—a Dell PowerEdge R820 server with Dell PowerEdge PCIe Express Flash SSDs (Dell PCIe Express Flash solution) and an HP ProLiant DL585 G7 server using HP IO Accelerators for ProLiant Servers (HP IO Accelerator solution). While the initial physical installation of the Dell PCIe Express Flash SSD storage device took more time and more steps than installing the first HP IO Accelerator in the HP server, the Dell PCIe Express Flash solution was significantly easier to service in all other scenarios. (Note: Because Dell typically ships systems with the Dell PCIe Express Flash SSD storage already installed, these initial installation steps should not be required.) With the Dell PCIe Express Flash solution, setting up the volumes for SSD deployment was dramatically easier than with the HP IO Accelerator solution— it took only 1 minute and 0 seconds to have it up and running, 98.0 percent less time than the HP IO Accelerator solution’s 49 minutes and 0 seconds. The significant difference in the two solutions came when we expanded the storage. The Dell PCIe Express Flash solution was considerably easier, was quicker by 93.0 percent, and required no costly user downtime. We needed only insert an SSD into the outside slot, while the HP IO Accelerator solution required us to power down the server and open the top access panel to add another storage card. The same would be true for adding any additional storage card; the HP requires a power down and user downtime while the Dell is as simple as adding a hot-swap drive. Figure 1 shows the times and number of steps it took to complete each task with the two solutions. Dell PCIe Express Flash HP IO Accelerator Dell win solution solution Initial physical installation Time (minutes:seconds) 15:15 08:55 Number of steps 8 5 Volume setup Time (minutes:seconds) 1:00 49:00 98.0% Number of steps 5 29 82.8% Adding storage Time (minutes:seconds) 0:40 9:30* 93.0% Number of steps 6 14* 57.1% Figure 1: Serviceability testing results for the two solutions. Less time and fewer steps are better. *The HP solution requires powering off and opening the server to add more capacity. The sections below detail the steps and times it took to complete the tasks for both solutions. Appendix A presents configuration information for the servers we tested, and Appendix B details our methodology. MAY 2012 A PRINCIPLED TECHNOLOGIES TEST REPORT Commissioned by Dell Inc.
  • 2. Initial physical installation Figure 2 presents our detailed findings for the physical setup for SSD deployment and configuration when we used the Dell PCIe Express Flash solution and the HP IO Accelerator solution. Note: For both servers, we assume that Windows Server 2008 R2 SP1 has already been installed and updated. Note: Because Dell ships systems with the PCIe Express Flash SSD storage already installed, these initial install steps should not be required. Dell PCIe Express Flash solution HP IO Accelerator solution 8 steps (15 min, 15 sec) 5 steps (8 min, 55 sec) 1. Power down the server. (30 sec) 1. Power down the server. (30 sec) 2. Disconnect the power cables, slide the server out 2. Disconnect the power cables, slide the server out using the rails, and remove the top access panel. (1 using the rails, and remove the top access panel. min) (1 min) 3. Remove the fan module, and install the backplane 3. Install the HP IO Accelerator card. (40 sec) to be used. (1 min, 20 sec) 4. Replace the top access panel, slide the server back 4. Install the PCIe pass-through card. (1 min) into position, and reconnect all power cables. (1 5. Install cabling from the new backplane to the PCIe min) pass-through card. (4 min) 5. Power the server on, and log in. (5 min, 45 sec) 6. Replace the fan module and top access panel, slide the server back into position, and reconnect all power cables. (45 sec) 7. Plug the SSD into the open bay slot. (10 sec) 8. Power the server on, and log in. (6 min, 30 sec) Figure 2: Steps and times each solution required to install the initial components. Volume setup Figure 3 presents our detailed findings for the setup for SSD deployment and configuration with the two solutions. The HP IO Accelerator solution took 29 steps and a total of 49 minutes to complete setup, and required a firmware update—which took 35 minutes, 35 seconds—before the solution was operable. The Dell PCIe Express Flash solution, which took only 1 minute and five steps to completely set up, required no downloads and no such firmware update. Setting up the OS for SSD deployment and configuration for the Dell PCIe Express Flash solution took 98.0 percent less time and 82.8 percent fewer steps than with the HP IO Accelerator solution. Even excluding the lengthy firmware update, it took the HP IO Accelerator solution 13 minutes 25 seconds to complete setup, significantly longer than the 1 minute the Dell PCIe Express Flash solution required. Dell PCIe Express Flash solution HP IO Accelerator solution 5 steps (1 min) 29 steps (49 min) Setting up new disk volumes (1 min) Installing HP IO Accelerator using all default settings (11 1. Once the server reboots, navigate to Disk min, 55 sec) Management. 1. Ensure that no existing IO Accelerator drivers have 2. At the prompt to initialize disks, keep defaults, and been used. (10 sec) click OK. a. Open Device Manager. 3. Right-click on the unallocated disks, and select b. Two mass storage controllers should be New Simple Volume. listed with yellow bangs. Serviceability comparison: Dell PCIe Express Flash SSDs vs. A Principled Technologies test report 2 HP IO Accelerators
  • 3. Dell PCIe Express Flash solution HP IO Accelerator solution 5 steps (1 min) 29 steps (49 min) 4. Click Next on the next four screens, and click 2. Download latest HP IO Accelerator from HP site Finish. (2.3.10 current). (2 min, 30 sec)+(2 min download) 5. Check that the disks show up as normal. a. Extract zip file, which should contain two executable files. 3. Run HP_IO_Accelerator_SNMPDefault_2.3.10.110_x64. exe. 4. Click Next. 5. Check I accept. 6. Click Next. 7. Click Next. 8. Click Install. 9. Wait for install to finish. 10. Click Finish. (1 min, 5 sec) 11. Restart the server. (6 min, 10 sec) Installing HP IO Accelerator Manager (30 sec) 12. Run HP_IO_Accelerator_IO_Manager_3.1.0_x64.exe. 13. Click Next. 14. Click Next. 15. At the pop-up, click OK. 16. Click Install. 17. Wait for the install to finish. 18. Click Finish. 19. After installation is finished, IE will launch to access the management page. Close it for now. Updating the firmware on the device (35 min, 35 sec) 20. Open a command prompt. 21. Enter the following commands after verifying the firmware file is correct. cd c:program fileshp io acceleratorutils fio-update-iodrive “C:Program FilesHP IO AcceleratorFirmwareioaccelerator_1070 53.fff” 22. Wait for the firmware update to finish completely. (29 min, 25 sec) 23. Restart the server. (6 min, 10 sec) Setting up new disk volumes (1 min) 24. Once server reboots, navigate to Disk Management. 25. At the prompt to initialize disks, keep defaults and click OK. Serviceability comparison: Dell PCIe Express Flash SSDs vs. A Principled Technologies test report 3 HP IO Accelerators
  • 4. Dell PCIe Express Flash solution HP IO Accelerator solution 5 steps (1 min) 29 steps (49 min) 26. Right-click on the unallocated disks and select New Simple Volume. 27. Click Next on the next four screens, and click Finish. 28. Repeat steps 26 and 27 for the next disk. 29. Check that the disks show up as normal. Figure 3: Steps and times each solution required to finish setup after the initial OS setup. Adding storage We compared how long it took to add more storage after initial setup and installation for both solutions, adding an SSD with the Dell PCIe Express Flash solution and another IO Accelerator card for the HP solution. The Dell approach of exposing four PCIe flash bays to the front of the server made adding additional capacity far easier than the HP approach of requiring discrete internal accelerator cards. Adding additional PCIe flash capacity to the Dell PowerEdge R820 took 93.0 percent less time and 57.1 percent fewer steps than with the HP IO Accelerator solution. Upgrading the HP IO Accelerator solution requires a server reboot and reconfiguration, activities which can lead to an increased risk of unplanned downtime. According to Emerson Network Power’s February 2011 study (http://www.emersonnetworkpower.com/en-US/Brands/Liebert/Documents/White%20Papers/sl-24659.pdf), such unplanned downtime can cost tens of thousands of dollars per incident. The hot-plug capabilities of the Dell PCIe Express Flash solution help avoid this potential downtime risk. Figure 4 shows the steps we followed to add storage to the servers. Dell PCIe Express Flash solution HP IO Accelerator solution 6 steps (40 seconds) 14 steps (9 min, 30 seconds) Adding the new storage (10 seconds) Adding the new storage (8 min, 55 seconds) 1. Insert the SSD into the server. 1. Power down the server. (30 sec) Setting up new disk volumes (30 seconds) 2. Disconnect the power cables, slide the server out using the rails, and remove the top access panel. 2. Navigate to Disk Management. (1 min) 3. At the prompt to initialize disks, keep defaults, and 3. Install the IO Accelerator card. (40 sec) click OK. 4. Replace the top access panel, slide the server back 4. Right-click on the unallocated disks, and select into position, and reconnect all power cables. (1 New Simple Volume. min) 5. Click Next on the next four screens, and click 5. Power the server on, and log in. (5 min, 45 sec) Finish. 6. Check that the disks show up as normal. Setting up new disk volumes (35 seconds) 6. Once server reboots, go to disk management. 7. At the prompt to initialize disks, keep defaults and click OK. 8. Right-click on the first unallocated disk, and select New Spanned Volume. 9. At the Welcome screen, click Next. 10. On the Select Disks screen, select the other Serviceability comparison: Dell PCIe Express Flash SSDs vs. A Principled Technologies test report 4 HP IO Accelerators
  • 5. Dell PCIe Express Flash solution HP IO Accelerator solution 6 steps (40 seconds) 14 steps (9 min, 30 seconds) available drive in the left box, and click the Add > button. 11. Click Next. 12. Click Next at the next two screens, and click Finish. 13. At the warning about converting basic disks to dynamic disks, click Yes. 14. Check that the disk shows up as normal. Figure 4: Steps and times each solution required to add an SSD after initial setup is complete. CONCLUSION Companies who invest in PCIe flash storage technologies benefit from devices that are quick and easy to service. While the Dell PCIe Express Flash storage device required more time upfront to install the first time, once in place it made setting up volumes and adding storage dramatically faster. Thanks to the Dell design and not needing to power down the server, we were able to complete each of these tasks in about 1 minute and we would expect no user downtime. In contrast, using the HP IO Accelerator solution setting up volumes took 49 minutes and adding storage took just under 10 minutes and could require significant user downtime or after-hours installation. These time savings and the lack of required downtime make the Dell PCIe Express Flash solution a good choice for your enterprise. Serviceability comparison: Dell PCIe Express Flash SSDs vs. A Principled Technologies test report 5 HP IO Accelerators
  • 6. APPENDIX A – SERVER CONFIGURATION INFORMATION Figure 5 provides detailed configuration information for the test servers. System Dell PowerEdge R820 HP ProLiant DL585 G7 Power supplies Total number 2 4 Vendor and model number Dell E1100E-S0 HP DPS-1200FB-1 A Wattage of each (W) 1,100 1,200 Cooling fans Total number 6 4 Vendor and model number San Ace 60 9GA0612P1J611 DC Brushless PFC0912DE Dimensions (h x w) of each 2.5" x 2.5" 3.5" x 3.5" Volts 12 12 Amps 1.50 4.32 General Number of processor packages 4 4 Number of cores per processor 8 16 Number of hardware threads per core 2 1 System power management policy Balanced Balanced CPU Vendor Intel AMD Name Xeon Opteron™ Model number E5-4650 6282 SE Stepping 7 B2 Socket type LGA2011 G34 Core frequency (GHz) 2.70 2.60 Bus frequency (GT/s) 8.0 6.4 L1 cache 32 KB 8 x 64 KB, 16 x 16 KB L2 cache 256 KB 8 x 2 MB L3 cache (MB) 20 16 Platform Vendor and model number Dell PowerEdge R820 HP DL585 G7 Motherboard model number Dell UL94V-0 HP 604046-001 BIOS name and version Dell 1.0.0 ProLiant System BIOS A16 BIOS settings Default Default Memory module(s) Total RAM in system (GB) 256 256 Vendor and model number Samsung® M393B2G70BH0-YH9 Samsung M393B1K70BH1-CH9 Type PC3L-10600R PC3-10600R Speed (MHz) 1,333 1,333 Speed running in the system (MHz) 1,333 1,333 Timing/Latency (tCL-tRCD-tRP- 9-9-9-36 9-9-9-24 tRASmin) Size (GB) 16 8 Serviceability comparison: Dell PCIe Express Flash SSDs vs. A Principled Technologies test report 6 HP IO Accelerators
  • 7. System Dell PowerEdge R820 HP ProLiant DL585 G7 Number of RAM module(s) 16 32 Chip organization Double-sided Double-sided Rank Dual Dual Operating system Windows Server 2008 R2 Enterprise Windows Server 2008 R2 Enterprise Name 64-bit 64-bit Build number 7601 7601 File system NTFS NTFS Service Pack SP1 SP1 Language English English Graphics Vendor and model number Matrox® G200eR ATI ES1000 Graphics memory (MB) 16 16 RAID controller Vendor and model number Dell PERC H710P Adapter HP Smart Array P410i Firmware version 21.0.1-0130 3.66 Cache size 1 GB 512 MB Hard drive 1 (operating system) Vendor and model number Seagate® ST9300653SS Seagate ST9300653SS Number of drives 2 2 Size (GB) 300 300 RPM 15,000 15,000 Type SAS SAS Hard drive 2 HP 320GB SLC PCIe ioDrive Duo for Vendor and model number Dell RealSSD P320h MTFDGAL350SAH ProLiant Servers Number of drives 2 1 Size (GB) 350 320 RPM n/a n/a Type PCIe PCIe Ethernet adapter Vendor and model number Intel Gigabit 4P I350-t HP NC375i Type Integrated Integrated Optical drive(s) Vendor and model number PLDS DVD+-RW DS-8A5SH None Type Internal N/A USB ports Number 4 external, 1 internal 4 external, 1 internal Type 2.0 2.0 Figure 5: System configuration information for the test servers. Serviceability comparison: Dell PCIe Express Flash SSDs vs. A Principled Technologies test report 7 HP IO Accelerators
  • 8. APPENDIX B – HOW WE TESTED Testing the HP IO Accelerator solution Installing the HP IO Accelerator 1. Cleanly shut down the server. 2. Disconnect the power cables. 3. Pull out server and remove the top access panel. 4. Verify an open PCIe slot is available. 5. Install the card in any available PCIe slot. 6. Secure the card to the chassis with the latch. 7. Replace the top access panel. 8. Push the server back into place. 9. Reconnect the cables. 10. Turn the server on. Installing HP IO Accelerator using all default settings 1. Ensure that no existing IO Accelerator drivers have been used. a. Open Device Manager and check for two unconfigured mass storage controllers. 2. Download latest HP IO Accelerator from HP site (2.3.10 current). a. Extract the zip file, which should contain two executable files. 3. Run HP_IO_Accelerator_SNMPDefault_2.3.10.110_x64.exe. 4. Click Next. 5. Check I accept. 6. Click Next. 7. Click Next. 8. Click Install. 9. Wait for install to finish. 10. Click Finish. 11. Restart the server. Installing HP IO Accelerator Manager 1. Run HP_IO_Accelerator_IO_Manager_3.1.0_x64.exe 2. Click Next. 3. Click Next. 4. At the pop-up, click OK. 5. Click Install. 6. Wait for install to finish. 7. Click Finish. 8. After installation is finished, IE will launch to access the management page. Close it for now. Updating the firmware on the device 1. Open a command prompt. 2. Enter the following commands after verifying the firmware file is correct. cd c:program fileshp io acceleratorutils fio-update-iodrive “c:program fileshp acceleratorioaccelerator_107053.fff” 3. Wait for firmware to finish completely. 4. Restart the server. Serviceability comparison: Dell PCIe Express Flash SSDs vs. A Principled Technologies test report 8 HP IO Accelerators
  • 9. Setting up new disk volumes 1. After server reboot, navigate to Disk Management. 2. At the prompt to initialize disks, keep defaults and click OK. 3. Right-click on the unallocated disks and select New Simple Volume. 4. Click Next four times. 5. Click Finish. 6. Check that the disks show up as normal. Testing the Dell PCIe Express Flash solution Installing the SSD and related components 1. Cleanly shut down the server. 2. Disconnect the power cables. 3. Pull out the server and remove the top access panel. 4. Remove the fan module. 5. Install the backplane to be used in the open backplane slot. 6. Lift the PCIe cage from the back of the server. 7. Plug in the PCIe pass-through card 8. Secure the card in place using the brackets. 9. Replace the PCIe cage. 10. Install cabling from the new backplane to the PCIe pass-through card. Cabling should route around the CPU and memory trays. 11. Replace the fan module. 12. Replace top access panel. 13. Push the server back into place. 14. Reconnect the cables. 15. Plug in the SSD to the first open bay slot on the side where the new backplane was installed. 16. Turn the server on. Setting up new disk volumes 1. From the Start Menu, select Control PanelAdministrative ToolsComputer Management. 2. Expand Storage, and select Disk Management. 3. At the prompt to initialize disks, keep defaults and click OK. 4. If you do not see the prompt. a. Check if the disk is listed in the center panel. i. Right click on the left hand box representing your disk and choose initialize disk. b. Rescan the disks by right clicking disk management and selecting Rescan Disks. c. If disk does not appear after some time, a reboot may be required. 5. Right click on the left hand box representing your disk and choose Online. 6. Right click the box labeled “unallocated” in the box representing your disk. 7. Select New Simple Volume. 8. Click Next four times. 9. Click Finish. 10. Check that the disks show up as normal. Serviceability comparison: Dell PCIe Express Flash SSDs vs. A Principled Technologies test report 9 HP IO Accelerators
  • 10. ABOUT PRINCIPLED TECHNOLOGIES We provide industry-leading technology assessment and fact-based marketing services. We bring to every assignment extensive experience with and expertise in all aspects of technology testing and analysis, from researching new technologies, to developing new methodologies, to Principled Technologies, Inc. testing with existing and new tools. 1007 Slater Road, Suite 300 Durham, NC, 27703 When the assessment is complete, we know how to present the results to www.principledtechnologies.com a broad range of target audiences. We provide our clients with the materials they need, from market-focused data to use in their own collateral to custom sales aids, such as test reports, performance assessments, and white papers. Every document reflects the results of our trusted independent analysis. We provide customized services that focus on our clients’ individual requirements. Whether the technology involves hardware, software, Web sites, or services, we offer the experience, expertise, and tools to help our clients assess how it will fare against its competition, its performance, its market readiness, and its quality and reliability. Our founders, Mark L. Van Name and Bill Catchings, have worked together in technology assessment for over 20 years. As journalists, they published over a thousand articles on a wide array of technology subjects. They created and led the Ziff-Davis Benchmark Operation, which developed such industry-standard benchmarks as Ziff Davis Media’s Winstone and WebBench. They founded and led eTesting Labs, and after the acquisition of that company by Lionbridge Technologies were the head and CTO of VeriTest. Principled Technologies is a registered trademark of Principled Technologies, Inc. All other product names are the trademarks of their respective owners. Disclaimer of Warranties; Limitation of Liability: PRINCIPLED TECHNOLOGIES, INC. HAS MADE REASONABLE EFFORTS TO ENSURE THE ACCURACY AND VALIDITY OF ITS TESTING, HOWEVER, PRINCIPLED TECHNOLOGIES, INC. SPECIFICALLY DISCLAIMS ANY WARRANTY, EXPRESSED OR IMPLIED, RELATING TO THE TEST RESULTS AND ANALYSIS, THEIR ACCURACY, COMPLETENESS OR QUALITY, INCLUDING ANY IMPLIED WARRANTY OF FITNESS FOR ANY PARTICULAR PURPOSE. ALL PERSONS OR ENTITIES RELYING ON THE RESULTS OF ANY TESTING DO SO AT THEIR OWN RISK, AND AGREE THAT PRINCIPLED TECHNOLOGIES, INC., ITS EMPLOYEES AND ITS SUBCONTRACTORS SHALL HAVE NO LIABILITY WHATSOEVER FROM ANY CLAIM OF LOSS OR DAMAGE ON ACCOUNT OF ANY ALLEGED ERROR OR DEFECT IN ANY TESTING PROCEDURE OR RESULT. IN NO EVENT SHALL PRINCIPLED TECHNOLOGIES, INC. BE LIABLE FOR INDIRECT, SPECIAL, INCIDENTAL, OR CONSEQUENTIAL DAMAGES IN CONNECTION WITH ITS TESTING, EVEN IF ADVISED OF THE POSSIBILITY OF SUCH DAMAGES. IN NO EVENT SHALL PRINCIPLED TECHNOLOGIES, INC.’S LIABILITY, INCLUDING FOR DIRECT DAMAGES, EXCEED THE AMOUNTS PAID IN CONNECTION WITH PRINCIPLED TECHNOLOGIES, INC.’S TESTING. CUSTOMER’S SOLE AND EXCLUSIVE REMEDIES ARE AS SET FORTH HEREIN. Serviceability comparison: Dell PCIe Express Flash SSDs vs. A Principled Technologies test report 10 HP IO Accelerators