1. 1 | P a g e
How to Create a LAMP System
Olivia J. Jones
This tutorial will instruct its readers to install a functional (and pretty awesome) stack system using a Linux
distribution called Debian, Apache, MySQL and PHP. Follow the steps and note the graphics, if it matches, you
are set.
Make sure that you have enough storage space available before you start this process. Personally I created a
virtual machine with this system with nearly 22 GB.
Once you have verified that you have the space needed, go to https://www.debian.org/distrib/netinst for the
version of Debian that you require based on the architecture of the device you are installing to and download
the iso.
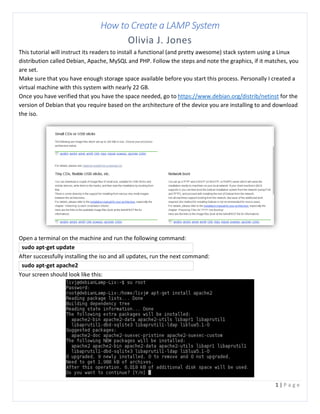
Open a terminal on the machine and run the following command:
sudo apt-get update
After successfully installing the iso and all updates, run the next command:
sudo apt-get apache2
Your screen should look like this:
2. 2 | P a g e
To ensure that this was successful, open a browser on your device and go the http//<your-ipaddress>. Use the
command ifconfig to find out your ip address if you have no clue as to what it is.
After typing in the address, you should see this page:
Now you can move on to the next phase of this process, installing MySQL. Go back to your open terminal and
clear your screen to make room. Run the following command:
sudo apt-get install mysql-server php5-mysql
You should see this:
Type "Y" to continue and you will be prompted to create a password for your new database:
3. 3 | P a g e
Now you will need to make sure that this installation is secure:
mysql_secure_installation
Answer the following questions: N for changing the root password, and Y for everything else.
You are now ready to install PHP. Clear your terminal again with the command clear then enter this command:
sudo apt-get install php5
Make a test file using either nano or vim to see if you have been successful so far.
nano /var/www/html/info.php
Insert the following into the file:
<?php
phpinfo();
?>
Save the file and restart Apache to ensure that all recent changes are retained.
4. 4 | P a g e
service apache2 restart
Test to see if everything works by typing in your address and the following to see the info page for PHP.
http://<your-ipaddress>/info.php It should look like this: http://192.168.123.234/info.php.
You now have a LAMP stack!!
To install PHPMyAdmin, use the command in the following graphic and see the result:
Continue the process and you will see this:
Your final install page should look like this:
5. 5 | P a g e
All done!!
To add WordPress to this system continue. Clear your terminal with the clear command yet again. Type this
command:
mysql -u root -p
This is how you begin setup for the database. You will be prompted for the MySQL password that you created
earlier. After typing it in, type these commands in to your terminal.
create database wordpress character set utf8 collate utf8_bin;
Input your password in the space that says [insert-password-here]
grant all privileges on wordpress. * to wordpressuser@localhost identified by -'[insert-
password-here]'
flush privileges;
exit
Now you can install WordPress!!
wget http://wordpress.org/latest.tar.gz
This will download into your current directory, extract the files:
tar -xzvf latest.tar.gz
Copy the "wp-config-sample.php" to "wp-config.php" by using the command:
cp wordpress/wp-config-sample.php wordpress/wp-config.php
Use nano or vim to edit the "wordpress/wp-config.php" file like this:
6. 6 | P a g e
define(‘DB_NAME’, ‘wordpress’);
define(‘DB_USER’, ‘wordpressuser’);
define(‘DB_PASSWORD’, ‘[insert-password-here]’);
Save and exit the editor. The result should be this:
Move the WordPress folder to your own web directory with the following command, inserting your username
in the space 'username':
cp -r /home/'username'/wordpress /var/www/html
You are finally ready to install WordPress via the web. In your open browser go to: http://<yourhostname-or-
ipaddress>/wordpress/wp-admin/install.php so your address should read
http://192.168.123.234/wordpress/wp-admin/install.php for example.
7. 7 | P a g e
You should also see this page:
After filling in the required info, the install will begin and end very quickly.
¡Voile! You have installed a LAMP stack, PHPMyAdmin, and WordPress successfully!! Go ahead and customize
your newly created blog, you deserve it.
This tutorial would not have been possible without the amazingly easy-to-use ones located at:
https://www.atlantic.net/community/howto/installing-lamp-on-debian-8/
and
https://www.atlantic.net/community/howto/installing-wordpress-on-a-debian-8/
So thanks to the author.