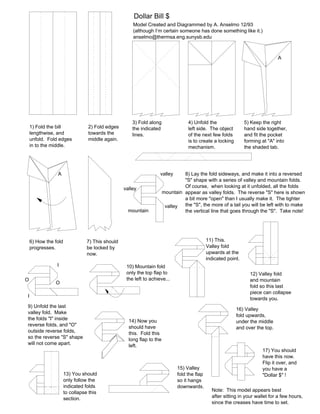
1. Dollar Bill $
Model Created and Diagrammed by A. Anselmo 12/93
(although I’m certain someone has done something like it.)
anselmo@thermsa.eng.sunysb.edu
A
3) Fold along 4) Unfold the 5) Keep the right
1) Fold the bill 2) Fold edges the indicated left side. The object hand side together,
lengthwise, and towards the lines. of the next few folds and fit the pocket
unfold. Fold edges middle again. is to create a locking forming at "A" into
in to the middle. mechanism. the shaded tab.
A valley 8) Lay the fold sideways, and make it into a reversed
"S" shape with a series of valley and mountain folds.
valley Of course, when looking at it unfolded, all the folds
mountain appear as valley folds. The reverse "S" here is shown
a bit more "open" than I usually make it. The tighter
valley the "S", the more of a tail you will be left with to make
mountain the vertical line that goes through the "S". Take note!
6) How the fold 7) This should 11) This.
progresses. be locked by Valley fold
now. upwards at the
indicated point.
I 10) Mountain fold
only the top flap to 12) Valley fold
O the left to achieve... and mountain
O
fold so this last
piece can collapse
I
towards you.
9) Unfold the last
16) Valley
valley fold. Make
fold upwards,
the folds "I" inside 14) Now you under the middle
reverse folds, and "O" should have and over the top.
outside reverse folds, this. Fold this
so the reverse "S" shape long flap to the
will not come apart. left.
17) You should
have this now.
Flip it over, and
15) Valley you have a
13) You should fold the flap "Dollar $" !
only follow the so it hangs
indicated folds downwards.
to collapse this Note: This model appears best
section. after sitting in your wallet for a few hours,
since the creases have time to set.